


Summary: Looking for the best video enhancer software to improve video quality? This 2026 guide ranks the top AI video enhancers and shows how to fix common issues like blur, noise, and low resolution. We tested leading tools based on quality, speed, and ease of use, as well as quick methods to upscale, denoise, stabilize, and restore footage to sharp HD or 4K.
It becomes easier and easier to turn blurry or low-quality footage into high quality videos, since today's AI video enhancers can automatically sharpen details, reduce noise, improve colors, and upscale resolution with minimal effort. Whether you're a content creator, videographer, or a casual user just wanting to enhance personal clips, choosing the right tool makes all the difference.
But with so many options available, finding the best AI video enhancer can be overwhelming. That's why we tested and ranked the top AI video enhancers for you, including both desktop software and online tools. (Since AI video enhancement is computationally intensive and often takes time to process, we don't recommend mobile apps for serious video enhancement.) In this guide, you'll find side-by-side comparisons, key features, pros and cons, and especially real test results to help you quickly choose the right tool.
At a Glance - Top-Rated Video Quality Enhancers (2026 Tested)
We've analyzed 30+ tools based on AI capability, output quality, AI upscaling efficiency, processing speed, stabilization accuracy, and more. Here are the top performers for your specific needs:
| AI Video Enhancer | Best For | Key AI Features | My Tests Highlights |
|---|---|---|---|
Best value, fast GPU acceleration, and all-in-one AI enhancement |
Video Super Resolution, Frame Interpolation, AI Stabilization, Audio AI, Image AI |
Up to 99% GPU utilization, fast processing, solid AI enhancement quality, esp. for hair and fur |
|
Professional restoration and cinematic-quality enhancement |
20 AI Models, Diffusion Models, SDR-to-HDR, Motion Deblur, Frame Interpolation |
Most natural-looking results, but hardware-demanding |
|
Cinematic AI enhancement with excellent speed-to-quality balance |
Video Super Resolution, Frame Interpolation, Color Correction, SDR-to-HDR |
Excellent low-light denoising and AI-generated video upscaling |
|
Beginner-friendly AI enhancement with rich AI models |
AI Upscaling, Face Enhancement, Stabilization, Colorization, HDR |
Consistent results across most footage with very simple workflows |
|
Animation enhancement and all-in-one AI workflow |
Upscaling, HDR, Denoise, Smoother AI, Colorizer, Stabilizer |
Excellent image quality, but minor frame drops |
|
Basic AI enhancement and face restoration |
Upscaling, Face Enhancement, Denoise, Stabilization |
Face restoration works well, but AMD performance was much slower |
|
Online AI enhancement with built-in video editing |
AI Video Upscaler, Video Editor, Templates |
The strong online workflow for editing, enhancing, and publishing in one place |
|
One-click online AI video enhancement |
AI Upscaling, Denoise, Sharpening |
Quick and convenient for social media clips |
|
Content creators, social media videos, and AI-powered editing |
AI Upscaling, Auto Enhance, Frame Interpolation, AI Denoise, AI Color Correction |
Fastest processing, and relatively basic AI enhancement quality |
|
Professional editing workflow with built-in video enhancement |
Lumetri Color, Unsharp Mask, Auto Color, Scaling & Professional Editing Tools |
Great for editing workflows, but not designed for AI video restoration. |
How I Tested the AI Video Enhancers
To ensure a fair comparison, I tested every AI video enhancer under the same hardware environment whenever possible.
Test environment
- CPU: AMD Ryzen 5 5600X
- RAM: 64GB
- GPU: AMD Radeon RX 6700 XT (8GB VRAM)
- OS: Windows 11 64-bit
To keep the tests as consistent as possible, I used the same source videos and similar output settings across all tools. For example, I primarily tested 2× upscaling (200%), as it's the sweet spot for improving resolution while minimizing artifacts caused by excessive enlargement. Since each tool offers different AI models and processing options, I generally selected the most commonly recommended or default model to reflect the typical user experience.
The test footage covered a variety of real-world scenarios, including animation clips, blurry everyday videos, low-quality high-motion dance videos, older videos with faces, vertical social media clips featuring a dog, low-light footage with visible noise, and a movie clip. These samples were selected to evaluate different aspects of AI enhancement, such as detail recovery, motion handling, face restoration, noise reduction, texture preservation, and color accuracy, rather than testing under only ideal conditions.
Ranking criteria: Visual quality alone isn't enough for an objective comparison. In addition to my hands-on evaluation, I measured output quality using NIQE (Natural Image Quality Evaluator) scores. To assess performance and hardware efficiency, I also recorded the average processing FPS, peak VRAM usage, maximum GPU utilization, and maximum CPU utilization during each test.
Best AI Video Enhancer Software for Windows/Mac
The most effective way to improve video quality is to use dedicated desktop video enhancer software, especially AI-powered tools. Compared with mobile apps or online editors, desktop solutions offer stronger processing power, better stability, and support for large video files without crashes or quality loss. More importantly, modern AI video enhancers can intelligently upscale resolution, remove noise, and restore details that traditional methods simply can't recover.
Based on my hands-on testing, the following desktop AI video enhancers delivered the best balance of image quality, speed, features, and overall value. Whether you're restoring old footage, upscaling low-resolution videos to 1080p or 4K, or reducing noise in low-light clips, these tools offer the most reliable results for different needs.
AI video enhancement isn't magic. Unlike AI image enhancers that process a single photo, video enhancers must improve thousands of consecutive frames while preserving temporal consistency to avoid flickering, unstable details, and other visual artifacts. That's why the improvements are often less obvious than those seen in AI image enhancement, where restoring a single frame is much easier. A good AI video enhancer can recover lost details, reduce noise, and upscale resolution, but it can't fully reconstruct information that was never captured in the original footage. Besides, the quality of the source video still plays a major role in the final outcome.
1. VideoProc Converter AI
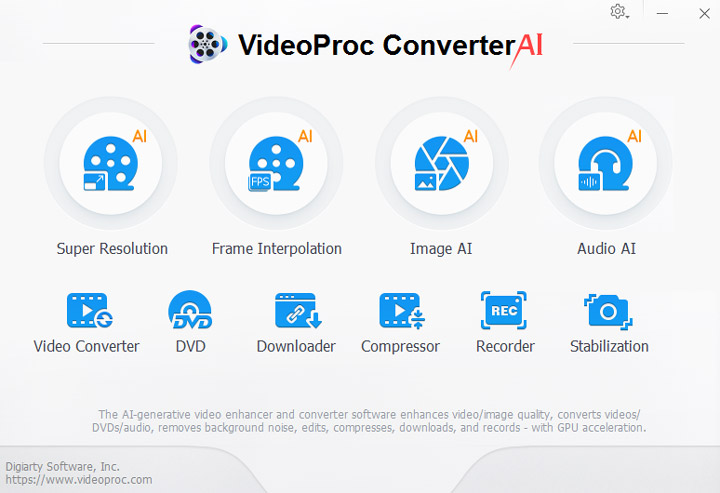
Best AI Video Enhancer for Fast, Budget-Friendly Video Enhancement
- OS: Windows 7+, macOS 10.13+. Uses CoreML/DirectML (DirectX 12+) for optimized AI Super Resolution.
- Pricing: Free trial; Price packages start at $34.95
- Key Tech: 16 AI models for video/image/audio enhancement, upscaling, face restoration, colorization, frame interpolation, stabilization; Level-3 Hardware Acceleraton, High Quality Mode & Fast Mode
VideoProc Converter AI is best AI video enhancer software to improve overall video qualtiy and upscale video resolution for beginners and semi-professionals. It combines powerful AI video enhancement with a one-click and automatic workflow, making it ideal for batch processing, 4K upscaling, denosing, and video clarity improvement without complex setup.

Why VideoProc Is the Best AI Video Enhancer:
- AI Super Resolution: Unlike traditional upscaling that stretches pixels, VideoProc uses deep learning to restore missing details while keeping original styles. It can upscale 360p/720p footage to HD/4K with natural textures, while reducing blur, compression artifacts, flickering, and ISO noise, ideal for old videos, downloads, CCTV, and DVD rips.
- Fix Stuttered, Shaky, Noisy Footage: AI Frame Interpolation generates smooth 60fps/120fps playback, while AI Stabilization removes shakes from handheld, drone, or action camera footage. Besides, Image AI can upscale, restore, and enhance photos, while Audio AI can remove background noise and speech. These makes VideoProc a true AI video enhancer, not just a video upscaler.
- Fast with full GPU Acceleration: With up to 90% workload offloaded to NVIDIA/AMD/Intel GPUs, VideoProc ensures fast processing and stable performance even for large 4K files, avoiding crashes common in heavy AI workloads.

Pros:
- One of the most budget-friendly AI video enhancers with excellent output quality.
- 16 AI models for video, image, and audio enhancement and restoration.
- Fast AI processing with full GPU acceleration (99% utilization).
- Feature-rich all-in-one toolkit for multimedia processing, conversion, and more.
- Flexible pricing, including lifetime licenses with free lifetime upgrades.
- Beginner-friendly and easy to use.
Cons:
- Offers fewer AI upscaling models than Topaz.
Real-World Test Highlights of VideoProc:
Performance
According to my tests, VideoProc Converter AI delivers excellent GPU acceleration. GPU utilization reached up to 99% in most cases, while processing speed remained stable at over 3 FPS (which is very reasonable for AI processing in an average computer). CPU usage stayed around 35%, generally lower than most competing tools, resulting in lower overall system load.
VRAM usage ranged from 3.0 GB to 5.5 GB, depending on the AI model and source footage. Although higher than some lightweight AI enhancers, it's still noticeably lower than Topaz Video AI, offering a good balance between AI capability and hardware requirements.
Output Quality
The visual differences between leading AI video enhancers are often subtle, and each tool performs differently depending on the source footage. Overall, VideoProc delivered consistently stable enhancement results, improving clarity and reducing noise without introducing obvious artifacts.
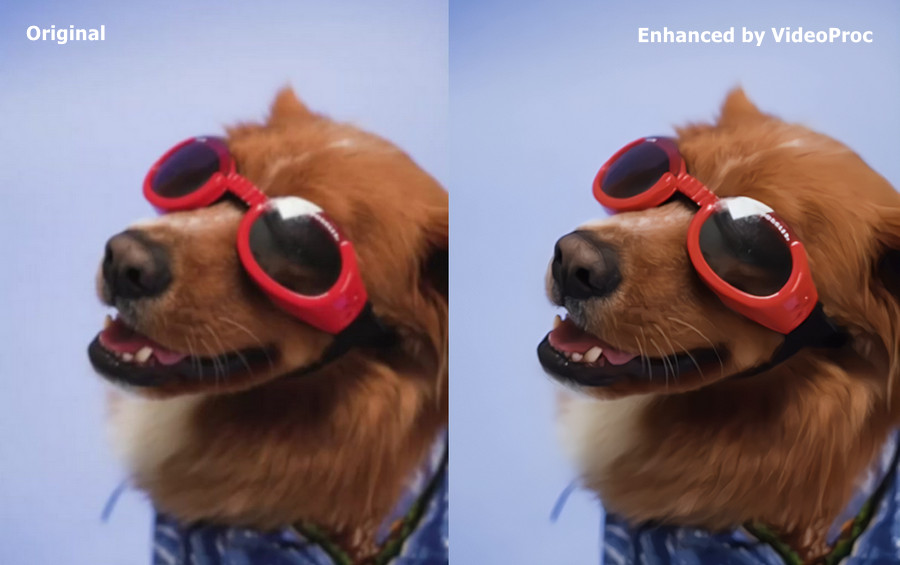
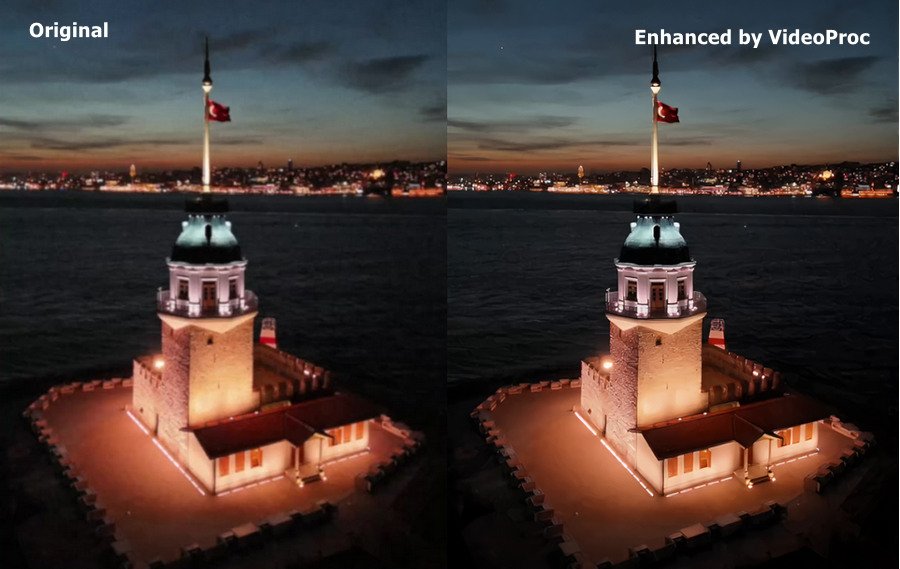
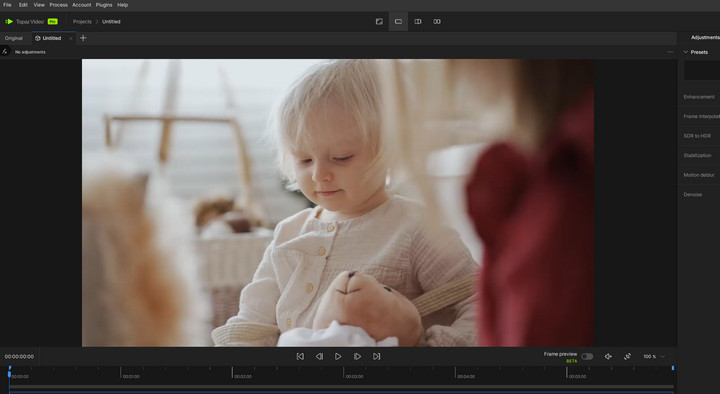
In my tests, VideoProc performed particularly well at recovering fine animal fur details (see the dog video comparison), removing noise from low-light footage (my night lighthouse clip), restoring moderately blurry close-up portraits (see the video tutorial above), and 2× upscaling AI-generated videos.For a more objective comparison, I also measured output quality using NIQE (Natural Image Quality Evaluator). With the quality level set to Highest, most test videos scored between 6.8 and 7.1, with only one outlier at 12. While NIQE is only a reference metric, these results place VideoProc in the upper-middle tier among the tools tested.
Test 1:
Test 2:
Test 3:


Read more about VideoProc Converter AI review >
2. Topaz Video
Best AI video enhancer for professional-grade upscaling and restoration
- OS: Windows 10/11 (64-bit), macOS 11 or later. A high-end GPU with 8GB+ VRAM is recommended for smoother processing.
- Pricing: Free trial available; starts at $299/year or $39/month (annual commitment). Subscription only; no lifetime license.
- Key Tech: Advanced AI models (Proteus, Iris, Nyx, Chronos, Apollo) for face recovery, motion deblur, denoise, and frame interpolation.
Topaz Video (Previously Topaz Video AI) is the industry-leading and powerful AI video enhancer software options for users who prioritize maximum quality. It is widely used for professional-grade video restoration, especially for old footage, compressed clips, or low-light videos that require deep detail reconstruction. It offers 20 AI models designed for different video enhancement scenarios, including diffusion models such as the Starlight Series, progressive enhancement models like Proteus, Iris, Nyx, Rhea/Rhea XL, Artemis, Gaia, and Theia, as well as specialized models for SDR-to-HDR conversion.
Unlike lightweight tools, Topaz focuses on frame-by-frame AI processing. Its models analyze video structure, motion, and textures to rebuild missing details, reduce heavy noise, and enhance clarity. In my testing, it delivered excellent results in facial detail recovery and texture sharpening, but at the cost of higher hardware requirements.
Note: Adobe announced its agreement to acquire Topaz Labs in June 25, 2026. While Topaz products are expected to remain available as standalone applications, future changes to product strategy, AI model development, updates, or pricing plans remain to be seen.
Pros:
- Professional-grade AI enhancement for high-end video restoration and upscaling.
- Specialized AI models for low-light footage, old video restoration, face recovery, and frame interpolation.
- Highly accurate enhancements that preserve the original style, textures, and fine details.
Cons:
- Requires powerful GPU for acceptable speeds
- Processing time in some cases is slower than most AI video enhancers
Real-World Test Highlights of Topaz Video:
Performance
Topaz Video offers a wide selection of AI models for different enhancement scenarios, which is a major strength. However, choosing the right model can be overwhelming for beginners. For consistency, I tested Proteus and Gaia v2 using 2× upscaling under their default settings.
GPU utilization remained consistently high at 98–99%, indicating excellent GPU acceleration. However, processing speed varied significantly between models. Proteus averaged only 0.26–1.12 FPS, while Gaia v2 reached 16.78 FPS on the same hardware. CPU utilization was also relatively high, ranging from 60% to 83%, with peak VRAM usage between 6 GB and over 10 GB. As a result, Topaz generally required more processing time than the other tools tested.
Output Quality
In terms of visual quality, Topaz Video AI delivered some of the most natural and realistic enhancement results in my tests, preserving textures and fine details while avoiding the over-sharpened look seen in some competitors. It did not always produce the clearest result, as it tends to preserve the original grain instead of over-sharpening the footage. It was particularly impressive on high-quality source footage and professional restoration tasks.
Objectively, however, the NIQE scores were not always the best. Proteus typically achieved scores around 7–9, while Gaia v2 scored 13.57 in my tests. This once again shows that NIQE should be used only as a reference, as it doesn't always align with perceived visual quality.
Overall, despite its higher hardware requirements, slower processing speed, and premium pricing, Topaz Video remains the industry benchmark for professional AI video enhancement, especially for users who prioritize maximum restoration quality over processing efficiency.


Read more about Topaz Video review >
3. Aiarty Video Enhancer
Best AI Video Enhancer that balances output clarity, speed, and detail.
- OS: Windows 10/11 (64-bit), macOS 11 or later.
- Pricing: Free trial available; $79/year or $165 lifetime (3 PCs/3 Macs) with free lifetime updates.
- Key tech: Diffusion + GANs AI models, denoise+deblur+detail, 95% Max GPU utilization, slow motion, HDR
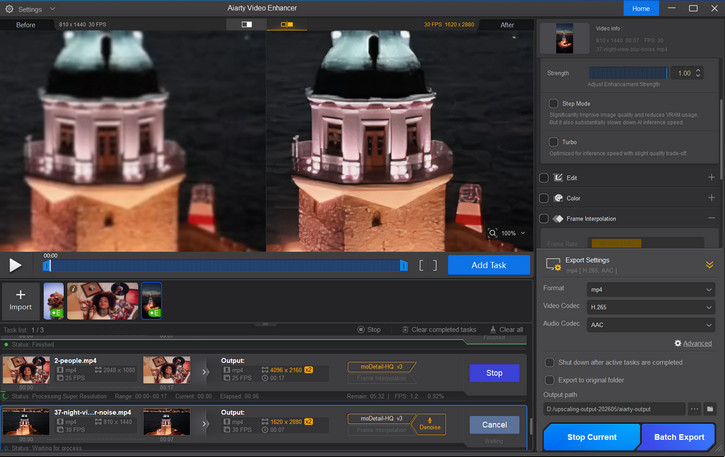
Although Aiarty Video Enhancer is a relatively new entrant to the AI video enhancement market, it has quickly established itself as a strong contender by focusing on professionally trained AI models and practical workflows. It strikes an impressive balance between cinematic output quality and processing efficiency, delivering natural-looking results without the long rendering times often associated with high-end AI enhancement.
Its dedicated AI models are designed to recover real-world textures, preserve fine details, and enhance overall image quality. Unlike many AI video enhancers that focus solely on upscaling, Aiarty also integrates AI-powered Frame Interpolation, allowing you to increase frame rates or create smooth slow-motion effects directly within the same workflow.
Compared with online AI video enhancers, the desktop application offers significantly better performance, supports larger and longer videos, and provides more consistent output quality. It's no surprise that the software has quickly gained recognition and recommendations from many well-known technology media outlets. Another highlight is its rapid development. Recent updates have introduced practical features such as Color Correction and SDR-to-HDR Conversion, enabling users to enhance and optimize videos in a single workflow. Additional tools, including a Strength Slider, Step Mode/Turbo Mode, and basic editing features, make it both flexible for enthusiasts and efficient for everyday video enhancement.
Pros:
- Excellent balance between cinematic output quality and AI processing speed.
- Well-trained AI models for restoring realistic textures and fine details.
- Flexible AI workflow with Auto mode, batch processing, manual controls, and adjustable denoise strength.
- Advanced post-enhancement tools, including AI Frame Interpolation, Color Correction, SDR-to-HDR conversion, and basic editing features.
Cons:
- Performance can be noticeably slower when GPU acceleration is unavailable.
Read more about Aiarty Video Enhancer Review >
4. HitPaw VikPea
Best AI Video Enhancer for Beginners and One-Click AI Enhancement
- OS: Windows 10/11 (64-bit), macOS 13 or later.
- Pricing: Free trial available; $43.19/month, $99.99/year, or $350.39 (one-time purchase, currently discounted from $437.99).
- Key Tech: 10+ AI models for video upscaling, face restoration, low-light enhancement, colorization, frame interpolation, stabilization, SDR-to-HDR conversion, and video repair.
HitPaw VikPea (formerly HitPaw Video Enhancer) has evolved into one of the most feature-rich AI video enhancers for mainstream users. Its intuitive interface, well-organized AI models, and guided workflow make it approachable even for beginners. The software is organized into multiple AI-powered modules, including Video Enhancer, Video Generator, AI Color, Video Beauty, Video Repair, and an AI Toolbox, making it more than just a video upscaler.
One of its biggest strengths is usability. Most enhancements can be completed with just a few clicks, making it far less intimidating than professional tools like Topaz Video AI. At the same time, it provides dedicated AI models for different content types, allowing users to choose between general enhancement, animation, portraits, or restoration without adjusting complex parameters. This ease of use is consistently highlighted in user reviews.
However, HitPaw's pricing has become increasingly premium. Despite offering a perpetual license, the one-time purchase now costs over $350, placing it in the same price range as professional software. In addition, some users have raised concerns about licensing, upgrade policies, and customer support, although many others report positive experiences with the software itself and its ease of use.
Pros:
- Clean, intuitive interface that's easy for beginners to learn.
- Wide selection of AI models covering upscaling, face enhancement, low-light restoration, animation, stabilization, and more.
- Produces noticeable improvements on moderately compressed or older videos with minimal manual tweaking.
- Frequent feature updates and an expanding AI toolkit.
Cons:
- Premium pricing, especially for the perpetual license.
- Results can vary significantly depending on the source footage and selected AI model.
- Licensing, subscription renewals, and refund policies remain common user concerns.
Real-World Test Highlights of HitPaw VikPea:
Performance
Overall, I found HitPaw VikPea to be a well-rounded AI video enhancer. It doesn't necessarily lead the pack in any single category, but it also doesn't have any obvious weaknesses. One thing I particularly like is its scenario-based workflow. Instead of asking users to choose between technical AI models, it lets you select enhancement modes based on the type of footage, such as General, HD, Old Video, Sharpen, Denoise, Anime, AIGC, or Game Recording. It's a much more intuitive approach, especially if you're new to AI video enhancement.
Performance was solid throughout my tests. GPU utilization consistently reached 99%, while CPU usage stayed at a reasonable 40–45%. Peak VRAM usage was on the higher side compared with some competitors, but both the average processing FPS and actual rendering time remained around the middle of the pack, offering a good balance between speed and hardware requirements.
Output Quality
In terms of output quality, I was generally satisfied with the results. Excluding anime footage, NIQE scores mostly fell between 6.1 and 10, which is quite competitive. More importantly, the videos looked noticeably clearer without introducing excessive sharpening.
That said, it's not perfect. In one of my test clips, the enhanced video came out slightly more saturated than the original, making the colors look a bit richer but also less faithful. I also noticed a small artifact around the girl's lower lip, where Topaz Video AI produced a cleaner and more natural result.
Overall, I think HitPaw VikPea strikes a good balance between ease of use, AI capabilities, and output quality. My biggest hesitation is the price—with a perpetual license costing over $350, it's no longer an easy recommendation for casual users, especially considering the strong competition in this price range.

Read more about Hitpaw Video Enhancer Review >
5. Unifab AI
Best AI Video Enhancer for Animation, HDR Conversion, and All-in-One AI Processing
- OS: Windows 10/11 (64-bit), macOS 11 or later.
- Pricing: Starting at $319.99 for the complete bundle(5 PC + gift card)
- Key tech: AI video upscaling, SDR-to-HDR conversion (HDR10 & Dolby Vision), Frame Interpolation (up to 120 FPS), AI Video Colorizer, surround audio upmixing, vocal removal, and subtitle generation.
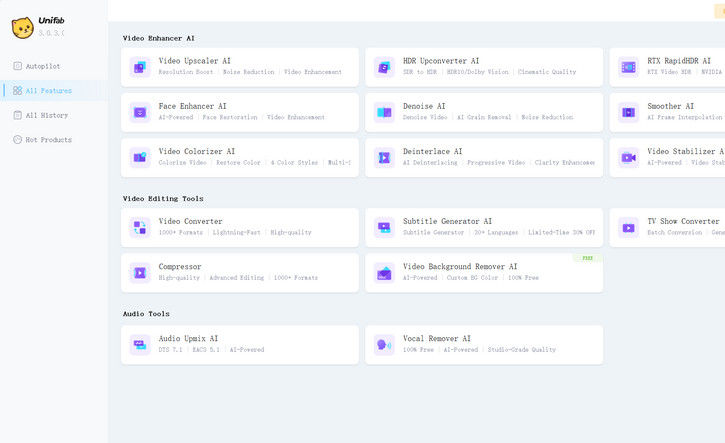
UniFab AI has evolved from the DVDFab ecosystem into a comprehensive AI-powered video enhancement suite. It is not a unique module; instead, it combines Video Upscaler AI, HDR Upconverter AI, RTX RapidHDR AI, Face Enhancer AI, Denoise AI, Face Enhancer AI, Smoother AI, Video Colorizer AI, Deinterlace AI, and Video Stabilizer AIinto a single program. It is one of the most feature-rich tools in this comparison.
One thing I found interesting is how much UniFab's workflow has evolved. Earlier versions treated these AI features as separate modules, meaning you often had to export a video after one enhancement before moving on to the next. Starting with UniFab 4.0, the introduction of Autopilot Workflow made the process much smoother by automatically analyzing the source video and recommending an AI enhancement pipeline. More recently, UniFab Studio, a professional-grade product, has taken this a step further, allowing multiple AI enhancement tasks to be chained together within a single project instead of treating each one as an isolated process.
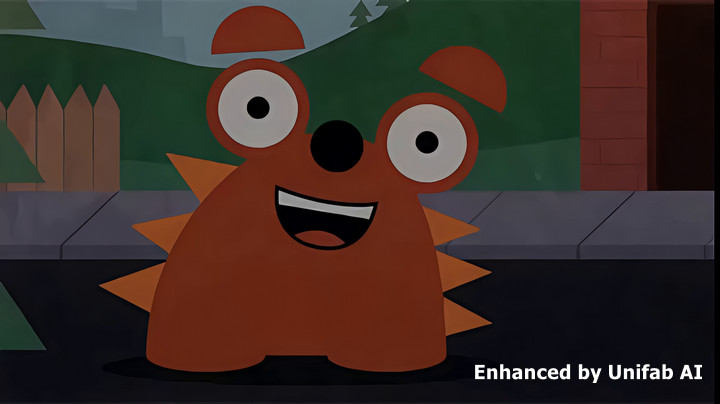
Another area where UniFab consistently stands out is animation and anime enhancement. Both my testing and community feedback suggest it produces smoother edges, cleaner lines, and more natural color transitions than many competing AI upscalers.
UniFab clearly prioritizes simplicity over flexibility, making it especially appealing to beginners and creators who prefer automated results over fine-grained parameter tuning. Most AI features work well with little manual adjustment. That said, advanced users may find the limited controls restrictive, and Frame Interpolation (Smoother AI) still operates separately in many scenarios. If you want both AI upscaling and frame interpolation, an additional rendering pass is often required, which can noticeably increase the overall processing time.
Pros:
- Feature-rich all-in-one suite combining sufficient AI enhancement tools.
- Excellent results for most videos, delivering natural color and clear details.
- Good at enhancing animation and anime with smooth edges and natural color transitions.
- Beginner-friendly interface with highly automated AI operation.
Cons:
- AI upscaling and frame interpolation must be processed separately.
- Limited manual controls for advanced users.
- Some test videos experienced minor frame drops after exporting.
- Requires a modern dedicated GPU for efficient processing.
Real-World Test Highlights of Unifab AI:
Performance
From my tests, UniFab AI makes good use of available GPU resources, with GPU utilization ranging from 91% to 99%. Peak VRAM usage stayed relatively low at 1.4–2.0 GB, making it less demanding on graphics memory than some competitors. Processing speed, however, varied considerably depending on the AI module and source footage, with average processing speeds ranging from 0.12 to 5.36 FPS.
One thing I did notice was that CPU utilization fluctuated quite a bit, ranging from 28% to 89%, suggesting that some AI modules rely more heavily on the processor than others. In my tests, several videos also took noticeably longer to export than most of the other AI video enhancers in this comparison.
Output Quality
Honestly, UniFab AI's output quality surprised me. Before testing, I expected it to sit somewhere in the middle of the pack, but several results were genuinely comparable to those from professional AI video enhancers. Across all of my test videos, the output was consistently sharp, detailed, and natural-looking, without introducing the overly processed look that some AI enhancers tend to produce.
The objective results were equally impressive. On real-world footage, NIQE scores consistently fell between 6.0 and 9.7, while the anime test ranked among the top three in my comparison with a score of 10.39. The numbers largely matched what I saw with my own eyes.
To be honest, I originally planned to rank UniFab AI much higher. The main reason I didn't was frame drop. Out of the six videos I tested, four dropped 1-2 frames, one dropped 5 frames, and another dropped 8 frames after processing. While these dropped frames may not always be noticeable during casual viewing, they're difficult to ignore if you're aiming for professional-quality output.
Overall, I think UniFab AI offers excellent image quality that largely justifies its premium price. The All-in-One Lifetime Bundle costs $319.99, while individual AI modules can also be purchased separately. If you're a frequent user who values output quality but prefers a lifetime license over Topaz Video AI's subscription model, UniFab AI is definitely worth considering.

Read more about Unifab Video Review >
6. AVCLabs Video Enhancer AI
Best Basic AI Video Enhancer for Beginners and Face Restoration
- OS: Windows 10/11 (64-bit), macOS 12 or later.
- Pricing: $39.95/month, $95.96/year, 149.90/lifetime
- Key tech: AI video upscaling (up to 4K/8K), AI Face Enhancement, denoising, colorization, stabilization, frame interpolation, and video restoration tools.
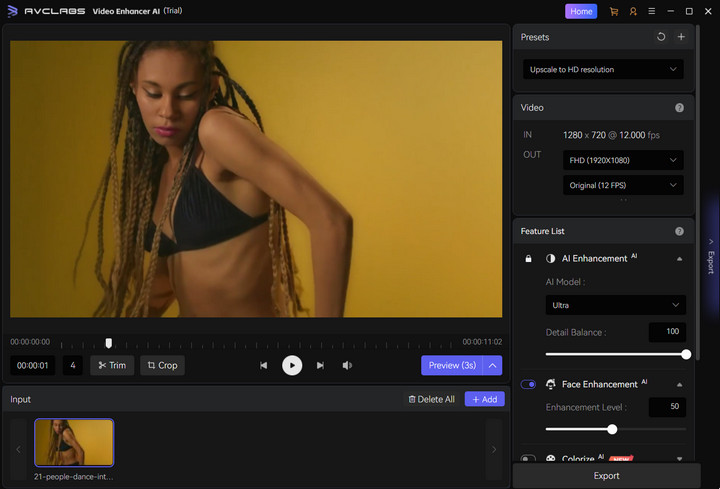
AVCLabs Video Enhancer AI is a relatively straightforward AI video enhancement tool designed for users who want better-looking videos without dealing with complicated settings. Compared with professional-focused solutions like Topaz Video AI, AVCLabs takes a more beginner-friendly approach, offering a simple workflow with preset AI models including Video Enhancer AI, Video Blur AI, and Stabilization.
One of AVCLabs' biggest strengths is its simplicity. The workflow is straightforward: import a video, choose an AI model, preview the result, and export. This preset-based design is frequently appreciated by users who prefer quick improvements without spending time fine-tuning parameters. Some users also highlight its Face Enhancement feature as one of the more impressive parts of the software, especially when restoring older footage or videos with low-resolution faces.
AVCLabs is better positioned as a basic and practical enhancer rather than a professional restoration tool. Based on user feedback and my testing, its results can vary depending on the source footage. Some clips benefit noticeably from enhancement, while others show more limited improvements compared with higher-end AI models. Processing speed can also become a concern for larger projects, and some users have pointed out that features such as AI Colorization still need further refinement in terms of color accuracy and consistency.
Overall, AVCLabs Video Enhancer AI is a good fit for beginners, casual creators, and users who mainly want to improve old videos, family footage, or face-heavy clips with minimal effort. It may not offer the same level of control or restoration quality as professional AI enhancers, but its ease of use remains its biggest advantage.
Pros:
- Very beginner-friendly with a simple interface and preset-based workflow.
- Face Enhancement performs well on old or low-quality footage.
- Provides a practical set of AI tools for upscaling, denoising, stabilization, and restoration.
Cons:
- Not fully GPU optimized; processing speed is not particularly competitive for large projects.
- Output quality is less consistent compared with professional AI video enhancers.
- Face enhancement can occasionally produce slightly artificial-looking details.
Real-World Test Highlights of AVCLabs Video Enhancer AI:
Performance
AVCLabs Video Enhancer AI currently focuses mainly on NVIDIA GPU acceleration. Since my test machine uses an AMD GPU, it failed to fully utilize hardware acceleration, resulting in significantly slower processing speeds compared with the other tools tested. Because the GPU acceleration was not properly activated, I decided not to include the performance metrics here. In practice, the performance may be much better on NVIDIA-based systems.
Output Quality
For testing, I used the trial version, which only allows 30 seconds of free preview. After that, the exported video is covered by a large central watermark, making it difficult to fully evaluate the final output.
Based on the preview results, AVCLabs delivered acceptable enhancement quality for basic video improvement. While it did not stand out compared with the stronger AI enhancers in this comparison, the results were sufficient for common tasks such as improving clarity and restoring low-quality footage.

Read more about AVCLabs Video Enhancer AI >
Best Online Video Quality Enhancer
The online video quality enhancers are becoming increasingly popular, and most video quality increasers online are free and easy to use, enabling users to improve video resolution, perform basic color correction, and remove shaky footage and background noise to fix and improve the quality of video. Although my tests showed that their deblurring and denoising capabilities aren't on par with dedicated desktop AI enhancers, they're still the go-to choice for quick social media edits.
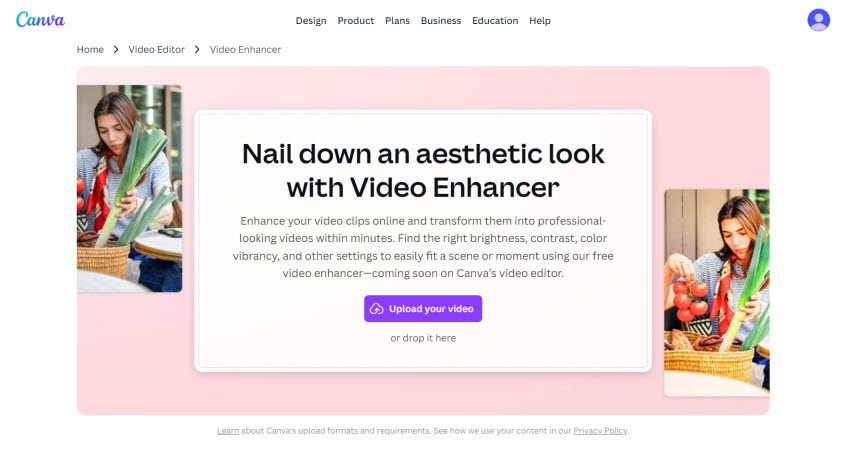
1. Canva
Best all-in-one online AI video enhancer for social media content creation.
- OS: Web-based, iOS, and Android.
- Pricing: Free for basic tools; $120/year (approx. $10/mo) for Canva Pro (includes AI Video Upscaler).
Unlike most online AI video enhancers that focus solely on upscaling, Canva combines AI enhancement with a full-featured online video editor. After upscaling, you can immediately continue editing using its timeline editor, templates, transitions, captions, brand assets, and collaboration features—all without switching to another application. If you're already using Canva for social media or marketing, the Video Upscaler fits naturally into your existing workflow without requiring another online tool.
Pros:
- One-click 4K AI Upscaling combined with manual adjustment sliders.
- No watermarks for Pro users and an incredibly vast library of templates.
- High-speed cloud rendering that doesn't rely on your computer's GPU.
Cons:
- Less powerful than dedicated desktop AI video enhancers for difficult footage.
- Video Upscaler consumes AI credits depending on your Canva plan.
- Best for videos under 10 minutes; very long videos may take time to process.
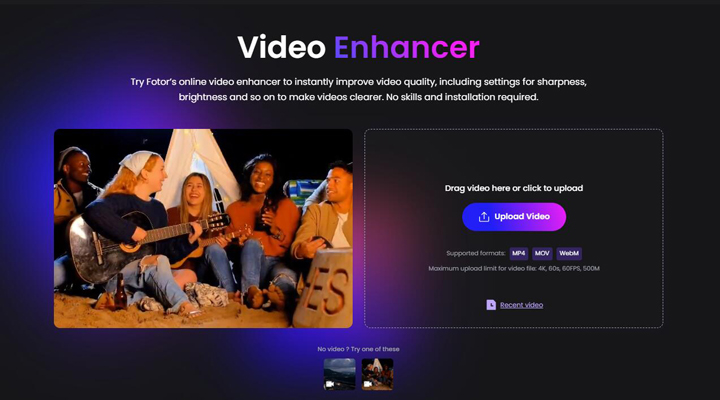
2. Fotor Video Enhancer
Best online video quality enhancer to improve video resolution with one click
- Pricing: Free trial available; AI enhancement consumes credits. Paid plans start from Fotor Pro, with additional AI credits available for purchase.
Fotor Video Enhancer is a browser-based AI video enhancer designed for users who want quick improvements without installing desktop software. Simply upload a video, let the AI process it automatically, and download the enhanced result. It supports common formats such as MP4, MOV, and WebM, and applies AI upscaling, sharpening, denoising, and color enhancement with minimal user input. Fotor Video Enhancer is a cutting-edge online tool that uses AI to improve video quality effortlessly. This tool bridges the gap between advanced video enhancement and ease of use, offering a powerful solution for content creators who want high-quality results without complex software. However, make sure your source video is less than 1GB in size and 5 min in length.
Pros:
- Easy to use and AI-powered enhancements.
- Automatic enhancements like sharpening details, color correction, and brightening dark videos.
- User-friendly interface and cross-device compatibility.
Cons:
- Potential for lower image quality and lossy compression compared to desktop software.
- Lacks granular manual control, for example, there are no sliders for sharpness or brightness.
- Limited free version (Watermarks on full exports).
Video Editing Software with Enhancing Features
For mobile users, improving video quality on iOS or Android directly is a huge time-saver. In 2026, mobile video enhancer apps have evolved to offer both automated one-tap improvements and detailed manual adjustments. Here are the most effective tools for a quick quality boost on the go.
1. CapCut
Best all-in-one video editor with built-in AI enhancement tools for improving everyday footage.
- OS: Windows 10/11, macOS 10.15 or later.
- Pricing: Free version available; CapCut Pro pricing varies by country, region, platform, and promotions.
- Key tech: AI Enhance Quality, video upscaling, noise reduction, flicker removal, and smart stabilization.
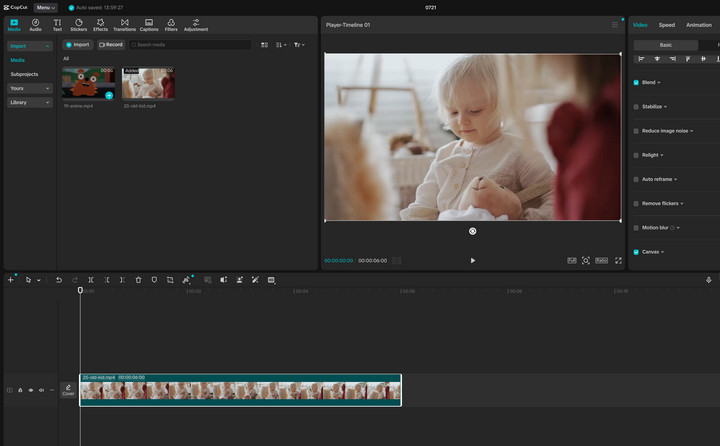
CapCut is a versatile video editor that combines AI-powered enhancement tools with an easy-to-use editing workflow. It helps improve blurry, noisy, shaky, or poorly lit footage through features such as AI enhancement, stabilization, flicker removal, and color adjustment, making it a practical choice for social media creators. While it shares the same ecosystem as JianYing (the Chinese version), CapCut and JianYing are not identical products. Their available features, templates, AI tools, and pricing models may differ depending on market and region.
Core Features for Low-Quality Video Enhancement:
- AI Enhance Quality: Improves video clarity by sharpening details, reducing noise, and enhancing colors with one-click processing.
- Flicker Removal: Reduces distracting lighting flickers caused by artificial lights or recording conditions.
- Noise Reduction: Helps clean up grainy footage and reduce unwanted visual noise.
- HD/UHD Upscaling: Enhances videos to higher resolutions, including UHD output options, while improving overall clarity.
- Smart Stabilization: Reduces camera shake and makes handheld footage smoother.
- Auto Adjust: Automatically balances exposure, tones, and colors for a more natural look.
Pros:
- Comprehensive toolkit covering stabilization, noise, and color in one app.
- Large collection of high-quality templates for quick, professional layouts.
- No watermark for most free exports when using standard editing features.
Cons:
- Some advanced AI enhancement features require a Pro subscription.
- Advanced AI processing can be demanding on older hardware.
Real-World Test Highlights of CapCut
Performance:
In our real-world test of CapCut's AI Enhance Quality feature, the software showed a very different performance profile compared with dedicated AI video enhancers. GPU utilization remained relatively low, with peak GPU usage ranging from only 16% to 26% during processing. However, the average processing speed was extremely fast, reaching around 75-458 FPS, with export times completed in just 1-3 seconds.
This impressive speed is probably because CapCut processes the enhancement during the timeline editing stage rather than during final export. The rendering progress appears while previewing or applying the enhancement effect, which is similar to the workflow in professional editors such as Adobe Premiere Pro. Peak VRAM usage was also relatively low, ranging from approximately 924 MB to 1.62 GB, making it lightweight even on mid-range hardware.
Output Quality:
Our tests showed a noticeable quality difference between CapCut's mobile and desktop versions. For users who want to use the Enhance Quality feature, the desktop version is recommended, as it delivers better enhancement results.
Compared with dedicated desktop AI video enhancers, CapCut's PC version still shows some differences in detail recovery and overall refinement. However, the gap is not significant for everyday content creation, and the results are sufficient for most social media creators who need quick improvements rather than professional-grade restoration.
The AI Noise Reduction feature delivered mixed results in our tests. While it can reduce some visible noise, the removal is not always clean. In certain cases, it may also slightly reduce fine details and make footage appear overly smooth.
Interestingly, CapCut achieved very competitive NIQE scores in our evaluation (note that NIQE is only an objective reference and does not fully represent perceived visual quality). Real-world footage scored approximately 5.8–8, while anime-style content scored around 10–11.

2. Adobe Premiere Pro
Best for professional video editing, color grading, and manual quality enhancement
- OS: Windows 10/11 (64-bit); macOS 12 or later (version requirements vary by Premiere release).
- Pricing: $22.99/mo for Premiere Pro; Creative Cloud Pro plans are available with additional Adobe apps and vary by promotion.
- Key Tech: Adobe Sensei AI, Firefly-powered features, Lumetri Color tools, and advanced manual adjustment workflows.

Adobe Premiere Pro is a professional-grade video editing software widely used in professional video production, including film, television, and online content creation. While not a dedicated AI video enhancer, it provides powerful manual tools to improve video quality through color correction, sharpening, basic noise reduction, and advanced editing controls.
Unlike AI-based enhancers that automatically restore missing details, Premiere Pro focuses on giving editors precise control over the entire enhancement workflow. Features like Lumetri Color allow detailed adjustments of exposure, contrast, saturation, and color balance, while effects such as Unsharp Mask can improve perceived sharpness. For resolution changes, Premiere Pro provides flexible scaling options through Set to Frame Size and Scale to Frame Size, giving users more control over how footage is resized. When more advanced enhancement is required, editors can extend the workflow by sending clips to After Effects for detail-preserving upscaling or using third-party AI plugins. With the right combination of manual adjustments, Adobe ecosystem tools, and AI extensions, Premiere Pro can significantly improve the overall look of flat, soft, or low-quality footage. However, users looking for a faster one-click AI restoration or dedicated upscaling solution may prefer specialized AI video enhancers.
Pros:
- Full professional toolkit for manual video quality enhancement
- Advanced color grading with Lumetri Color for cinematic results
- Seamless workflow with other Adobe Creative Cloud apps
Cons:
- Not a true AI video enhancer (most enhancements are manual)
- Steep learning curve for beginners
- High system requirements for 4K editing workflows
Real-World Test Highlights of Adobe Premiere Pro
Performance:
In my tests, Adobe Premiere Pro showed relatively low GPU utilization compared with dedicated AI video enhancers. The maximum GPU utilization ranged from 10% to 67%, while the maximum CPU utilization was much higher, with several tests exceeding 96%. The average processing FPS ranged from 25 to 50.33 FPS, and export times were generally between 3 and 8 seconds.
The impressive export speed is likely because Premiere Pro handles scaling during the editing workflow rather than performing AI-based enhancement during final rendering. Similar to CapCut's workflow, the processing is largely completed when applying or previewing the effect, so the final export mainly packages the already processed timeline instead of running intensive AI inference.
Output Quality:
I used Premiere Pro's Fit to Frame for testing. This is a traditional scaling method rather than an AI enhancement feature, so the results were noticeably different from dedicated AI video enhancers.
Compared with AI-powered tools, Premiere Pro showed limited detail reconstruction. Some exported videos appeared softer, with visible noise, and several clips showed noticeable pixelation or block artifacts after scaling. The NIQE scores were generally between 9 and 13, indicating weaker objective image quality compared with most AI enhancement solutions.
Overall, Premiere Pro isn't designed to compete with dedicated AI video enhancers in automatic restoration quality. Its real strength is the professional editing workflow, where enhancement, color grading, audio, and post-production all happen in one place. That said, Adobe's recent acquisition of Topaz Labs makes me optimistic. If Topaz's industry-leading AI models are gradually integrated into Premiere Pro, it could become a much more compelling AI video enhancement solution in the future.

Which AI Video Enhancer Should You Choose?
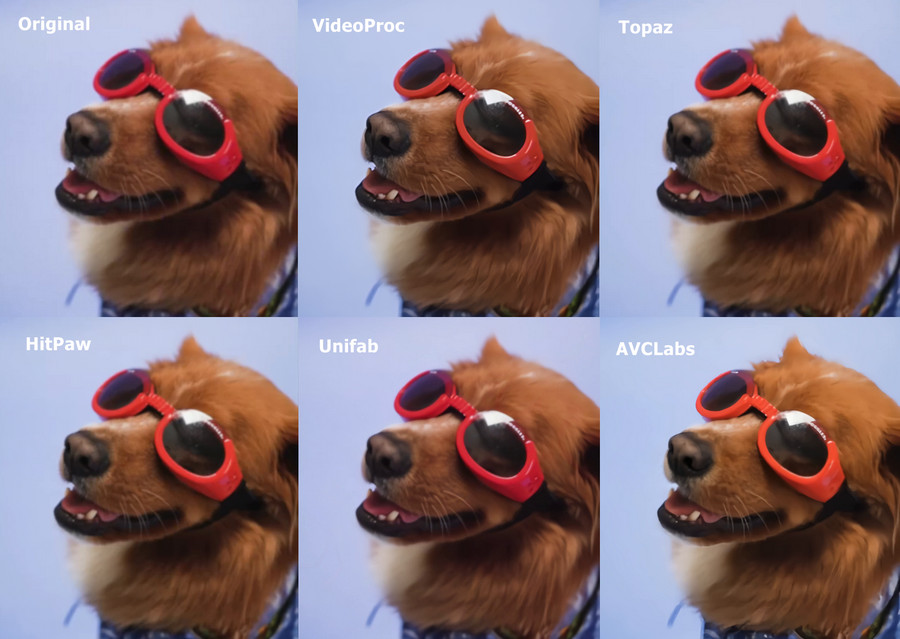
After testing these AI video enhancers side by side, I found that there isn't a single "best" tool for everyone. Most of the dedicated desktop AI video enhancers delivered satisfying results, and in many cases, the differences were more subtle than you might expect. To make those differences easier to see, I've put together a side-by-side comparison below using one frame from one of my test videos. For clarity, this comparison includes the original video and only five AI enhancers.
The right choice depends on your budget, hardware, workflow, and the type of videos you enhance most often.
- Choose VideoProc Converter AI if you want the best overall value, fast GPU-accelerated processing, and an all-in-one toolkit that's suitable for most users.
- Choose Topaz Video if professional restoration quality matters more than price and hardware requirements.
- Choose Aiarty Video Enhancer if you're looking for cinematic-quality results with an excellent balance between output quality and efficiency.
- Choose HitPaw VikPea if you prefer a beginner-friendly interface with a wide selection of AI enhancement models.
- Choose UniFab AI if you frequently enhance animation or want a feature-rich AI suite without an annual subscription.
- Choose CapCut, Canva, or Fotor if your primary goal is creating social media content and you need efficient editing workflow, browser-based or lightweight enhancements rather than professional restoration.
Best Video Enhancer FAQ
1. What is the best video enhancer software in 2026?
For most users, AI video enhancer software like VideoProc Converter AI, Topaz Video, Aiarty Video Enhancer, WinXVideo AI offer the best overall results in terms of clarity, upscaling quality, and ease of use. HitPaw VikPea and Unifab AI are also good choices.
2. What is the best AI video enhancer for improving low-quality footage?
Top choices include VideoProc Converter AI, Topaz Video AI, and CapCut. These tools are widely used because they can automatically upscale resolution, reduce noise, and recover details from blurry or compressed videos with minimal manual effort.
3. Can video enhancer software really fix blurry or old videos?
Yes, to a certain extent. Modern AI video enhancers can reconstruct missing details, reduce compression artifacts, and improve sharpness. However, results still depend on the original footage quality, severely damaged or extremely low-resolution videos may not fully recover to "true HD" quality.
4. What is the easiest way to enhance video quality?
The simplest method is using an AI video enhancer. Most tools only require you to import a video, choose an enhancement mode (such as upscaling or denoising), and export the result. This avoids manual editing and is ideal for quick improvements.


