
 VideoProc Converter AI
 New AI features are available



 Listed in
 A 1080p video may look fine on a phone or laptop, but it can appear soft, blurry, or less detailed when played on a 4K TV, monitor, or large screen. That is why many people want to upscale 1080p to 4K before watching, editing, sharing, or uploading their videos. However, upscaling 1080p to 4K is not just about changing the resolution from 1920 × 1080 to 3840 × 2160. If you simply stretch the video, the result may still look blurry, or even make compression artifacts more noticeable. To get a cleaner and sharper 4K result, you need to choose the right upscaling method based on your source video.
In this guide, we’ll show you the best ways to upscale 1080p to 4K, including AI video upscaling, online tools, professional restoration software, and video editors. We’ll also explain which method works best for different types of footage and what settings to use for better results.
What Actually Happens When You Upscale 1080p to 4K
Upscaling 1080p to 4K means increasing a video from 1920 × 1080 to 3840 × 2160. A 1080p video has about 2 million pixels per frame, while a 4K UHD video has over 8 million pixels per frame. In other words, the software needs to create four times as many pixels as the original video. But increasing the pixel count does not automatically create true 4K detail. The final result depends on how those extra pixels are generated.
Traditional upscaling methods, such as bilinear, bicubic, or Lanczos scaling, mainly resize the existing pixels to fit a larger frame. They are usually fast and useful for simple 4K export, but they may make the video look soft, blurry, or artificial if the source lacks detail.

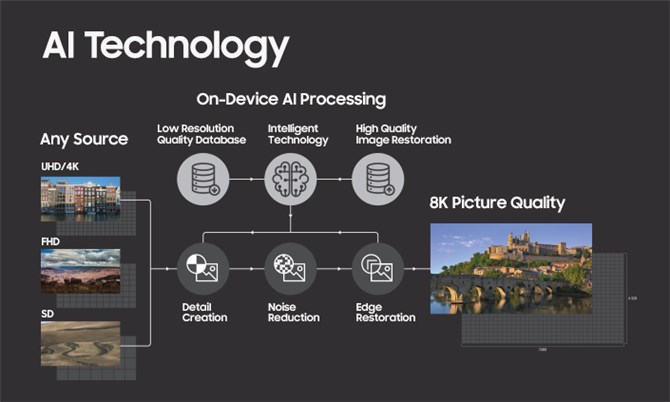
AI upscaling works differently. It analyzes the video frame by frame and tries to generate more natural-looking details, cleaner edges, and better textures. It can also help reduce blur, noise, and compression artifacts, depending on the source video and the AI model. That is why AI upscaling 1080p to 4K is usually a better choice when your original video is old, compressed, blurry, or not sharp enough for a 4K screen.
Method 1. Upscale 1080p to 4K with Naturally Improved Details
VideoProc Converter AI is a dedicated AI video upscaler for converting 1080p videos to 4K. Its Super Resolution feature uses AI models trained on a wide range of video types, allowing you to upscale videos by 200%, 300%, or 400%, up to 4K resolution, while preserving a natural-looking result.
In addition to increasing resolution, it can also help reduce common video artifacts such as noise, grain, pixelation, and blur. Whether you want to enhance old DVD footage, videos shot with early cameras, downloaded clips, classic anime, AI-generated visuals, or other low-resolution videos, VideoProc Converter AI can help you achieve cleaner, sharper, and more natural-looking results with less effort.

VideoProc Converter AI - Upscale Videos to 4K with Natural Detail
- Upscale videos by 200%, 300%, and 400% to reach up to UHD 4K resolution
- Automatically fix noises, bluriness, pixelations, and more common visual flaws
- 4 Deep-trained AI models to bring larger resolution without introducing artifacts
- Faster batch processing speed, better compatibility with more computers
- All-in-one: enhance video/image/audio , convert, compress, download, and more

Step 1. Import Videos to the AI 1080p-to-4K Upscaler
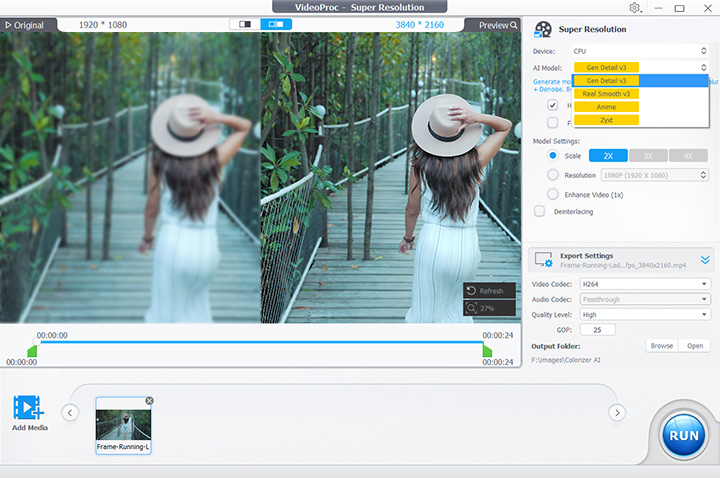
Launch VideoProc Converter AI and open the Super Resolution module from the main interface. Then drag and drop your Full HD videos or images into the workspace. You can also click the +Add Media button to load files from your computer.

Step 2. Pick the 4K Upscaling Model
Choose an AI model from the drop-down list. Personally, I recommend Real Smooth v3 and Gen Detail v3. Both models work well for increasing video resolution while preserving and naturally enhancing original details, such as fabric textures, feather details, edges, and fine patterns. Then choose 4K as the target resolution.
Tips:
If you are upscaling a batch of videos, you can click Apply to All to use the same settings for every file. You can also adjust the settings one by one if different videos need different upscaling models or output settings.
Step 3. Preview and Export the Upscaled 4K Video
You can keep the output encoding settings as default in most cases. If needed, you can also adjust them manually. For example, you can choose AV1 for higher compression efficiency or ProRes for smoother editing in professional video editing software. After everything is ready, click the RUN button to start upscaling your videos from 1080p to 4K.
Note:
VideoProc Converter AI has lower system requirements than many other AI video upscalers, such as Topaz Video AI. It will prioritize GPU acceleration when upscaling 1080p videos to 4K. If your GPU does not meet the minimum system requirements, you may see a "No GPU Found" prompt when entering the Super Resolution module. CPU processing is still possible, but it will be much slower. Check the system requirements for utilizing AI tools.
Method 2. Upscale 1080p to 4K with Online 1080p to 4K Upscaler
TensorPix is an online AI video enhancer that lets you upscale and enhance videos directly in your browser. Since the processing happens online, you do not need to rely heavily on your own GPU. However, you do need to upload your video and wait for cloud processing, so the experience can depend on your file size, internet speed, and server availability.
Like many other online 1080p to 4K upscalers, TensorPix also comes with some limitations. For example, 1080p video processing is only available to paid users, and it supports up to 3 videos at a time. Since your files need to be uploaded to the cloud, it may not be the best choice for private footage, client projects, or sensitive videos. The export options are also relatively limited, with H.264 and HEVC as the main output codecs.
In my test, the output quality was not as stable or refined as what I could get from desktop 1080p-to-4K upscaling tools. For this reason, TensorPix is better suited for short clips and occasional online 1080p to 4K upscaling. If you are working with large files, private videos, long recordings, or many videos at once, a desktop 1080p to 4K converter is usually a better choice.
Step 1. Open TensorPix and Sign In
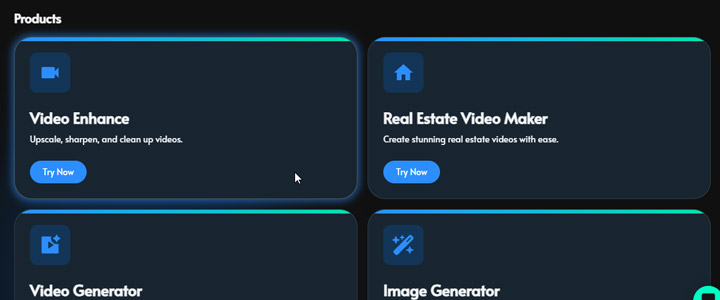
Go to TensorPix's official page. Sign in to your account or create a new one if needed. Hit Video Enhance to navigate yourself to its online 1080p to 4K conversion page.
Step 2. Upload Your 1080p Video
Drag and drop the 1080p video file into the upload area. Keep in mind that the upload speed depends on your file size and internet connection. For large videos, the upload may take a while.
Step 3. Choose the AI Enhancement Option
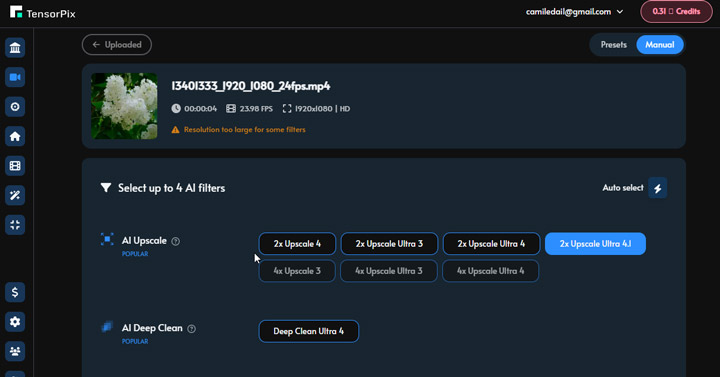
Choose the upscaling filter starting with 2x. You can also enable extra filters, such as AI Deep Clean and AI Motion Smoothing, depending on the condition of your source video.
Step 4. Start Online Processing
Click the Enhance button to start upscaling your 1080p video to 4K. Once done, you can download it for offline playback.
Method 3. Upscale 1080p to 4K with Topaz Video AI
For users who need advanced video upscaling and do not mind the higher cost or hardware requirements, Topaz Video AI is a strong option for upscaling 1080p videos to 4K. At $299 per year, it is one of the more expensive video enhancers on the market, but it has also earned a strong reputation for AI video restoration. It offers a wide range of AI models for different types of footage, though these models can take up a lot of storage space. In my test, downloading and trying several models used around 40GB of disk space. The upscaling quality is impressive most of the time, though not always perfect. Topaz Video AI also gives you detailed controls for sharpening, denoising, detail recovery, color adjustment, and multi-model enhancement. This makes it flexible for serious restoration work, but probably more than what most users need for regular 1080p to 4K upscaling.
Step 1. Install Topaz Video AI
Download and install Topaz Video AI, then sign in with your Topaz account. Make sure your subscription or trial is active before processing the video. Since Topaz Video AI is demanding on hardware, it is also a good idea to check whether your computer meets the system requirements, especially the GPU, VRAM, storage space, and available disk space for AI models.
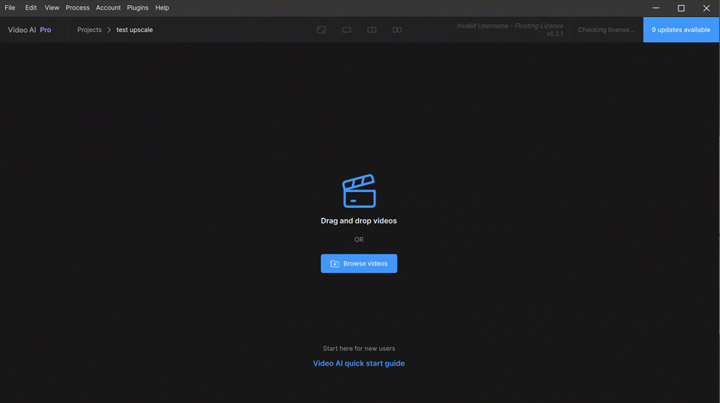
Step 2. Import your 1080p video
Open Topaz Video AI. Create a new project. Import your video by dragging and dropping the file into the workspace. Once the video is loaded, Topaz Video will display it in the preview window and show the available enhancement options.
Step 2. Set the output resolution
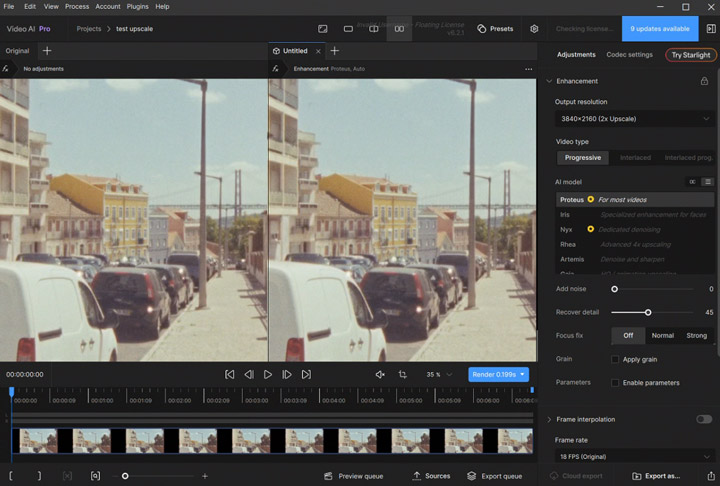
In the output settings, choose 4K resolution or set the upscale factor to 2x. Since 1080p is 1920 × 1080, a 2x upscale will convert it to 3840 × 2160, which is standard 4K UHD.
Step 3. Choose the right AI model
Topaz Video AI offers different AI models for different types of videos, such as clean footage, noisy videos, compressed clips, old recordings, or videos with motion blur. I pick Proteus as it's suitable for most videos.
Step 4. Fine-tune enhancement settings
Adjust settings such as noise reduction, sharpening, detail recovery, and compression artifact removal if needed. Do not push the values too high, because over-processing can make the video look unnatural. If the source video is already clean, use lighter settings. If it is noisy, blurry, or heavily compressed, you may need stronger enhancement.
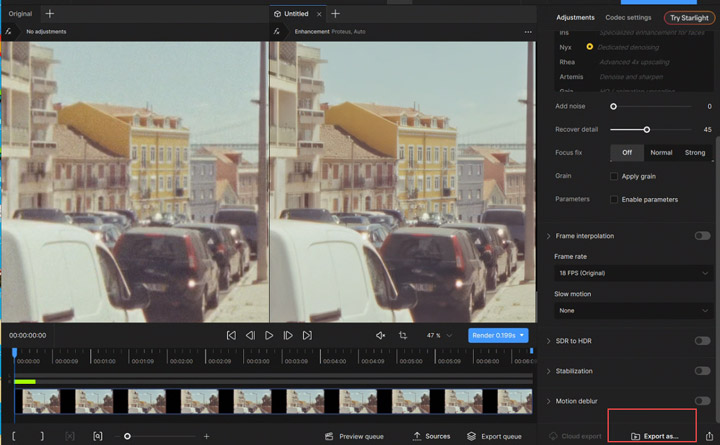
Step 6. Export the enhanced video in 4K
Click the blue icon in the lower right corner ofthe preview window to preview. Once satisfied, click Export As and complete the export settings to start upscaling your 1080p videos to 4K.
Method 4. Upscale 1080p to 4K with Premiere Pro
In Adobe Premiere Pro, upscaling a 1080p clip to 4K relies on its basic resizing and interpolation algorithms. Premiere doesn't have a dedicated AI tool like some standalone upscalers, but it can scale footage to 4K by placing it on a 4K timeline and using smart media scaling. The key concept is simply telling Premiere to render your footage at a larger resolution while preserving as much detail as possible through intelligent scaling and export settings.
It's straightforward and does not require extra software. You work entirely within your usual editing environment. However, the upscaling relies on interpolation rather than true AI reconstruction, meaning Premiere simply spreads existing pixels across a larger frame. Results can look softer or less detailed compared to purpose-built AI upscalers, and the quality won't magically produce new texture.
Step 1. Create a 4K Sequence
Open Adobe Premiere Pro and create a new project. Then go to File > New > Sequence. In the sequence settings, set the frame size to 3840 × 2160, which is the standard 4K UHD resolution. Keep the frame rate the same as your original 1080p video to avoid motion issues.
Step 2. Import Your 1080p Video
Import your 1080p video into the Project panel. You can drag and drop the file directly into Premiere Pro, or go to File > Import to select the video from your computer. Then drag the video onto the 4K timeline.
Step 3. Fit the 1080p Video to the 4K Frame
Right-click the video clip on the timeline and choose Set to Frame Size. This lets Premiere Pro scale the 1080p footage to fit the 4K sequence while keeping the scaling more flexible for later adjustment. If needed, you can also fine-tune the scale value in the Effect Controls panel.
Step 4. Apply Mild Sharpening If Needed
If the upscaled video looks a little soft, you can apply a mild sharpening effect, such as Sharpen or Unsharp Mask. Avoid using too much sharpening, as it may create halos, harsh edges, or an unnatural look.
Step 5. Export the Video in 4K
Go to File > Export > Media. Set the output resolution to 3840 × 2160. You can choose H.264 for better compatibility or HEVC/H.265 for a smaller file size. Enable Use Maximum Render Quality to help preserve better scaling quality during export.
Step 6. Check the Exported 4K Video
After exporting, play the 4K video and check the sharpness, motion, and overall image quality. If the result looks too soft or the compression is too visible, try increasing the export bitrate or using an AI video upscaler before editing in Premiere Pro.
Note:
Video editing programs like Adobe Premiere Pro or DaVinci Resolve offer built-in upscaling features (e.g., Super Scale) that can be applied during export, but that may be taxing for your system. Also, upscale as the final step and adjust sharpness and noise reduction settings for best results.
FAQ
Can You Upscale 1080p to 4K?
Yes, 1080p video can be upscaled to 4K. This process involves increasing the pixel count of 1080p content to fit a 4K resolution. You can use VideoProc Converter AI to upscale 1080p to 4K. This versatile 4K upscaler can upscale to 4K using various methods, from basic interpolation techniques to more sophisticated AI-based machine learning models.
Upscaled 4K vs Native 4K, Is There Any Difference in Quality?
An upscaled 4K (from 1080p) video will look better than the one without upscaling (1080p) on a 4K TV, but a 1080p video can only approach its perfection on a 1080p TV. In theory, you would probably think a video with 4K resolution will look perfect on a 4K TV, but this is not always the case.
The truth is, sometimes you can't even tell the difference between an upscaled 4K video and a native 4K video on the same 4K TV screen merely by the sight of your eyes. Besides, it is worth noting that the quality largely depends on the sources and upscaling software. If the quality of the source is far too low (720p HDTV), it will never outpace the look of an ultra-high quality source (4K). Shortly speaking, an upscaled 4K will look better but may not be astonishingly perfect.
Does Upscaling to 4K Really Work?
Upscaling to 4K can be effective and improve the viewing experience. However, the result largely depends on the upscaling technology and the quality of the original content. The better the quality of the original content, the more effective the upscaling. And some content benefits more from upscaling than others.