
How to Enhance Video Quality with VideoProc Converter AI
Wonder how to enhance video quality easily? Try the 7 ways offered by VideoProc Converter AI. The all-in-one video/image enhancer can upscale low-quality videos to 4K, reduce noise, restore clarity, adjust colors, stabilize shaky footage, boost FPS, and improve audio quality using 16 advanced AI models. VideoProc also provides tools for video converting, compressing, editing, and recording.


Quick Diagnosis: Why Your Video Quality Looks Bad?
Click to see the causes and solutions
-

My video is blurry, soft, or pixelated
-

My video is noisy & grainy
-

My video is low resolution
-

My Video colors look dull
-

My video is shaky
-

Motion looks choppy
-

My video has background noise
-


 00:00:0600:00:1900:00:18Off On
 Remove Noise
 Remove Vocals
 Remove Instrumentals
7 Ways to Enhance Your Video Quality without Reshooting
Quick Answer:
You can enhance video quality by upscaling low-resolution videos, removing noise, sharpening blurry and soft footage, improving colors and lighting, stabilizing shaky videos, increasing frame rate, and making audio clearer.
1. Increase Resolution with AI Video Upscaling
Low-resolution footage shot by old cameras and mobile phones, in 480p or 720p, often appear pixelated or blurry on large high-definition displays. If the clip is simply too small, stretch it will go soft. Some videos downloaded from the internet will be indistinct and have compression artifacts.
How Does AI Video Upscaling Work?
Super Resolution can increase 480p/720p to 1080p, 2K, or even 4K with noticeably improved clarity, reduced grain, and enhanced detail.
Best for:
- Old home videos (480p/720p)
- DVD or VHS recordings
- Early smartphone videos
- Videos downloaded from social media
- Webcam recordings
- Security camera footage
Steps:
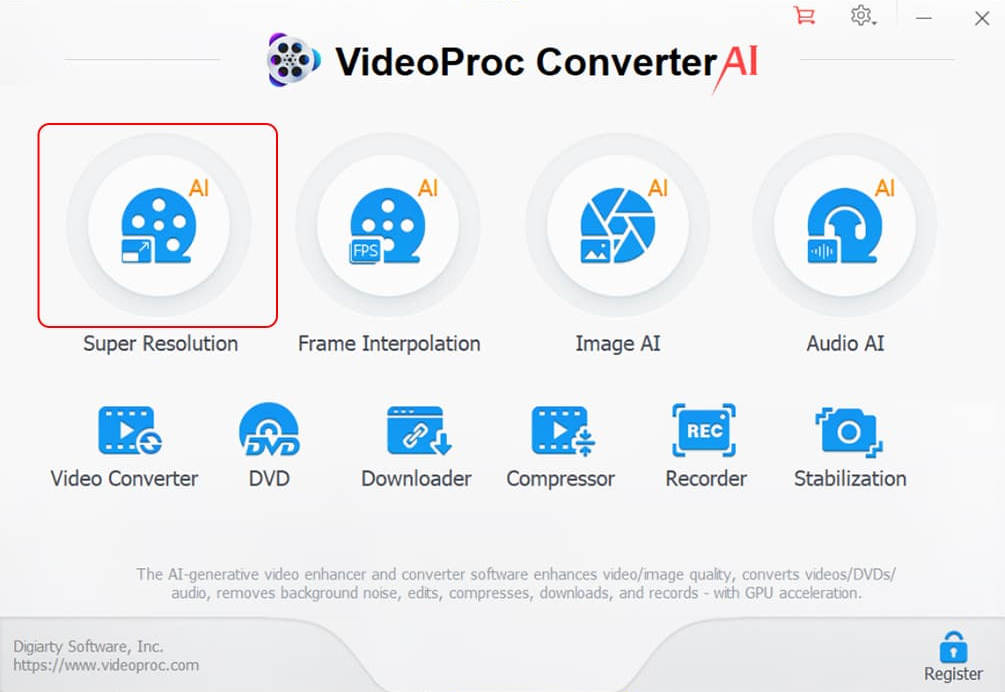
Step 1. Install and open VideoProc Converter AI, and choose "Super Resolution".
Step 2. Drag your video file into the video importing area on the left, and left the software load the video.
Step 3. Choose an AI Model of Super Resolution: Gen Detail and Real Smooth are recommended.
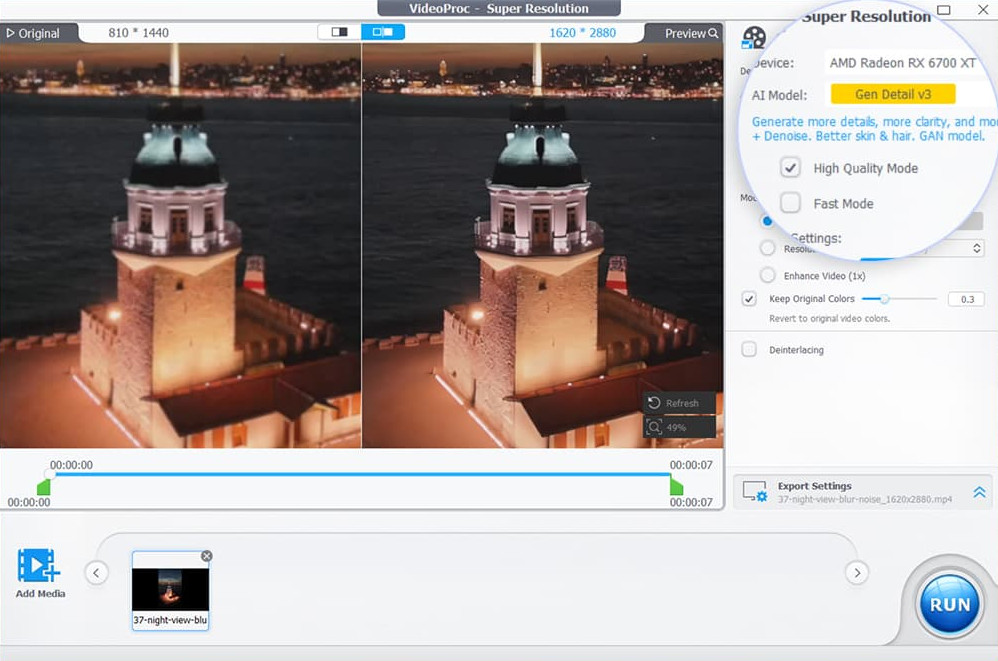
Step 4. Under Model Settings, choose a Scale factor, such as 2X; or, you can choose a Resolution preset such as 4K (3840 x 2160).
Optional Settings:
Tick "Keep Original Colors" if you want the output closer to the original color, and drag the slider to the right. You can try any degree and compare the result on the preview window.
Under Export Settings, you can change video/audio codec, format, quality level, and GOP, output foloder, if necessary.
Step 5. Hit the RUN button on the lower right to start upscaling the video to the target resolution while enhancing the quality automatically.
Before After showcase
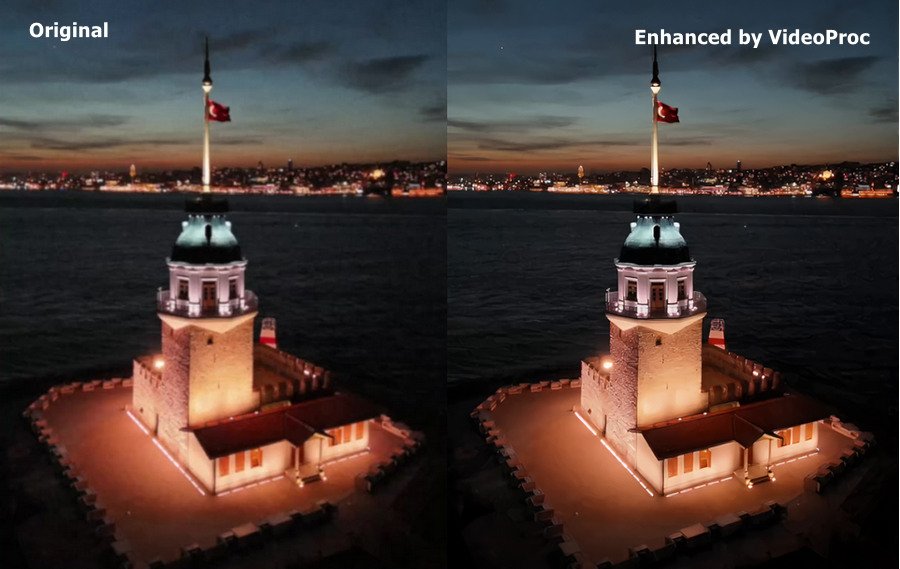
My experience of upscaling video:
In most cases, 2× upscaling delivers the best balance between quality and realism. While 3× or 4× upscaling may sound more appealing, the AI has to estimate and generate significantly more missing pixels, which increases the risk of artifacts, over-sharpening, and unnatural textures.
If your source video is extremely low resolution (such as 240p or 360p), it's important to keep expectations realistic. AI upscaling is fundamentally different from generative AI. Its goal is to reconstruct and enhance existing visual information rather than invent entirely new details. When the original footage contains very little usable information, no AI video upscaler can magically turn it into true high-definition footage.
Choose High Quality Mode for the best output. In VideoProc Converter AI, High Quality Mode generally produces cleaner results than Fast Mode. Although processing takes longer, it's the recommended option when output quality matters most.
2. Remove Noise to Fix Grainy Videos
Digital noise, often seen as visible "grain", commonly affects videos shot in low-light or nighttime conditions, recorded with high ISO settings, or digitized from VHS tapes and other old footage. It can also appear in heavily compressed videos, reducing overall clarity and fine details.
How Does AI Denoising Work?
Any of the four AI Super Resolution models in VideoProc can automatically and naturally reduce noise and grain to make videos much clearer. AI will detect and remove the real noise in videos while keeping details.
Best for:
- Night videos
- Low-light recordings
- High ISO footage
- Smartphone videos in the dar
Steps:
Step 1. On the main interface of VideoProc Converter AI, tap “Super Resolution”, and import your source video(s).
Step 2. After the video is loaded, choose AI Model on the right. We suggest you try both Real Smooth Gen Detail for denoising, since they perform differently on different materials.
Step 3. Choose Scale or Resolution: you can tick Enhance Video (1X) to keep original resolution, or select scaling options for upscaling.
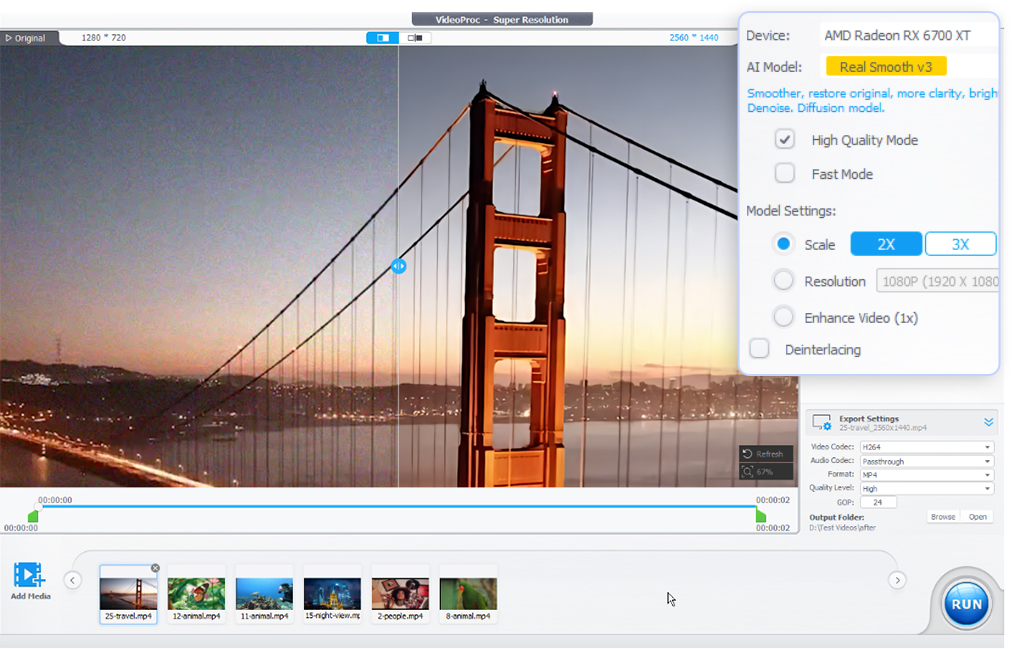
Step 4. Click RUN to start automatic AI denoising.
 Before After showcase
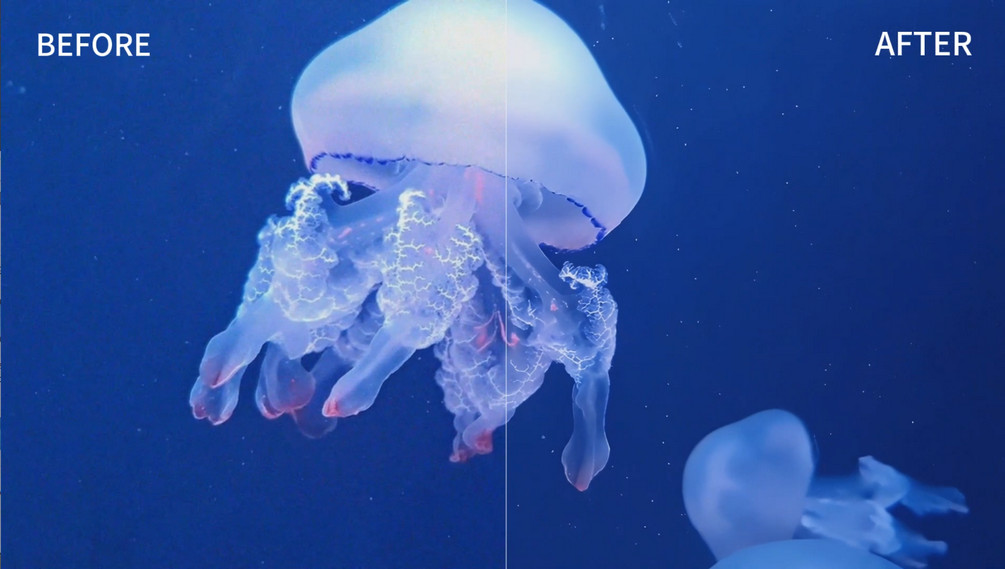
My experience of denoising video:
In VideoProc, you can realize fully automatic AI denoising without further ado.
Choose a proper AI model: in my tests, Real Smooth V3 performs better in denosing than Gen Detail V3. But you can try them yourself.
The ‘Keep Original Color’ option may affect the denoising effect occasionally, so we suggest not to apply it if you want a better denoising effect.
3. Sharpen Blurry and Soft Footage
Videos may look blurry or soft because of slight camera shake, focus issues, motion blur, low-quality lenses, or repeated compression. These problems reduce edge definition and fine details, making faces, text, and textures appear less clear than they should.
How Does AI Video Sharpening Work?
AI sharpening detects soft edges and blurred areas in each frame, then reconstructs lost details and enhances edge clarity using deep learning models. Gen Detail model in VideoProc will automatically improve important details while reducing halos, excessive noise, and other unwanted artifacts.
Best for:
- Slightly out-of-focus videos
- soft-looking footage
- compressed videos
- AI-generated videos
- old digital recordings
Steps:
Step 1. Launch VideoProc Converter AI, go to "Super Resolution", and add your blurry or soft footage.
Step 2. After video loading and AI reference, choose AI Model on the right. Gen Detail model is recommended for sharpening videos.
Step 3. You can upscale the video by 2X, 3X, or 4X, or just keep original resolution.
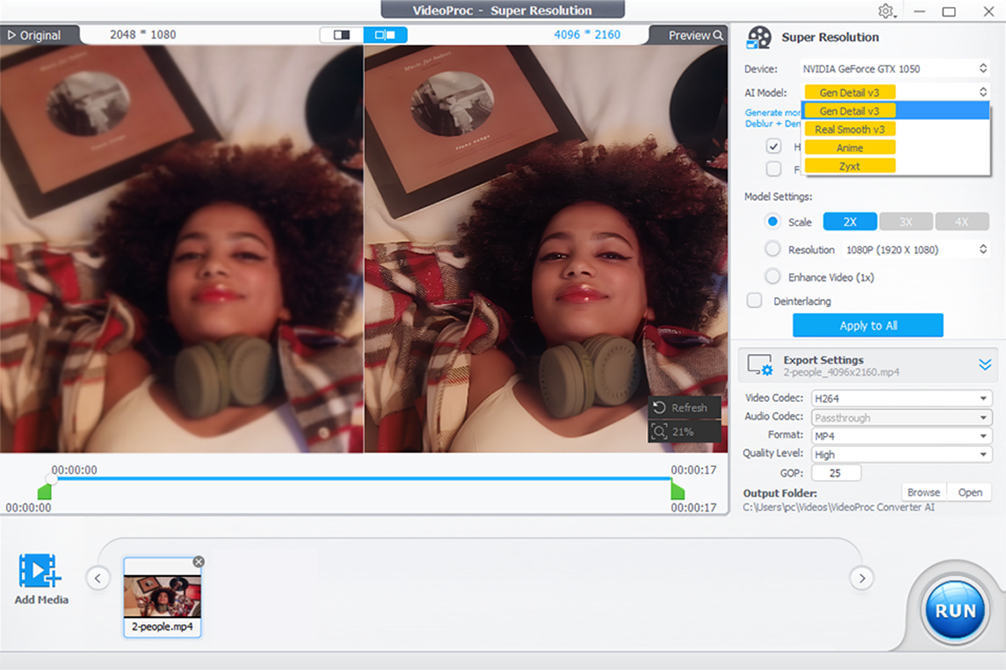
Step 4. After export settings needed, just tap the RUN button to let the software fix your blurry and soft videos.
Before After showcase
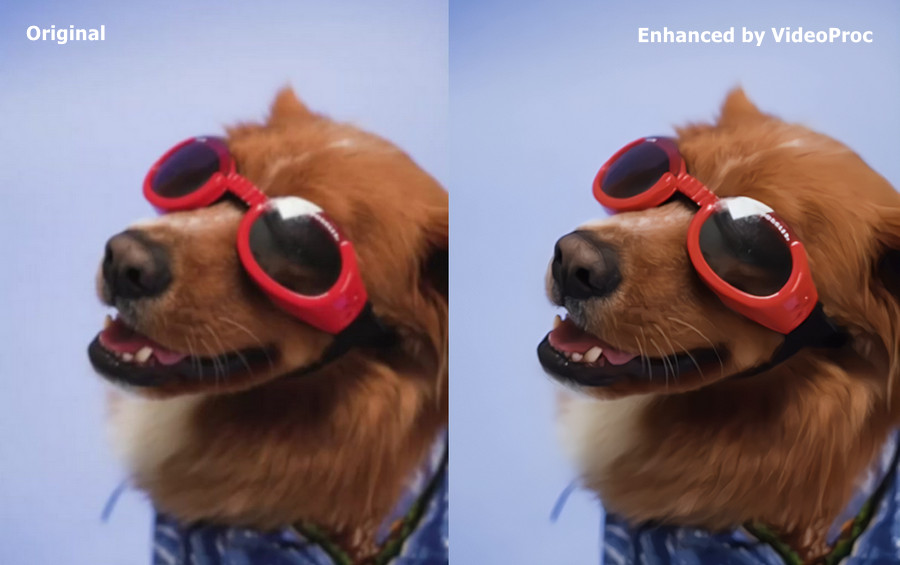
My experience of sharpening video:
VideoProc performs particularly well when sharpening animals, fur and hair, close-up faces, plants, and other fine textures.
In most cases, the Gen Detail model delivers better sharpening and detail recovery. But for certain videos, the Real Smooth model may produce more natural-looking results.
For the best balance of sharpness and natural detail, 1× or 2× enhancement is generally recommended. Higher scaling ratios may produce softer-looking results.
If your original footage contains heavy noise or grain, sharpening may be less noticeable.
4. Adjust Colors and Lighting for Better Visuals
Videos recorded in low light, underexposed conditions, or challenging lighting environments often look too dark, washed out, or lacking in contrast and color. Even well-exposed footage may appear flat or dull due to inaccurate white balance or limited dynamic range.
How to Adjust Color in VideoProc?
Color is a non-AI feature in VideoProc Converter AI. Adjusting brightness, contrast, saturation, highlights, and shadows helps restore a natural balance between light and dark areas while improving color accuracy. With proper adjustments, videos can appear brighter, more vibrant, and visually appealing, creating a more polished and cinematic look.
Best for:
- Dark videos
- Underexposed footage
- Washed-out or faded colors
- Low-contrast videos
- Videos with incorrect white balance
Steps:
Step 1. Open VideoProc Converter AI, and go to "Video Converter".
Step 2. Add your video by dragging and dropping or clicking "+Video".
Step 3. Select "Effect" tab on the toolbar. On the Effects panel, you can adjust Brightness, Contrast, Hue, Gamma, and Saturation, and hit Done.
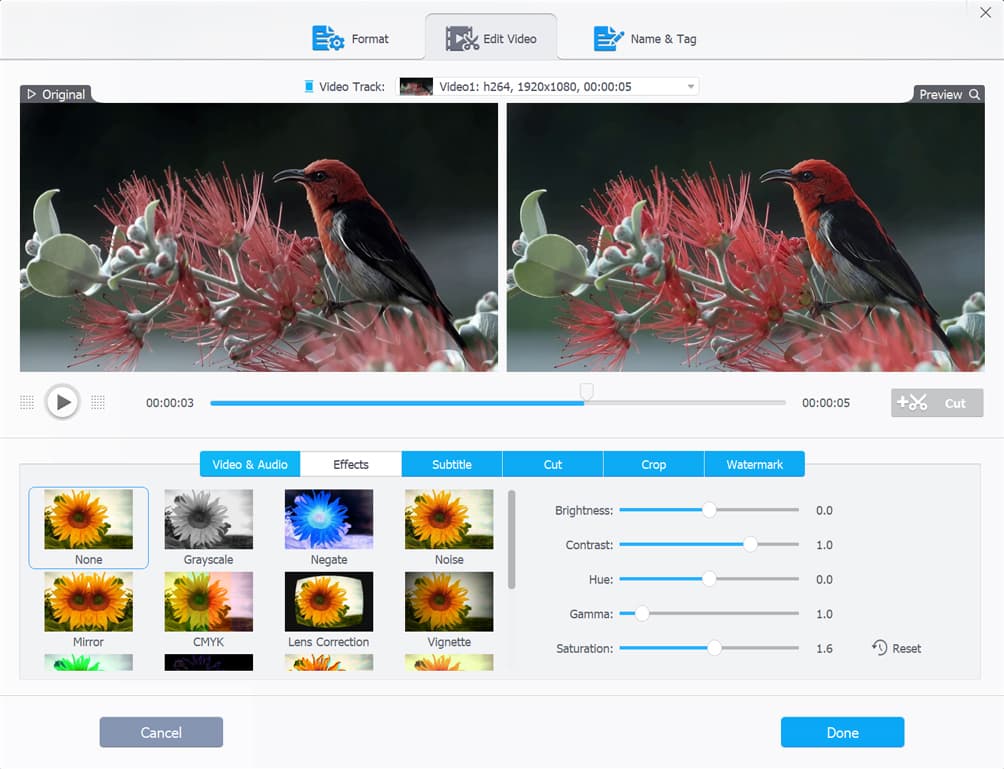
Step 4. Click on the RUN button to activate the color correction.
5. Stabilize Shaky Footage
Videos captured handheld or while walking, running, riding, or during other sporting and actions often suffer from unwanted camera shake and jitter. These unstable movements can make footage distracting, less professional, and uncomfortable to watch.
How Does AI Video Stabilization Work?
Stabilization in VideoProc analyzes motion between frames to identify and compensate for unwanted camera shake. By smoothing jitters and maintaining natural motion, it creates steadier, more cinematic footage with minimal cropping or distortion.
Best for:
- Dark videos
- walking footage
- action camera videos
- drone footage
- sports recordings
Steps:
Step 1. On the home interface of VideoProc Converter AI, select "Stabilization".
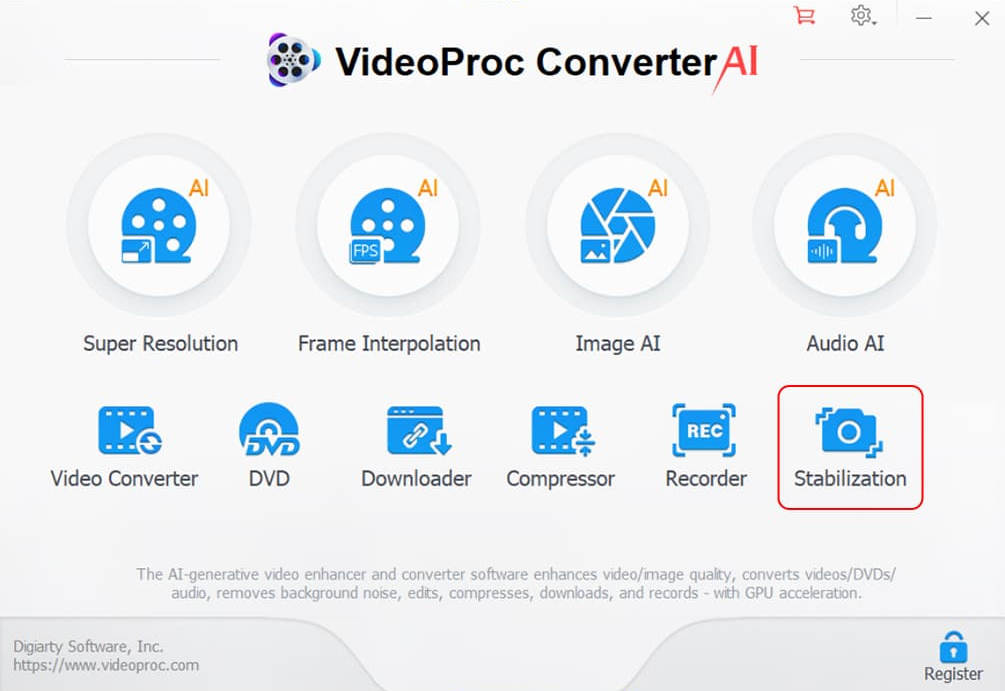
Step 2. Import your shaky footage in either way: drag and drop or Click on "Add Video" to add from computer.
Step 3. Choose Mode and Preset:
Mode
Two Pass is suggested when you need a best stabilization result, while the processing speed will be slower.
One Pass balances the stabilization result and speed.
Preset
Best Stability delivers the strongest stabilization with only a slight crop.
Fastest prioritizes speed, producing smoother footage with a modest crop.
Balanced offers the best balance of stabilization quality, crop ratio, and processing speed.
Minimum Crop keeps cropping to a minimum while effectively stabilizing shaky footage.
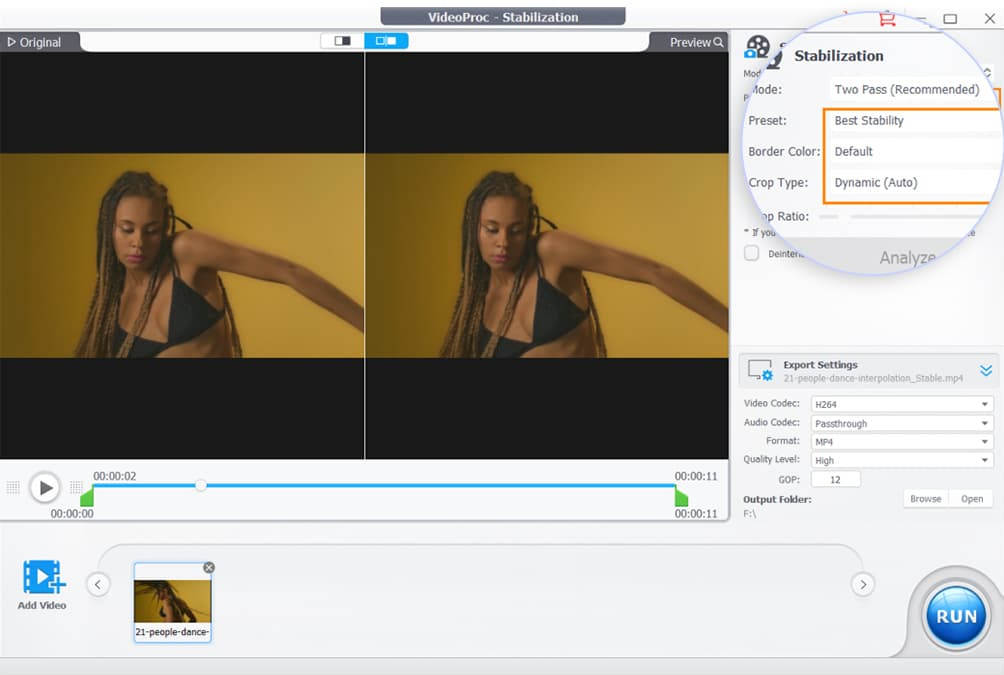
Step 4. Fine-tune options like Mode, Preset, Border Color, Crop Type, and Crop Ratio to achieve your desired look, then click Analyze again to apply the changes.
Step 5. After output settings, hit the RUN button to start processing and exporting.
6. Boost FPS to Eliminate Lag and Choppy Playback
Low frame rate videos often appear choppy or jerky, especially during fast camera movements or action scenes, where motion may not look as smooth on modern high-refresh-rate displays.
How Does AI Frame Interpolation Work?
Frame Interpolation in VideoProc analyzes motion between consecutive frames and generates realistic intermediate frames to increase the frame rate from 24fps or 30fps to 60fps or higher. The result is smoother, more fluid motion with reduced stutter.
Best for:
- sports and action videos
- gameplay recordings
- fast camera movements
- drone and FPV videos
- 24fps or 30fps videos
Steps:
Step 1. Open VideoProc Converter AI. On the main interface, choose Frame Interpolation.
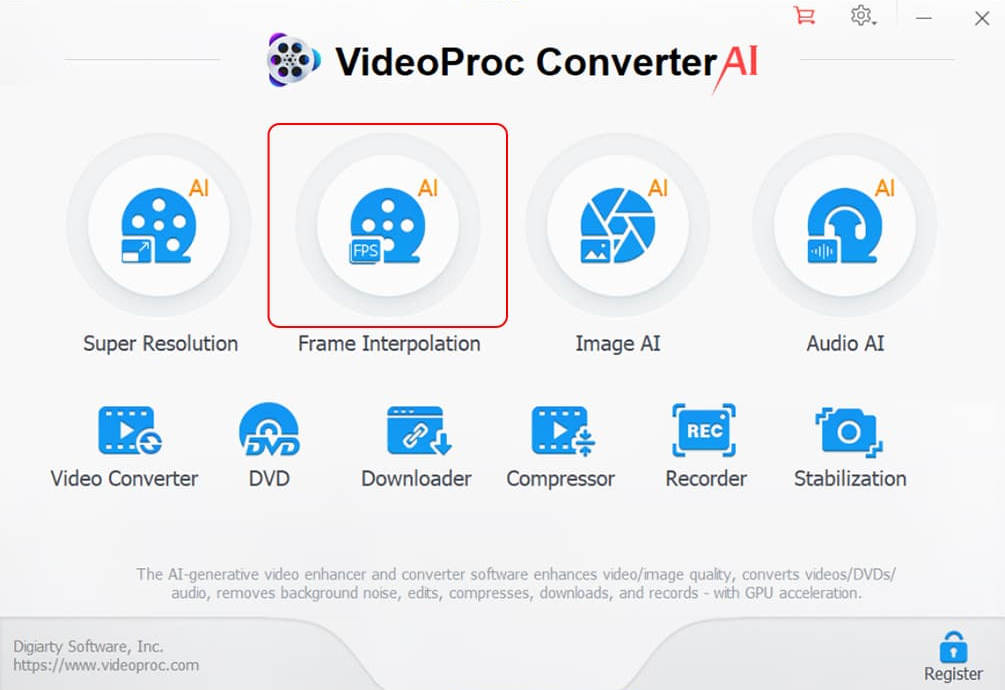
Step 2. Import your low FPS video to the panel in Frame Interpolation.
Step 3. After AI reference, choose "Insert Frames" model, where you can set FPS by 2X, 3X, 4X, or 5X.
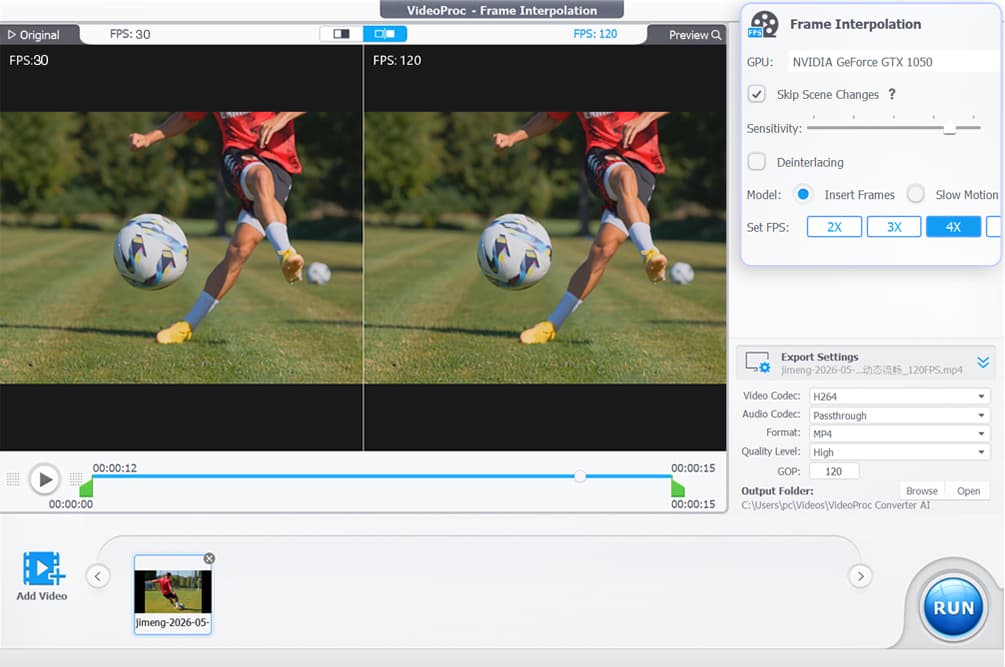
Step 4. After all settings, hit RUN to export the video.
My experience of increasing frame rate:
My Experience: In most cases, 30–60 fps provides the best balance between smooth motion and playback compatibility. For sports, gaming, and other fast-moving footage, 90–120 fps can produce noticeably smoother results. However, very high frame rates may not play back smoothly or be fully supported on some devices or media players, so 60 fps is generally the safest choice unless higher frame rates are truly needed.
Skip Scene Changes
Interpolating across scene changes can create unwanted artifacts or a "jello" effect. VideoProc Converter AI automatically detects cuts and skips frame interpolation at those points, while smoothly interpolating the rest of the video.
*Pro Tip: Start with a sensitivity of 85. Increase it if artifacts appear around cuts, or lower it if normal frames are mistakenly treated as scene changes.
Slow Motion
The Frame Interpolation tool also allows you to create slow motion videos by slowing down the original videos 2X to 5X.
7. Improve Audio Quality in Your Video
Poor audio quality can significantly affect the viewing experience, even when the video looks clear. Background noise, wind sounds, room echoes, and unwanted human speech are common issues in videos recorded with built-in microphones, outdoor cameras, or low-quality recording environments.
How Does Audio AI Work?
VideoProc offers two main AI audio tools: Noise Suppression and Vocal Remover. The former reduces background noise in audio and videos by identifying and filtering unwanted sounds while preserving voice clarity; the latter removes vocals or background music from recordings. Together, they reduce audio distractions, improve speech intelligibility, and help create cleaner, more professional-sounding audio.
Best for:
- Voice recordings and podcasts
- Interviews and vlogs
- Videos with background noise
- Outdoor recordings with wind noise
- Screen recordings and tutorials
Steps:
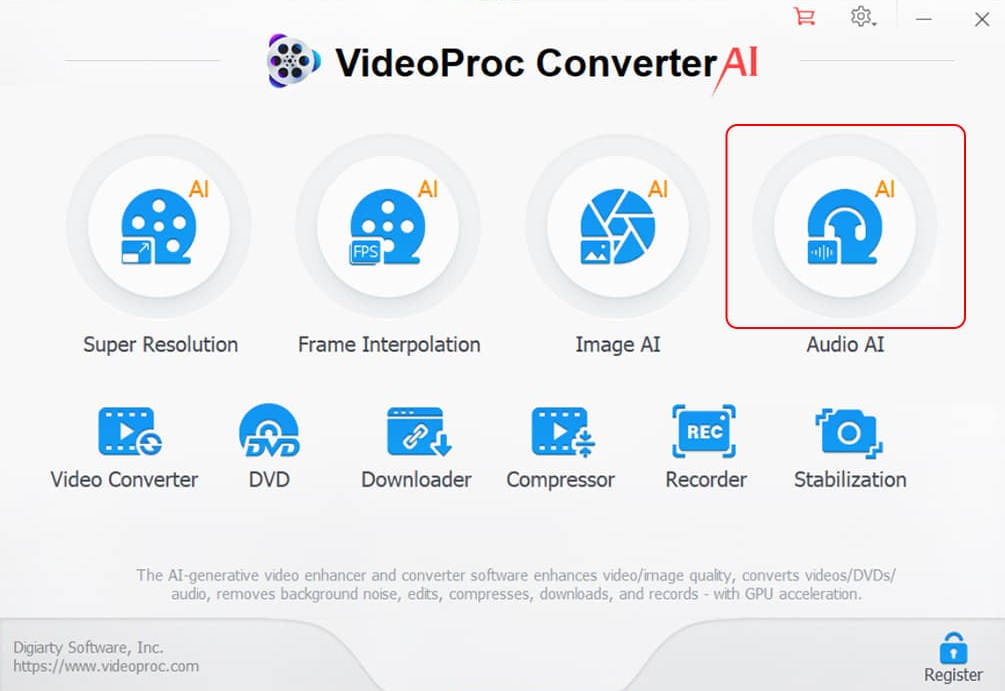
Step 1. After launching VideoProc Converter AI, choose Audio AI on the main UI.
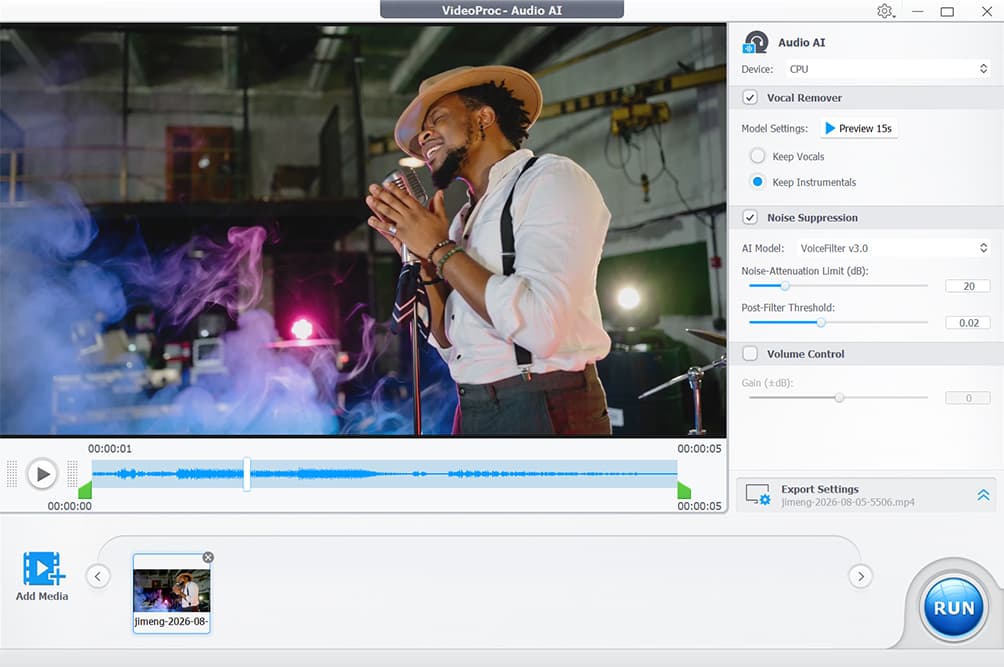
Step 2. Add your audio or video file with unwanted background noise.
Step 3. Choose the tool you need:
Noise Suppression: Removes distracting background noise, including traffic sounds, wind, hissing, and ambient chatter.
Vocal Remover: Lets you choose what to keep — vocals or instrumentals. Keep the instrumental track to create clean background music, or keep the vocal track to remove background music.
Compare Desktop AI Software with Online Video Enhancer
According to our test, Videoproc Converter AI can upscale and enhance a 720p into sharp 1080p or even 4K, without creating that plasticky or over-smoothed look. Compared with online and average desktop video enhancers, it is faster with full GPU acceleration, more secure by local processing, and export with higher resolution, clarity and details. See detailed comparison below.
|
VideoProc Converter AI (Desktop) |
Online Enhancer | Other Desktop Enhancers | |
|---|---|---|---|
| Best use cases | Recovering fine animal fur details, removing noise from low-light footage, restoring moderately blurry close-up portraits, and 2× upscaling AI-generated videos | Enhance and upscale already-good footage | Generally good, depending on the AI models and source footage |
| Key Techs | Well-trained AI models tailored for different videos; not just upscale, but intelligently reduce noise, refine detail and overall visual quality | Cloud-based AI enhancement, super resolution, denoising, and sharpening models | Specialized AI models, Super Resolution, Restoration & Frame Interpolation |
| Output Overall Clarity | High-fidelity output with enhanced clarity, restored details, and reduced noise, while preserving natural-looking results | Good for basic enhancement, but generally limited to mild improvements compared with professional desktop enhancers | Generally high-quality results, but strengths vary by AI model and footage type. Some excel at detail recovery, while others perform better on specific scenes |
| Denoise ability | Excellent. Strong noise and grain reduction while preserving fine details and a natural look | Good for light to moderate noise, but results can be limited on heavily noisy footage | Generally good, but results vary by model. Some may over-smooth footage and lose fine details |
| Deblur ability | Strong deblurring for soft and blurry footage, with effective correction of common blur | Generally better suited to mild blur and basic clarity enhancement | Generally strong, but results vary by AI model and footage |
| Detail Recovery | Strong detail recovery, especially for faces, fur, hair, plants, and other fine textures, with natural-looking results | Limited to moderate detail recovery; works best on relatively good-quality footage | Some models can recover significant detail, while others may introduce artifacts |
| Max Resolution | 4K Ultra HD | Higher resolution needs more credits |
Typically 4K/8K |
| Processing speed | Fast by supporting of level-3 GPU Acceleration | Typically slower due to online processing, queue delays, and occasional retries | Vary depending on the hardware, and processing settings |
| GPU utilization (based on our tests) | GPU utilization reaches up to 99% in most cases. Optimized for NVIDIA/AMD/Intel | Not applicable to the user's GPU; AI processing is typically handled by cloud GPUs | Most can achieve over 90% GPU utilization, but GPU optimization and compatibility vary by brand |
| CPU usage (based on our tests) | CPU usage stayed around 35%, generally lower than most competing tools, resulting in lower overall system load | Typically low on the user's device, as most processing is handled in the cloud | Typically 40% or higher, with some reaching over 80% at times |
| Ease of Use | Very beginner-friendly, with a highly automated workflow that requires little to no manual parameter adjustment | Simple and easy to use, with a straightforward upload-and-enhance workflow | Generally easy to use, but some offer multiple AI models that require more careful selection, while others have slightly more complex workflows |
| Batch Process |  |
 |
|
| Other Features | All-in-one: enhance videos, images, audio; convert, compress, edit, download, and record | Basic video enhancement only | Mostly focused on video enhancement, rather than a broader all-in-one workflow |
| Watermark | 5 watermark-free processing and exports | Free plans often add a watermark, while paid plans may remove it | Most paid versions export without watermarks, but free trials or limited versions may add one |
| Max Upload Limit | No upload limit; process videos directly on your computer | Usually have file-size or video-duration limits, often ranging from a few hundred MB to around 2GB | Generally no upload-size limit, except for some open-source enhancers |
| Privacy | 100% Local & Private | Require uploading your videos to remote servers, which may raise privacy concerns for sensitive or personal footage | 100% Local & Private |
| Requirement | Installation on Windows 7+, macOS 10.13+ Recommended for AI features: Windows 10+, macOS 10.15+ |
Signup, credits | Averagely Windows 10+, macOS 10.15+ |
| Pricing | Affordable pricing at $34.95 for 1 year, or one-time payment of $54.95 for 1 PC or $79.95 for 5 PCs | Often more expensive for frequent use, with pay-per-output pricing and extra charges for HD/4K processing | Often more expensive, with some costing nearly $300 per year and many offering no lifetime plan |


User Reviews
-
Great video AI tool
I'd like to briefly talk about what I've learnt during the trial process, firstly VideoProc Converter AI's video enhancement speed is fast among similar software, which is commendable!
Verified , collected via Trustpilot By Lee
-
Amazing customer service
I recently had to reinstall my computer and had to reach out to them regarding reinstalling. Not only did they reply quickly, they figured out my problem after a couple follow up questions.
Verified , collected via Trustpilot By Jamie
 -
Such a Great Product!
I am a Content Creator for 3 Youtube Channels and a 4th Under Construction. I Don't Know how I Survived Years without YOUR Product! I use VideoProc Converter AI Everyday from Stabilization to Photo/Video Correction.
Verified , collected via Trustpilot by Jae M
Frequently Asked Questions
-
What factors affect video quality?
Video quality depends on multiple factors across capture, processing, and playback stages, including:
● Resolution – Determines the level of detail based on pixel count (e.g., 720p, 1080p, 4K).
● Frame Rate (FPS) – Affects motion smoothness; higher FPS reduces stutter in fast scenes.
● Bitrate – Controls how much data is used per second; higher bitrate generally improves clarity but increases file size.
● Codec & Encoding – Compression methods (e.g., H.264, HEVC) impact quality retention and efficiency.
● Color Depth & Gamut – Influence color accuracy, gradients, and overall visual richness.
● Lighting & Noise – Poor lighting often introduces grain and reduces detail.
● Stabilization & Motion Handling – Camera shake or motion blur can reduce perceived sharpness.
● Post-Processing – Enhancements like sharpening, denoising, and color correction refine the final output.
● Playback Conditions – Network bandwidth and display quality (screen resolution, HDR support) affect how videos are viewed.
-
What are the filming skills to improve video quality?
Improving video quality starts at the shooting stage. Key filming skills include:
● Lighting – Use sufficient, soft lighting to reduce noise and preserve detail. Natural light or well-positioned key lights can significantly improve clarity.
● Camera Settings – Choose appropriate resolution, frame rate, and bitrate. For example, shoot in 4K for flexibility and use higher FPS for fast-moving scenes.
● Framing & Composition – Keep your subject well-framed and stable. Use basic composition techniques like the rule of thirds to create more balanced and professional visuals.
● Internet Speed (for streaming) – Ensure a stable and fast connection to avoid compression artifacts, buffering, or quality drops during live streaming or uploads.
-
How to make mobile phone videos look professional and high-definition?
You can instantly improve the visual clarity of your mobile footage by manually adjusting parameters in editing apps like CapCut or Premiere Pro. While AI handles the heavy lifting, these manual tweaks create a more "cinematic" and crisp look.
The "Overlay & Sharpen" Pro Hack:
1. Duplicate the Track: Place a copy of your video on the layer above the original.
2. Blend Mode: Set the top layer’s blend mode to "Screen" or "Soft Light."
3. Opacity: Lower the opacity to 30% - 50% to add instant depth and glow.
Recommended Manual Settings:
Apply these ranges to your adjustment layer for a sharper, cleaner image:
● Sharpen: +25 to +40 (The key to visual crispness)
● Contrast: +10 to +15 (Removes the "flat" mobile look)
● Saturation: +5 to +10 (Vibrant but natural colors)
● Highlights: -15 (Recover detail in bright areas)
● Shadows: +10 (Lift dark areas to reveal hidden details)
● Vignette: +10 (Draws focus to the center for a cinematic feel)
Pro Tip: Manual adjustments improve "style," but they cannot fix physical pixel loss or heavy blur. To truly transform 1080p to 4K or fix grainy night shots, use our AI Video Enhancer for a lossless resolution boost.