


Grainy video often results from poor image signal quality, particularly when footage is shot in low light. To compensate, the camera raises ISO, boosting brightness but also amplifying sensor noise, leading to a rough, speckled appearance. This issue becomes even more noticeable on smaller sensors, where each pixel struggles to capture enough light, especially in shadows. In post-production, lifting underexposed footage can bring the noise back, while overly aggressive noise reduction can smooth out details, making the image flat and lifeless.
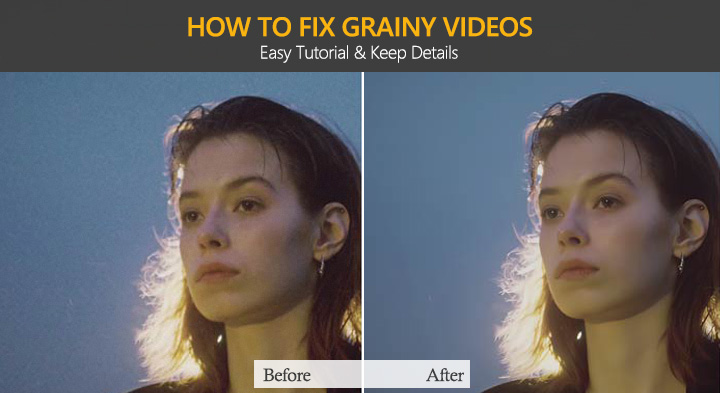
This is where different grain removal methods come into play. In this post, I'll share 4 of the best ways to fix grainy videos, including techniques using video editing software like Premiere Pro and easy 1-click AI video enhancement tools. Let's continue reading to find out how.
Editor's Note for 2026:
As a video editor with over a decade of experience rescuing poorly lit, grainy footage, I've seen graininess reduction evolve from aggressive blurring tools to intelligent generative AI. In 2026, the challenge isn't just about removing the grain; it's also about preventing faces from looking like plastic mannequins. In this guide, I'll share the exact workflows and AI models I use daily to strip away grain while preserving the essential textures.
Best Solutions to Fix Grainy Video: The Quick Comparison
If you're looking to fix grainy video quickly, the best solution depends on your goals, budget, and the level of control you need. Below is a comparison of the top tools available, based on their grain removal effectiveness, detail preservation, and ease of use.
| Software / Tool | Price Tag | Render Time | Score of Detail Preservation | Hardware Acceleration | Best Use Case |
|---|---|---|---|---|---|
34.95/year, $54.95 lifetime |
~18s |
9.5 / 10 |
Excellent |
Quick daily fixes, vlogs, hardware-friendly |
|
$299/year (Personal), ~$399/year (Studio Bundle) |
~64s |
9.6 / 10 |
Moderate |
Cinematic restoration, high-res upscale |
|
Starting at $22.99/month |
~32s |
5 / 10 |
Good |
Quick timeline edits (sacrifices detail) |
|
$295/lifetime |
~36s |
9.2 / 10 |
Good |
Pro color-grading workflows |
💡 How I Tested These Solutions to Fix Grainy Videos
To cut through all the marketing hype and give you honest recommendations, I tested these solutions using real-world footage on a custom-built editing PC with an NVIDIA GeForce RTX 3060 GPU, Intel(R) Core i5-11400F CPU @ 2.60GHz, 16GB of RAM, and Windows 11.
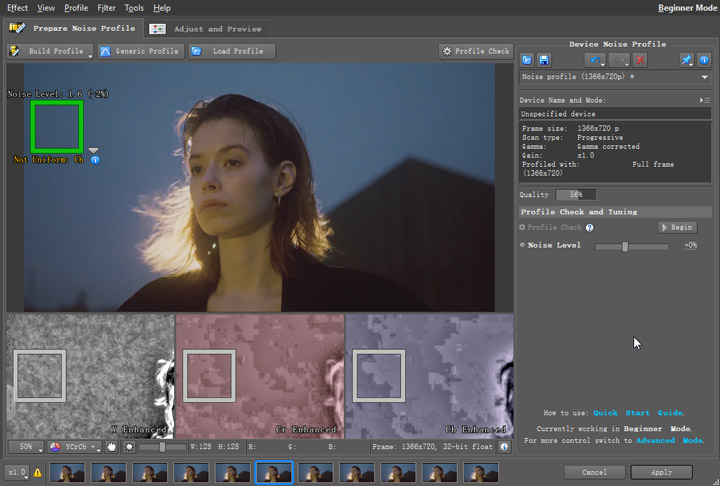
The Test Footage: A 1366x720p footage downloaded from Pexels,, shot at ISO 14496-12, exhibits heavy grain that makes the image distracting and unclear.
How I Evaluated: I judged each solution based on 3 main factors:
- Grain Removal & Detail Preservation: Did it clear out grain while keeping skin texture and other details.
- Processing Speed: How fast was the software in terms of frames per second?
- Ease of Use: Was the interface simple and intuitive?
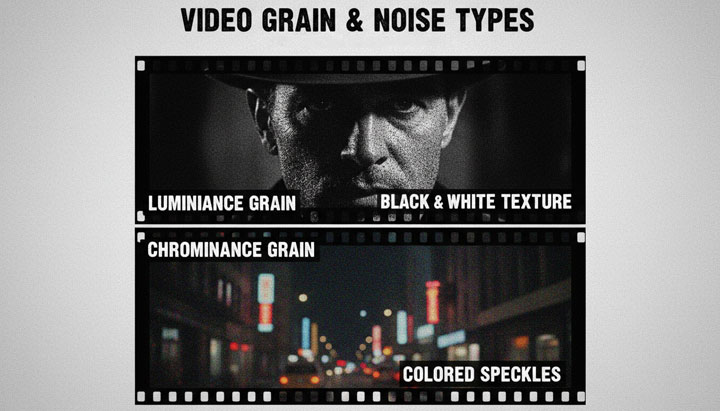
Types of Video Grain and Noise
When fixing grainy footage, it helps to understand that the visible grain usually comes from different types of underlying noise. In most real-world footage, these forms often appear together rather than in isolation.
Luminance grain appears as black and white texture. It affects brightness and fine detail, making the image look rough or unstable, especially in shadows and darker regions.
Chrominance grain appears as colored speckles, usually red, green, or blue. It is most visible in low-light or low-signal areas where color information becomes less stable.
Why Your Videos Looks Grainy
Video noise is not caused by a single factor. It is usually the result of weak light capture combined with signal amplification or data loss during processing.
Digital Zoom Amplification
Digital zoom enlarges a cropped portion of the image instead of adding real detail. When the image is stretched, both detail and existing noise are amplified. This leads to reduced sharpness and more visible grain, especially at higher zoom levels.

Small Sensor Limitations
Smaller sensors capture fewer photons per pixel, producing a weaker signal that is more prone to noise when amplified. Higher pixel density can also reduce light sensitivity per pixel, especially in shadows. This is why small sensor devices like iPhone often perform well in daylight but become noisy in low light conditions.
Low Light Exposure Stress
The camera sensor has a physical limit in how much clean light it can capture. In low light, the signal becomes weak compared to internal sensor noise. To compensate, ISO is increased, which amplifies both real image data and unwanted signal variations. Fast shutter speed can have a similar effect by reducing light intake per frame. The result is visible grain, especially in darker areas where the signal is weakest.
How to Fix Grainy Video Using AI Tools
Artificial intelligence has completely transformed the way we handle noisy footage and enhance video quality. Instead of manually blurring the image to hide the grain, AI tools analyze the video frame by frame, recognizing the difference between unwanted static and essential textures.
1. Use VideoProc Converter AI
- Rating: 4.5/5
 by TheSweetBits
 - Price: $34.95/year (3PCs); $54.95 for a lifetime license; $79.95 for a family lifetime license (up to 5 PCs).
If you want to fix grainy, low-light, or generally poor-quality footage with just a few clicks, VideoProc Converter AI is definitely worth trying. It is driven by AI, so most of the process is handled automatically without the need for manual tweaking. The result is cleaner, more natural-looking footage with fewer visible artifacts. Powered by AI models trained on large datasets, it can differentiate between noise and real details, separating them more accurately. This is why it can improve grainy footage while still preserving important textures such as skin, hair, edges, and facial features, instead of over-smoothing everything or losing fine detail.

Follow these steps to fix grainy footage with VideoProc Converter AI:
Step 1. Download and launch VideoProc Converter AI. Click Super Resolution. Drag and drop to add your source grainy footage to this AI video enhancer.
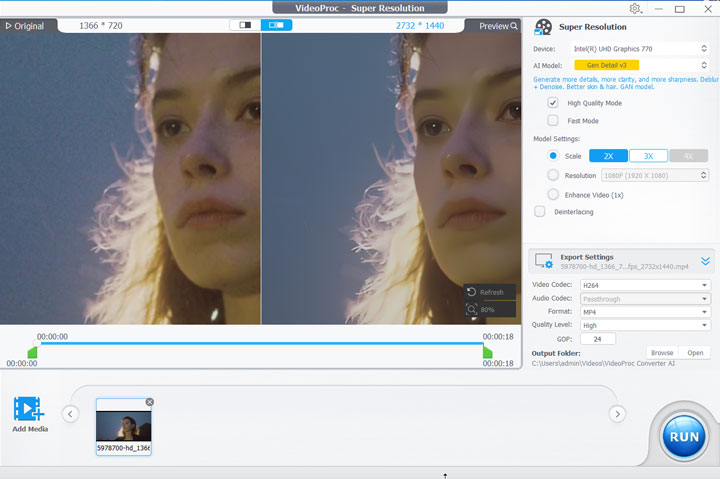
Step 2. Choose the AI model that best suits your video. From my tests, Gen Detail v3 and Real Smooth v3 deliver excellent results. You can try with they to see which works for your video best.
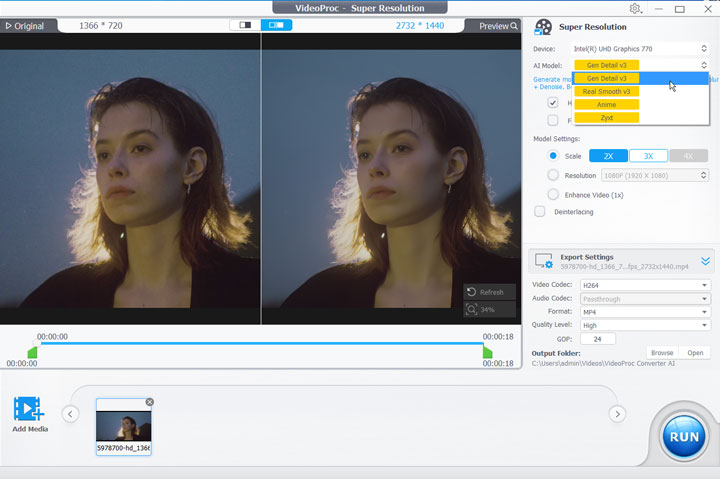
Tips: Suppose you want to upscale the resolution, you can choose the target resolution like 2k and 4k. Alternatively, choose the upscale ratio like 2x and 3x to upscale the video to 2- or 3-times of the original resolution.
Step 3. Scroll up with your mouse to preview the video in a zoomed-in view. You'll notice that the grain has been clearly removed while the details are preserved, and even enhanced naturally. Click Run to begin using AI to fix the grainy footage and restore its clarity.
2. Use Topaz Video
- Rating: 4.7/5
 by G2
by G2 - Price: $299/year (Personal), $699/year (Pro), ~$399/year (Topaz Studio Bundle).
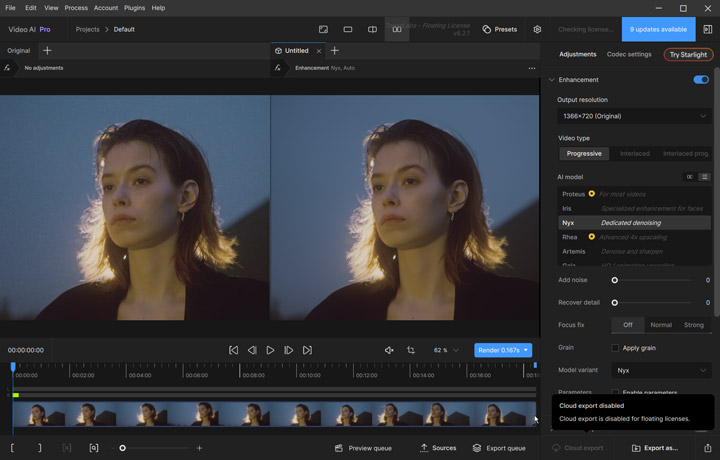
According to Topaz Labs, the denoising feature of Topaz Video is powered by deep learning algorithms that can distinguish between noise and important image details. This allows it to reduce grain and artifacts while still preserving fine textures and structures that are often lost in traditional noise reduction tools. From my own testing, this is also where the Iris model stands out the most. It reduces noise quite effectively while keeping the image natural, especially in areas like skin texture, hair, and edges. Some users report that it can sometimes produce a slightly waxy look, but I have not experienced that myself so far. What's more, Topaz Video AI allows footage to be enhanced up to 4K and even 8K, which is especially useful when working with grainy footage intended for large-screen viewing or UHD post-production projects.
Follow these steps to fix grainy footage with Topaz Video:
Step 1. Purchase the premium plan of Topaz Video which costs 299USD per year. After that, download, install, and run the program.
Step 2. Drag and drop your source grainy footage into Topaz Video. In the right-side panel, open the Enhancement section to access the available AI tools.
Step 3. Try different models to find the one that works best for your grainy footage. From my tests, Nyx is more suitable for high-resolution footage with noise issues, while Iris works better for faces and portrait-focused content.
Tips: You can also switch between models depending on the type of footage, especially if the noise level or detail complexity varies across scenes.
Step 4. Start with Denoise set to Auto, then fine-tune it manually if the image starts to look too smooth or “waxy.” Increase Recover Details gradually to bring back fine textures that may be lost during denoising.
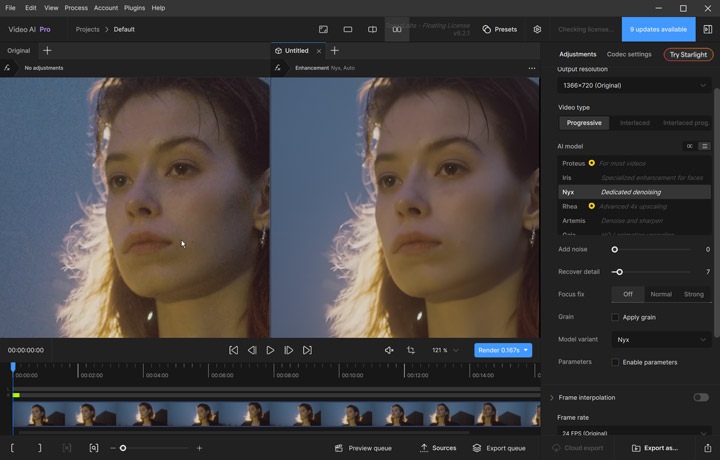
Tips: You can add a small amount of grain (around 2-4) to make the result look more natural and less artificially processed. Use the preview function to check the denoising effect and make adjustments until you are satisfied.
Step 5. Adjust the export settings and choose a high-quality codec such as ProRes to avoid introducing additional compression noise. Once everything is ready, click Export to process the final video.
How to Fix Grainy Video with Pro Video Editing Software
While AI grainy removal software are great for fast and automated noise reduction, they are not always the best choice for every situation. In professional workflows, especially when working with color grading, VFX, or broadcast-level content, editors often need more control over how noise is reduced and how details are preserved. This is where professional editing software comes in. Tools like Adobe Premiere Pro and DaVinci Resolve Studio allow you to manually fine-tune grainy reduction settings, target specific areas of the image, and integrate grainy removal directly into a full post-production workflow.
3. Use Adobe Premiere Pro
- Rating: 4.5/5 by G2
- Price: Starting from $22.99/month (individuals, annual plan, paid monthly).
Adobe Premiere Pro includes a built-in effect called VR De-Noise. Although it was originally designed for 360-degree footage, it can also be applied to standard video. It provides a quick way to reduce visible noise directly inside the editing timeline without requiring any additional plugins. However, the downside is that VR De-Noise is relatively limited compared to dedicated tools. It offers only basic control and often failed to preserve fine details as effectively, especially in heavily grainy footage. It often works best when paired with third-party grain removal plugins like Neat Video for more natural-looking and cleaner results.
Follow these steps to fix grainy footage with Premiere Pro:
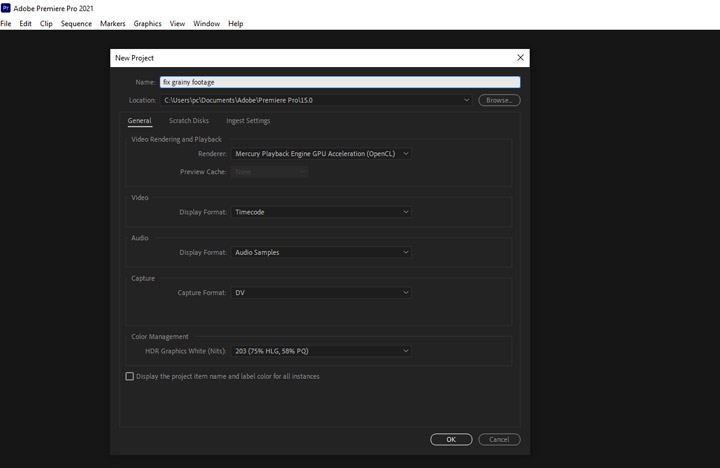
Step 1. Purchase and install Adobe Premiere Pro from Adobe Creative Cloud, then launch the software.
Step 2. Complete the settings of the file name, resolution, and more to create a new project.
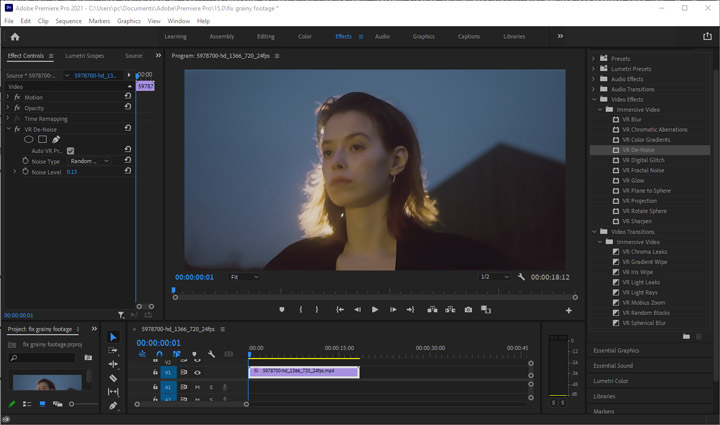
Step 3. Drag the source grainy video into the Media Library section and then drag it into the timeline.
Step 4. Go to Effects and search for VR De-Noise. Drag it to the clip on the timeline to apply this effect. Adjust the Noise Level under the Effect Control section to tweak the intensity of this effect.
Step 5. Preview the result in the Program Monitor, then go to File > Export > Media and click Export to save the final video.
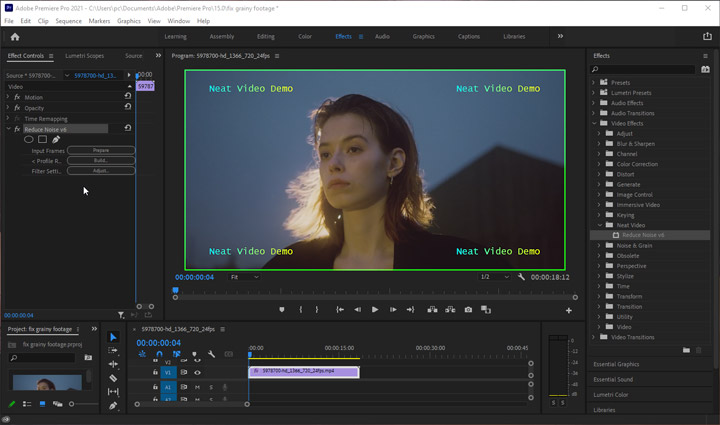
Optional Reading: Using Neat Video in Premiere Pro
As you can see from the example, removing grain often makes the footage look softer and less detailed. You can fix some of that with manual tweaks, but it's not always beginner-friendly. That's why many people turn to Neat Video. It's a paid plugin with a solid reputation for cleaning up grain while keeping more detail intact, and you'll need to install it separately in Premiere Pro.
Step 1. Download the plugin version of Neat Video from its official website. Double-click the installation file and follow the on-screen instructions in the installation wizard to complete the setup.
Step 2. Open Premiere Pro and create a new project. Import your grainy footage and drag it onto the timeline.
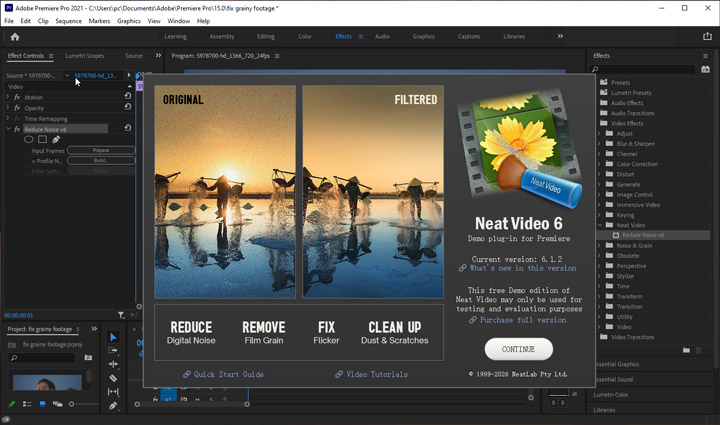
Step 3. Navigate to Effects > Video Effects, and apply Neat Video to the clip. Then, go to the Effect Controls panel, click Prepare, and the Neat Video window will open automatically. If you're using the demo version, you can click CONTINUE to proceed.
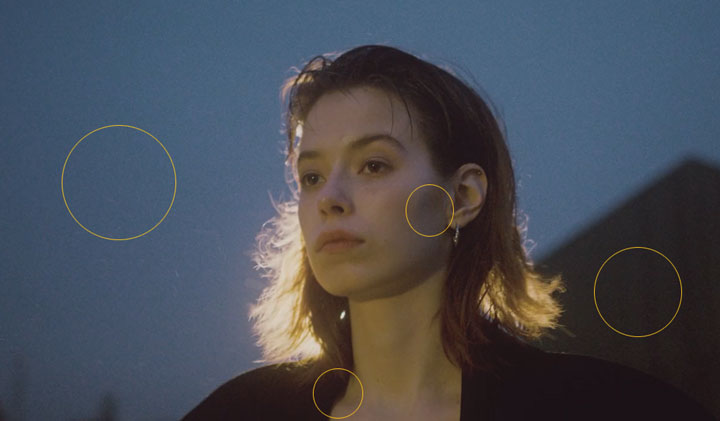
Step 4. In the preview window, zoom into a flat or low-detail area such as a wall, sky, or shadow, then drag to select that area and click “Auto Profile” to analyze noise.
Step 4. Switch to “Noise Filter Settings”, preview the processed result, and adjust sliders like noise reduction strength if the image looks too soft or too smooth.
Step 5. Preview the result, then hit Apply. Click File > Export > Media, choose your format and location, and click Export at the bottom of the Export window.
4. Use DaVinci Resolve Studio
- Rating: 4/5
 by PCMag
 - Price: $295 for a perpetual, lifetime license.
If you need advanced control over how noise is reduced across frames and within each frame, DaVinci Resolve Studio is one of the most powerful tools available. The noise reduction tools are part of the Studio version, and they provide both temporal and spatial control over noise reduction. This makes it possible to reduce grain across multiple frames as well as within individual frames, which is especially useful for heavily grainy or high-resolution footage where basic denoising tools are not enough. Unlike simple filters, this dual approach allows more precise control over how noise is handled in motion and static areas, helping maintain better overall image consistency.
Follow these steps to fix grainy footage with Davinci Resolve Studio:
Step 1. Import the grainy video into DaVinci Resolve by opening the Media page, dragging the file into the Media Pool, and then placing it onto the timeline in the Edit page.
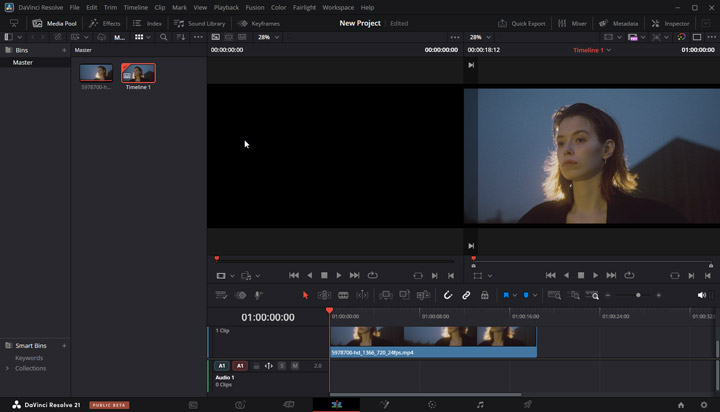
Step 2. Go to the Color page from the bottom navigation bar. Open the Motion Effects panel in the right-side controls.
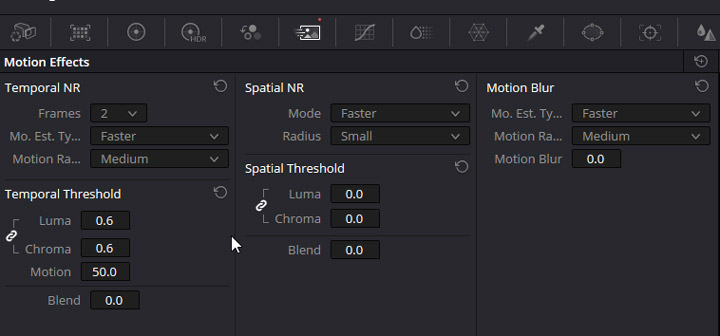
Step 3. Enable Temporal Noise Reduction to reduce flickering grain across multiple frames. Enable Spatial Noise Reduction to reduce noise within a single frame.
Tips:
- It's suggested to use Better for Motion Estimation in most cases.
- Increase Chroma threshold first to remove colored noise. Increase the Luma threshold to fix the grainy look.
Step 4. Export the final video by going to the Deliver page, selecting a format or preset, choosing where to save the file. Click Add to Render Queue > Start Render to export the video.
Pro Tips: How to Prevent Grainy Footage In-Camera
The best way to deal with grainy footage is to avoid it during shooting. Once noise is baked into the image, it is much harder to remove without losing detail.
Keep ISO Under Control
Instead of raising ISO too early, try to work within your camera's native ISO range whenever possible. If your camera supports dual native ISO, switching to the second native level can often produce a cleaner image than staying in between values.
Prioritize Lighting Over Camera Settings
If your footage looks dark, adding more light is almost always a better solution than pushing ISO. Even a small increase in lighting can significantly improve image quality and reduce visible grain, especially in shadow areas.
Balance Shutter Speed Carefully
Slowing down shutter speed can help bring in more light, but it should be done with caution. A good starting point is the 180-degree rule, where shutter speed is set to roughly double your frame rate. Going slower can reduce noise, but may introduce noticeable motion blur.
FAQs
Can you fix blurry and grainy video at the same time?
Yes, AI video enhancement tools like VideoProc Converter AI can fix both blurriness and graininess, along with other visual issues, in a single pass. The tool uses advanced algorithms to mathematically reconstruct missing edge contrast while simultaneously removing digital noise (grain). This ensures that the natural sharpness of the frame is preserved, rather than being destroyed.
Why does my video look unnatural after grainy reduction?
If your video looks unnatural after grain reduction, it’s likely due to over-smoothing or excessive noise reduction, which can blur fine details like skin texture or small elements, creating a soft, plastic-like appearance. Some noise reduction algorithms may also introduce artifacts like halos or result in areas that are unnaturally smooth compared to the rest of the footage. To fix this, you can switch to AI noise reduction software known for better detail preservation, like VideoProc. If you're using video editing software like DaVinci Resolve, you can adjust settings like the Luma Noise Threshold, apply selective noise reduction to problematic areas, and fine-tune other parameters for more natural results.


