
 New AI features are available
Got an image full of random color dots or brightness specks and wondered how to get rid of them?
That grainy, speckled texture is digital noise. It usually shows up in photos taken in low light or with a high ISO setting.
Fortunately, Photoshop gives you several tools to tackle it. In this guide, we'll show you how to reduce noise in Photoshop with different tools, so you can pick the right approach and rescue your images with confidence.
Understanding Digital Noise
Noise comes in different forms. You'll usually spot two types of them: luminance noise and chrominance noise.
Luminance noise affects the brightness values of your pixels rather than their color. Think of it like the gritty texture you'd see in an old black-and-white photograph. It adds a rough, uneven look to what should be smooth surfaces. This type of noise is actually less offensive to the eye.
Chrominance noise, also called color noise or chroma noise, shows up as random red, green, and blue pixels across your image where they simply don't belong. You've probably seen it in photos taken in low light.
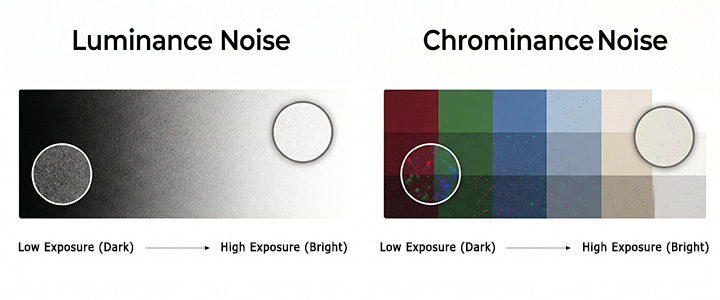
Not all noise is the enemy, though. Acceptable grain adds texture and character rather than ruining the shot. It can actually give your photo a natural, film-like quality that many photographers intentionally chase. If your image has a subtle, even grain pattern, you might want to leave it alone. Removing every trace of noise can make photos look overly smooth and almost plastic.
Prepare the Image for Noise Reduction
Before you start reducing noise, a little prep work goes a long way.
- Noise Reduction Timing: Apply noise reduction before sharpening, adding contrast, or upscaling. Sharpening especially amplifies noise, so always reduce noise first.
- Non-Destructive Editing: Duplicate your background layer and convert it to a smart object. This way, you can always go back if something looks off.
- Shadow Brightening Control: Dark areas in a photo tend to hide the most noise, and brightening them too aggressively can make that grain explode into view.
Getting your image and workspace set up correctly saves you from headaches later and gives you far more control over the final result.
Adobe Camera Raw
Adobe Camera Raw is a powerful plugin built into Photoshop that processes raw files before they even reach the main editing workspace. It works by interpreting the raw sensor data directly, giving you cleaner, more flexible noise reduction than most other methods. It's especially effective for RAW images shot in low light or at high ISO settings.
Here's how to reduce noise in Photoshop with Adobe Camera Raw.
- Open your image in Photoshop, then go to Filter > Camera Raw Filter.
- Click the Detail panel (the magnifying glass icon).
- Find the Noise Reduction section.
- Drag the Luminance slider to reduce grainy, textured noise.
- Adjust Color to remove colored speckles.
- Fine-tune Detail and Contrast to recover sharpness lost during reduction.
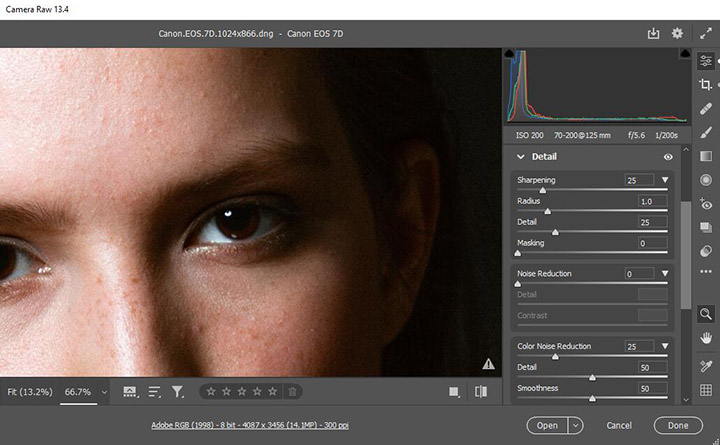
Each slider plays a specific role. Luminance smooths grain but can soften fine details. Color targets color speckles without hurting overall sharpness. Detail and Contrast help restore texture after heavy smoothing.
Reduce Noise Filter
Photoshop has offered the built-in Reduce Noise Filter for many years. This native feature is a classic, straightforward option that has helped photographers clean up their images long before modern automated tools existed.
The principle behind this filter is based on spatial mathematical blurring. The software looks at a pixel and compares it to its neighbors. If it looks completely random or out of place, the filter then averages it out to blend that pixel smoothly into the surrounding area.
Here's how to reduce noise using the Reduce Noise filter in Photoshop.
- Duplicate the layer or right-click it and choose Convert to Smart Object.
- Go to Filter > Noise > Reduce Noise from the top menu bar.
- Zoom in your image to at least 100% in the preview window.
- Increase Strength gradually to adjust the overall amount of blurring applied to the luminance noise.
- Adjust the Preserve Details and Sharpen Details values subsequently to restore the sharpness that may have been softened during the process.
- Move the Reduce Color Noise slider to the right to minimize random rainbow speckles.
- Check Remove JPEG Artifact if you are working with a blocky JPEG image.
- Click OK when you are happy with the results.
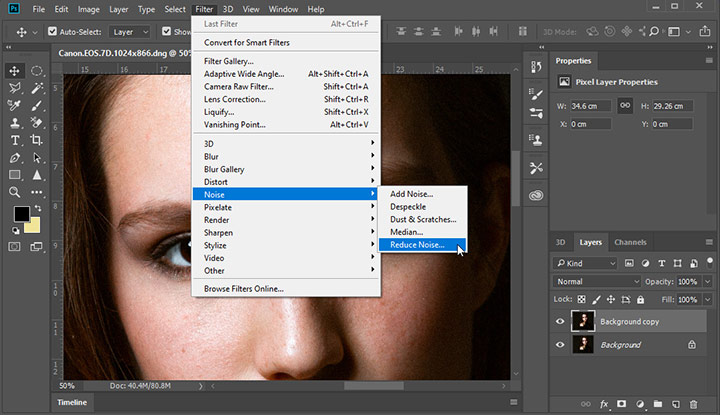
Reduce Noise Filter is incredibly useful for quick fixes on standard JPEG files. It's fast, simple, and the perfect choice for treating mild noise in photos destined for social media or small screens.
However, you need to be careful. Because it relies on blurring, pushing the settings too high will wipe out fine textures, giving everything a fake, plastic look.
Tip: My personal preference is to start with Strength set to 10 and Reduce Color Noise set to 90, leaving both Preserve Details and Sharpen Details at zero.
Lab Color Mode
Digital noise is usually worse in color than in brightness. If you are dealing with severe color splotches, switching the image to Lab Color mode can separate the brightness channel from the color channels.
This allows you to apply heavy blurring specifically to the color channels to kill the ugly speckles, while keeping your lightness channel completely untouched and the image sharp.
Follow the steps below to remove noise by switching to Lab Color mode.
- Go to Image > Mode > Lab Color from the top menu.
- Duplicate the layer to keep the original photo intact.
- Open the Channels panel. You will see your composite Lab channel, along with Lightness, a, and b.
- Select the "a" channel. Go to Filter > Blur > Gaussian Blur to blur the selection.
- Select the "b" channel. Repeat the exact same process to apply a Gaussian Blur to this layer.
- Click on the top composite Lab channel to see your full color image again. The color speckles should be gone.
- Finally, go back to Image, select Mode, and click RGB Color to return to your normal editing workspace.
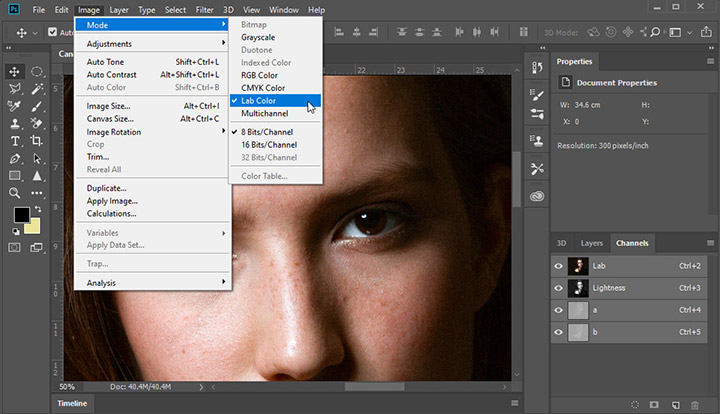
This method feels a little like looking under the hood of Photoshop, but it is actually very straightforward.
You would choose this method when your image is plagued by splotchy, colorful noise, but the underlying texture is still crisp. It is highly applicable for low-light event photography or moody portraits where you cannot afford to lose any fine details like eyelashes or skin pores.
Image Stacking
Digital noise is totally random. If you take 10 photos of a statue on a tripod, the statue stays exactly the same, but the noise moves around in every frame. Image stacking leverages this characteristic using time averaging to process noise.
When you load all of those photos into Photoshop, the software stacks them, identifies the random pixels that keep changing, and mathematically averages them out to zero.
It's straightforward and largely automated. Five to ten photos of the exact same scene with the same exposure settings will work perfectly.
Here's how to reduce grain in Photoshop by stacking images.
- Open Photoshop without opening a document.
- Go to File > Scripts > Load Files into Stack. Browse and select your images.
- Check the boxes for "Attempt to Automatically Align Source Images" and "Create Smart Object after Loading Layers."
- Click OK and let Photoshop do the heavy lifting.
- Once Photoshop finishes loading your new Smart Object, go to Layer > Smart Objects > Stack Mode > Median from the top menu.
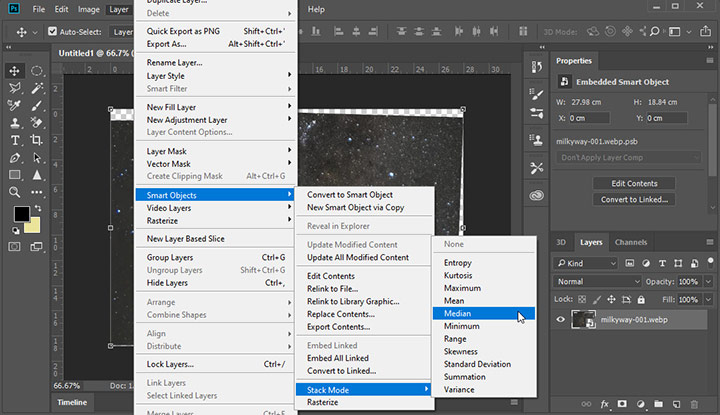
Photoshop offers several stack modes, but Median is the one you want for noise reduction. It is highly effective at discarding random outliers and keeping the consistent data.
You would choose this method for static, tripod-based photography like architectural interiors, dark cityscapes, or astrophotography. It is highly applicable here because it uses math instead of spatial blurring, your final image remains incredibly crisp. Make sure your camera is set to manual mode so your aperture, shutter speed, and ISO do not change between shots.
Photoshop Noise Reduction Plug-In
Sometimes Photoshop's built-in tools just cannot handle the mess. For severely noisy images, professional retouchers often use plugins like Neat Image for finer control and better results.
Instead of just guessing which pixels are random, Neat Image uses noise profiles, much in the same way you would use a plugin to remove video noise in Premiere Pro. The software actually analyzes your photo to understand the exact type of electrical interference your specific camera model creates. It then mathematically subtracts that noise footprint from your image.
Here's a basic workflow to reduce noise in Photoshop with the Neat Image plug-in.
- Download and install Neat Image Plug-in for Photoshop.
- Open the photo in Photoshop.
- Duplicate your background layer or convert it into a Smart Object.
- Go to Filter > Neat Image > Reduce Noise.
- Build a noise profile by clicking the Auto Profile button under the Prepare Noise Profile tab.
- Switch over to the Adjust and Preview tab.
- Use the Noise Reduction Amount and Noise Level sliders to control how aggressively the software targets noise.
- If needed, switch to Advanced Mode to tweak individual channel profiles, different frequencies, sharpening, edge recovery, and more.
- Click the Apply button at the bottom to send the corrected image right back into your Photoshop workflow.
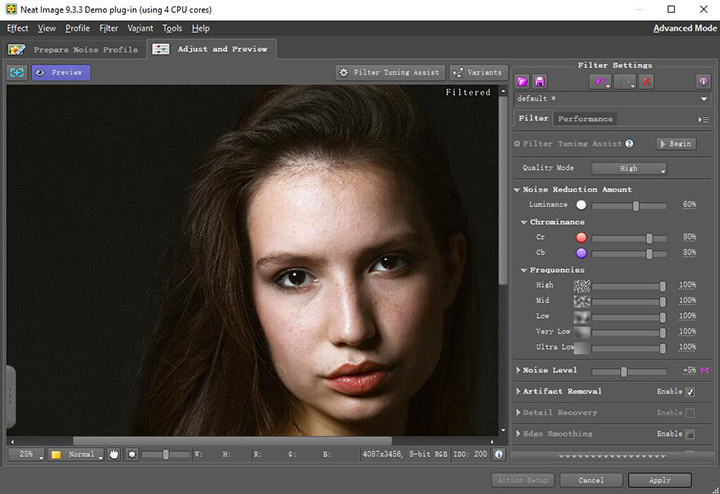
These plug-ins are perfectly suited for extremely high ISO shots, deeply underexposed images, or even cleaning up old digitized photos. When the native filters leave your photo looking soft and artificial, a specialized plugin can often save the day while keeping those tiny, crucial details completely intact.
Reduce Image Noise with AI
Using AI to remove noise from images has become commonplace in recent years. Instead of using traditional math to blur the pixels, AI models trained on massive datasets can intelligently separate the random digital noise from the actual subject.
VideoProc Converter AI offers a highly effective approach. But here is the interesting part: denoising is a core step trained directly into its Image Super Resolution tool.
As the AI model analyzes your image to add new pixels and increase its physical size, it intelligently separates the random digital noise from the actual subject in the process. It reconstructs crisp edges and natural details, leaving you with a clean, sharp image.

- Download and open VideoProc Converter AI on your computer.
- Click on the Image AI module on the main home screen.
- Drag and drop your noisy photo right into the application window.
- Select an AI model under the Super Resolution tab.
- If you only want to remove noise without changing the size of your image, check the box before "Enhance Image (1x)". If you also want to make the photo larger, choose a different resolution.
- When you are happy with the results, export the clean file by clicking the big RUN button.
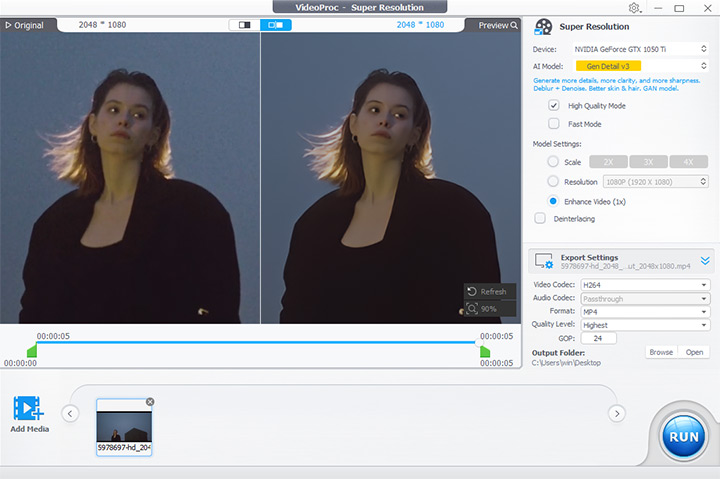
By combining noise reduction and upscaling into a single automated process, VideoProc Converter AI saves you the trouble of running multiple different filters in Photoshop. You would choose this software when you have severely degraded images, action camera shots taken in low light, or older photos that need a complete overhaul.
It is incredibly applicable for batch processing, too. If you have an entire folder of noisy photos from a dark event, you can drop them all into the software and let the AI clean them up automatically, saving you hours of manual editing in Photoshop.
Reducing Noise While Shooting Your Next Photo
The absolute best way to handle digital noise is to avoid creating it in the first place. You can save yourself hours of tedious editing by making a few smart choices before you even press the shutter button.
- Keep your ISO low: Your ISO setting is the main culprit for amplifying noise. Keep it as low as your lighting allows. Opening your aperture wider is a great way to let in more light without raising the ISO.
- Use proper exposure: Try to get your exposure right in the camera. Underexposing a photo and brightening it later acts like a magnifying glass for hidden grain.
- Expose to the right: Look at your camera's histogram and push the graph as far to the right as possible without turning things pure white. This gathers extra light for perfectly clean shadows. You can easily darken the photo back to normal later.
- Avoid excessive shadow brightening: Even on a clean photo, pushing the shadow sliders too high in your editing software will reveal hidden noise. Sometimes it is best to just let dark shadows stay dark.
- Shoot in RAW: JPEGs throw away shadow data to save space. The RAW format keeps all your sensor data, giving your noise reduction software significantly more information to work with.
- Use a stable tripod: If your subject is still, a tripod lets you use a longer shutter speed to gather natural light. More light means you can drop your ISO to its absolute lowest, cleanest setting.
Conclusion
So, that's all about how to reduce noise in Photoshop. There is no single magical button for fixing noise. The right tool always depends on the specific image you are working on and the exact type of noise you are trying to eliminate.
If you have a slightly grainy JPEG destined for social media, the native Reduce Noise filter is your best friend. If you are trying to rescue a dark, noisy raw file from a once in a lifetime event, firing up Adobe Camera Raw or a dedicated plugin is the way to go. And if you are dealing with multiple images and want to save yourself the hassle of manual adjustments, VideoProc Converter AI will save the day.