
When you turn on your camera in a dim room or bump the ISO to capture a night scene, the result often looks gritty. That gritty look isn't always artistic film grain. Film grain appears as a fine, even pattern of tiny dots. Those colored speckles you see can be unwanted digital noise.
The good news is you can denoise grainy footage in different ways. This guide explains how to denoise video in Premiere Pro and beyond. Some methods are quick and free. Some keep more details. Follow along with short experiments and real-world tips, so your next edit looks cleaner without losing detail.
Understanding Video Noise
This may sound nerdy, but not all noise in the video is the same.
Digital noise refers to random, unwanted discoloration or speckling in your footage, often caused by low light or small camera sensors. In high-ISO digital footage, you may see color speckles (chrominance noise) and grainy variations in brightness (luminance noise). It can look like static that crawls across the frame.
Some noise flickers from frame to frame. That's where temporal filtering can help by comparing frames. Basic Premiere fixes are mostly spatial filtering, that is, smoothing within a frame.
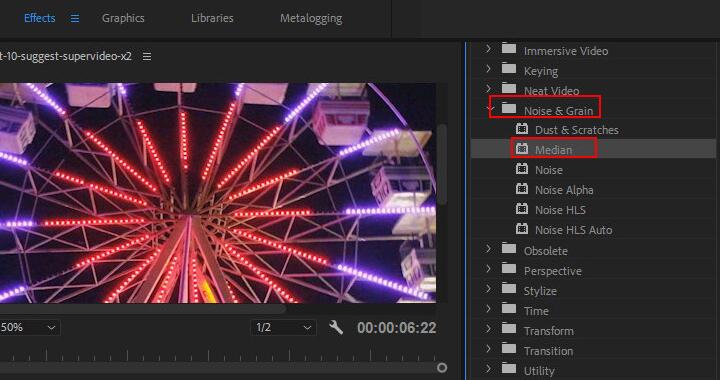
Using the Median Effect
The Median effect is a simple but effective tool to reduce noise. It works by replacing each pixel with the median value of neighboring pixels, which smooths out noise while preserving edges better than a basic blur. Premiere Pro has the Median effect labeled as Obsolete, but it still works in current versions and is handy for noise reduction.
Here's how to denoise video in Premiere Pro with the Median effect.
- Place your video clip on the Timeline.
- Go to Effects > Video Effects > Obsolete > Median.
- Drag it onto your clip.
- Create a mask to apply Median only to noisy backgrounds.
- Feather the mask edges to around 100 so the effect blends smoothly.
- Raise Radius slowly until grain starts to fade. A common starting range is 1 to 5 for mild noise, but really noisy footage might need higher.
- Review the result. The goal is a sweet spot where the speckles drop, but faces and edges still look normal.
The Median effect is easy to use for a beginner or a quick fix on mildly grainy clips. It's a free solution and can significantly reduce speckle noise. By masking, you localize the blur to where it's needed. However, even with masking, Median does blur the image. It's not as high-quality as advanced methods. The video may appear softer, which might not be acceptable in professional work.
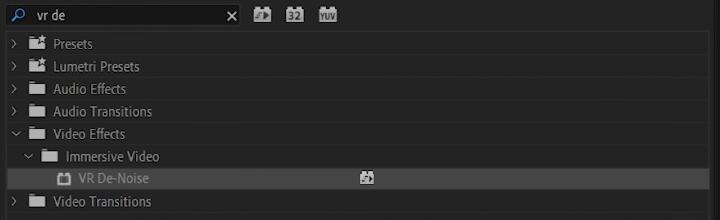
Using the VR De-Noise Effect
Premiere Pro includes some VR effects that surprisingly can be repurposed for normal footage. VR De-Noise is meant to reduce noise in 360° VR videos, but it can also work on regular clips, providing another free denoising option with a different algorithm.
Follow the steps below to denoise grainy pictures with the VR De-Noise effect.
- Go to Effects > Video Effects > Immersive Video > VR De-Noise.
- Apply it to your clip and open Effect Controls.
- Set Noise Type to Fine, Medium, or Coarse depending on your grain size.
- Mask the VR De-Noise effect to specific regions of the frame if needed.
- Raise Noise Level until noise disappears without smearing detail.
- Uncheck Auto VR Properties if the effect behaves oddly.
VR De-Noise is heavier than a simple blur but lighter than most plugins. It tends to do a better job than a simple Median because it's tailored for noise removal. This effect can reduce noise while maintaining more detail. It's a great first stop for moderate noise, especially if you experiment with masking.
Using Third Party Plugin
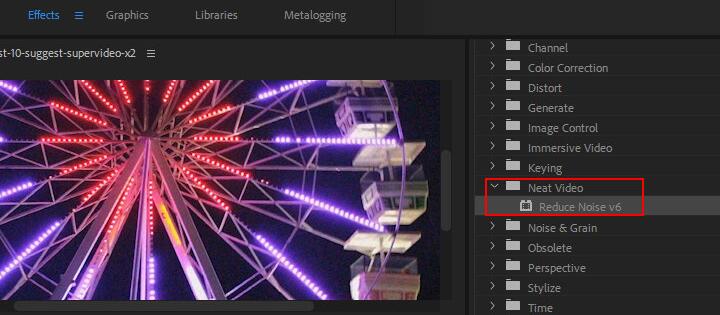
For critical work or severely noisy footage, Neat Video is often regarded as the gold standard for video noise reduction. It excels by creating a noise profile for your footage and applying custom noise reduction that preserves detail. It also offers temporal noise reduction, meaning it can compare multiple frames to reduce flickering noise and even things like camera sensor pattern noise.
Here's a step-by-step for using Neat Video in Premiere Pro to denoise video.
- Install the plugin and restart Premiere.
- Place your noisy clip on the timeline and create an adjustment layer.
- Go to Effects > Video Effects > Neat Video > Reduce Noise v(x).
- Drag and drop the effect onto the adjustment layer.
- In Effect Controls, click Prepare > Build > Auto Profile button (in the Neat Video window).
- Preview and adjust the temporal and spatial settings if needed.
- Click Apply to make Premiere save and apply the denoising when you are happy.
Playback is likely to be choppy unless you render, because the plugin does heavy computation on each frame. When configured well, this noise-profiling approach and temporal filtering can dramatically clean up grainy footage and outperform basic effects. The trade-off is cost (around $79.90) and longer render times.
Using An Economical AI Denoiser
Sometimes you can try an AI pre-edit cleanup without paying premium plugin prices.
VideoProc Converter AI is worth considering as a more economical option. It's an external utility that upscales and enhances videos. The denoising algorithm is built in its Super Resolution module. When you import your video, the AI models automatically perform a series of enhancements, including denoising.
The program learns what real image detail and what random noise should look like, then intelligently separates the two during processing. It can remove visual noise and grain in low-light footage, make soft, noisy clips sharper and cleaner, and handle challenging high-ISO clips.
After downloading and installing the software, follow these steps to denoise grainy footage.

- Launch VideoProc Converter AI and go to the Super Resolution module.
- Import your video(s) by dragging and dropping.
- Choose the Gen Detail model from the drop-down.
- Enable Enhance Video/Image (1x) to use the original resolution.
- Change output settings like codec and quality level if needed.
- Click RUN to start the process.
VideoProc Converter AI is paid software, but it's more affordable than many pro plugins. It suits vloggers or editors who frequently shoot on phones or action cameras in low light and need a one-click solution before editing.
Pro Tips for Noise Reduction Success
Regardless of which method you use, there are some best practices to keep in mind. Professionals develop a feel for it over time. Here are some guidelines to help you denoise like the pros.
- Start with good footage if possible: Noise reduction can't perform miracles. Extremely noisy footage will always be a challenge to clean completely without artifacts.
- Apply noise reduction early in post, since you don't want to later amplify the noise by boosting shadows or adding contrast.
- Use temporal and spatial strategies: Combine temporal and spatial denoising in stages.
- Isolate noise reduction to where it's needed using masks.
- Reduce noise to an acceptable level, not necessarily eliminate 100%.
- Consider adding grain after denoising for a final filmic touch.
- Work on high-quality intermediate files to ensure the rest of your post process works on a cleaner, robust file.
By following these practices, you can achieve a high-quality, polished look even on footage that originally suffered from noise. Professional editors and colorists routinely rescue low-light shots using these techniques. It's a matter of using the right tool for the job and fine-tuning the parameters. Over time, you'll develop an eye for it and know exactly how much denoising to apply to get that sweet spot of clarity without destroying detail.
Conclusion
Digital noise doesn't have to ruin your video. Start by identifying whether it's sensor noise, compression artefacts or noise introduced by brightening. Use quick blurs or Median for minor fixes, VR De-Noise for a convenient built-in solution, VideoProc Converter AI for an affordable pre-edit cleanup, and Neat Video when you need the most natural, detail-preserving result.
Always test on a short segment at full resolution before committing to a method, and remember that a little grain can add character. With these tips, you'll be able to rescue noisy clips and deliver videos that look clean, polished and professional.


