
 New AI features are available
Wondering how to upscale an image in Photoshop?
Enlarging a low-resolution photo used to feel like a losing battle against blocky squares. As one of the best photo editing software, Photoshop offers various tools to enlarge a low-resolution photo while keeping edges crisp and the textures realistic. You don't have to settle for fuzzy results anymore.
In this guide, we'll show you ways to upscale an image in Photoshop using AI or without AI. Ready to rescue those tiny photos? Let's dive right in.
1. Use Generative Upscale
If you have been searching for how to upscale an image in Photoshop AI, Generative Upscale is exactly what you need.
As the name suggests, it uses generative AI to enlarge images. Instead of just stretching and smoothing, it literally re-generates the image to hallucinate photorealistic details that weren't in the source file. It's much closer to what you see in dedicated standalone image upscaling software. You can use Generative Upscale in both Photoshop and the web app.
Here's how to upscale an image in Photoshop AI using Generative Upscale.
- Open your image in Photoshop.
- Go to Image > Generative Upscale from the top menu bar. If you are using the web app, that's Generative > Generative upscale.
- Choose a model you want to use to upscale the image.
- Set the desired output scale (2x or 4x) as needed.
- Click Upscale. Photoshop will create the upscaled image in a new document, and the web app will create a new layer.
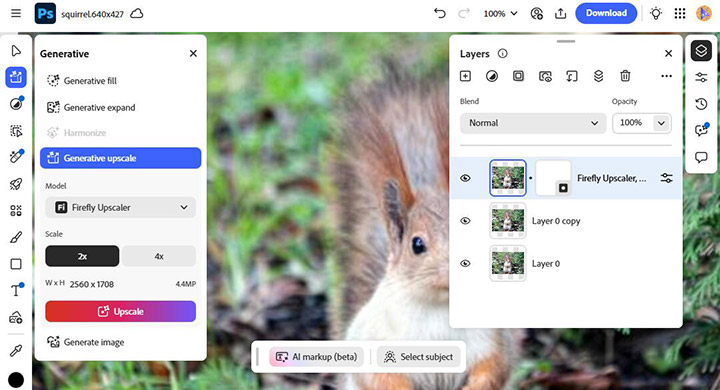
Note: There are three AI models available in Generative Upscale, with Partner models from Topaz requiring a premium subscription.
- Firefly Upscaler: Keep the original photo's identity while upscaling up to 6144 x 6144 px.
- Topaz Gigapixel: Preserve existing detail, up to 56 megapixels output (likely Gigapixel's Standard model).
- Topaz Bloom: Add new detail with creative AI upscaling, up to 9 megapixels.
If you would like to know more, here are our reviews of Topaz Gigapixel and Topaz Bloom as standalone applications.
2. Resize and Preserve Details
To upscale an image, you can use the classic resampling tool. Preserve Details 2.0 can upscale your image while maintaining sharpness.
This method strictly adheres to your original structural data. It uses advanced edge detection to carefully calculate what the missing pixels should look like based solely on the data already present in your photo. You get zero generative surprises or weird artifacts.
Follow the steps below to upscale your image in Photoshop with Preserve Details 2.0.
- Open your image in Photoshop.
- Select Image > Image Size from the top menu bar.
- Click the chain icon to ensure the aspect ratio remains unchanged.
- Check the Resample box and change the dropdown to Preserve Details 2.0.
- Enter your desired new Width or Height values.
- Click OK to apply the settings.
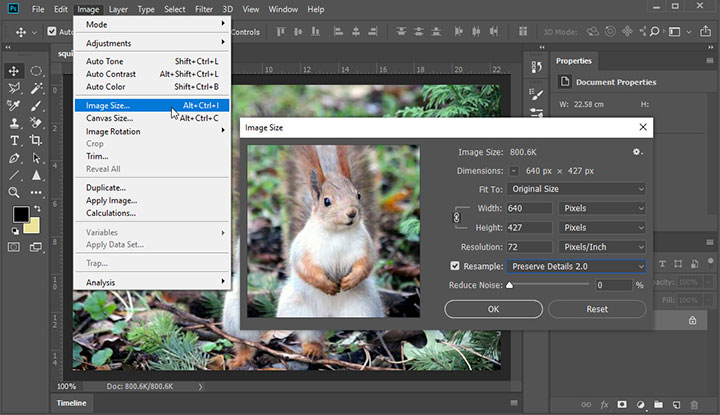
Preserve Details 2.0 keeps your clean lines looking sharp, exact, and true to the original vision. It is absolutely perfect for clean graphic design assets. Think about upscaling a company logo, a sharp piece of digital art, or a precise technical diagram.
3. Use Super Resolution in Camera Raw
Adobe Camera RAW also includes a Super Resolution feature designed to double the linear resolution of your images. It uses machine learning to enhance sharpness and preserve clean edges when enlarging files for large prints or heavy cropping. This method is ideal for processing landscape or wildlife photography, especially when you need to crop in tightly on an animal or a distant subject.
There's just one thing to note: to access Super Resolution, you can only open the image directly in the Camera Raw dialog, rather than applying it as a filter from inside Photoshop.
Here's how to upscale an image in Photoshop with Super Resolution in ACR.
- Open your image using File > Open. Raw files open in the Camera Raw dialog box by default.
- Right-click anywhere on the image and select Enhance from the menu.
- Check the Super Resolution box labeled and click the Enhance button.
- The software handles the rest.
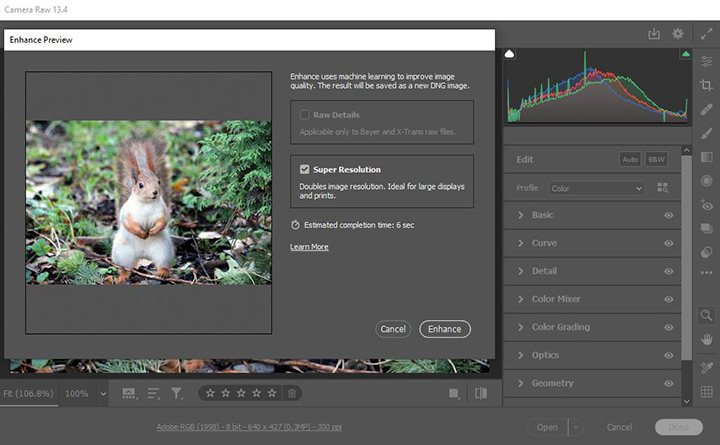
The AI needs good data to work with. While it works on JPEGs or TIFFs, Super Resolution will produce the highest quality results on uncompressed RAW files.
If Photoshop Doesn't Upscale Images as Expected
Photoshop isn't the only answer to upscale an image, especially when you have dozens of low-resolution pictures to fix, or your computer struggles with Photoshop's heavy tools. In these cases, VideoProc Converter AI is an alternative solution.
Instead of trying to be a full photo editing suite, VideoProc Converter AI focuses its Image AI module entirely on enhancement and restoration. It uses its own Super Resolution technology powered by Convolutional Neural Networks. The AI models automatically denoise, deblur, and generate missing pixels, allowing you to upscale an image all the way up to 10K resolution.

VideoProc Converter AI - Batch Upscale Images with AI
- Upscale images resolution to 4x/10K and video resolution to 4K.
- Intelligently interpolate pixels. No distortion. No pixelation.
- Full GPU accelerated to enlarge images and videos in bulk.
- AI tools for image: Super Resolution, Face Restoration, Photo Colorization.
- Convert, compress, quick-edit, screen record, and download videos.
 Excellent
Download and open VideoProc Converter AI and follow the steps below to upscale images.

- Go to Image AI from the main screen.
- Drag and drop one or more low-resolution images straight into the interface.
- Choose an AI Model as needed. Gen Detail is the overall recommended model to use across a variety of images.
- Set your target scale to 2x, 3x, 4x, or select a resolution preset.
- Click the RUN button when you are happy with the preview.
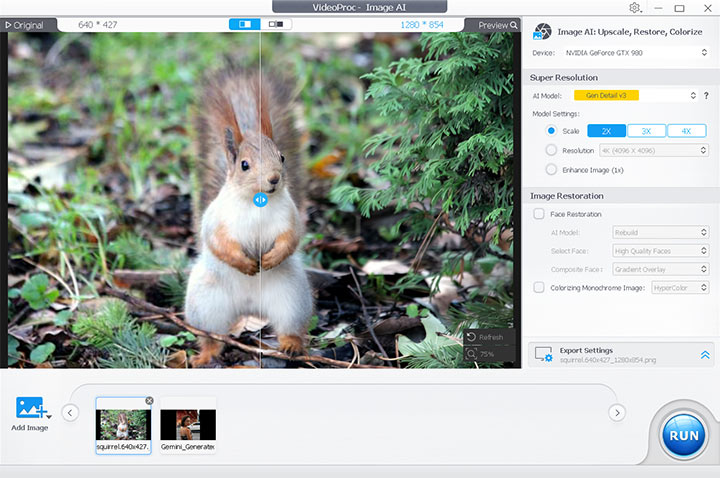
This software has a few unique advantages that make it a favorite for power users. First, it supports batch processing. You can drop a folder of fifty old family photos into the app and enhance them all at once, which is a massive time saver compared to Photoshop's single-file approach. Second, it includes dedicated sub-models for Face Restoration and Photo Colorization, making it incredibly easy to sharpen blurry portraits or bring black and white photos back to life. Finally, it uses Level-3 hardware acceleration. The application dynamically manages your GPU and CPU, even when crunching through high-resolution exports.
Comparing the Results: Which Method Should You Choose?
In the image below, I cropped the exact same area from each of the upscaled photos, so you can clearly see how different upscaling methods handle details and textures when viewed side by side.
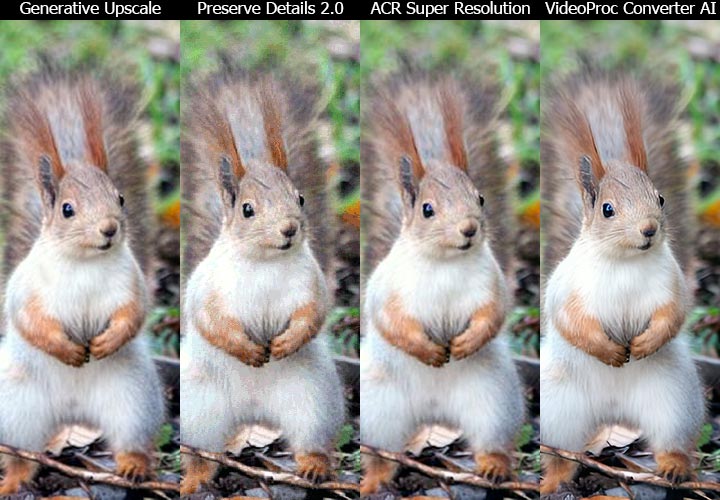
No matter which method you choose, the initial upscale is rarely the final step. Professional editors almost always do a little post-processing to polish the final result. Once your upscaled image is generated, you may also want to selectively sharpen the image to make the details pop.
Also, upscaling especially amplifies noise, so always reduce noise in Photoshop first.
Conclusion
Mastering how to upscale an image in photoshop requires knowing exactly which tool to pull from your digital toolbox. In certain cases, you need the strict accuracy of traditional algorithms. Other times, leveraging the uncompressed power of RAW data is the smarter move. And for the biggest jobs, bringing in dedicated tools like VideoProc Converter AI handles the heavy lifting perfectly.
Ready to see the difference for yourself? I highly encourage you to download the free trial of VideoProc Converter AI. Test it against Photoshop's native tools using your own noisy or low-resolution photos, and find out which workflow fits your style best!