


Key Takeaway: Traditional resizing mathematically stretches pixels, causing blur and pixelation. To enlarge an image without losing quality, using an AI-driven upscaler is a superior choice. Dedicated AI upscalers like Topaz Gigapixel and VideoProc Converter AI deliver the highest quality, artifact-free enlargements. Photoshop, GIMP, and Fotor serve as excellent alternatives depending on your budget and workflow.
Images are technically sorted into vector and raster formats. The former can be resized without losing quality because they are made up of mathematical equations and geometric shapes. However, when raster images (photos or images with complex color gradients) are enlarged, pixelation occurs. That's because they are formed by small squares of color (pixels), and when enlarged, the pixels become more visible.
Therefore, to make images larger without sacrificing quality, you need to, on the one hand, increase pixels as their physical sizes get larger, and on the other hand, calculate new pixels from the existing ones as accurately as possible.
Now remember the rule of thumb, we'll explain in the following sections how to enlarge images without losing quality.
Why Images May Lose Quality When Enlarged
Digital images are made up of a fixed grid of tiny colored squares called pixels. When you try to make an image larger, you are forcing that fixed number of pixels to fill a much larger space. The software you use has to figure out what to put in that empty space.
Standard image editors, like Mac Preview, MS Paint, or even older versions of Photoshop, rely on a mathematical process called pixel interpolation. They look at the existing pixels and essentially stretch them, guessing what colors should go in the new blank spaces based on the surrounding pixels. The enlarged image may suffer from severe pixelation, soft edges, and a lack of texture. Traditional interpolation cannot create details that weren't there to begin with.

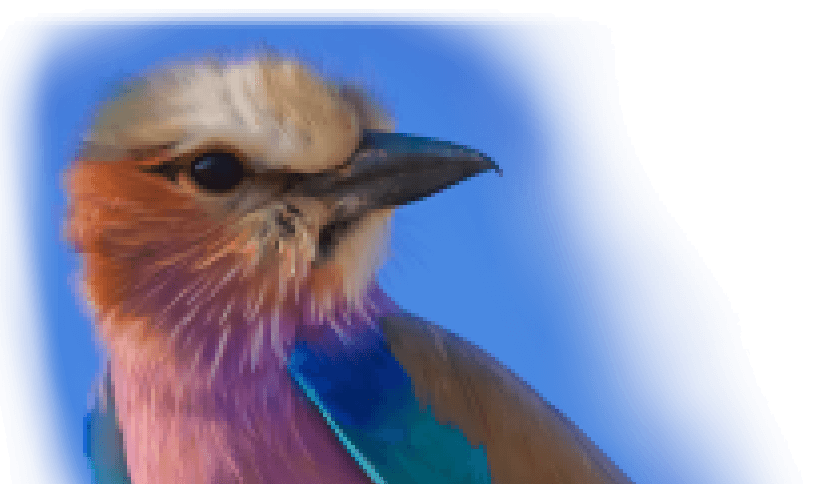
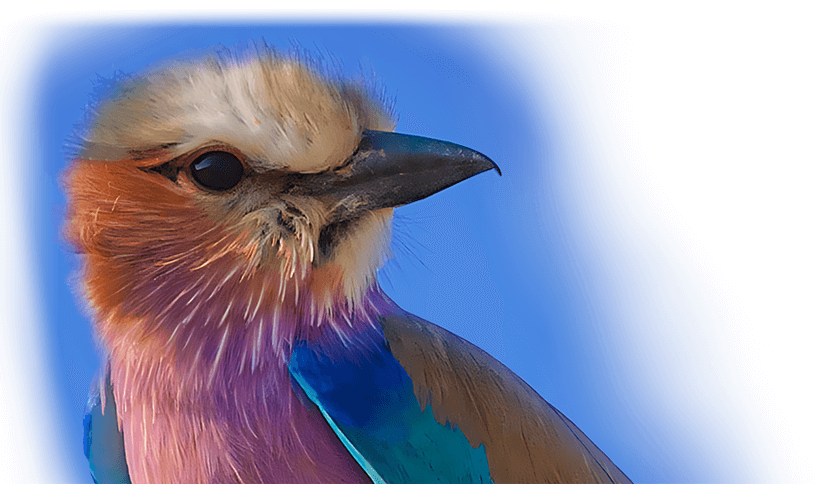
Modern AI upscalers use advanced algorithms instead of mathematically stretching existing pixels. They don't just stretch the pixels; they actually regenerate the missing details. The AI understands what a human eye, a strand of hair, or a brick wall is supposed to look like, and it creates brand-new, accurate pixels to fill in the gaps. This ultimately results in a high-resolution image featuring sharp, crisp edges and restored textural details, while eliminating blurriness and compression artifacts. However, it is also worth noting that different AI algorithms may produce varying degrees of hallucinations (generated artifacts) or impose different requirements on hardware specifications.
1. Enlarge Image without Losing Quality Using Photoshop
Photoshop is designed for anyone looking to improve their image processing skills and create high-quality images for print or digital media. With its advanced algorithms and processing power, Photoshop allows you to upscale images while maintaining their sharpness, clarity, and detail. The best resize algorithm in Photoshop is the bicubic algorithm, specifically the bicubic sharper option. It provides the highest quality and sharpest results when resizing images.
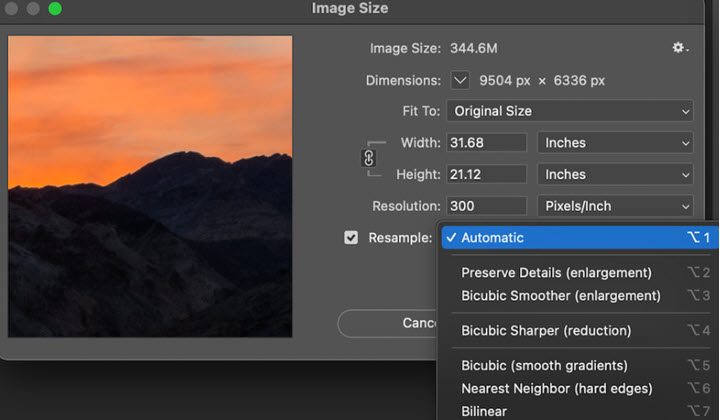
Step 1. Open an image with Photoshop. Open Image and Image Size in the top bar.
Step 2. Check the Resample option. Expand the drop-down menu. Choose Preserve Details (enlargement) or Bicubic Smoother (enlargement) algorithm for image resizing. The former one will make the enlarged image smoother, while the latter shaper.
Step 3. Input the target pixels in width and height. If you want to enlarge the image for printing, switch the measurement here to inches. Keep the link icon highlighted and you can scale it up at its original aspect ratio.
Step 4. Now you can save or export the image in the File option.
Expert Note:
Adobe Photoshop is best suited for professional photographers, graphic designers, and digital artists who require absolute, pixel-perfect control over their images alongside powerful upscaling capabilities.
The primary advantage of Photoshop is its capabilities of deep, complex manipulation before or after the enlargement process. Conversely, the biggest cons are its steep learning curve, which can overwhelm casual users, and its expensive monthly subscription model, making it a costly investment if you only need to resize a few photos.
2. Enlarge Image without Losing Quality Using AI
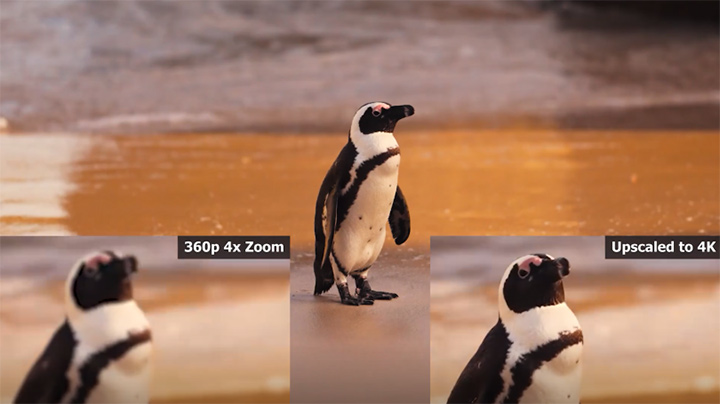
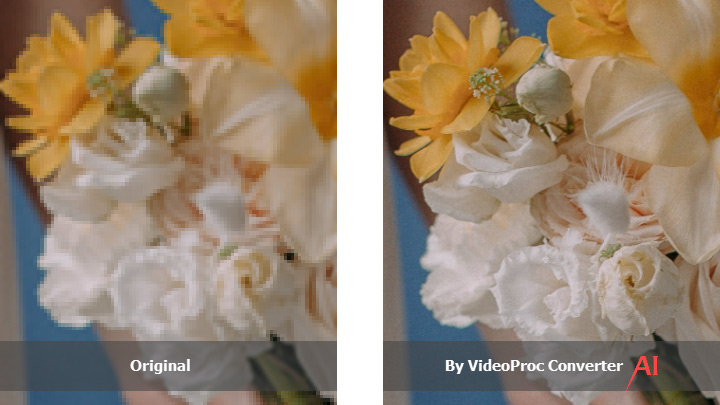
VideoProc Converter AI is a comprehensive video processing software that has been enhanced with AI upscaling capabilities. In addition to videos, it also supports images in all formats (JPEG, PNG, PBM, WebP, HEIC, TIFF, GIF, PPM, PGM, XPM, etc.) Compared to traditional image resolution changers, it employs the latest AI image upscaling models trained by millions of data and enhances the details of each pixel intelligently while increasing image resolution. Moreover, VideoProc Converter AI uses different models to scale up real-life images and anime images, thus producing the most pleasing results.

VideoProc Converter AI - A Game-Changing AI Image Upscaler
- Increase image resolution to 8K/10K and video resolution to 4K.
- Intelligently interpolate pixels. No distortion. No pixelation.
- Full GPU accelerated to enlarge images and videos in bulk.
- AI upscaling, denoising, frame interpolation, stabilization, deinterlacing.
- Convert, compress, quick-edit, screen record, and download videos.
![]() Excellent
Excellent ![]()
Now download VideoProc Converter AI and see how to make images larger without losing quality!

Step 1. Launch VideoProc Converter AI. Click "Image AI" in the main interface.

Step 2. Now it's time to pick the right AI model. Gen Detail v3 and Real Smooth v3 are usually good bets. You can tweak the resolution by choosing a preset like 2x or 4x, or just set it exactly how you want it.
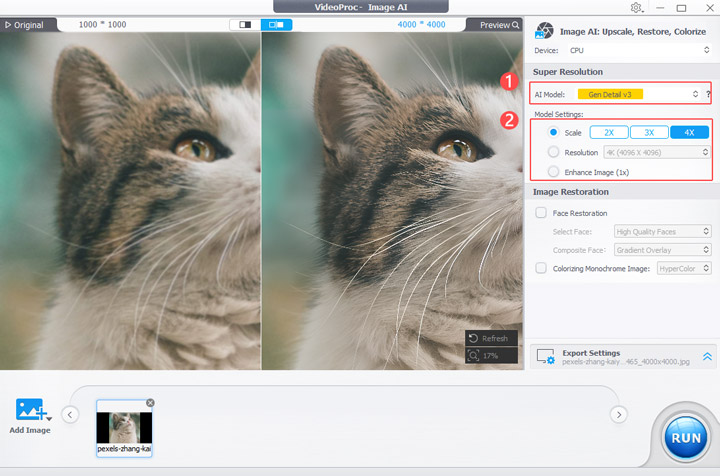
Step 3. Choose a format for the output image. Click RUN to export. Also, you can import the image to upscale it multiple times before it reaches the maximum output of 10K (nearly 10,000 pixels in width).
Video Tutoral: AI Upscale Image to 4K/8K/10K for Max Resolution
Expert Note:
VideoProc Converter AI is best suited for content creators, marketers, and everyday users who want a fast, privacy-focused offline tool that can handle both image and video enhancement.
On the plus side, this AI enhancer boasts a highly intuitive interface, excellent hardware acceleration that runs smoothly even on mid-range PCs, and a cost-effective lifetime license option. However, it may lack the fine-grained manual editing capabilities typically found in image editors, such as layer masks, for instance.
3. Enlarge Image without Losing Quality with Topaz Gigapixel
Topaz Gigapixel is a dedicated, professional-grade image upscaler that focuses solely on image enlargement. The program offers specialized models including Standard, Lines, Art, and High Fidelity to handle different types of image noise and textures. It can magnify the resolution of your images by up to six times with vivid details.
- Launch the software and drag and drop your images directly into the main interface.
- Choose your enlargement factor. You can select presets like 2x, 4x, or 6x, or enter a custom width/height.
- Select the model that best fits your image. For most photos, Standard or High Fidelity works best.
- Adjust the "Suppress Noise" and "Remove Blur" sliders.
- Once you are satisfied with the preview, click Save Image to export your high-resolution file.
Expert Note:
Topaz Gigapixel is best suited for professional photographers, archival restoration specialists, and users preparing high-fidelity images for large-format printing where accurate detail preservation is critical.
On the plus side, the program consistently delivers the most realistic, artifact-free results in the industry. However, this professional-grade performance comes with a few notable drawbacks: it carries a premium price tag with no free tier, and the complex neural networks demand significant hardware power, meaning users with older computers or basic laptops will likely experience sluggish processing times compared to more lightweight software.
You can read our full review of Topaz Gigapixel here.
4. Enlarge Image without Losing Quality Using GIMP
GIMP stands for GNU Image Manipulation Program. It is a free and open-source raster graphics editor used for image retouching and editing, free-form drawing, converting between different image formats, and more. As for image scaling, it offers 4 interpolation methods to resize raster pictures. Here's how.
Step 1. Open GIMP on your computer. Click File > Open to import an image.
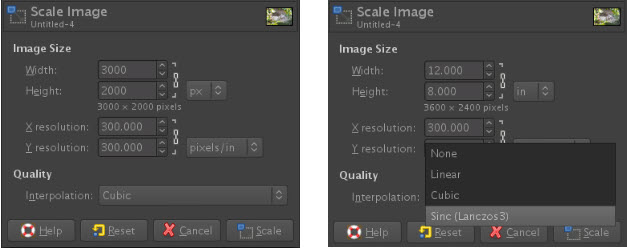
Step 2. Click Image > Scale Image. Input the target image size. Similar to Photoshop, you can change the measurement to inches or dots for printing.
Step 3. Choose the interpolation algorithm. "Cubic" works for most images except very small or incredibly detailed ones. For detailed graphics, you can use "Lanczos" or "Linear". Notice that there's no best algorithm for all, and you need to test multiple times to find the proper one in your case.
Step 4. Click the Scale button to save the changes. Start to process and export the image.
Expert Note:
GIMP is best suited for budget-conscious creatives, Linux users, and open-source advocates who want powerful, layer-based photo editing without the financial burden of a subscription.
The biggest pro is undoubtedly its price tag and the flexibility offered by its community-driven plugins. The main con, however, is that it lacks a native, one-click AI upscaler out of the box. Achieving high-quality enlargements that rival Topaz or VideoProc requires manually installing third-party Python scripts or relying on older, less effective interpolation methods that may result in pixelation.
5. Enlarge Image without Losing Quality Online for Free
Some online image processing tools now utilize AI algorithms to upscale images. For example, Fotor. It allows for both creative enhancements and fundamental changes. It is accessible to anyone for free online and can be used by uploading images from a computer or pasting the URL of an image from the internet.
There is no limit on the number of images you can process with Fotor AI Enlarger, but the maximum file size is 10 MB per image. The output format can be selected as JPG or PNG depending on your needs.
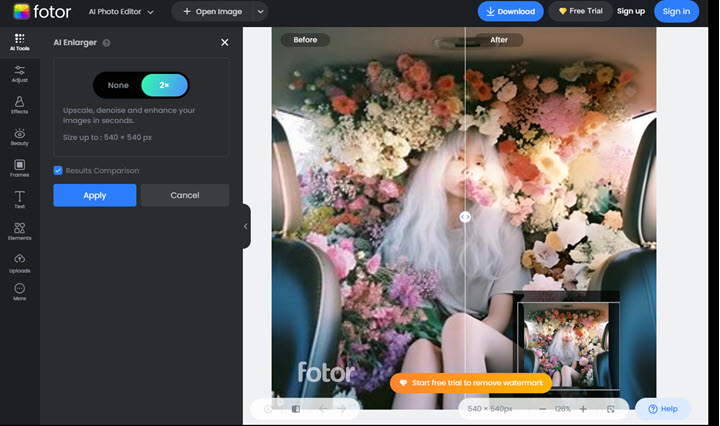
Step 1. Go to the official website of Fotor. Open its AI toolkit and choose AI Enlarger.
Step 2. Load your image from your device or via a URL.
Step 3. Then it starts to enlarge the image by 200%.
Step 4. When it completes, download the image. If you are using its free version, you'll get an image with the Fotor watermark in the bottom left corner.
Expert Note:
Fotor is best suited for social media managers, bloggers, and casual users who need a quick, accessible solution for light editing and upscaling without the hassle of installing desktop software.
However, you must upload your photos to their servers, which may be a privacy concern for some users. Additionally, the free tier is heavily monetized with distracting ads, restricts downloads to lower resolutions, and slaps a watermark on your work. Unlocking the true high-definition, watermark-free upscaling requires a paid subscription or premium AI credits.
Pro Tips for Enlarging Images Without Quality Loss
Here are some best practices to follow if you want professional-grade enlargements.
- Always Start with the Highest Quality Source File: Whenever possible, track down the original RAW, TIFF, or high-bitrate PNG file. If you attempt to upscale a heavily compressed, pixelated JPEG, the software will end up magnifying those compression artifacts alongside the image.
- Use the Gradual Upscale Method: If you are not using AI, scale your image up in smaller increments. This allows the software to recalculate the pixels more accurately, preserving slightly better edge clarity than a massive one-time jump.
- Apply Sharpening After the Enlargement: Do your resizing and noise reduction first. Once the image is at its final, larger dimensions, use a gentle Unsharp Mask or Smart Sharpen tool to dial in the final edge clarity.
- Export in Lossless Formats: For archival storage or professional printing, always export your newly enlarged image as a TIFF or PNG. If you need to post the image to a website, consider modern web formats like WebP, which offer lossless compression at much smaller file sizes than traditional PNGs.
- Prepare Enlarged Images for Print: For a print to look crisp, professional, and photorealistic when viewed up close, the industry standard is 300 DPI. If your image doesn't have enough pixels to supply that 300 DPI density, the printer has to stretch the available data, resulting in a blurry or pixelated print.
FAQ
Can I resize an image without losing quality?
Yes. However, traditional image enlargement algorithms are highly likely to result in blurry images. To enlarge an image without losing quality, using AI-driven super-resolution software is a superior choice. These programs are capable of intelligently generating new pixels and restoring textures, thereby preserving edge sharpness.
What is the best way to enlarge a photo for print without quality loss?
The most effective method is using AI upscalers to reach a resolution of 300 DPI for your target print size. Traditional resizing often results in pixelation once transferred to paper. AI software restores realistic textures and sharpens fine details, ensuring your physical prints look professional and crisp rather than blurry when viewed at a close distance.
How can I resize an image for free?
You can resize images for free using open-source desktop software like GIMP or convenient browser-based tools like BigJPG. While these are excellent for quick, one-off tasks, many free online tools impose strict file size limits or watermarks. For professional results and unlimited batch processing, dedicated desktop AI software remains the superior choice for maintaining high-resolution detail.


