
 New AI features are available
We've all been there. You are staring at a gorgeous shot and then you play it back. Grain. Lots of it. Whatever the reason, that grainy, noisy footage is dragging your entire project down.
Here's the good news: you don't have to live with it. DaVinci Resolve offers multiple ways to tackle noise reduction. The trick is knowing which method to use, when, and why. And that's exactly what this guide is for.
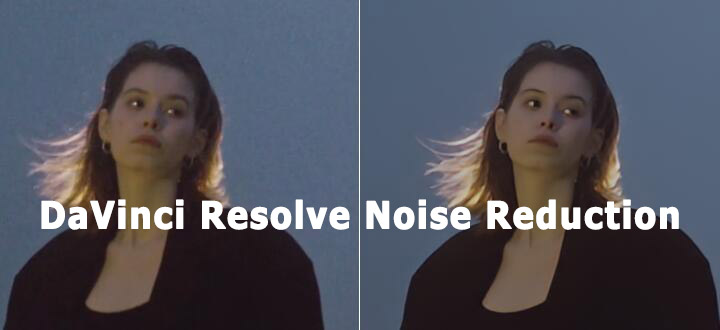
Whether you are a total beginner working with the free version or a seasoned pro looking to squeeze every last bit of quality out of your Studio workflow, there's a solution here for you. We'll walk through each method step by step, compare the pros and cons, and help you figure out which one makes the most sense for your specific situation.
A Brief Background on Video Noise
Video noise isn't just one thing. If you zoom in on your noisy footage, you'll notice two distinct types of grain, and each requires a slightly different approach.
Luminance noise looks like classic monochrome grain. It affects the brightness (luma) information, making shadows look speckled and uneven. Chroma noise, on the other hand, is all about color. This is especially visible in underexposed shadows or when you push color grading too far.
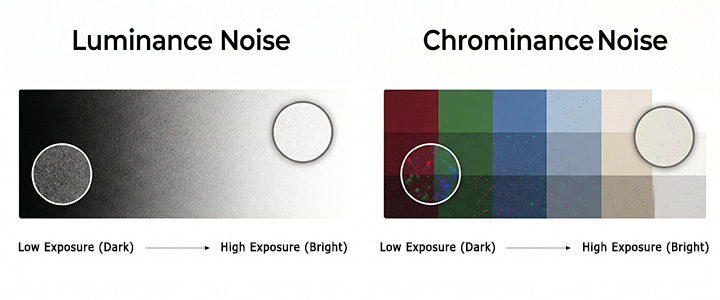
Regardless of whether the noise in your video stems from low-light shooting, high ISO settings, or a small sensor, the golden rule is that noise reduction must come first. NR Node First, then Temporal before Spatial. Get this foundation right, and your results will instantly look more professional.
Quick Comparison Table
Method |
Cost |
Ease of Use |
Detail Preservation |
Best For |
|---|---|---|---|---|
Free Version |
Free |
Moderate |
Poor |
Minimal noise, non-critical projects |
Studio Version |
$295 one-time |
Moderate |
Good |
Professional workflows, demanding footage |
VideoProc Converter AI |
$54.95 lifetime |
Easy |
Good |
Pre-edit cleanup, AI batch denoising |
DaVinci Resolve Noise Reduction (Free Version)
DaVinci Resolve is one of the best free video editors available, though it never offers the highly specialized noise reduction tools that the paid Studio version does. Its Remove Noise (RN) tool reduces noise by subtly blurring the grain. It cannot effectively or intelligently separate detail from noise. The result is often a softer, less detailed image, and it can be very time-consuming to get even modest results.
This method is best for projects where you have extremely minimal noise and you are not working on something critical. For anything with significant grain, you will likely be disappointed. But if you have no other option, here is exactly how to use it.
Step 1: Switch to the Fusion page
Look at the bottom of your DaVinci Resolve window. You will see icons for Media, Cut, Edit, Fusion, Color, Fairlight, and Deliver. Click the one that looks like a little alien or a fusion reactor. That is your Fusion page.
Step 2: Select your Media node
In the Fusion node editor, you will see a node labeled "MediaOut" and likely a "MediaIn" node connected to it. Click on the MediaIn node to select it.
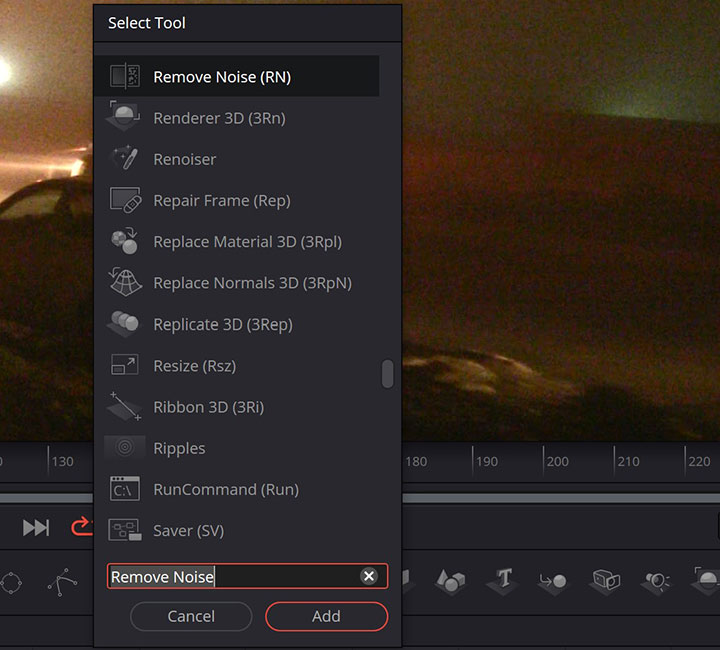
Step 3: Add the Remove Noise node
With the MediaIn node selected, press Shift+Space on your keyboard. This opens the "Select Tool" search bar. Type "Remove Noise" into the search bar. You will see the Remove Noise (RN) tool appear in the list. Click on it, or press Enter to add it.
Step 4: Position the node
A new node labeled "Remove Noise" will appear in your node tree, connected right after your MediaIn node.
Step 5: Open the controls
Click on the new Remove Noise node in the node editor to select it. Then, simply drag and drop the Remove Noise node into the viewer window (the large preview area). This will open the Remove Noise tool controls in the Inspector panel on the right side of your screen.
Step 6: Adjust the settings
You have two primary methods to choose from: the Color Method and the Chroma Method.
- Color gives you independent control over the Red, Green, and Blue channels. For each channel, you have two sliders: Softness and Detail. "Softness" blurs the color channels, while "Detail" brings back some sharpness. It is a constant balancing act.
- Chroma is often more effective because it separates the image into luminance (brightness) and chrominance (color) information. This allows you to target video grain and color splotching more directly.
Pro Tip:
A common issue is that, after completing these steps, the image may appear somewhat too soft, resulting in a loss of fine detail. A common workaround is to add an Unsharp Mask effect. This will help restore some of the perceived sharpness to your image without bringing back all the noise you just worked to remove.
Bottom Line: The free version's Remove Noise (RN) tool is a basic, CPU-only process. It works, but it is slow and the results are limited. Using the RN tool requires patience, and you will need to constantly toggle your adjustments on and off to see if you are actually improving the image or just making it blurry.
DaVinci Resolve Studio Noise Reduction (Paid Version)
DaVinci Resolve Studio gives you the full Temporal and Spatial NR controls right in the Color page. These tools are smart. They analyze your footage frame by frame and pixel by pixel to separate real image detail from random noise. The Studio version also unlocks GPU acceleration, which means faster rendering and, more importantly, the ability to actually see your changes as you make them.
Step 1: Switch to the Color page
Look at the bottom of your DaVinci Resolve window. Click the icon that looks like a color wheel. This is where all the magic happens.
Step 2: Create a noise reduction node
Right-click on your clip's node in the node editor, and select Add Node > Add Serial. Double-click on the new node and type "NR" or "Denoise". Drag and place it in the very first node in your chain. Grading amplifies noise, so always clean the image first, then grade it.
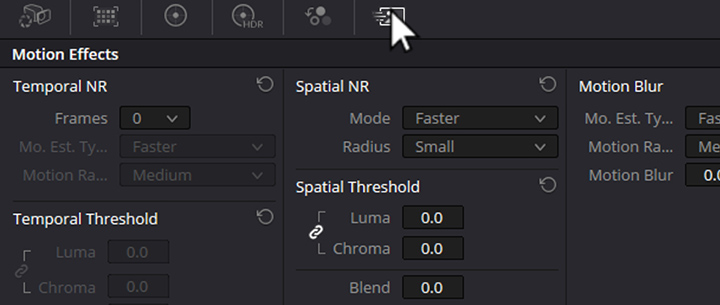
Step 3: Go to the Motion Effects panel
Select your NR node in the node editor, and open the Motion Effects panel. It has two distinct sections: Temporal NR at the top and Spatial NR below it. Using both together is common and recommended. The correct order is Temporal first, then Spatial.
Step 4: Temporal Noise Reduction
Temporal NR analyzes pixels across multiple frames in time to separate the consistent details of your shot from the random, flickering noise. But it can cause ghosting on fast-moving subjects if you push it too hard. Here are the key controls.
Frames: controls how many neighboring frames are sampled for the analysis. A higher number means stronger smoothing but also more processing load. Start with a low value like 1 or 2 and increase only if needed.
Motion Estimation Type: tells Resolve how to detect motion in your image.
- Faster: Less accurate but lighter on your GPU. Good for quick previews or footage with very little motion.
- Better: More accurate but requires more processing power. This is the default and a good starting point for most projects.
- Best: The most accurate and the heaviest on your system. Use this for critical shots where you need the absolute best quality and you are willing to wait for renders.
Motion Range: tells the estimator what scale of motion to expect.
- Small: Assumes slow-moving subjects with little to no motion blur. Use this for interviews, static shots, or slow pans.
- Medium: A general-purpose setting for moderate motion.
- Large: Assumes fast-moving subjects with significant motion blur. Use this for action footage, sports, or fast camera movement.
Temporal Threshold Luma: controls how aggressively luminance (brightness) noise is averaged across frames. A value of 0 applies no correction. Start low and increase gradually. A practical starting range for moderate footage is 15 to 35. Increase it until the grainy texture is reduced, but stop before you see soft edges or ghosting.
Temporal Threshold Chroma: controls the same averaging process but for color noise. Chroma noise is usually more visually distracting than luminance noise, so do not be afraid to be a little more aggressive here. Start around 15 to 35 and adjust until the ugly color splotches disappear.
Step 5: Spatial Noise Reduction
Spatial NR works entirely within a single frame, analyzing neighboring pixels and smoothing out inconsistent areas. It is great for tackling chroma blotching and codec artifacts, but overdoing it will soften your image and make it look waxy.
Mode: Set this to Faster initially. Spatial NR is already heavy on your system, and Faster mode gives you a good balance of quality and performance.
Spatial Threshold: Click the small link icon to adjust Luma and Chroma independently.
- Chroma noise is what Spatial NR is best at cleaning up. Increase the Chroma amount until the color blotching is gone. You can often be quite aggressive here without ruining your image quality.
- Luma controls luminance smoothing within single frames. Increase it only if you still see luminance noise after Temporal NR. Start with very small increments and check your results at 100% zoom.
Blend (Spatial or Temporal) mixes the spatially denoised image with the original. The smaller the value, the stronger the noise reduction effect.
Motion Blur: allows you to adjust ghosting, trailing, or smearing effects. If you see ghosting, your Motion Estimation Type might be set too low (Faster) for the amount of motion in your shot. Try switching to Better or Best. Alternatively, your Motion Range might be set too low (Small). Try Medium or Large.
Note:
Noise reduction is computationally expensive. Even with GPU acceleration in Studio, heavy noise reduction settings will slow down your playback and increase your render times. Render your noise-reduced clips in place so you can work with smooth playback while you continue grading.
Standalone AI Noise Reduction Software
Your NLE is not the only solution. Instead of fighting with noisy footage inside your NLE, you can clean it up first, then import it into DaVinci Resolve for editing and grading.
VideoProc Converter AI is a standalone media processing application that sits alongside your NLE rather than trying to replace it. It's built as a pre-production assistant to handle computationally heavy AI tasks outside your timeline, so your editing workflow can stay responsive and free of lag.
Its Super Resolution tool offers different AI models for different types of footage, automatically denoising, deblurring, and adding missing details. You can choose to upscale your video resolution, up to four times 4K, or maintain the original resolution. The algorithm distinguishes between actual detail and random noise. This is especially useful for nighttime vlogs, indoor tutorials, and high-ISO scenarios.

Step 1: Install and Launch the Software
Download and install VideoProc Converter AI from the official website. Once installed, launch the application and select Super Resolution to enable AI enhancement.
Step 2: Enable AI Denoising
Drag and drop your footage into the software. Batch processing is supported. The program offers multiple AI models for different scenarios.
- Real Smooth is designed to remove noise and restore flaws. It delivers clearer, smoother, and brighter video outputs.
- Gen Detail is designed for maximum detail preservation. It is ideal for footage where you want to keep fine textures like skin, fabric, and hair.
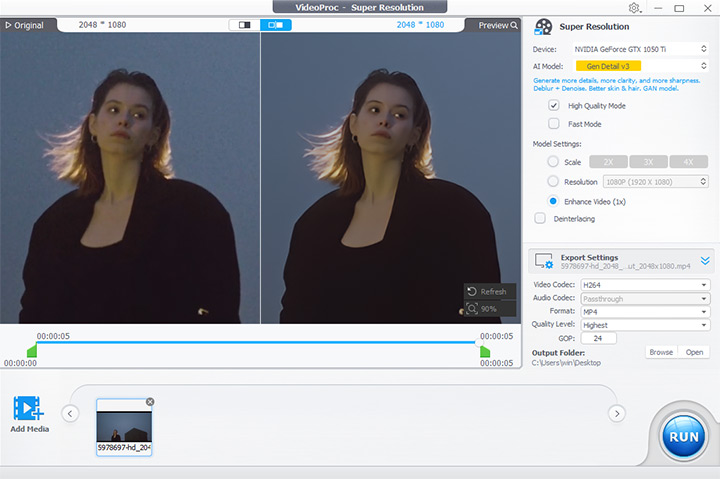
You can select the model that best matches your footage and goals, and experiment with the results for each.
Step 3: Export the Cleaned Footage
Once you have selected your model, you can choose the output resolution and format. When you are happy with the preview, click the RUN button to begin processing and export the denoised videos. The software supports Full Hardware Acceleration, which can make processing up to 47 times faster.
Step 4: Import into DaVinci Resolve
Now that your footage is clean and denoised, import it into DaVinci Resolve just like you would any other media file. Because the noise has already been removed, you can focus entirely on editing and grading without worrying about amplifying grain.
Bottom Line: For creators who want a simple, automated solution that works without a steep learning curve, VideoProc Converter AI is an excellent video denoiser. It is particularly well-suited for YouTubers, vloggers, and casual creators who need to clean up noisy footage quickly without spending hours tweaking sliders. The batch processing and GPU acceleration mean you can process multiple clips efficiently, and the additional AI tools add real value.
Best Practices and Common Mistakes
These best practices will save you time, preserve image quality, and help you avoid the most common mistakes.
- Always use a separate node for noise reduction and place it first in the node tree.
- Begin with conservative settings and make small incremental adjustments.
- Fast-moving footage needs careful Temporal NR settings to avoid ghosting.
- Check at 100% zoom to check your results before you commit.
- Preserve some noise. A completely noise-free image often looks unnatural. A tiny amount of grain gives footage texture and depth.
- Use Resolve's caching feature to render your noise-reduced clips in place.
Noise reduction is not magic. If your footage is severely underexposed, shot at ISO 12800, or heavily compressed, no amount of noise reduction will make it look perfect. The best way to deal with noise is to prevent it in the first place. Shoot with enough light, keep your ISO as low as possible, and use a camera with a good sensor.
Conclusion
So that's all about noise reduction in DaVinci Resolve.
The free version of DaVinci Resolve gives you the basic Remove Noise (RN) tool. It's free, CPU-only, and it can handle very subtle noise reduction when you have no other option. If you are just starting out and you have minimal grain, this will get the job done.
DaVinci Resolve Studio unlocks full Temporal and Spatial Noise Reduction in the Color page. For a one-time purchase of $295, you get GPU-accelerated tools that are genuinely powerful and capable of handling most professional noise reduction tasks.
VideoProc Converter AI offers a different approach. At a very affordable price, you get a standalone AI enhancement suite that cleans your footage before it ever hits your timeline. The AI does the heavy lifting automatically, and you can batch process multiple clips at once. If you want a simple, affordable, automated solution, it's worth a serious look.