
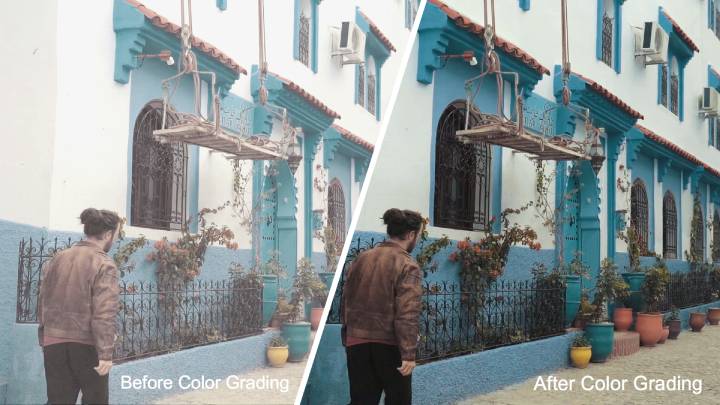
If you are a vlogger or YouTuber, you know how colors can breathe life into your videos and engage your audience. Merging clips and adding background music are not enough to tell a good visual story. There's one essential step in the post-production process: color grading.
Color grading is the process of manipulating and enhancing the color in specific ways for a stylistic and artistic effect in the video. So, how to color grade video? In this article, we'll show you through the process of color grading so that you can achieve the visual mood and set yourself apart from other filmmakers. Let's dive in.
What is Color Grading
Color grading refers to the process of adjusting or enhancing the color of the footage to achieve a specific effect. Color grading helps tell a visual story successfully. It improves the appearance of the frames in different environments, adds emotions and atmosphere to the footage, etc. During this process, colorists adjust saturation, brightness, contrast, white balance, and other parameters to color grade videos.
Color grading was once referred to as color timing and involved a complicated and pricey manual process in a film production. But now, you can color grade your video much easily with color-grading software or a non-linear editor.
Color Correction vs Color Grading
While the whole process of color grading actually falls into two parts: color correction and color grading. There are slight differences between them.
Color correction is the process of fixing some technical issues caused by the shooting environment and camera settings. Color correction helps make your footage look like human eyes would see in the real world. In color correction, you fix color issues and get natural and baseline pictures. In color grading, you fine-tune the colors and get a specific effect for your footage. Hollywood uses cinematic color grading a lot to help set the mood and tell a better visual story.
Color Grading Basics
Before jumping into how to color grade video, it's necessary to cover some basics. This helps a better color grading progress. Color editing tools used in video editing software are generally based on these models and theories. If you are already familiar with color theory, you might skip to the next part of how to color grade.
RGB, or the RGB color model, is an additive color model based on human perception of colors. In the RGB model, red, green, and blue are used as primary colors and added together to reproduce a broad array of colors. The secondary color is when two of three components mixing with the same strongest intensity. Green and blue make cyan, blue and red are magenta, red and green get yellow.
Hue refers to the color itself. For example, you might describe a blue color as light blue or indigo blue. Despite the lightness or colorfulness, they both have a hue of blue. Simply put, hue means a color's "pure color".
Learn more about how to change color with hue >
Saturation is related to the intensity or purity of the color. It reflects the amount of hue used to define a color. In more general terms, saturation refers to how colorful the color is. You can turn colorful clips to black and white by reducing the saturation to zero when color grading.
Lightness, luminance, brightness or value, all refer to the level of light in your color. They all indicate how bright or dark your color is. Colors with the same hue and saturation but with different lightness may have different emotional effects on the viewer. The most common lightness ranges are the highlights, mids, and shadows.
How to Color Grade Video
Various colorists may have different color grading processes, and the specific steps of color grading may vary slightly due to different video editing software. If you are just starting, here's the general workflow with the simple yet powerful video editor, VideoProc Vlogger. Follow the guide to facilitate your color grading process.

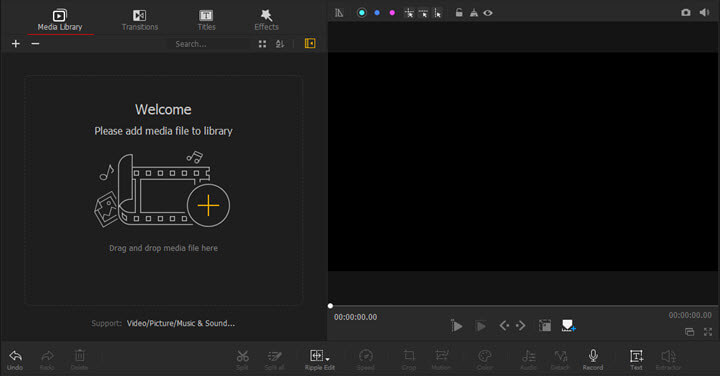
Step 1. Drag Your Footage to the VideoProc Vlogger Timeline
Launch VideoProc Vlogger and create a new project. Add your footage to the Media Library by either clicking on the + icon or simply dragging and dropping your files. Then drag your footage from the Media Library to the Video Track in the timeline.
Step 2. Get Access to the Color Grading Panel
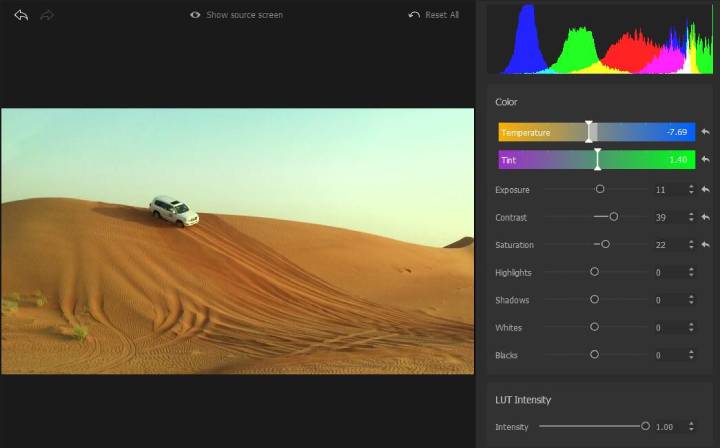
Select the video clip that needs color grade, and click Color in the toolbar to get access to the Advanced Color Editor.

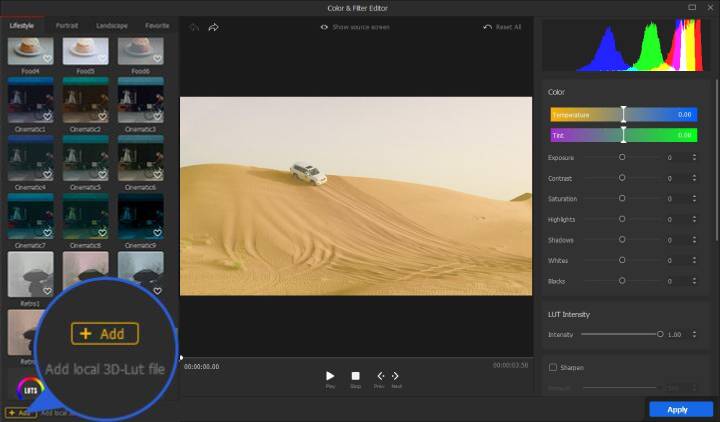
Step 3. Import a Camera LUT If Needed
Click the Add button in the lower-left corner of the color grading panel, then browse your folder to add the local 3D-LUT file.
Note: Your clips may be shot in one of the following three ways: RAW, log-encoded, or "video" with or without a profile. LOG formats may sometimes require a camera LUT for a correct baseline. If that's your case, you'll want to load a camera LUT. If not, you can skip this step.
Step 4. Proceed to Color Correction
Drag the corresponding slider on the right side of the color editing panel, so that you can correct white balance, fix exposure, tweak contrast and saturation. You can also enter a value in the exposure, contrast, and saturation buttons.
Note: Color correction refers to fixing some technical issues during shooting and getting a proper baseline for your footage. A proper color correction can also create visual consistency for your footage. During this step, you'll want to make your video clips look as natural as possible to the human eye. Read our blog on how to color correct a video.
Step 5. Color Grade Your Video Clips
Color grade your video either manually or start with a LUT. Color grading manually would give you the most control but would take more time. Using a LUT would save you some time and add consistency to your footage, as long as your clips are color corrected properly.
1. Start with A Creative LUT
Click on the filter you want to use on the left side of the color grading panel, and VideoProc Vlogger will apply it to your clip automatically. Drag the slider of LUT Intensity on the right to adjust the strength. VideoProc Vlogger lets you choose from about 100 built-in LUTs to work quickly and efficiently. You can also import local 3D-LUT files by clicking the Add button in the lower-left corner.
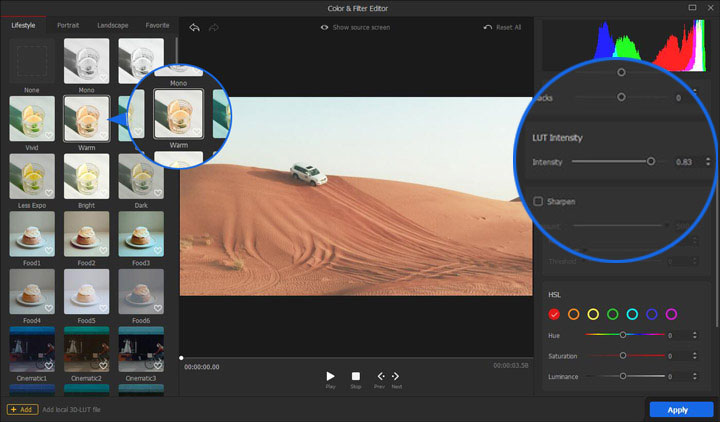
To compare the footage with and without the filter, click the Show source screen button above the preview window. To remove the LUT, you can either click the None option on the left or the Reset All above the preview window.
Note: LUTs are short for Lookup Tables. They are files that include instructions to transform color to another color based on RGB value. You can consider them as color rendering functions or just like filters you can apply to your clips to create an instant look.
2. Fine Tune the Parameters Manually
Drag the slider of each parameter or enter a value in the corresponding input box to enhance the look the LUT gave you.
The following are the specific explanations of the parameters that may be used in the color grading process. For beginners, once you know what they do and how they work, you'll be able to color grade your video according to your specific needs.
#1. White Balance
White Balance means making the white color to proper white and all other colors look more natural. It also describes the color temperature of your footage. You can make your footage look cooler or warmer by adjusting the white balance to evoke different emotions of the viewer.
In VideoProc Vlogger, you can adjust the white balance by setting the Temperature and Tint. Drag the Temperature slider left to add yellow to your whites and right to add blue. Drag the Tint slider left to switch the whites towards magenta and right to switch them towards green.
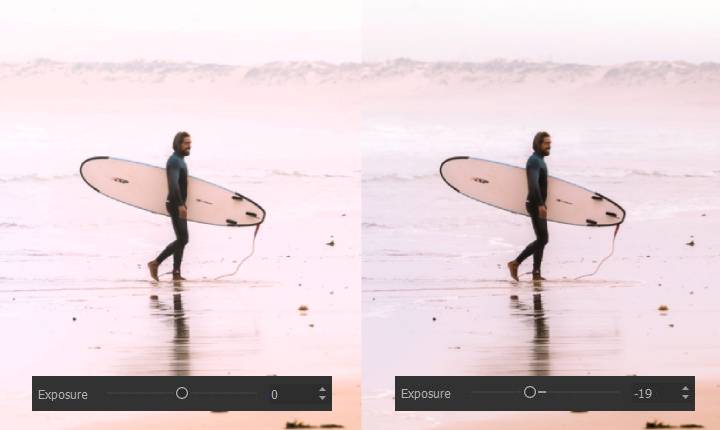
#2. Exposure
Exposure is about the overall brightness of your footage. Underexposed footage would look dim and details in the shadow areas would get lost. On the contrary, overexposed footage would contain more light than needed and lose shadows to give contrast.
In VideoProc Vlogger, you can fix exposure issues by adjusting the value of Exposure. Drag the Exposure slider left to reduce exposure and right to increase exposure.
#3. Contrast
Contrast refers to the difference between the light and dark areas that make an object distinguishable in your footage. The footage with low contrast would look cloudy or washed out. With an increase in contrast, you can make the bright areas brighter and the dark areas darker.
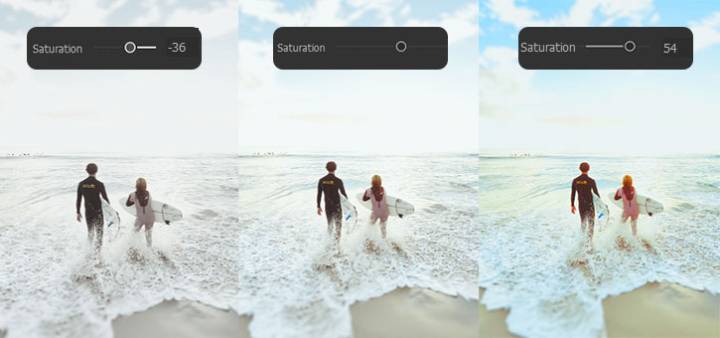
#4. Saturation
Saturation refers to the purity or intensity of a color, as mentioned before. It reflects how colorful a color is. The footage with high saturation would have pure colors, and colorful footage can be converted to black and white when the saturation is reduced to zero.
In VideoProc Vlogger, you can use the Saturation slider or HSL tabs to adjust the saturation of your video clips. Drag the Saturation slider left to desaturate and right to saturate your footage.
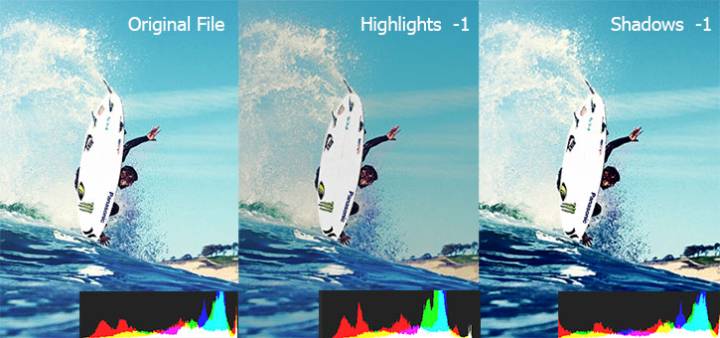
#5. Highlights and Shadows
Highlights and shadows are two of the most common lightness ranges. This is where you adjust each section of your footage. Highlights are the brightest area in your video clips and shadows are the darkest areas.
In VideoProc Vlogger, highlights and shadows are controlled respectively by the Highlights and Shadows slider. Drag the Highlights slider left to darken the highlights and right to brighten the highlights. Drag the Shadows slider left to darken the shadows and right to brighten the shadows.
#6. Whites and Blacks
Whites and blacks respectively control the brightness and shadows in your footage. Compared to highlights and shadows mentioned before, whites and blacks influence the overall image, while highlights and shadows only affect the bright or dark parts respectively.
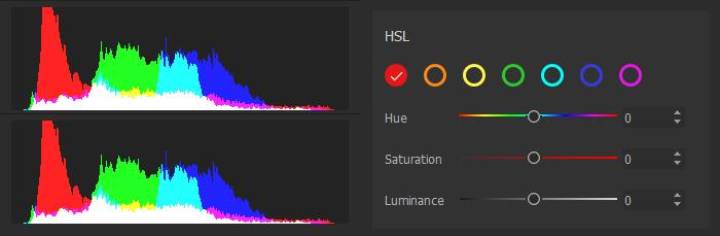
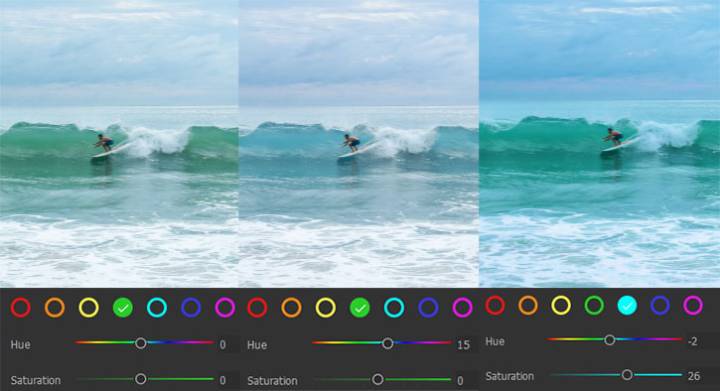
#7. HSL
HSL stands for hue, saturation, and lightness. It's an alternative representation of the RGB color model, where red, green, and blue are used as primary colors and cyan, magenta and yellow are secondary colors.
Adjust a specific color instead of the entire image with the HSL Secondary Control in VideoProc Vlogger. Pick a hue according to your needs, drag the slider to adjust its hue, saturation, and luminance respectively, so that you can control a specific color instead of the entire image.
Step 6. Perform Final Color Adjustment for Further Edits
Click the Apply button in the lower right corner to save the changes and go back to the main interface for further edits.

Tips to Color Grade Your Video
1. Color Grade in the Same Environment
This may seem cliche but still necessary to mention. When lighting conditions change, the human eye and brain will continuously adjust the perceptions of color and brightness, which may influence the consistency of your color grading. Professional colorists color grade in blacked-out rooms to minimize these effects. You don't need to carry it to extremes, just try to color grade in the same environment.
2. Choose A Reference Clip
The video clips probably are not from the same camera or the same shooting environment, so keep in mind that it's important to create a consistent look across a series of video clips when you color grade. The best way to reduce the impact is to choose the one with average exposure and levels as a reference clip and match the color between different shots. This would help you color grade efficiently and achieve visual consistency for your footage.
3. Pay Attention to Skin Tones
The skin tone may be the easiest to notice when it's wrong, yet no one will ever notice when it's correct. Human beings vary slightly in skin tones. Whether dark skin or light skin, all correspond with the brown hue with different saturation and darkness.
However, skin color may not always be the color of skin. For example, under neon lights, the color of human skin may appear orange, blue, etc. So you'll need to color grade your video in context.
4. Let Mood Be Your Guide
Everyone knows that colors can help set the mood and feeling in your footage. Color grading is one method filmmakers use to communicate with the audience. So take account of the emotions that you want to evoke and let that mood be your guide when color grading.
Which Software Is Best for Color Grading
Dedicated programs like DaVinci Resolve can be the best for color grading for professional colorists. Industry-standard color grading software allows you to control every detail of color grading so that your footage will get a stunning look.
VideoProc Vlogger can be the best choice for novice vloggers and YouTubers. In VideoProc Vlogger, you can adjust the exposure, contrast, saturation, white balance, and other basic parameters. HSL Secondary Control is also available for you to adjust each hue accordingly and respectively. Plus with 3D LUTs supported, you can easily color grade your video like a pro.
Download VideoProc Vlogger for free and color grade the video for your desired look.


