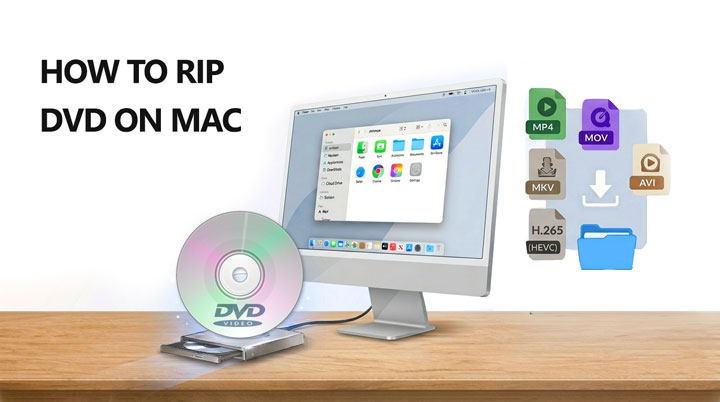
Summary: This post shares how to rip a DVD on Mac easily in 2026. You'll know both free and paid methods to rip DVD of any kind on Mac effortlessly with nice quality.
If you've ever tried to watch or save a DVD on your Mac, you know it's not as simple as just popping it in. Between USB-C ports, finicky external drives, and the copy protection on commercial discs, things can get confusing fast. Whether you're backing up a few home videos or preserving a shelf of Hollywood movies, the right approach makes all the difference. Some free tools work for simple discs, others handle tricky encrypted movies, and a few let you keep every menu, subtitle, and chapter intact. In this guide, I'll show you how to connect your DVD drive, how to rip DVD on Mac using some of the best DVD rippers, and choose the best format so your collection looks and plays great on M1, M2, and M3 Macs, without wasting time on trial and error.
Before Getting Started: Connecting a DVD Drive to Mac
Before you can rip a DVD on Mac, you need the right hardware. Since modern MacBooks only have USB-C ports, you can't just plug in an old external drive. You need a drive that can draw enough power from your Mac to spin the disc.
I've found that many cheap $20 drives from Amazon "click" or fail because they don't get enough juice from a single USB-C port. If you're using a MacBook Air or Pro, I recommend using a powered USB-C hub or a drive with a "Y-cable" to ensure a stable connection. Without a solid power supply, your DVD ripping software will likely crash halfway through the process.
Method 1: How to Rip a DVD on Mac for Free with HandBrake
HandBrake is still the most popular free tool for Mac users, but it isn't the "one-click" solution it used to be. Because it doesn't natively bypass DVD encryption (CSS), a standard install will often give you a "No valid source found" error when you try to rip a protected DVD on Mac. To make it work, you'll need to manually install libdvdcss, which has become much harder on modern macOS due to System Integrity Protection. If you're just ripping home-made DVDs, such as old wedding videos and travel footage, you can skip the extra libdvdcss files and follow these steps:
Step 1. Load the DVD Source
Insert your disc and open HandBrake. Click "Open Source" and select your DVD drive. If the disc is not protected, HandBrake will scan and display the available titles.
Step 2. Select the Main Title
Choose the title that matches the main movie. This is usually the longest one, but for some discs, you may need to check the duration or preview a few options to be sure.
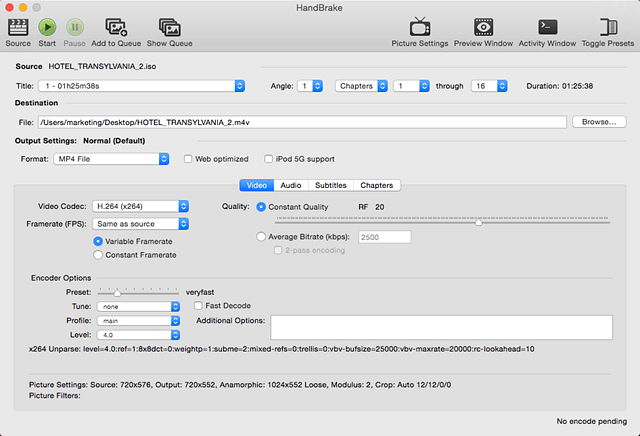
Step 3. Choose a Preset and Format
Select a preset like "Fast 1080p30" or "Apple 1080p30 Surround." Even though DVDs are only 480p, these presets help ensure correct aspect ratio and playback compatibility on modern Mac screens. If needed, you can switch the format to MP4 (default) or MKV depending on your preference.
Step 4. Set Output and Start
Choose your "Save As" location, then click "Start" to begin the conversion. The process may take some time depending on your Mac's performance, as HandBrake relies heavily on CPU encoding.
My Take: HandBrake is a CPU-intensive DVD ripper. Even on a powerful M3 Mac, it can push the system hard and make the fans spin up. While it supports Apple's VideoToolbox for hardware acceleration, it's still not the fastest or most efficient option. Worse still, it's designed for transcoding rather than full DVD backup which doesn't retain the original DVD structure, such as menus, extras, or navigation. If your goal is a complete 1:1 copy with everything intact, HandBrake isn't the right tool for that.
Method 2. How to Rip DVD on Mac with VideoProc Converter AI
VideoProc Converter AI is a practical option for ripping DVDs on Mac, especially if you're dealing with a large collection of commercial discs. Many store-bought DVDs use protection schemes like "99-title" protection, Sony UOPs, or ARccOS. It automatically bypasses copy protection and identifies the real main title, so you can rip the correct movie without manually testing dozens of files.
Once loaded, you can convert your DVD into formats like MP4, MKV, or MOV, depending on your needs. It also supports modern codecs such as H.264, HEVC (H.265), and even AV1, which helps reduce file size significantly while maintaining good visual quality. If you prefer to keep everything intact, full DVD backups are supported as well. You can copy the disc as an ISO image or VIDEO_TS folder, preserving menus, chapters, and other original information.
- Rip (commercial) DVD/ISO/VIDEO_TS folder into MP4, MKV, and 420+ formats
- Convert DVDs for iPhone, iPad, Apple TV, Android, and other popular devices
- Enable 1-click shrinking videos from GBs to MBs without noticeable quality loss
- 1:1 backup with full or main title mode, preserving menus, chapters, and extras
- All-in-one: convert, edit, de-interlace. AI-enhance footage, download, and record

Step 1. Insert and Scan
Open the program, click DVD and choose the disc that inserted in your macOS computer. It will begin analyzing the content. Protected discs are handled automatically in most cases, so there's no need for extra setup.
Step 2. Choose Output Format
MP4 (H.264) works well for most devices, including iPhone and Apple TV. If you're using an Apple Silicon Mac (M1/M2/M3), HEVC (H.265) is a good option for reducing file size while keeping similar quality.
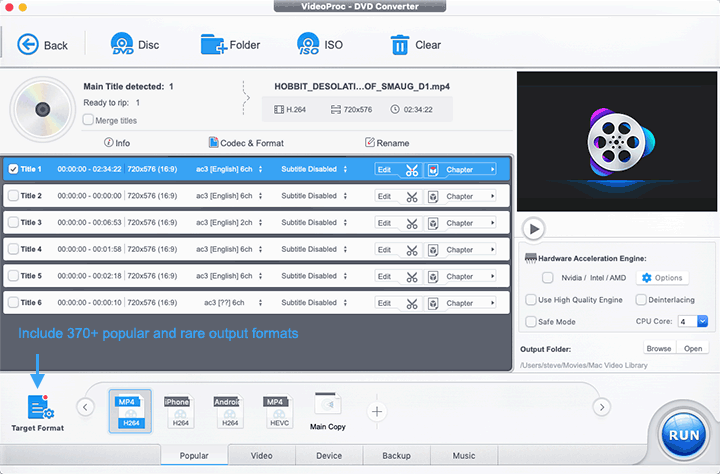
Tip: Enable Hardware Acceleration
Make sure hardware acceleration (Metal) is enabled to speed up the process. On an M2 Max MacBook Pro, a full movie typically finished in around 6–8 minutes in my testing.
Step 3. Start Ripping
Click Run and let it process. The workflow is straightforward and requires very little manual adjustment.
My Take: The main advantage here is convenience. You don't need to install extra components, figure out protection types, or tweak complex settings just to get a clean rip. Beyond DVD ripping, it also includes tools like deinterlacing and AI Super Resolution, which can help improve the look of older DVD footage when viewed on modern displays. Overall, it's a more consistent and low-effort workflow, especially when you're working through multiple commercial discs.
Method 3. How to Rip DVD on Mac with MakeMKV
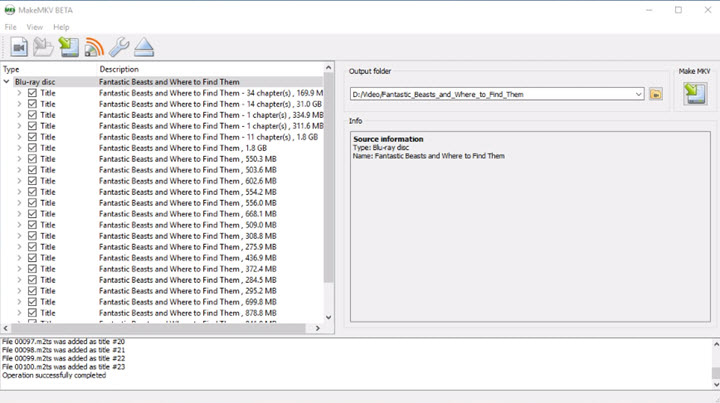
MakeMKV is a good option if your goal is to preserve the original DVD content without any quality loss. Instead of re-encoding the video, it extracts the original data from the disc and repackages it into an MKV file. This means you get the full video, along with all audio tracks, subtitles, and chapter information, exactly as they are on the disc. The downside is file size. A single DVD usually ends up around 5GB to 8GB, which can add up quickly if you're ripping multiple discs.
Step 1. Load the DVD
Open MakeMKV and insert your DVD. Click the disc icon to start scanning. After a short analysis, the program will display a list of titles, along with their duration, file size, and available audio/subtitle tracks.
Step 2. Identify the Main Movie
Look for the title that matches the length of the main movie. It's usually the longest one, often around 1.5 to 2 hours. However, don't rely on size alone. Some discs (especially protected ones) may include multiple titles with similar lengths.
How to Pick the Main Title to Rip on Mac
You can check the number of chapters, preview segments if available, or test a couple of likely candidates. Keep in mind that picking the correct title is the most important part - and often where most of the time goes. If you'd rather avoid the guesswork, some tools can automatically detect the main title for you, which makes the process much more straightforward.
Step 3. Select Tracks and Output Folder
Expand the selected title to choose which audio tracks and subtitles you want to keep. For example, you might remove commentary tracks or unused languages to save space. Then choose an output folder where the MKV file will be saved.
Step 4. Start Ripping
Click the "Make MKV" button to begin. The process usually takes 10–20 minutes depending on your drive speed. Since there's no re-encoding, the output file will be large but retains the original quality.
My Take: MakeMKV is best suited for users who want a full, lossless copy of their DVDs and don't mind larger file sizes or some manual work. It's particularly useful for archiving or preserving original content for future use. However, it struggles with many commercial movie discs due to advanced copy protection.
Which Format Should You Choose When Ripping DVDs on Mac
When ripping home and protected DVDs on a Mac, the format and codec you choose mainly depends on how you plan to use the digital copy.
MP4 with the H.264 codec is the simplest choice for most people. It works on Macs, iPhones, Apple TVs, smart TVs, and almost all popular devices, while keeping file sizes manageable.
HEVC (H.265) is a great option, if you want the same quality as H.264 but with roughly half the file size. On Apple Silicon Macs and newer Apple devices, GPU acceleration ensures smooth playback and fast encoding. For those who prioritize the smallest possible file size, AV1 offers the best compression, though playback support is still somewhat limited.
MKV is a flexible choice for those who want to preserve more of the DVD's original features, such as multiple audio tracks, subtitles, and chapters. You can even use H.264 or H.265 inside an MKV container, giving you a balance between quality and convenience.
If your goal is full archiving or burning that DVD into another disc, making a 1:1 copy as an ISO or VIDEO_TS folder ensures you keep the disc exactly as it is, including menus and extras, though the files will be much larger and less practical for everyday viewing.
In short, MP4/H.264 works well for everyday watching, HEVC/H.265 is great for saving space, and MKV or ISO copies are best if you want to preserve everything for future use.
The Bottom Line: What is the Best Way to Rip a DVD on Mac?
After testing almost every tool on the market, my advice depends on your collection. If you have a few home-recorded discs, Handbrake is a perfect, free solution. But if you have a shelf full of Hollywood movies and you value your time, a tool like VideoProc is the most efficient way to handle the encryption and speed requirements of a modern Mac.
The most important thing is to start the preservation process now. DVD discs eventually "rot" or get scratched. By ripping your DVDs to your Mac today, you're ensuring that your favorite movies remain part of your digital library for years to come.
FAQs
How do I rip a DVD on my Mac?
To rip a DVD on your Mac, insert the disc and open a DVD ripper like VideoProc Converter AI. Click DVD and choose the inserted DVD, choose your MP4 H.264 or other format as your target format, and hit RUN to start ripping DVD on Mac.
How to Fix "Drive Not Found" errors when ripping DVDs on Mac
This error is caused by the hidden macOS security setting. Since Big Sur, Apple blocks third-party apps from reading external disks by default. If your software can't detect the DVD, go to System Settings > Privacy & Security > Full Disk Access, find your ripping app, and turn it ON. This simple step "breaks the seal," allowing your software to read the encrypted data on the disc. Without this permission, no matter which tool you use, ripping a DVD on Mac simply won't work.


