Whether you wish to play a DVD bought from Amazon.com (USA) on a Canada DVD player or need to back up the favorite TV series DVDs on Mac, you are going to need to rip the DVD. Unfortunately, ripping protected DVDs on Mac can be hard.
❓ Why is Ripping Protected DVDs on Mac So Difficult
The core challenge stems from sophisticated copy protection (DRM) embedded in commercial DVDs to prevent illegal distribution. For instance, these discs use methods like:
- CSS: A foundational encryption system.
- RCE: Region Code Enhancement, locking discs to specific geographical areas.
- UOPs: User Operation Prohibitions, restricting actions like skipping intros.
- Sony ARccOS & RipGuard: Introduce artificial errors to confuse rippers.
- Disney's X-project DRM: Notorious for creating 99 or more fake titles to obscure the real movie.
Because of these different protection schemes, many media players and basic DVD rippers either fail to recognize the disc or stop halfway through. To find DVD rippers that actually work, I tested several options and picked four reliable methods for ripping copy‑protected DVDs on Mac. They include both paid all‑in‑one software and free open‑source tools, along with the key setup steps. All of them work on modern Macs and are compatible with recent macOS versions, including macOS Tahoe and macOS Sequoia.
Disclaimer: This guide is intended for personal fair use and backing up legally purchased media. Please refer to the DVD copyright laws in your country before ripping protected content.
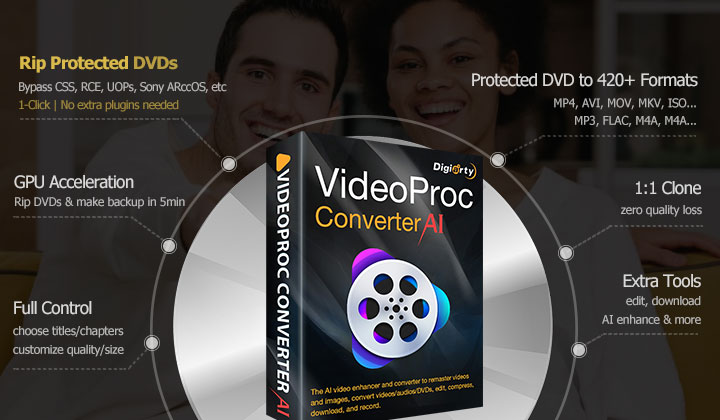
Method 1. Rip Protected DVDs on Mac with VideoProc (Easy, Fast)
VideoProc Converter AI (from Digiarty) offers a simple, click-and-go way to remove copy protection from DVD on Mac. You can rip discs to digital formats like MP4 or MKV for easier playback, or create full disc backups that preserve the original structure, such as VIDEO_TS folders or ISO files. It also works reliably with DVDs that use complex copy protection schemes including Sony ARccos, Disney DRM, and Region Code (1-6).
It works fast. In my tests, for example, it handled a Disney DVD with 99 titles flawlessly, automatically identifying the main movie. With hardware acceleration enabled, the rip completed in just 2 minutes, while most other DVD rippers I tried, especially open-source ones, took anywhere from 30 minutes to 2 hours.
Beyond DVD ripping, it also functions as a media converter and AI video and image upscaler, supporting a wide range of video and audio formats. You can also compress large videos or trim, edit clips, and even level up the picture clarity with AI before saving.

Pros:
- Bypass CSS, RCE, UOPs, Sony ARccOS, and more DVD protections without extra plugins.
- Rip Disney 99-title DVDs, commercial movies/TV series/workout DVDs, and more.
- Rip copy-protected DVDs to MP4, MKV, MOV, VIDEO_TS, ISO, MPEG-4, and 420+ formats.
- 6 backup modes to digitize your DVD collection with the original content and quality.
- Gain expert-level control over quality, resolution, chapters, subtitles, etc.
- AI upscale DVD and old videos to 4K for perfect big-screen viewing.
Cons:
- It is a paid software (though a free trial is available with output length limits).
How to Rip Protected DVDs on Mac Within a Simple Click
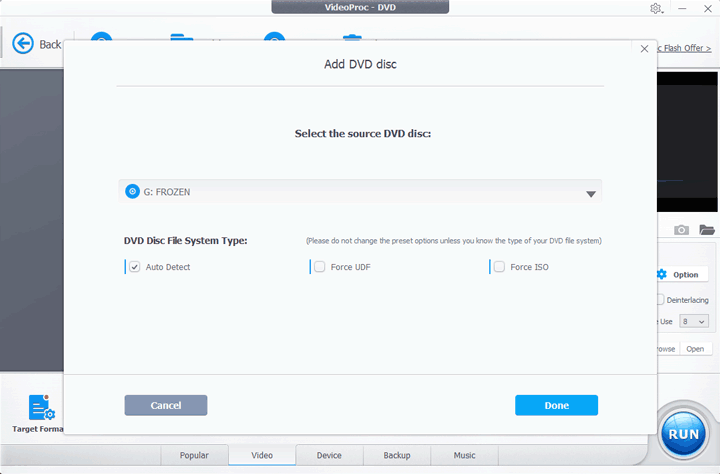
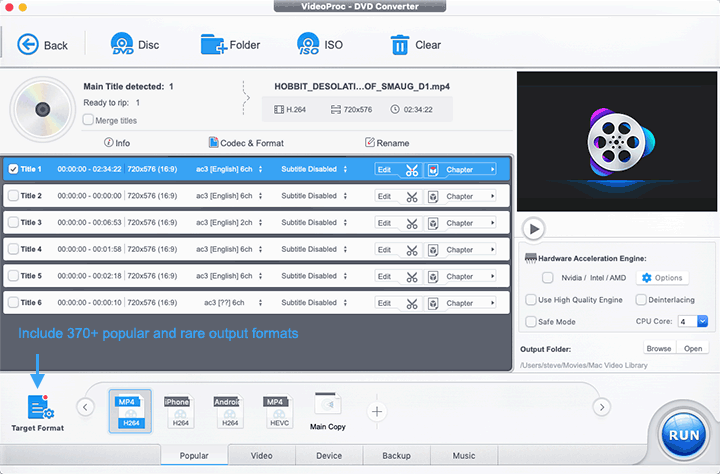
Step 1: Select the Protected DVD.
Insert the DVD into your Mac's optical drive. Install and download VideoProc Converter AI. Next, launch the program. Click DVD and then Disc. Select the protected DVD you just inserted, then click Done to proceed.
Step 2: Choose the Output Format.
Select the desired output format from the options given by the Target Format panel. VideoProc Converter AI allows you to convert protected DVD to MP4, MKV, FLV, MOV, AVI, and 420+ other media formats.
Tips for picking the best format for your needs:
- For a perfect (1:1) backup: In Backup Mode, choose from Main Copy, Title Copy, ISO (disc image), Video_TS (DVD folder), MKV Copy, or H264 MKV.
- To save storage space (ideal for mobile or web): Pick a popular digital format from the Target Format section. Our top recommendation is MP4 HEVC. We've found it's the best way to get up to 50% smaller files than H.264 without losing quality. For instance, a 9GB DVD typically compresses to about 1.5GB in HEVC, making it perfect for your mobile devices and sharing online.
- To tailor your output further: You can easily rip audio from copy-protected DVDs by choosing formats like MP3, FLAC (lossless), M4R (ringtone), etc. Or, optimize your content for specific device playback by selecting profiles for iPhone, iPad, Android, PS4/PS5, Xbox, and many more.
Step 3. Start to Rip the Protected DVD on Mac.
Click Browse to choose your desired output folder and then click Run to begin the process of ripping encrypted DVD on Mac.
Way 2: Rip Protected DVD on Mac for Free with HandBrake (Advanced, Open-Source)
HandBrake is a well-known, cross-platform, open-source video transcoder that’s popular with tech enthusiasts and home theater users. You can use it to rip DVDs on a Mac, and it gives you detailed control over things like bitrates, frame rates, audio tracks, and subtitles.
By default, HandBrake can only read homemade or unprotected DVDs. Commercial discs aren’t supported out of the box. On a Mac, you can get around this by adding a third-party library called libdvdcss. Installed via the Terminal, it quietly works in the background to handle CSS (Content Scramble System) keys and unlock encrypted sectors. With this setup, HandBrake becomes a free and highly customizable way to rip standard copy-protected DVDs if you don’t mind a slightly technical workflow.

Pros:
- Completely free and open-source.
- Offers expert-level control over video encoding (bitrate, frame rate, audio tracks, and subtitles).
- Excellent compression for creating small, high-quality MP4 or MKV files.
Cons:
- Requires command-line usage via Mac's Terminal to install the necessary library.
- Cannot bypass advanced structural DRM (like Disney's 99-title protection or ARccOS).
- Does not support 1:1 disc image backup (like ISO or Video_TS folders).
How to Rip Protected DVD on Mac for Free with HandBrake
Step 1: Install HandBrake.
Go to the official site of HandBrake to download and install the latest version of HandBrake on macOS.
If you open up HandBrake right now, the Mac might remind you, "HandBrake" can't be opened because it is from an unidentified developer. If you see this notice, press OK to exist.
Press System Preference to launch up the Security & Privacy panel. Hit Open Anyway, and then press the Next button on the shown up new panel.
Step 2: Install Homebrew.
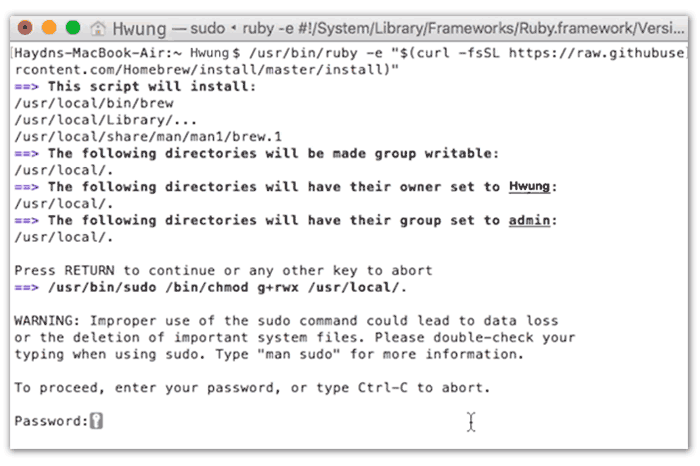
Press CMB + SPACE, enter Terminal to start up Terminal. Alternatively, you can go to Finder > Application > Utility to locate Terminal, and click on this to open the Terminal application. Herein, enter the below Homebrew install command line, and then press RETURN.
- macOS Mojave or later: /bin/bash -c "$(curl -fsSL https://raw.githubusercontent.com/Homebrew/install/master/install.sh)"
- macOS High Sierra or earlier: /usr/bin/ruby -e "$(curl -fsSL https://raw.githubusercontent.com/Homebrew/install/master/install)"
Note: Some users might come across a pop-up panel that asks your permission to install the developer tools. In this case, press Enter > Agree. Hit Done once the process finishes.
Enter the administrator password when the Terminal application reminds you to enter your password for proceeding. Your trusty Mac computer now starts to install Homebrew. This may take minutes.
Input brew help when you are reminded to run 'brew help' to get started. Press RETURN to proceed.
Input brew doctor when you are reminded to make a choice for further help. Press RETURN to proceed.
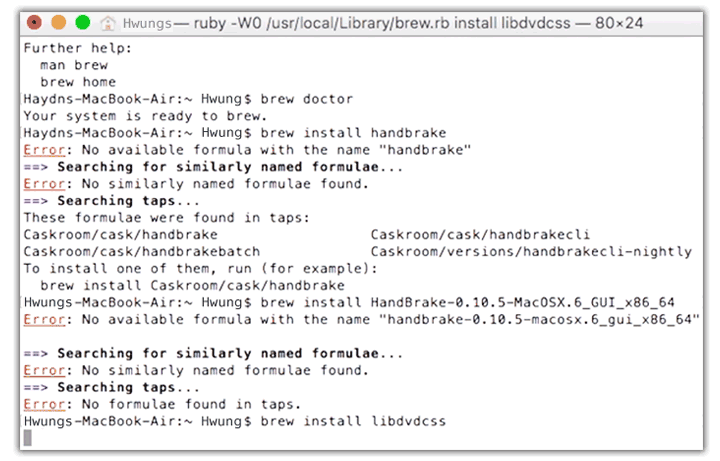
Step 3: Install the Libdvdcss Library.
Enter command line brew install libdvdcss on the Terminal window, press RETURN. Now, you should have libdvdcss successfully installed on your Mac.
Step 4: Select the Target Protected DVD.
Insert the protected movie DVD onto the computer. Launch up HandBrake. Select the right DVD drive on the pop-up sidebar, and choose Open. HandBrake starts to scan the titles of the chosen DVD.
Step 5: Select the Wanted Titles.
HandBrake, by default, will choose the main title of the protected movie DVD. Suppose you want to rip one or several specific chapters, press the drop-down button of Title, and select the needed ones.
Step 6: Choose the Picture Quality.
On the right side of the HandBrake DVD ripper, there are several presets. Choose the one that works best for you. I myself usually select Very Fast 480p30 to rip US DVDs and select Very Fast 476p25 for EU DVDs.
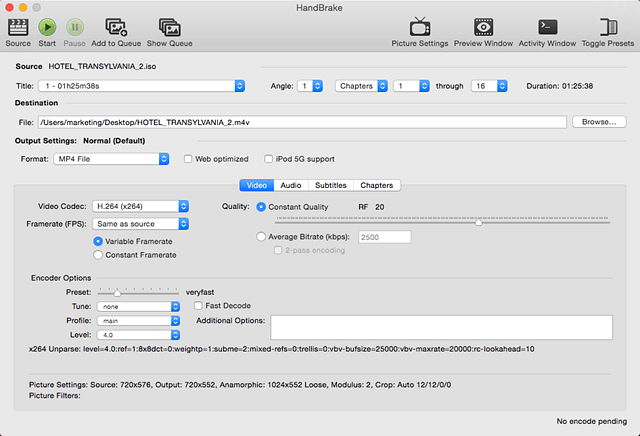
Step 7: Rip Protected DVD on Mac.
Assign a destination folder to hold the output DVD copy file. After that, click on the green Start Encode button underneath the top menu bar. HandBrake now starts to rip protected DVD on your Mac.
Disclaimer: Digiarty Software does not advocate ripping protected DVDs for any commercial purpose and suggests referring to the DVD copyright laws in your countries before doing so.
Way 3: Rip Protected DVD on Mac for Free with MakeMKV (Lossless Backup)
MakeMKV is a popular choice among home theater users who want to rip protected DVD on Mac without reducing video quality. Unlike tools such as HandBrake that compress video during conversion, MakeMKV simply extracts the original video, audio, and subtitle tracks from the disc and saves them in an MKV (Matroska) file. The streams remain unchanged, so the output keeps the same quality as the source DVD.
Because it doesn’t re‑encode the video (typically MPEG‑2 on DVDs), the process is relatively fast and usually limited by the read speed of your Mac’s optical drive. In many cases, a 2‑hour DVD can be processed in around 10–15 minutes.
MakeMKV also includes its own built‑in decryption engine. It can handle common protections such as CSS and region codes, allowing users to rip protected DVDs on Mac more easily. The software has been labeled as "beta" for years, but it remains fully functional. During this period, the developer regularly provides a free beta key on the official forum, which allows users to access its core DVD and Blu‑ray ripping features at no cost.
Pros:
- Preserves the original video, all audio tracks, and subtitles exactly as they are on the disc.
- Very fast processing (usually 10-30 minutes, limited mostly by your DVD drive's read speed).
- Free to use while in beta (which it has been for years).
Cons:
- Generates massive file sizes (uncompressed standard DVDs can be 4GB–8GB).
- Only outputs to MKV format.
- It’s occasionally struggle with highly complex, newer DRM structures.
Step 1: Load the Protected DVD.
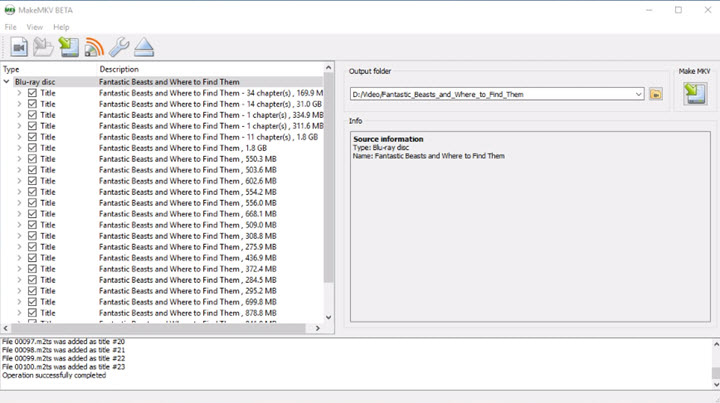
Download and install MakeMKV on your Mac, then launch the program. The initial screen will display a list of available optical drives. If you haven't inserted the encrypted DVD yet, do so now. Click on the source menu and select the DVD you just inserted to load it into the program.
Step 2: Choose DVD Titles.
MakeMKV will then take a few minutes to read the disc, remove the DVD copy protection, scan the DVD contents, etc. Once finished, it displays the titles. Video and audio content of each title are displayed as well, in a tree-like structure. By default, MakeMKV selects all titles to be copied to MKV on Mac, but you can choose specific titles by unchecking those you don't want. Generally, the title with the most chapters and the largest size is the main movie.
Step 3: Rip Copy Protected DVD on Mac.
Choose an output folder to store the ripped DVD video, then click the MakeMKV button to start the process of ripping protected DVDs on Mac.
Way 4: Rip Protected DVD on Mac for Free with VLC (Basic Uses)
VLC Media Player is a free, open-source player that can open nearly any video format and also lets you rip protected DVD on Mac using its Convert/Stream feature. Unlike dedicated rippers, VLC extracts video by playing the DVD and recording it into a new file, so the process runs in real time—for example, a two-hour movie takes about two hours to rip.
VLC includes basic decryption libraries such as libdvdcss, allowing it to handle standard CSS encryption and region codes without extra setup. Some DVDs with advanced structural protections, like Sony ARccOS or Disney’s 99-title layout, may require more patience, but VLC remains a convenient all-in-one option for extracting DVD content on Mac.

Pros:
- Completely free and likely already installed on your Mac.
- Can bypass basic CSS and Region Codes without extra terminal installations.
Cons:
- The ripping process occurs in real-time (a 2-hour movie takes 2 hours to rip).
- Cannot handle advanced DRM (X Project, ARccOS).
How to Rip Protected DVD on Mac for Free with VLC
Step 1: Add the Protected DVD.
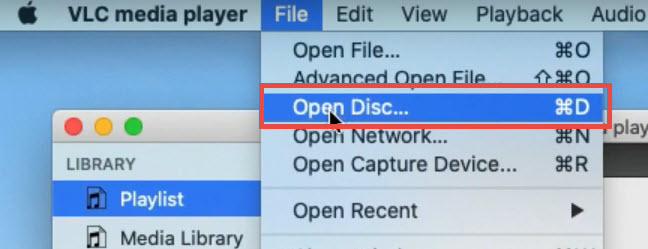
Go to the VLC official site and download the most recent release of VLC for macOS computers. Insert the DVD you want to rip onto your Mac and launch VLC media player. Then click on File at the top left corner of the main window, then choose the Open Disc... button. Choose the DVD disc for loading to the program.
Step 2: Select DVD Titles.
Click Disable DVD menus. Check Stream output. Click the Settings button at the bottom right corner to choose the proper title. If you're unsure which title to choose, you can play the DVD in VLC to identify the correct title. However, it may not always work, especially with heavily protected DVDs.

Step 3: Specify the Output Format.
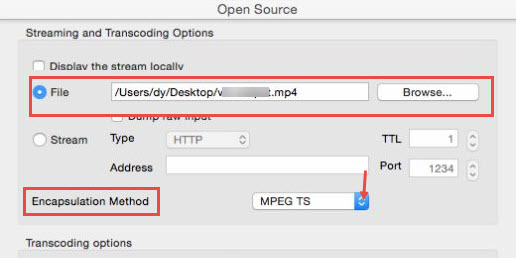
Check the Stream output box and hit the Setting button. Click Browse… to choose the destination folder on your Mac where you want to save the ripped video and give it a name. Open the Encapsulation Method dropdown menu. Select the desired output format (e.g., MP4, AVI) for the ripped DVD content.
Step 4: Rip Protected DVD on Mac.
Click Start to begin ripping your protected DVD on Mac via VLC. Wait for the process to complete. This can take several minutes to a few hours depending on the length of the video and your computer's processing power.
Which Method is Right for You? Our Recommendation
Choosing the best method to rip your protected DVDs on Mac depends on your priorities regarding ease of use, cost, output quality, and the complexity of the DVD's protections. To help you decide, here's a side-by-side comparison of the methods:
Feature |
VideoProc Converter AI |
HandBrake |
MakeMKV |
VLC Media Player |
|---|---|---|---|---|
Protection Support |
All types |
Limited |
Basic |
Basic |
Output Formats |
420+ popular and rare formats |
MP4, MKV |
Only MKV |
Limited (Basic streams) |
Speed |
Fastest! Up to 47x faster |
Moderate |
Fast |
Slow |
Ease of Use |
Easiest in a click |
Moderate |
Easy for basic ripping |
Difficult |
File Size Control |
Excellent |
Good |
None |
Limited |
Best For |
Reliable, easy, high-quality ripping of any protected DVD. |
Ripping CSS-protected DVDs (if tech-savvy). |
Bringing MKV copies of less complex DVDs. |
Basic ripping of CSS/Region/UOP DVDs. |
Final Verdict
There is no single "best" way to rip protected DVD on Mac, only the right tool for your specific scenario:
- If you want 100% original quality and don't mind huge file sizes, use MakeMKV.
- If you are tech-savvy and willing to set up terminal commands, HandBrake is a fantastic free option.
- If you want to save time, avoid technical setups, and directly output highly compressed MP4s for your iPhone or iPad, VideoProc Converter AI is the most reliable premium choice.
Free download and install VideoProc Converter AI to rip any protected DVDs on Mac!


