
Summary: How to record Minecraft? Follow through the post and learn the top 5 Minecraft screen recorders that you can leverage to record Minecraft on Windows and Mac without lag.
Minecraft is a 3D sandbox game where there are no set goals to conquer. With adventures unfolding at every turn, the game empowers you to unleash your creativity limitlessly. But why keep your thrilling exploits confined to your Minecraft screen? By recording Minecraft gameplay, you can share your triumphs and entertain others, and what's more, it opens doors to connecting with fellow players and showcasing your skills. Thus in this post, we are going to show you how to record Minecraft with the top 5 Minecraft screen recorders. And whether you're a seasoned player or new to the game, these 5 best recording software for Minecraft could help capture the essence of your gameplay and share it with others.

Best Way to Record Minecraft on Windows 10/11 and Mac
As the best Minecraft screen recorder for Windows 10/11 and Mac, VideoProc Converter AI allows you to record Minecraft in 4K/HD quality with no lag. It offers the most flexible way to capture the entire or partial Minecraft gameplay screen, record video from your webcam, or simultaneously to create a game reaction video for your YouTube. Besides, packed with a basket of utility tools, you can crop, trim, and highlight any content on your Minecraft screen, and even add outlines, texts, arrows, voiceover, images, and more.

VideoProc Converter AI – Best Way to Record Minecraft with No Lag
- Record the Minecraft gameplay screen and your voice at the same time.
- Capture full or selected 4K/HD Minecraft gameplay screen in multiple recording modes.
- Full GPU acceleration to record on Minecraft without lag.
- Draw highlights with images/shapes, and add annotations with texts during recording.
- Record, edit, compress, convert, and trim Minecraft gameplay recording in one-stop.
Excellent ![]()
![]()

Step 1. Free download VideoProc Converter AI and launch it on your Windows/Mac.
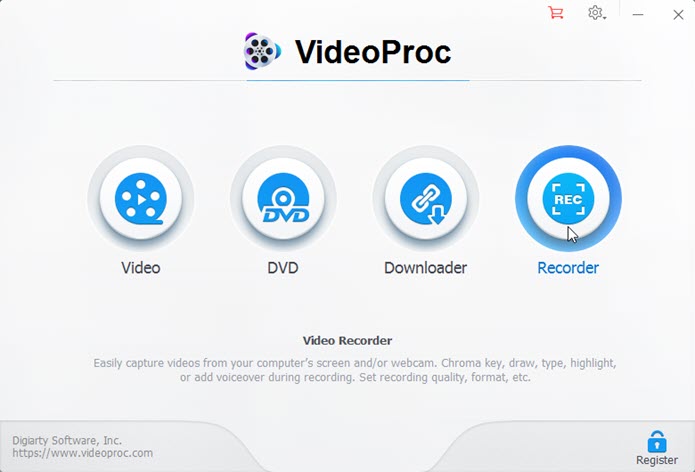
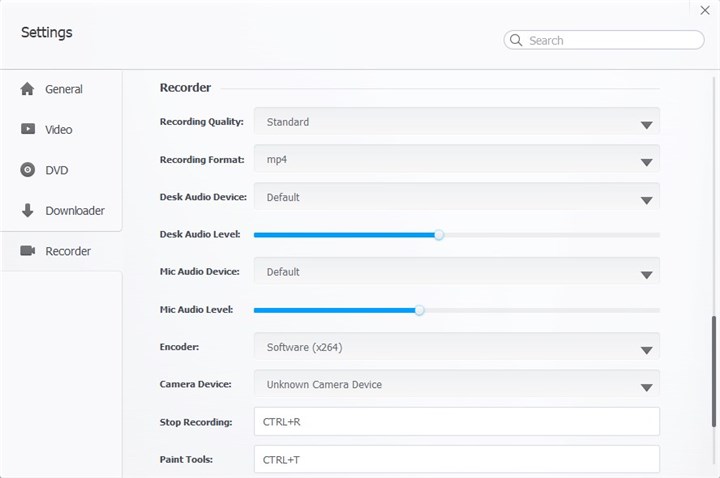
Step 2. Tap Recorder on the home page, and select a recording mode. Click on the Wrench icon at the top-right corner to adjust the video quality, format, output path, and other settings.
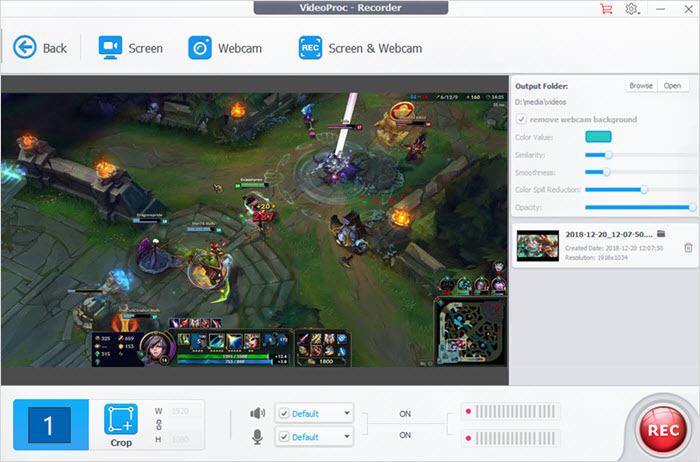
Step 3. Open the Minecraft gameplay you wish to record, and you can use the Crop tool to select to record a part of your screen if needed.
Step 4. Enable audio devices so that the recorder can capture both the microphone and system audio while recording Minecraft.
Step 5. Click on the Rec button to start recording, and you can use the shortcuts 'Ctrl+Alt+Shift+T' to bring or hide the painting tools during recording. And once finished, click the Stop button to stop recording, and the Minecraft gameplay video clips will be stored in the location previously configured.
How to Record Minecraft with OBS
OBS, an open-source video recording software for Windows 10/11, Mac, and Linux, is a great option to record Minecraft gameplay for free. One of OBS's key strengths is its versatility and extensive customization options. You can capture your entire Minecraft gameplay screen or specific elements within it. Furthermore, the Minecraft screen recorder allows seamless integration of your webcam feed, overlays, images, and text, and you can optimize your Minecraft recordings by adjusting bitrates, frame rates, and other parameters to achieve optimal results.
Step 1. Free download OBS screen recorder on your computer. Launch it.
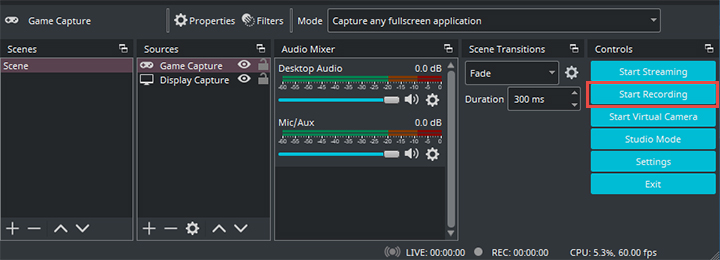
Step 2. Click on the '+' button under the 'Scenes' section, and give it a descriptive name. Then click on the '+' button under the 'Sources' section and select 'Game Capture'. Give it a name, such as 'Minecraft Gameplay'.

Step 3. Click on 'Settings' in the bottom-right corner, and in the 'Audio' tab, select your desired audio input source, such as your microphone.
Step 4. Return to the main OBS window and click on the 'Start Recording' button. Now Open Minecraft and play the Minecraft game in full-screen mode. OBS will record your gameplay in real time.
Step 5. Press the record button again to stop the recording.
How to Record Minecraft with Bandicam
Bandicam is another Minecraft recording software that can record in Minecraft with no lag on Windows 10/11. It provides the flexibility to customize your recording area, allowing you to select a specific area of your Minecraft screen to capture. Moreover, the Minecraft screen recorder utilizes a higher compression ratio while preserving content quality that closely resembles the original work. This can ensure that your Minecraft recordings are of excellent visual fidelity.
Go download and install the latest version of Bandicam, and follow the steps below to record Minecraft on Windows:
Step 1. Launch Bandicam, and click on 'Settings' in the top right to configure both the video and audio settings for your Minecraft recording. And then run Minecraft on your computer.
Step 2. Click on the Rectangular area box, which presents the recording area. By default, it will cover the entire screen. If you want to record only Minecraft, you can resize the box to fit the Minecraft window.
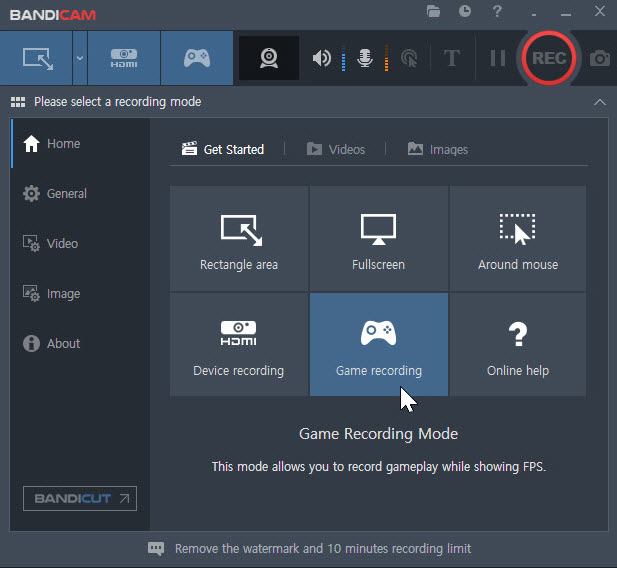
Alternatively, you can choose the 'Game Recording Mode' and select Minecraft from the dropdown list. This will automatically adjust the recording area to the Minecraft window.
Step 3. Click the 'Record' button, and the recording will start after the countdown, or you can use the hotkey (by default, F12) to start recording Minecraft as well.
Step 4. Once you have finished recording your Minecraft gameplay, click on the 'Stop' button or hit F12, and the software will save the recorded Minecraft gameplay video to the output folder you specified.
How to Record Minecraft with QuickTime
QuickTime Player goes beyond being a multimedia player for Windows and Mac systems. With its remarkable screen recording feature, you can effortlessly record on Minecraft for free, capturing the entire screen or selecting a specific portion with ease. Once you have recorded your desired content, you can save the file directly on your computer or share it on your social platforms.
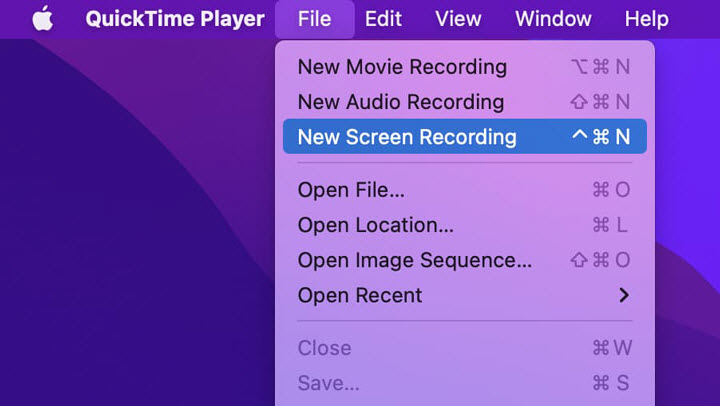
Step 1. Open QuickTime on your Mac or Windows, and click on File > New Screen Recording. Alternatively, you can use the shortcut key Command + Control + N to start a new Minecraft recording.
Step 2. In the screen recording window, you can customize settings before starting recording on Minecraft. And to record audio from Minecraft, click on the small arrow next to the record button and select the appropriate microphone option.
Step 3. Go to the Minecraft gameplay screen you wish to record, and click on the screen to select the area you want to capture.
Step 4. Click on the 'Record' to start recording in Minecraft gameplay. After finishing, click on the 'Stop' button in the menu bar at the top of the screen to stop the Minecraft recording.
QuickTime will open the recorded Minecraft gameplay in a new window. To save it, click on 'File' in the menu bar and choose 'Save' or 'Save As' to specify a location and name for the video file.
How to Record Minecraft with Game Bar
Xbox Game Bar is a versatile gameplay overlay that comes pre-installed with Windows 10/11 and fits with almost all PC titles, including Minecraft. Optimized for game-play capture, the tool can easily record on your Minecraft gameplay without any lag. Follow the steps below to record Minecraft gameplay with Game Bar:
Step 1. Make sure you have the Xbox Game Bar installed on your Windows computer, and if you don't have it, you can download it from the Microsoft Store.
Step 2. Launch Minecraft and start a game session that you want to record. Press the Windows key + G to open the Xbox Game Bar overlay
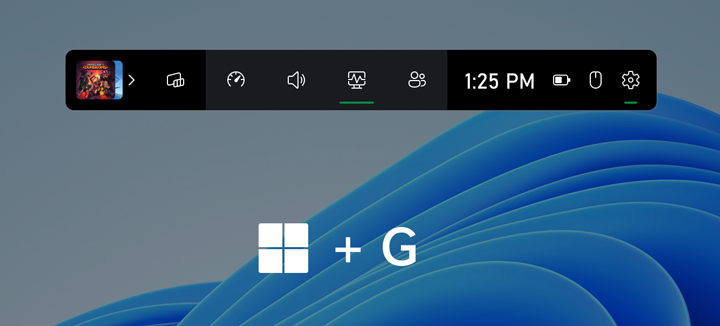
Step 3. Launch Minecraft and start a game session that you want to record. Press the Windows key + G to open the Xbox Game Bar overlay
In the recording options window, make sure the 'Record from' dropdown menu is set to 'Game' to capture Minecraft specifically.
If you want to include your microphone audio in the recording, make sure the 'Record mic' option is enabled.
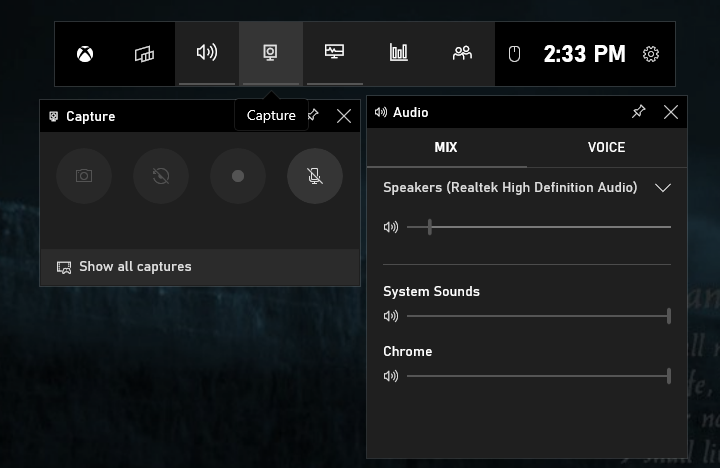
Step 4. Then click on the 'Record' button or use the keyboard shortcut Windows key + Alt + R to start recording in Minecraft. During the recording, a small timer will appear in the top right to indicate the during of your recording.
Step 5. Once finished, press the Windows key + G again to open the Game Bar overlay. Click the 'Stop' button on the recording control widget to end the recording.
Your recorded Minecraft gameplay video will be saved in the 'Captures' folder in your Videos directory by default.
FAQs
1. How to record Minecraft on Windows 10?
To record Minecraft on Windows 10, you can choose the built-in Xbox game bar:
Press the Windows key + G on your keyboard to open the Game Bar overlay, and click on Record to directly record Minecraft on Windows 10 without downloading any third-party screen recorder.
2. What recording software do YouTubers use to record Minecraft?
The recording software YouTubers use to record Minecraft gameplay varies, depending on their preferences and specific needs. Some commonly used recording software for Minecraft among YouTubers includes OBS, Bandicam, Game Bar, and VideoProc Converter AI. And for those seeking easy and full-featured recording software for Minecraft, try VideoProc Converter AI.


