For video gamers, recording gameplay on your PC to share with friends, or on video platforms, like Twitch and YouTube, would be a very common need. So to help you with this job and make it much easier, we will list 4 tools, for you, with detailed steps.
And they are,
- Windows 10/11 Game Bar
- NVIDIA Shadowplay
- OBS Studio
- VideoProc Converter AI
Choose the one that your prefer to start recording your gameplay on PC. Or if you know nothing about any of them, you can check them one by one. We will share you every detail about their video game capturing.
How to Record Gameplay on PC with Windows 10/11 Game Bar and Game DVR
Game Bar and Game DVR are the built-in gameplay recording features only available in Windows 10/11. Windows 7 and 8 users cannot use it. Its interface is very simple and user-friendly, making it easy for you to capture tons of fantastic gameplay moments, and create gaming montage from those recordings. To open it, you can just simply press the shortcut Windows key + G. And you will see its interface like this,
Below, we'll break down each in more detail.
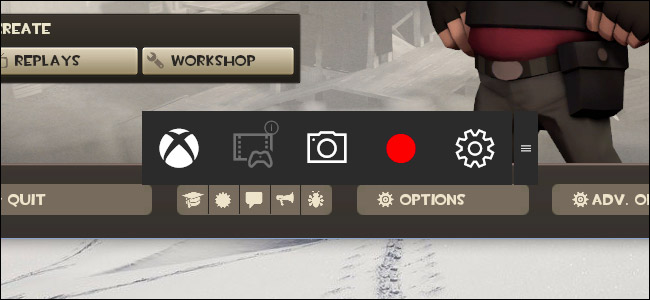
To record your gameplay while you are playing it, just click the red record button, or use the shortcut Windows key + Alt + G. Here is a tip. If you cannot see the Game Bar, it is probably because you are playing the video game in windowed mode.
After starting recording, Game Bar would show you the timer in the top right corner of the window in default. If you do not like it, you can press the shortcut Windows key + Alt + T to hide it. When you want to finish the recording, just press Windows key + Alt + R. And the recorded file would be saved in the user's Videos\Captures folder.
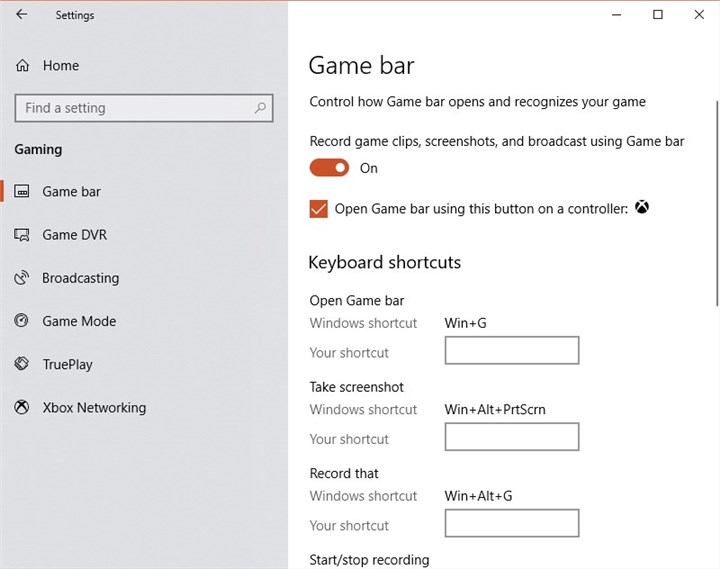
These are pretty much the basic features which we will need for recording video game in Windows 10/11 with the Game Bar and Game DVR. In fact, they can help us do more for the job. First go to Settings and find Gaming on Windows 10 or Windows 11. You will see Game Bar and Game DVR there.
In Game Bar, you can turn on or off this feature, and customize the keyboard shortcuts as with your preference.
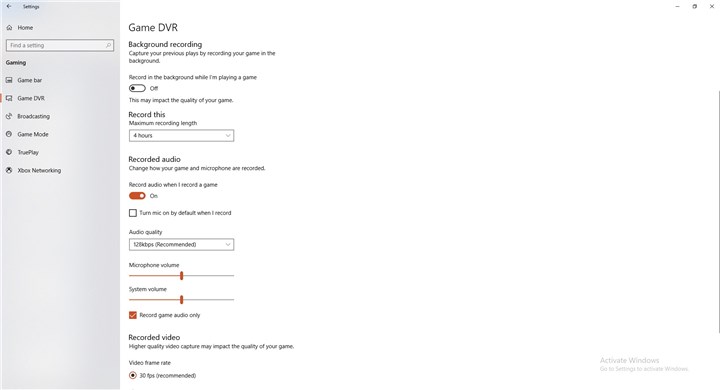
In Game DVR, there are more features than Game Bar.
1. Check and change the game clips saving folder.
2. Background recording. By turning it on, we can record the gameplay in the background while we are playing the game, as long as from 15 seconds to 10 minutes. The bad thing is that this feature may impact the game quality.
3. Change the maximum recording length. Game DVR supports recording from 30 minutes to 4 hours.
4. Record audio. By turning this feature on, Game DVR would automatically record both system and microphone sounds. There you can also change the audio quality with options, 96kbps, 128kbps, 160kbps, and 196kbps.
5. Change recorded video game quality. There you have two options for your recorded gameplay, 30fps and 60fps. You can also directly choose the video quality by Standard or High.
How to Record Gameplay on PC with NVIDIA ShadowPlay
ShadowPlay is just a part of the NVIDIA GeForce Experience. As its name shows, it is only with the NVIDIA graphic card. If your PC is built with AMD graphic card, you can go to choose the AMD ReLive.
When ShadowPlay records video games, it utilizes the GPU itself, no taking up your CPU. So it would be much smoother than other recording tools. While, what it can improve is that NVIDIA should give this software an indicator or something on the screen when recording, so users can know that recording is happening. Anyway, the operation would be very simple.
Step 1. Run your game. When you want to record it, just click the shortcut key Alt + Z to bring up the Nvidia ShadowPlay.
Step 2. Choose the Record option to start recording.
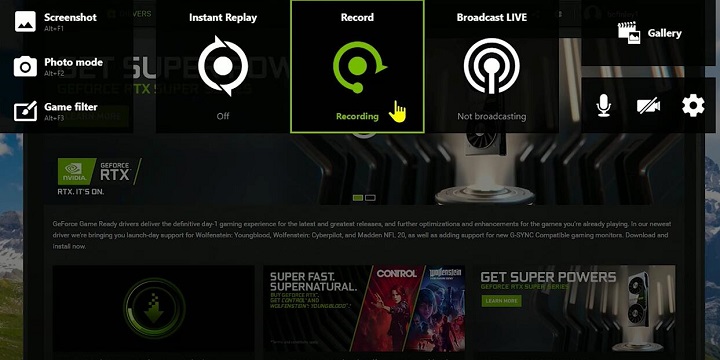
Step 3. When you plan to stop the recording, just click the Alt + Z again and choose stop recording option.
How to Record Gameplay on PC with OBS Studio
OBS Studio is a free and open source application for video recording and streaming. In my personal perspective, it should be the best options for video game recording. In it, you can,
1.create multiple scenes, like computer window, images, text, browser windows, webcams, capture cards and more, and freely switch between them with custom transitions.
2.use a bunch of configuration options for better recording experience.
3.stream on Twitch, YouTube, and more platforms.
Step-by-Step Guide on How to Use OBS for Gameplay Recording
Step 1. Open this software on your PC (If you don't have it yet, please head to its homepage for downloading.).
Step 2. Go to Scenes, then add one scene, and give it a name that you like.
Step 3. Next go to Sources menu to choose one option. Here we choose Game Capture. Also, you can give it a name, and then click the OK button.

Step 4. Then a window with multiple properties would pop up. You can leave it as it is. Or you can also customize them for better recording experience. About how to set them, I will show you in a specific part below. After all set, click the OK button.
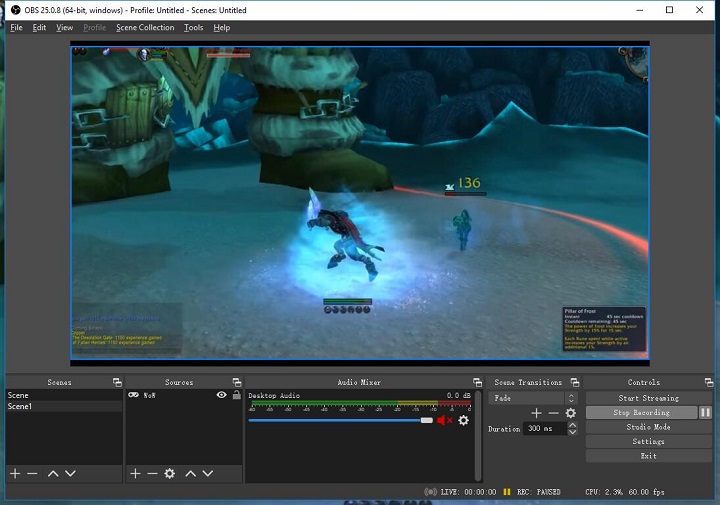
Step 5. Now just choose the Start Recording option.
How to Set OBS for Best Video Game Recording (Especially Low-end PC)
When we are playing the video game and recording it with OBS at the same time, if the settings are not very OK, PC would become laggy, especially for the low-end one. So in this part, we will tell you how to customize the OBS settings for better gameplay recording.
When we are playing the video game and recording it with OBS at the same time, if the settings are not very OK, PC would become laggy, especially for the low-end one. So in this part, we will tell you how to customize the OBS settings for better gameplay recording.
1. Configure the Basic OBS Settings
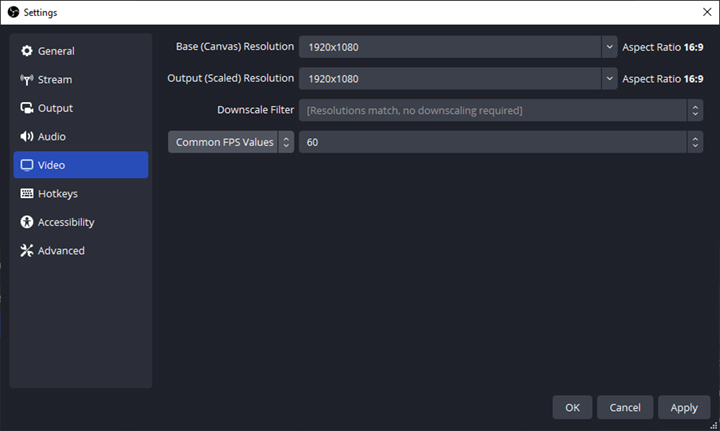
First, we will begin with the simple and common ones. Choose the Settings which is in the right corner of its homepage. Then in the Settings window, choose Video option. There you can turn all video settings to the level that your PC prefers, like
1. Reducing recording resolution to 720p or 480p.
2. Using the Bicubic downscale filter.
3. Lowering FPS to 24 or 30.
2. Apply the Quick Sync Video Feature
Quick Sync Video is one of the Intel's hardware core for quick video encoding and decoding. In OBS, you can activate it. So Intel's QSV will handle the video encoding and decoding related to the recording job, while, your NVIDIA or AMD graphic card handles the job related to video game playing. By that, your PC would run at its full capacity and become smoother.
First choose the Output option in the OBS Settings page. Then find the Encoder section and switch it to the Hardware (QSV) option.
If you cannot find this option, it is probably because your PC's CPU has no such capability. Or you can also use some tools to check if your PC has it or not, for example, VideoProc Converter AI.
How to Record Gameplay on PC with VideoProc Converter AI
VideoProc Converter AI is an application with a bunch of features related to media file processing. One of them is the recorder feature. With it, recording video game on your Windows computer would become much easier. It provides three modes for you to record a gameplay. They are recording the video game screen only, the camera, and both of them. If you choose to record both gameplay and camera, there is also a chrome key feature available for replace your camera background with the game image. System and microphone sound recording is also included.
So why not free download it now and follow the steps below to start recording your gameplay?

Step 1. Install and run the VideoProc Converter AI application on your Windows computer (Tip: VideoProc Converter AI is also compatible with macOS, if you need.), and choose the Recorder feature from its homepage.

Step 2. Click the Screen or the Screen & Webcam button. Now, if you just want to record part of the game screen, you can click the Crop menu to make it. And if you want to record the sound and voice, please turn on the system and mic options.
Step 3. Now just click the REC button to start recording.
Step 4. When you want to finish the recording, just get back to VideoProc Converter AI and click the Stop menu.

How to Personalize VideoProc Converter AI for Better Gameplay Recording
In the top right corner of the VideoProc Converter AI Recorder, there is a gear-like button. You can click it for more options about the recording.
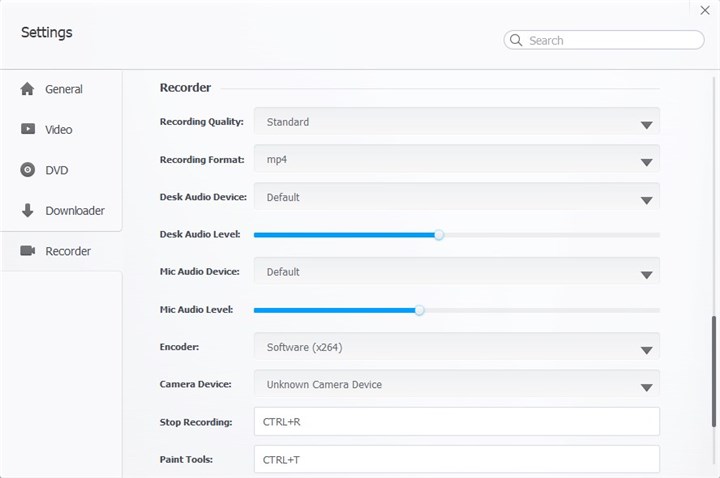
1. Recording Quality: Standard and High. Please note that high quality also means larger file size.
2. Recording Format. You will have 5 options to choose, MP4, FLV, MOV, MKV, and TS.
3. Customize audio device and volume.
4. Encoding method.
5. Customize shortcuts.
FAQs about How to Record Gameplay on PC
1. How can I record my gameplay using Windows 11 Screen Recorder?
You can use the Snipping Tool app that comes with Windows 11 to record any portion of your screen or the whole screen. To do this, open Snipping Tool, click the Record button, then click New. Drag and drop a rectangle to select the area you want to record, then click Start. When you are done, click Stop and save your recording.
2. How do I record a portion of my screen gameplay with Snipping Tool?
Snipping Tool is a built-in tool that allows you to take screenshots and record videos of your screen. To record a portion of your screen with Snipping Tool, you need to open Snipping Tool and click the Record button on the top toolbar. Then click New and drag a rectangle over the area you want to record. Click Start and wait for the countdown to begin recording. To stop recording, click Stop.
3. Where are my recordings saved with Snipping Tool?
By default, your recordings with Snipping Tool are saved to your Videos directory in a folder called Snips. You can also copy, share, or save them from Snipping Tool's gallery by clicking Open File Location.
4. How can I edit my gameplay recordings on PC?
You can use various video editing software to edit your gameplay recordings on PC. Some examples are VideoProc Vlogger, Clipchamp, Adobe Premiere Pro, etc. These software allow you to trim, crop, rotate, add effects, transitions, text, music, and more to your recordings.
5. How can I share my gameplay recordings on PC?
You can share your gameplay recordings on PC by uploading them to online platforms such as YouTube, Twitch, Facebook Gaming, Vimeo, etc. You can also share them via email, cloud storage services, or social media apps. Depending on the platform you choose, you may need to adjust the format, resolution, bitrate, and length of your recordings.
6. How can I record my gameplay using AMD ReLive?
You can use AMD ReLive, a feature of AMD Radeon Software, to record your gameplay if you have a compatible AMD graphics card. To do this, install AMD Radeon Software on your PC and open it. Then click the Settings icon and enable ReLive. Then press Alt+Z to open the overlay and click the Record button. You can choose to record the last few minutes of your gameplay or start a new recording. You can also take screenshots by pressing Alt+PrtScn. When you are done, press Alt+Z again and click the Stop button or press Alt+R again. You can find your recordings in the Videos folder under ReLive.
7. Where are my gameplay recordings saved with Xbox Game Bar?
By default, your recordings with Xbox Game Bar are saved to your Videos directory in a folder called Captures. You can also access them from the Game Bar's built-in gallery by pressing Windows key + G and clicking the Widgets menu > Gallery.
8. How can I record my entire desktop gameplay using OBS Studio?
You can use OBS Studio, a free screen recording software, to record your entire desktop or individual windows. To do this, install OBS Studio on your PC and open it. Then click the + button under Sources and select Display Capture. Choose the display you want to capture and click OK. Then click Start Recording to begin recording and click Stop Recording when you are done.
9. Where are my gameplay recordings saved with OBS Studio?
By default, your recordings with OBS Studio are saved to your Videos directory in a folder called OBS Recordings. You can also change the output location and format in Settings > Output > Recording.


