
From Fornite to Call of Duty, from Animal Crossing to Zelda, people enjoy not only playing the game, but also watching their peers playing the game, in the form of game montage. You probably have recorded tons of your best plays, how about turning these recordings into a game montage video? Both for sharing and as a memory to cherish.
After all, many players find themselves traveling back to the old time when they watch a game montage created years ago. The glorious times.
Here we will walk you through detailed steps to make a gaming montage, even if you have zero editing experience. The pros might also find inspiration here, as we have analyzed several HIT game montages, and rounded up the technique and strategy adopted in video editing.
How to Make a Gaming Montage from 0 to 1
There are several options when it comes to gaming montage. It can be a random cut of fantastic scenes, the mash-up of the highlighted moment you enjoyed and wanted to share with other players; in other cases, you might want to come up with a story in advance, and base your gameplay montage on that story.
The workflow can be slightly different for each scenario. For the random cut type, it is much easier. You don't need to overthink it, just go ahead and dump every recording into the game video editor, play around with all kinds of editing possibilities, and get inspired along the way. If you want there to be "a story" in the montage, you need to plan out things in advance and intentionally capture the scenes you need for the storytelling.
Either way, editing gameplay montages can be as fun as playing the game, and as less daunting as you might think. Below is the roadmap to clear your mind, from deciding your production type to editing and sharing the montage.
1. Decide Your Montage Type/Story
You got tons of gameplay recordings but feel lost when trying to assemble them into one video? You cannot decide which clip goes first and what's next? You don't know how long each clip should be and how to edit them to the beat of the music? All these questions can be the reasons that discourage you from creating a gameplay montage.
Deciding your montage type in advance can help you clear your mind and make an EPIC gaming montage, one that keeps viewers watching and distinguishes itself from the average montage that swarmed across YouTube.
For instance, the creative gameplay video NEVERMORE [CS: GO] by Fuze on YouTube is based on a story, which you can read in the description on the NEVERMORE [CS: GO] video watch page.
For Animal Crossing: New Horizons Player, you can go extreme with an assumption: What will happen if I dig up and flood all the ground? See, that's a story you can base on, experiment on, record, and edit into a video gameplay montage. Just so you know, YouTuber PDWinnall created the video to tell that story, and it has 7 million views now since it was uploaded in 2020.
If you don't want to go that far in making a montage video, you can also go by a simple theme. For instance, Call of Duty players can record all the headshot snipings, and compile the clips into one montage.
2. Capture the Gameplay
Depending on which platform your game is on, the methods to capture the video game are varied. The most important thing is, make sure the recorder supports Replay Buffer. It will record fantastic scenes that happened seconds or minutes ago. By doing so, you don't have to record the gameplay the entire time and burn your hardware, but capture the moment after good things happen.
For computer games, you can use dedicated game recording software to capture the gameplay. Don't forget to tap on the default recorder offered by your GPU. For instance, the Shadowplay in Nvidia GeForce Experience supports the replay buffer natively.
For game consoles such as PS4, you can record the video natively for up to 60 minutes with the gamepad, or use a capture card to record it longer than an hour. Here is a detailed tutorial to record PS4 gameplay in 3 ways, with pictorial guides. For Xbox users, check this guide instead.
3. Download Video Editing Software
Once you have all the clips ready on the computer, it's time to use a video editing application to create the game montage. Depending on your skill level, budget and PC specs, you can go with Premiere Pro CC, DaVinci Resolve, Final Cut Pro on Mac, and even venture for After Effects and C4D for modeling.
If you don't have time investing into learning those industry-level applications, but still want the final video production to be awesome with velocity effects (speed ramping), seamless transition, gunshot syncing to the beat of the music, dope sound effects, and cinematic grading, you do have a choice using VideoProc Vlogger.
VideoProc Vlogger is a multi-track free video editing application for Windows and Mac users, it supports speed ramping effects with a graph editor as that in Adobe After Effects, but is much more flexible and easy for beginners to use. All the key elements that make a gaming montage stand out can be achieved using VideoProc Vlogger.
VideoProc Vlogger Features for Gaming Montage:
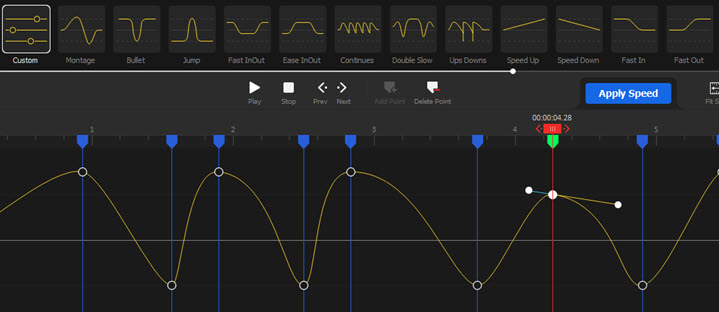
- Velocity effects: Create speed ramping in the speed editor, add keyframes and drag the curves.
- Edit to the beat: Use audio analyzer to mark out the beat, edit the highlight to the punch of the music.
- Creative transition and animation: Double exposure transition, camera panning with keyframes, etc.
- Visual and audio effects: Glitch effects, sound effects, text effects, light glaring and flashy effects in stock.
- Green screen compositing: add gun and player modeling and extracting the subject by removing green screen.
Click the buttons below to free download VideoProc Vlogger and enjoy the full version for free:

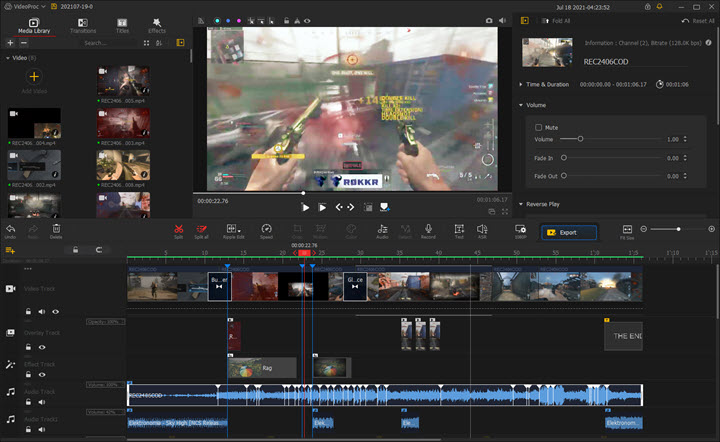
4. Assemble the Clips on the Timeline
Once you have downloaded and installed VideoProc Vlogger, launch it and create a new project.
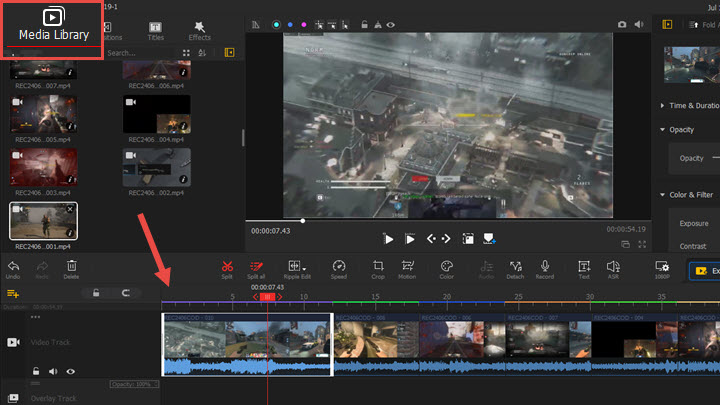
Import the gameplay recordings into the Media Library, and drag them to the timeline.
Editing Tips:
Some people prefer to assemble the gameplay clips randomly, follow their instinct freely and go wherever it leads. If that's your type, play around in VideoProc Vlogger and have fun. If you want to follow some rules, here are some tips:
- Go through all the clips to have a basic idea of what you have at hand.
- Sort out the clips, remove ones you don't need, and name the clips you need in a certain order roughly.
- Drag the clips to the timeline orderly, playback in the preview window, and decide the music and pace of the video.
- You can drag the clip back or forward to change its sequence.
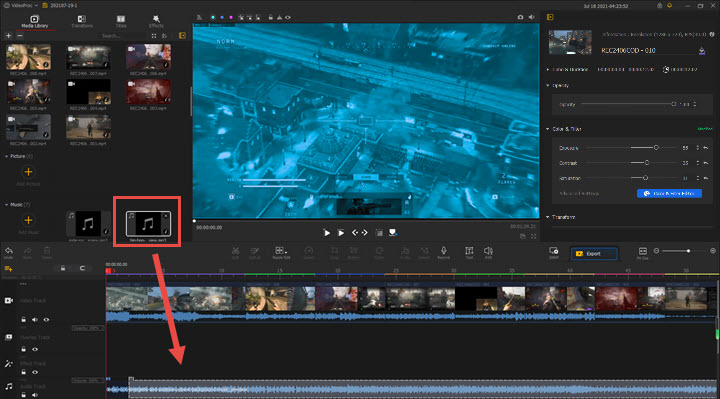
5. Choose Background Music for Gaming Montage
Find songs you love and import them into the Media Library in VideoProc Vlogger.
Drag the music to the Audio Track on the timeline.
Editing Tips:
- Some of us tend to choose background music after the final editing is done. In fact, finding background music during the rough cut stage can be a whole new experience. The benefit is, you can let the flow of the music guide your edits.
- Given that a gameplay montage usually involves lots of clips, setting the mood and pace by choosing a song in the early stage can save you tons of work.
- You can base the edit on the flow of the music, or go with a rough cut, and find music that best suits the pace. You can mix multiple songs in VideoProc Vlogger, it supports an unlimited number of tracks.
- For music resources, you can go to these 19 sites to free download music, among which SoundCloud is best for creative commons music, and Premium Beat for royalty-free music.
- You can also search for gaming montage on YouTube, and look for the most popular background music for the game you are playing. There are well-curated YouTube and Spotify playlists such as Best Songs for Fornite Montage, Best Songs for Call of Duty Montage, etc.
6. Edit the Gaming Montage
Applying basic edits is easy in VideoProc Vlogger, after that, you can go with creative edits, adding velocity effects, which is one of the most important aspects to give you "the flow" of the gaming montage; add seamless transitions or impactful transitions, blend the text into the gameplay, color grading the footage for the overall look and specific scenes.
Let's get going from the easiest to the creative ones.
Cut and Trim the Gameplay Recordings
Click on the clip and hit Split from the toolbar in VideoProc Vlogger.
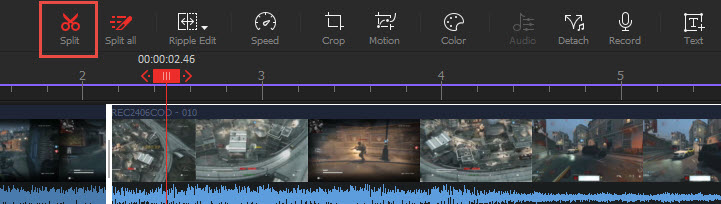
Drag the edge of the clip to trim it. If you drag in the opposition direction, you can recover the trimmed parts. This is very convenient to edit the clip to the beat of the music, as you can always go back to adjust the section you want to keep.
Add Velocity Effects
Click on the clip and hit the Speed icon from the toolbar.
Use the speed ramping presets or add your own keyframes.
Add Transitions, Titles, Effects
Go to the stock effects tab in the top left corner, drag and drop the effects to the timeline.

Click on the gameplay clip to make sure it's selected, and click the Color icon.
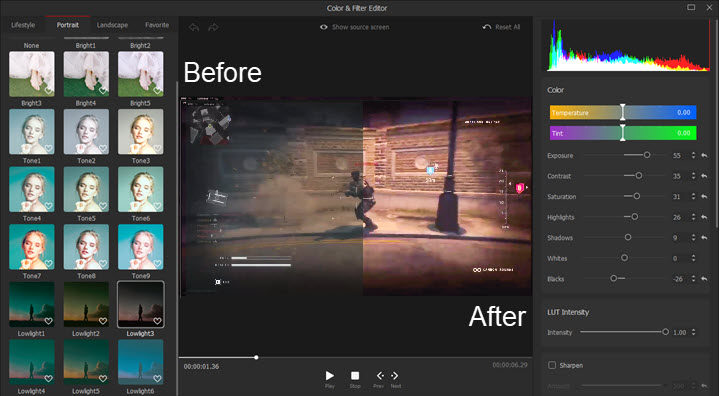
In the Color Editor, you can use LUTs to color grade the footage, and make adjustments with parameters such as contrast, saturation, vignette, etc.
Export the Gaming Montage Video
Click the Export icon above the timeline, select the target format, MP4 is recommended. Select a target resolution, such as 4K, 1080p, the default resolution is the same as the one you select when creating the project.
The entire process is easy and friendly for beginners, once you get the hang of it, you can explore the features and use them to your advantage.
Below are 5 tips to make your gaming montage enchanting and of high quality.
5 Creative Editing Tips for Making a Gaming Montage
#1 Apply Velocity Effects
Here is a gaming montage by ShutteR from YouTube, watch it and see how the velocity effects have enhanced the video.
The transition between each scene is coupled with speed ramping effects. Within each scene, there is slow-mo used to highlight an action, and then it speeds up again to fast out into another scene.
In VideoProc Vlogger, you can easily create these velocity effects, and make it smooth since the speed change is based on curves, instead of steep lines.
#2 Sync Gunshot with Music Beat
This Call of Duty Game Montage made by DemixB is a nice example. The video uses the Can Can Song from Offenbach, and sets the gunshot to the tune of the music. It builds up to the climax, where the gunshot echoes with the orchestral explosions.
In VideoProc Vlogger, here's how to edit to the beat easily:
- Drag the gameplay video to the timeline, right click on it to detach the audio.
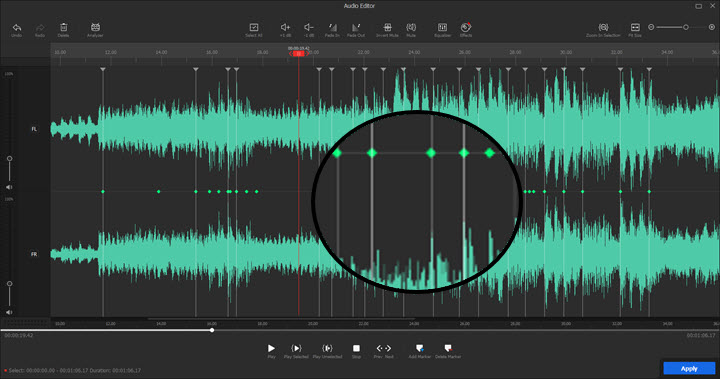
- Click the audio clip and go to the Audio Editor.
- Click Audio Analyzer, and use the analysis method 1: Audio Onset. It works nicely to detect gunshots and sounds that have a strong onset.
- Click the Analyze button, you will see the gunshot sounds are highlighted with little diamond shapes. Select them and add markers to the point you want.
- Click Apply and go back to the timeline. You can see that the game audio clip has markers on it. 6. Repeat the process to add markers to the background music.
- Repeat the process to add markers to the background music.
- Now with the markers as guidance, you can split the video, trim it, adjust its position on the timeline, change its speed to make sure the scene matches up to the beat of the background music.
#3 Go for Creative Transitions
Adding transitions in the gaming montage can spice up the footage, especially when you have lots of clips for the montage. Don't overuse it though, if you don't want to confuse your audience with all kinds of glaring and dazzling transitions.
There are many creative ways for a seamless transition, for instance, you can go for a Match Cut to mash-up clips visually.
Double Exposure Transition is another trick to try.
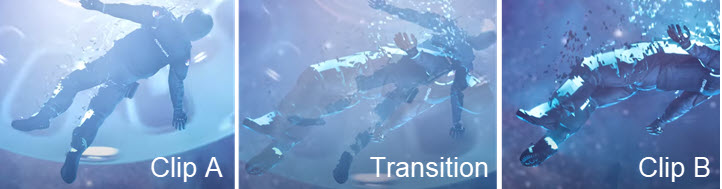
- In VideoProc Vlogger, prepare two gameplay clips.
- Drag clip A to the Video Track, and Clip B to the Overlay Track. Nudge Clip B to the left so that it begins before Clip A ends.
- Split Clip B, with the first section "overlap" with clip A vertically.
- Click on the first section of Clip B, and scroll to the composition section on the top right panel, use a blend mode.
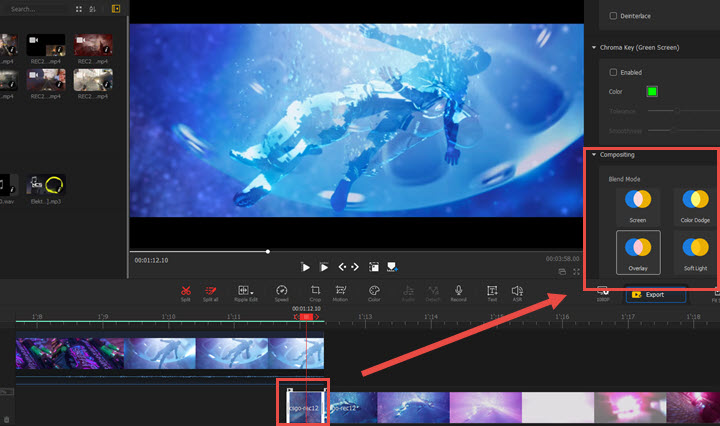
Using the Blend Mode feature in VideoProc Vlogger, you can experiment with all kinds of dope effects for the gaming montage.
#4 Reverse the Clip to Discover Possibilities
Rewinding the clip can be fun for certain scenes. Imagine there's an explosion in the gameplay footage, you can use the reverse speed effects, so that everything goes backward in time.
In VideoProc Vlogger, you can apply Reverse Speed effects in one click.
- Scrubbing the playhead in the video to preview the content. Find the section you want to reverse speed.
- Split that section into a clip, click on the clip, and hit Reverse Play in the inspector panel, on the top right of the main screen.
#5 Color Grade the Footage for the Mood
Different color grading strategies can totally change the mood of your gaming montage video. Here are some ideas for your inspiration.
Turn Everything Black and White for a Moment
In NEVERMORE 2, from 1:40s to 1:42s, the soldier jumps and shoots in the air, and the scene turns black and white, with a black bar crop closing animation, and the music pitch changed. Altogether, the visual and audio changes create a different mood.
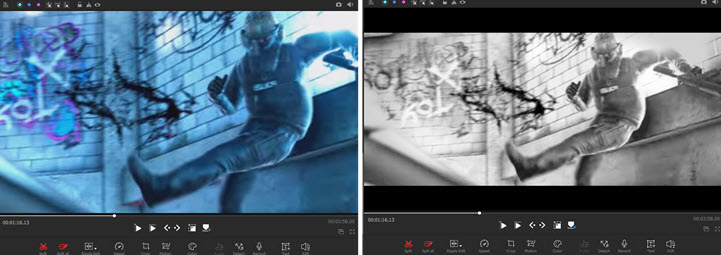
Using VideoProc Vlogger, you can use filters (LUTs) to change the color of the gameplay footage, whether it is for a small section, or the entire clip.
Apply a Crimson Shade to the Map
In another game montage video, the creator color graded the cave with a crimson shade, implying that there's going to be a massacre in the gameplay.
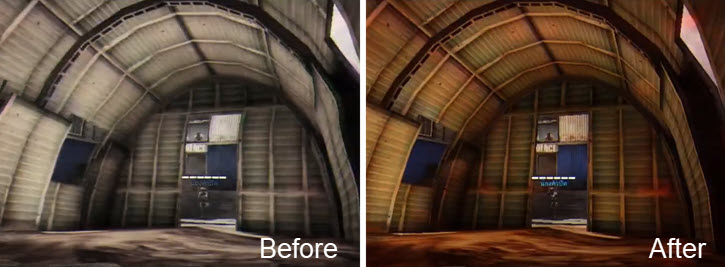
Using VideoProc Vlogger, you can use the HSL tool in Color Editor to change colors.
Add Vignetting for Special Occasions
Vignetting adds dark corners to the video. You can use vignetting to create a certain mood, or highlight action in the video. If your gameplay is based on a story, vignetting can be used creatively as a flashback to the past, or adding a sense of nostalgia.
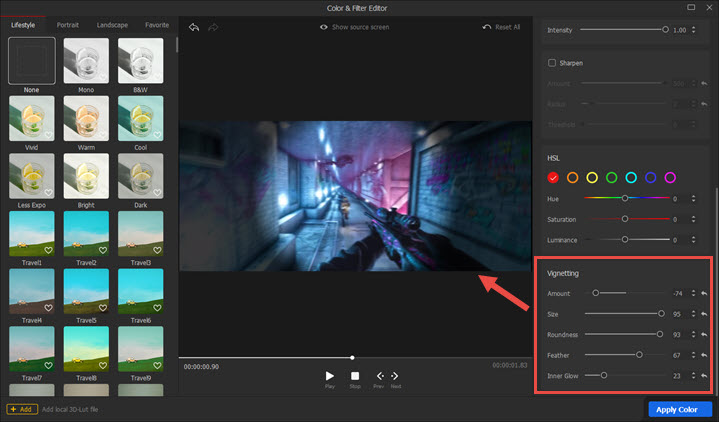
In VideoProc Vlogger, you can add vignetting effects in the Color Editor. There are parameters such as amount, size, roundness, feather and inner glow to adjust the vignetting to your liking.
Click the buttons below to free download VideoProc Vlogger to make a gaming montage:


