Screen recorder has play an important role in our everyday workflows like announcing the release of a new product, making tutorials/demonstration videos for a product, obtaining traffic by creating a marketing video, filming an online meeting, recording some engaging or useful clips of diverse activities or things in daily routine, etc.
And there are many free and paid screen recorders outside which can help us to complete these jobs. This is great for having so many options and we can definitely find one which is perfect and suitable for ourselves. But the question is that it will take you a lot of time, especially for those who are new to this stuff. How can we make it simpler and easier? No worries. In this post, we have carefully put the top picks of the best screen recorders for different operating systems, including Windows, macOS, Linux, Android, and iOS, and for unique purposes, such as the screen recorder for gaming, as well as how to record your screen using each program.
First, let's check how we choose the best video capture software for you, or what criteria the tools we have checked for each tool that we have tested before they get into this list. Only when we figure these out, so you can trust our picks, right? Besides, after you learn about them, you can also choose one on your own.
How We Choose a Best Screen Recorder
Is It Free or Paid?
To fit the needs of individuals, we've framed up this article with free video recording software, paid screen recorders as well as open source screen recorders. Whether you want to do pro events as a content creator, or you want to hand in your assignment as a student. We've got you covered.
Recording the Screen with High Video Quality
I guess nobody likes the video with low quality. Besides, recording your screen with low quality is very unfriendly to your viewers, if you plan to show it to others. So when we choose a recorder, we need to carefully check the parameter number, like how many pixels, FPS, and bit-rates that the tool can provide on its side.
The App's Orientation
Is this tool specifically designed for gaming, broadcasting, etc? We have to find out what it is good at and bad at, so we can make the correct choice.
Whether It can Run Smoothly on Low-end Computers
Yes, there are many users talking about this issue, so we decide to take it into consideration when testing the apps. And the logic is that not all screen recorder software are friendly to each PC. Some of them have some configuration requirements, or it cannot run smoothly.
Internal Sound and Microphone Sound Recording
A silent video is boring indeed. Sound is important and indispensable, such as when we plan to make a tutorial by recording the screen, only making the people watch what we do but without narration? Not a good idea. Or when we want to record a video game and go live, sound is a must. Besides, we need also to check if its sound recording is with background noise or not.
Webcam and Picture-in-Picture Recording Supported or Not
Sometimes we need ourselves to show in the recording video, so the application should support it. And if you plan to choose a screen capture software which also has the same feature, then you need to check if it is compatible with the front camera.
Will Recordings Be Watermarked?
There is some paid software which allows you to use it for free but with watermark, unless you upgrade it to the full version. This is disturbing truly, but understandable. If you do not like it, be careful about this feature, and we will also mark out free screen recorders without watermarks in this article. There are some situations where we also need the watermark, but it should be customized, like our own brand logo. This feature should be also considered.
Recording Length
This should be cared about when you would like to record a long video, like two hours.
Are There Some Built-in Video Editing Features (Basic or Advanced) Available?
Every time we recorded a video, it cannot be perfect. We need to cut the unwanted part, add some effects to make it beautiful, or more. Then if the tool has its own editing features, we don't need to look for another software, which will save us a lot of time and money.
Are There Some Ads?
Some developers will allow some ads appearing their software. If you cannot stand this, please check it carefully, especially some with vicious ads.
Will Android or iOS Devices Should Be Rooted or Jail-broken?
When we were testing some tools for mobile devices, there are some which require rooting or jail-braking, so they can work on the device. This is kind of dangerous. Rooting and jail-breaking definitely will lead to your data loss if you have no backup. Besides the system will be quite open to the outside, there are high risks for being hacked and attacked. So all mobile tools which we have chosen below definitely require no rooting and jail-breaking.
Now let's check the gems that we have collected for you.
Best Screen Recorder #1. VideoProc Converter AI
- OS: Windows, macOS
- Price: You can either use VideoProc Converter AI for free or simply pay a one-off fee of $54.95 to get a lifetime license for VideoProc Converter AI.
VideoProc Converter AI is desktop screen recording software widely used in video creation (e.g. video game, e-learning) for its accessibility, simplicity, and power. Even if you don't have too much knowledge to the software, you will likely feel comfortable pretty quickly.
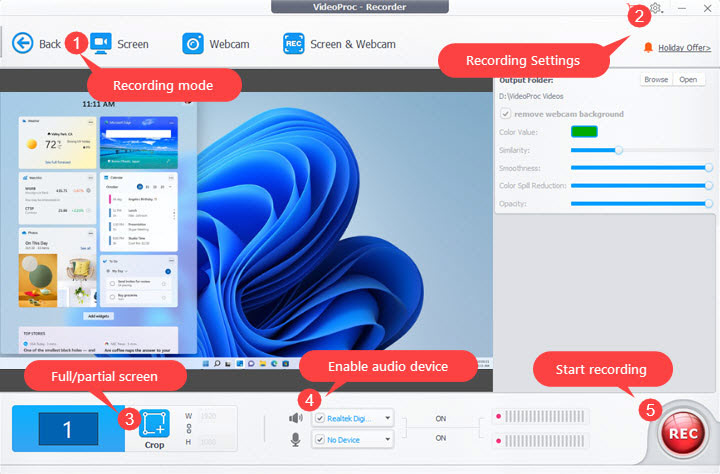
A total of four recording modes are available on the VideoProc Converter AI. The Screen mode captures your entire computer screen; the Webcam modes record video from your facecam; the Screen & Webcam mode records screen activities and the webcam simultaneously. And the last one is the iPhone mode, which is exclusive to VideoProc Converter AI for macOS, giving us the ability to record iPhone screen with internal sound and microphone sound on a Mac.
All of these recording modes capture your full screen. Some people might be wondering what if I plan to record part of my screen. No sweat. VideoProc Converter AI allows you to record any part of your screen by using crop tool.
Speaking of chroma key, VideoProc Converter AI has this feature too, making your recordings more appealing by adding yourself or some special effects to the background, as well as grabbing viewer's attention and increasing interaction. More so, you can modify the green/blue screen parameters to yield a more natural result when there is any color spill.
The real benefit of VideoProc Converter AI is GPU acceleration. The addition of Nvidia's NVENC, Intel'Quicksync and AMD's AMF hardware encoding to VideoProc Converter AI take a great amount of the load off your CPU and put it on more significant part instead. With GPU acceleration, even an old machine can handle the computationally-intensive tasks.
Also, the recorder can make screencasts in Standard or High quality and offers a wide range of video formats to choose, covering MP4, MOV, FLV, MKV and TS. If the video settings are not satisfactory to you, then you can head to the VideoProc Converter AI built-in converter to transcode file format, birate, resolution, etc.
VideoProc Converter AI - Probably the Best Screen Recorder
- Record 4K screen on Mac, full screen on Windows, and external screen of webcam, iPhone and iPad...
- Composite two videos or add special effects using chroma key.
- Support popular video formats and GPU encodings.
- Bonus features: video transcoding, cut, trim, merge, stabilize, denoise, DVD ripping, online video downloading, etc.

How to Use VideoProc Converter AI Converter
Step 1. Download and install the software to your computer by hitting the download button above.
Step 2. Once the installation is complete, launch it on your computer and select Video Recorder on the main interface.
Step 3. Select a recording mode you need at the top bar.
Step 4. Set up video settings by clicking the wheel-shaped icon on the top-right corner, including video quality, video format, location, etc.
Step 5. Select to record a part of your screen using the crop tool if needed.
Step 6. Enable audio devices so that the recorder can capture both computer sound and microphone sound.
Step 7. Click the Rec button in the lower right corner to start recording. You are also allowed to use the shortcuts to quickly bring or hide the painting tools during recording. At last, click the Stop button to stop recording and you will find the video clips stored on the location previously configured.
Best Screen Recorder #2. Bandicam
- OS: Windows
- Price: $39/per PC. It has a trial version that has 10-mins limit on record and has watermark on picture.
Bandicam is considered one of the best video capture software for YouTubers and gamers, allowing users to capture high definition and super smooth videos with the minimal system resources.
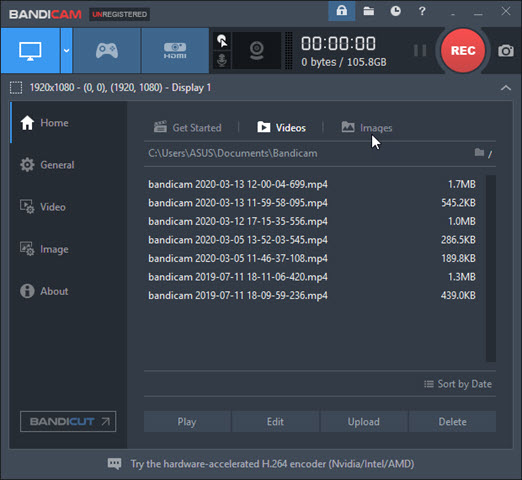
Bandicam has two intreface modes: simple UI and extended UI. You can switch to each other at any time. The former one is quite straightforward and simple, offering a few recoding options and monitors. The latter gives you more controls to advanced settings, such as output directory, video format, snapshot, FPS overlay and others. The only trouble is that you can notice some Ads attached at the corner and bottom of the extended UI. When you put a check on them by mistake, pop-up windows will get in the way.
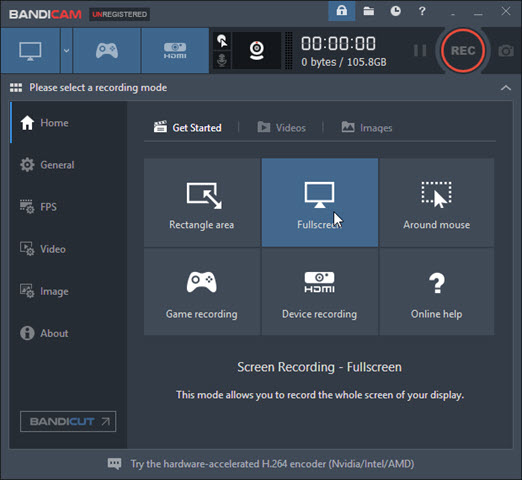
Bandicam is the yardstick by which all other screen capturing software are measured. So, what's better than the Bandicam? Largely because its various recording modes can cope with almost all situations seamlessly, except live-streaming. The Screen Recording Mode, the most widely used, is designed for capturing activities happened on desktops, allowing you to make a screencast in partial area of the window or full screen along with webcam overlay, internal sound and system sound.
The Game Recording Mode specializes in filming high quality video games. In theory, Bandicam is able to capture games with the max quality in 4K@480FPS, which would be a stunning visual experience. Apart from this, it makes it possible for you to screen record games on an old computer because of the DirectX/OpenGL/Vulkan graphics technologies that can offload CPU when performing multiple tasks.
And the Device Recording Mode is designed for users to capture external devices like PS4, XBOX, Cameras, Smart TVs, etc. Note that you have to get a video capture card and an HDMI cable in the first place.
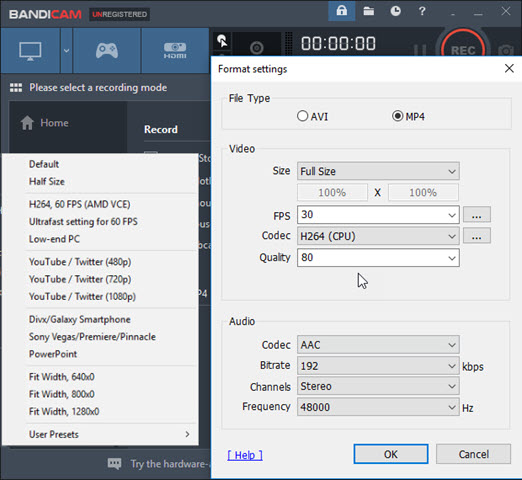
Bandicam supports two major container formats coupled with other codecs, including AVI@H264/Xvid@PCM/MP3, MP4@H.264@AAC, etc. Finally, Bandicam has a build-in video file recovery application that helps user to recover the broken MP4 & AVI files which are terminated by accident.
How to Use Bandicam
Step 1. Download and install Bandicam to your Windows PC.
Step 2. Open Bandicam and set up the recoding settings. Screen recoding requires a lot of system sources. To make your recording having less lag, you should select proper recording settings, such as reducing video resolution/frame rate, enabling hardware encoder, using only one sound device, etc. If you know a little about video formats, select one from the preset list.
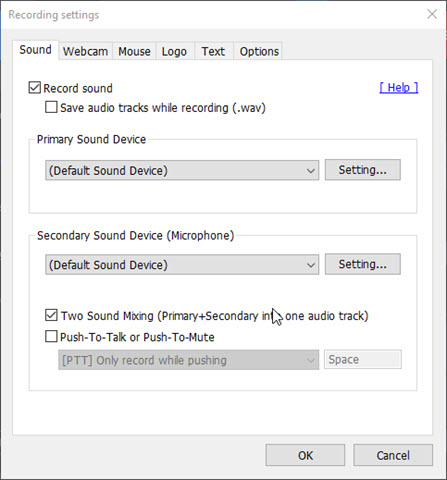
Step 3. Furthermore, you can add webcam and voice-over to your video. Click on the Settings option under the Record tab. Then you are allowed to enable facecam and microphone if you need. Apart from these, you can add other effects like logo, title, mouse effects and more.
Step 4. Select an output directory. In order to decrease your computer performance, you would better move your output videos from C: drive.
Step 5. Choose a recording mode. There are three modes available on Bandicam. To record desktop activities as PowerPoint, YouTube videos, go for the general Screen recording mode. To capture a PC game like League of Legends, Minecraft, choose Game mode with FPS overlay. To film external devices like camera, Xbox, PS4, go for Device recording Mode.
Step 6. Activate recording. You can even take a snapshot or call out annotation tools during recording. When recording has been over, you can upload the clips directly in Badnicam (by heading to Home > Videos > Single click the one you want to upload > and click Upload below > choose a social network).
Best Screen Recorder #3. OBS: Open Broadcaster Software
- OS: Windows, macOS, Linux.
- Price: Free. It does not offer any customer service, while you can turn to the OBS forum where you can get some tips on technical problems.
Open Broadcaster Software, also known as OBS, is a cross-platform and open source screen recorder that allows users to make screencasts on desktop or share your screen over the internet.
However, the recording operation and system configuration is not as straightforward and friendly as it could be.
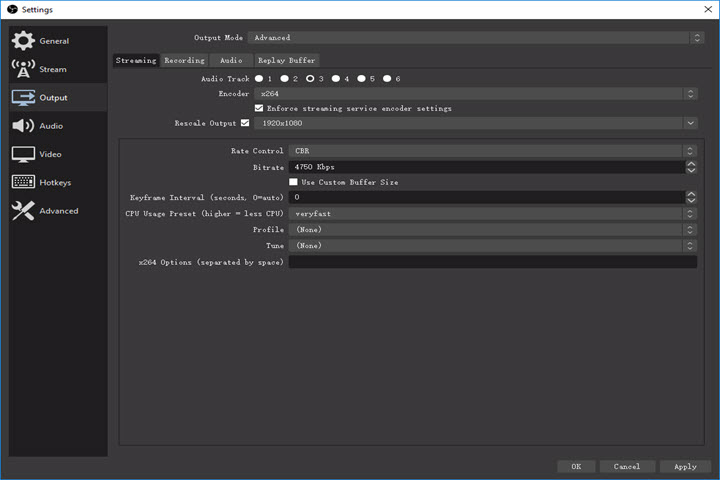
OBS is not purely a computer recording software. It is also a video switcher and video encoder. OBS supports a range of container formats as FLV, MP4, MOV, MKV, TS, and M3U8. You can convert any video to MP4 with its built-in video converter program (Navigate to File > Remux Recodings). For video encoding, OBS enables x264 software, Quicksync, AMF and NVENC to encode recordings into the H.264 and the H.265 formats, which is a graphics technology to offload CPU. However, video streams that are encoded by GPU always have quality loss at image, compared to x264 encoder.
And it's worth remembering that OBS does not come with any video editing tools, which might be prohibitive to some users.
How to Use OBS
Step 1. Get a free download of OBS. As it is an open source program hosted in Github, you can even fork a repository for OBS if you know programming.
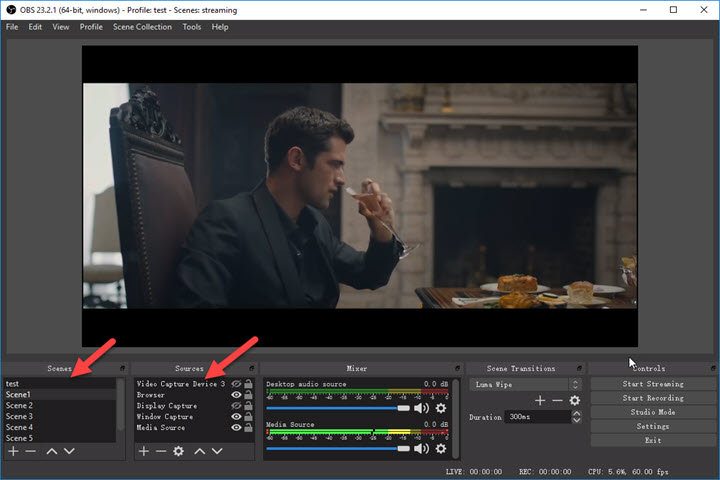
Step 2. Launch the OBS and add scene and source to your studio. Then you can switch between them when streaming or recording later.
Step 3. Regulate both of the streaming and recording settings. If you chase for high quality streaming and recording, you can opt for x264 encoder@1080P@60FPS. But if you find the obvious lag in streaming or recording, then reduce the encoding settings to normal values.
If you just make a screencast locally, go to the main window and click on Start Recording button under the Control tab. If you want to go live, then keep reading.
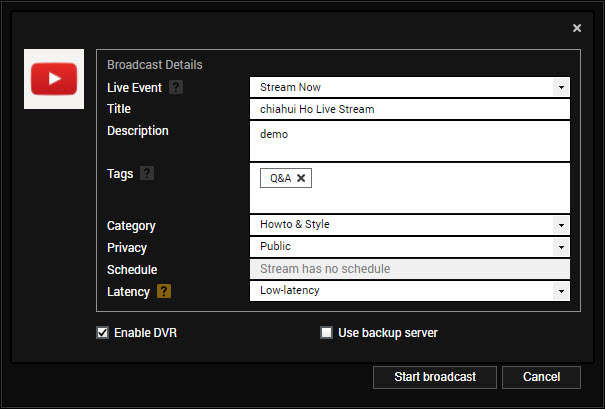
Step 4. To live-streaming online (take YouTube live as an example), navigate to YouTube > click on the profile menu on the upper right corner > YouTube Studio > Click on Create button > select Go live in the list > select one out of the three recording modes > fill in streaming information and click on Create Stream button.

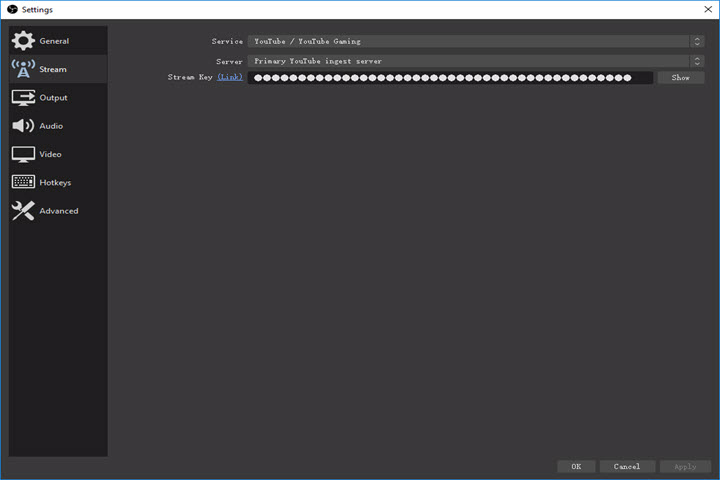
Step 5. Copy the stream key to the OBS. The stream key is to connect the OBS and your YouTube channel. Just click on the copy button within YouTube, YouTube will copy it to your clipboard. Navigate back over to the OBS and insert the stream key into OBS.
And move to the main screen click on Start streaming. You might be thinking everything is good for streaming. No!
Step 6. Remember to make sure everything is OK again. Then return to YouTube Studio and click on Go live again. And you're good to go streaming.
Best Screen Recorder #4. ShareX
- OS: Windows
- Price: Free and open source
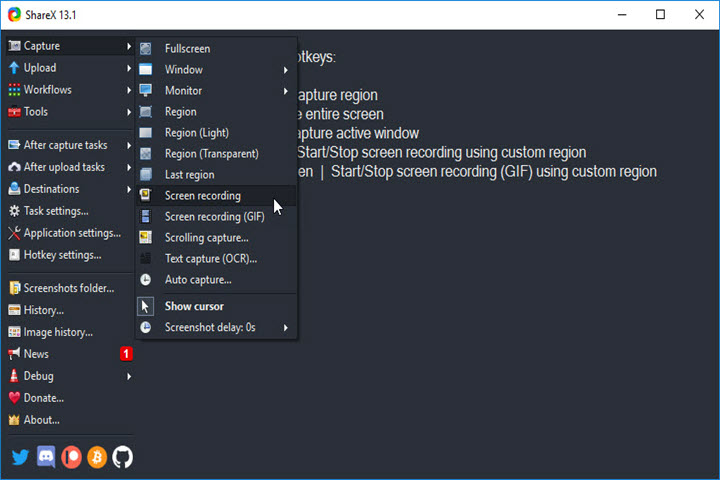
The next one is ShareX. It is a free and open source screen recorder helping people capture videos, screenshot, GIF, text, etc. efficiently and easily on Windows.
The interface seems a little complicated as it packs with lots of little icons. You might be thinking that there is another program to learn. But trust me and don't switch it off. You can create screencasts with ease as long as you copy the way I configure the ShareX system.
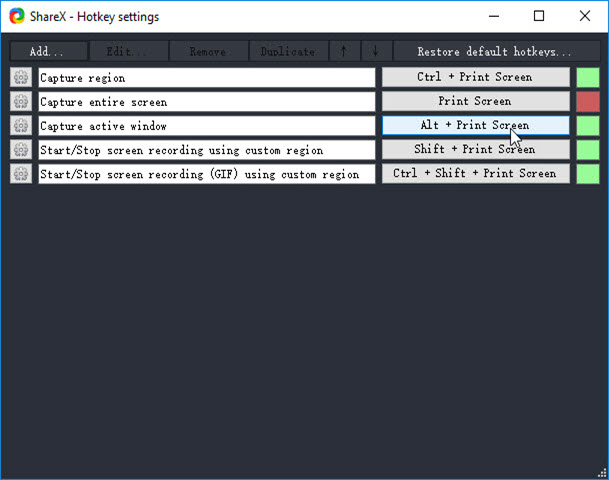
ShareX has an advanced hotkey system. When you firstly get in ShareX, you'll see it's talking about currently configured hotkeys for various abilities. Of course, you can change those hotkey settings by navigating to Hotkey settings in the sidebar.
After all recording settings are done, you are free to go. Hold on the hotkey you have set up and select to record a full screen, an active windows or partial area along with sound.
How to Use ShareX
Step 1. It would be a nice choice to configure shortcuts at first. As you can see, there too many menus and option on the sidebar. Setting shortcuts can fly you through workflows.
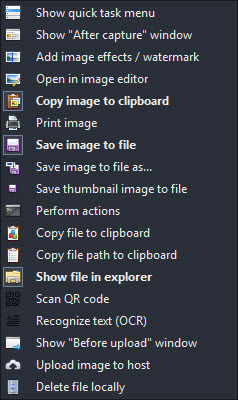
Step 2. Then, we are moving to After capture tasks. There is a long list of different options. Go for Show file in explorer, which can help you access your files once recording is done.
Step 3. To record a clean video, you have to set a proper encoding settings. H.264/x264@AAC is the most general and efficient video profile. If you are using an old computer that will get overload easily when open multiple tasks, take hardware encoders into consideration.
The frame rate of recording is set at 30 by default. If you want a smoother screencast, push it higher.
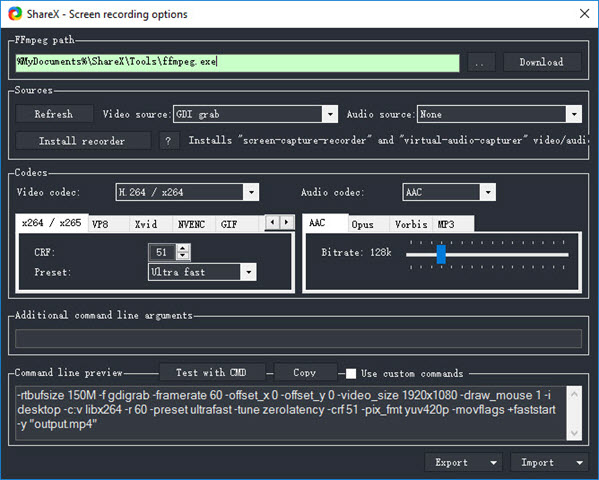
Step 4. To start screen recording, go back to the main window > click on Capture in the sidebar > select the Screen recording option > customize the dimension to capture > recording gets started.
Best Screen Recorder #5. QuickTime Media Player
- OS: macOS
- Price: Free
You might be considering that the list isn't careful enough to include screen recorder for macOS. And this part is going to let you know the free video recording software – QuickTime Media Player.
People could deem QuickTime as a simple media player for video or music playback. However, it also come with capabilities to record high-quality videos that happen on your displays or devices.
When you launch QuickTime, you'll see there is no pop-up window at all. If you are new to macOS, it could be troublesome for you to use QuickTime. Because the UI logic of macOS quiet differs from Windows OS. You should move to the top menu on the main screen to enable QuickTime screen recorder when QuickTime is launched.
And there is one hidden feature that little user would know. That is to make a screencast along with a facecam using QuickTime. What you need to do is to select New Movie Recording in the first place (but do not click on the start button). Then you will size down the facecam window and move it to a corner. Next, you will enable screen recoding by selecting New Screen Recording on the menu. At last, click on the start button of the Screen Recoding window and select an area to record (but remember to include the facecam). And you will get a recording with webcam overlay. However, QucikTime has some limitations on screen recording. One is the facecam will disappear when you get a window in full screen, even Float on Top is on. The second is that QucikTime won't record simultaneous internal sound and voice over. You have to turn to third-party tool.
How to Use QuickTime Media Player
Step 1. Upgrade the QuickTime Media Player to the newest version in the App Store.
Step 2. Launch the free video capture software - QuickTime from Applications or Launchpad.
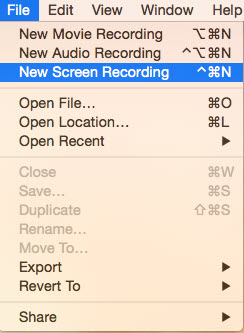
Step 3. When you have opened up the QuickTime, navigate to the upper menu > select File > choose one recording modes out of three.
New Movie Recording captures the built-in facecam or external cameras. New Audio Recording allows you to record system sound or microphone sound; New Screen Recoding films the display's activity. Do remember to click the arrow icon to select output video quality, audio source and other options before recording.
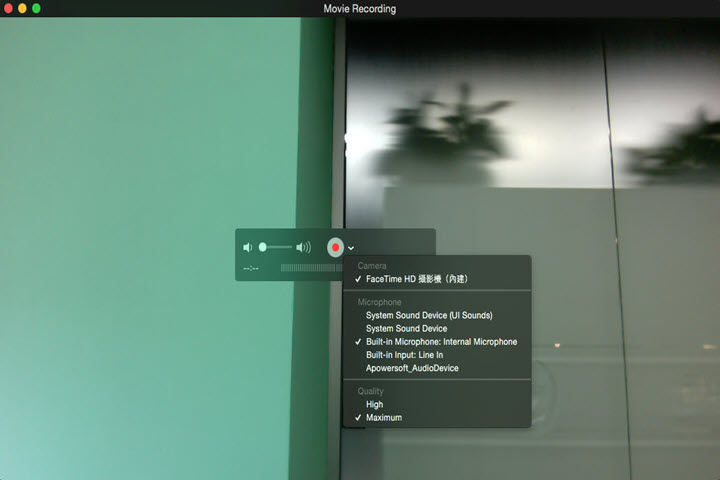
Step 4. When the recording window pops up, you can click on the down arrow to configure camera, microphone and recording quality. After that, click on the Red record button to activate recording.
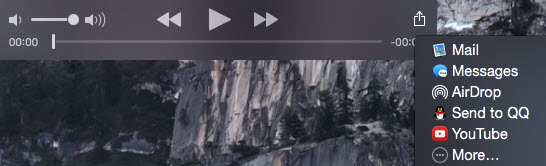
Step 5. Once finish recording, you can send the clip through AirDrop, email, message, etc., or post it to YouTube directly within Quicktime.
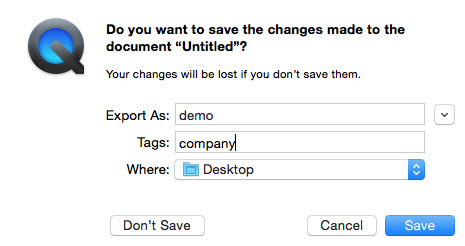
Step 6. You can save or discard your recordings by clicking on the X button of the player.
Best Screen Recorder #6. Camtasia
- OS: Windows and macOS
- Price: $249. The combination of video capture software and video editing software.
Camtasia is a great media creation tool used to make recordings from your screen, webcam or microphone, and it's also a video editing software where you can make edits and polish your clips.
It took me a while to download and install the Camtasia Studio for its installer takes spaces around 488 MB, which is larger than all screen recorder within our picks.
There is also an assistant hotkey system in Camtasia. For start recording, press F9 on the keyboard. After a 3s countdown, Camtasia will hide the toolbar and start recording. To stop recording, hit the F10, Camtasia will save the clips at Media Bin. When you need to edit the clip, drag and drop the clips to timeline directly.
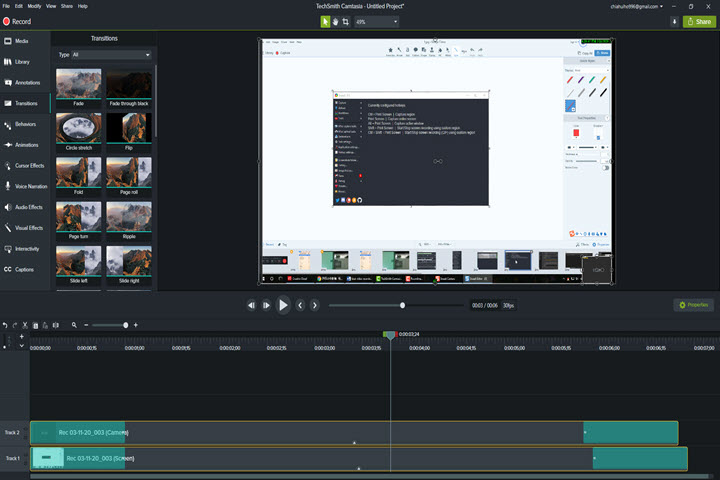
The most glaring feature of Camtasia is definitely the non-linear video editor. You can use all these editing tool as annotations, transitions, Captions, etc. to create a nice tutorial, marketing videos, demonstration videos and more. And Camtasia has a media library allow you to download videos, effects, images, music for commercial purpose on social networks.
How to Use Camtasia
Step 1. Download and install Camtasia to your computer.
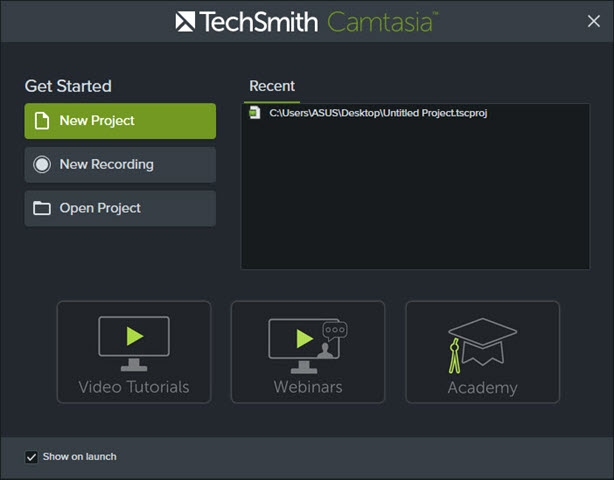
Step 2. Launch the app and select New Recording in the initial panel. It will bring a dialog box on the lower corner, which you can regulate a few important settings in this tab.
Step 3. Camtasia automatically select Full screen mode by default, but you can change the resolution by moving Custom in the next, then drag the rectangle, input the value in the fields or simply choose a preset from the list by clicking on the down arrow.
The second point worth remembering is that if you want to capture a video along with webcam overlay and audio, you have to tweak the AVI video format to the .trec format that is managed by Camtasia only under the General tab. Otherwise, the webcam and audio options will not be available. Once the settings is done, you are free to go.
Click on the rec button to start recording. After 3s countdown, it will screen record automatically. You can enhance your recording by using annotation tools either.

Step 4. When screen recording is over, Camtasia will import the clips to its video editor by default. Within Camtasia, there are tons of video editing tools available. You can leverage these tools to create a cool tutorial, online course, demonstration video and more.
Best Screen Recorder #7. Xbox Game Bar
- OS: Windows
- Price: free
Xbox Game Bar, more likely the best screen recorder for PC, is an overlay that is capable of recording, live-streaming, taking pictures, chatting with your friends, etc. with the minimal impact to gaming experience.
Note that you have to get both of your Windows OS and Game Bar upgraded to the latest version, because Microsoft has renewed Game Bar and included more awesome features.
The redesigned Game Bar is essentially widget based and personalized, which you can select your favored widgets and move them to whatever part of the screen. And in the following, I want to let you know how to customize and use your own Game Bar.
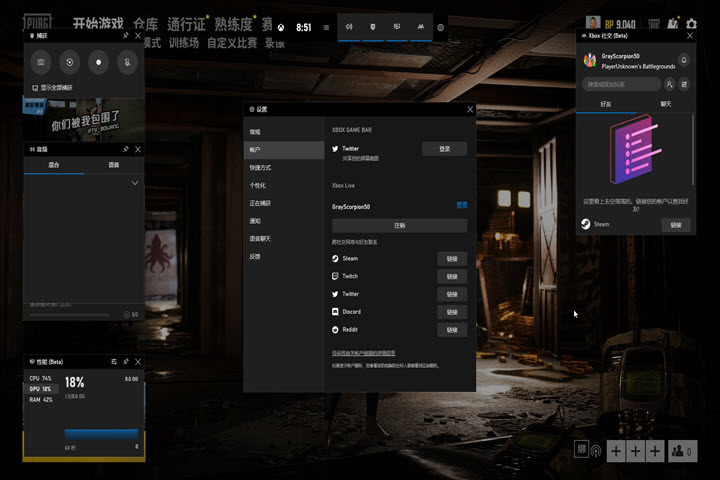
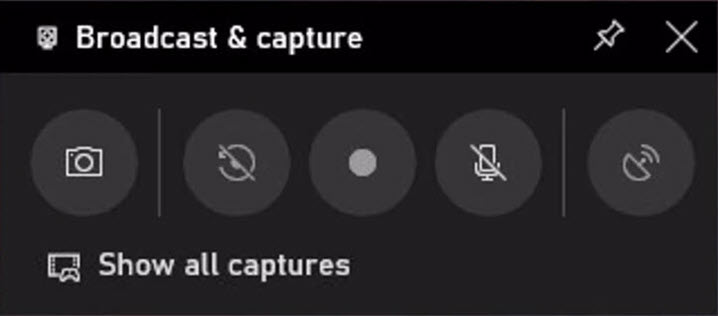
When you want to record some moment that you had in game, just hit the Windows + G to bring it up. You'll see five widgets staying on the screen. The Broadcast & capture tab allows you to start/stop recordings, taking screenshots, live-streaming and enable/mute microphone. In the Audio tab, you are able to control all your audio sources, covering audio from your system, microphone, headset, without ever leaving your game. The monitor performance is a new added feature that gives you an overview of the GPU usage, the CPU usage and the RAM usage. Xbox Social is a platform where you can contact other PC folks. In the middle tab, you get a timber and some widget information. Moreover, you can adjust other important settings like frame rate, image quality, hotkey system to make a more personal Game Bar.
At last, you can screen record not just video games. Actually, you are able to record other applications using Game Bar, such as browser, Microsoft offices, etc. However, when you return to the desktop, recording will be automatically stopped. And the recordings are not capture in full screen. These things might frown upon some users.
How to Use Xbox Game Bar
Step 1. You don't need to download it, it's a native and free video recording software in Windows 11/10. Note that you should upgrade the Windows OS and Game Bar to the newest version.
Step 2. To initial the Game Bar, you can open up the Start menu and click on the Game Bar or hit the Windows and G keys at the same time.
Step 3. Set up a personal Game Bar. When you open up the Game Bar, there are a few widget overlays on the screen. Go to the middle tab which gives to the time, all widget information, and advanced settings that you can change shortcuts, log in social network, voice, etc.

Step 4. To record things happening in your desktop, head to the Capture tab and click on the recording button over there or enable recording by press shortcut. When you start recording, you'll get a pop-up widget to tell you that it is recording the screen.
Step 5. Once the recording has been complete, you'll get a message telling you it has saved your recording automatically. If you click on the message, it will open up the folder where the recordings are saved.
Best Screen Recorder #8. Xsplit Broadcaster
- OS: Windows
- Price: $199 for a lifetime license or try for free.
This is a more high-end desktop recording software designed for helping streamers broadcast with ease.
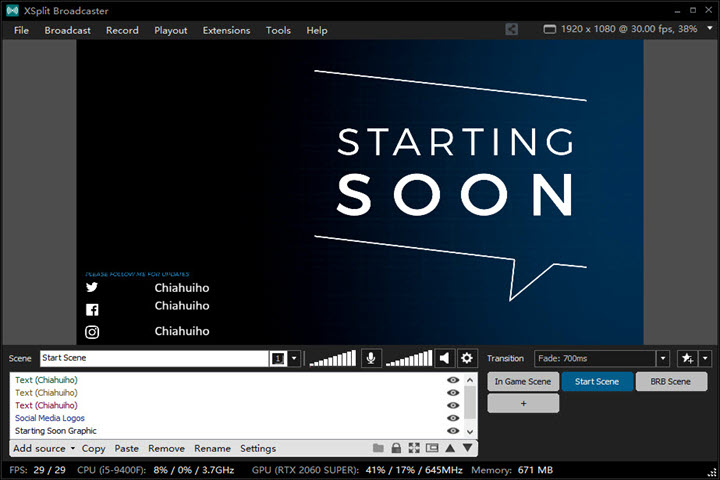
You have to sign in Xsplit with an account when you launch it, whatever Twitch, YouTube, Facebook or something else. The first look to Xsplit amazed me for its simplicity and decent working space. It gives more room to the monitor instead of tools.
At the top of the window is a list of menus allow you can configure recording and broadcasting settings. And the monitor sits right in the middle. Further down is the core of the software that help streamers to build up their own studio. At the very bottom of the software is a performance monitor that identifies your CPU and GPU and give you feeds of the resource usages. And one more thing you have to be aware of is that Xsplit uses only half of recourse usages compared to OBS with the exact same set of scenes.
In the following, I will show how to broadcast and record using Xsplit.
Note: You won't get some important settings in the trial version of Xsplit. Recording/streaming will be watermarked when resolution is beyond 720p; audio output is limited to mono channel instead of stereo. Less noted but equally important, you are not allowed to use Xsplit for any commercial purpose with no license.
How to Use Xsplit Broadcaster
Step 1. Download and install the Xsplit Broadcaster to your PC.
Step 2. Launch the Xsplit Broadcaster and build your studio by adding scenes at first. It is worth remembering that there is hugely important feature which allows you to import OBS source to Xsplit, if you use OBS before.
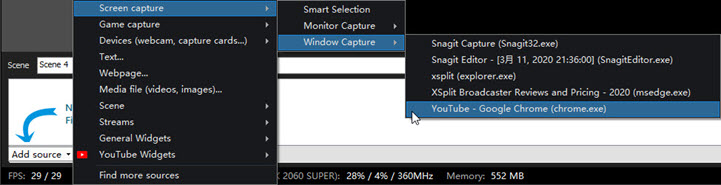
Step 3. Add sources that you will record or broadcast. Once you have finished setting up the studio, you can switch to every scene and share every source with ease.
Step 4. To record your source, move to the top menu > Record > Local recording. If you're not going to live stream, end of the story here.
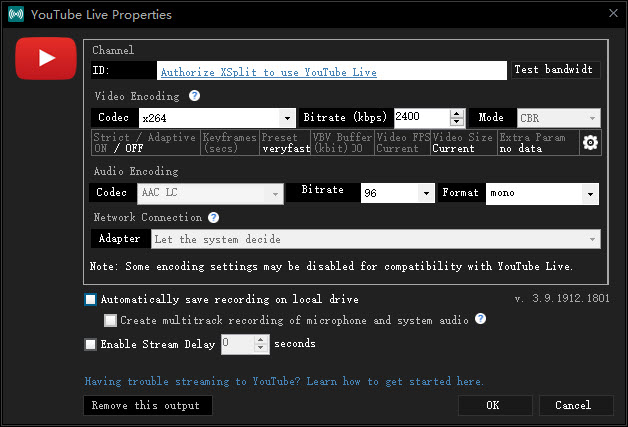
Step 5. Set up a broadcast output. Go down to the Broadcast menu > Set up a new output > and select a streaming service you need. Here I go for YouTube. If you don't get your service, click Find more outputs to open the plug-in store, install the plug-in you need.
Then click on authorize Xsplit to use YouTube Live with your YouTube account. You can check the encoding settings here either.
Step 6. To go live, move to the Broadcast menu and click on your output > fill in studio information > click on Start broadcast. Once the characters at the top of the menu gets red, live stream starts. If you see any frame drop, lower your bitrate.
Best Screen Recorder #9. Screencastify
- OS: Windows, macOS, Linux
- Price: $49/per year. However, you are allowed to record videos no longer than 5 mins with no watermark for free
If you are hunting for a online screen recorder that works on all operating OS. You should take a look at the browser-based recording tool – Screencastify.
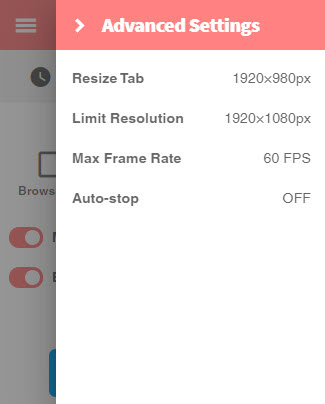
This would be a very game-changing online screen recorder. First, you don't have to download and install the application to your computer. It just requires you to have an email account and a browser, whatever, Chrome, Edge or Firefox, it's all the same. Second, it is able to capture sources from your display, active applications, webcam as well as microphone sound. Third, you can regulate some recording settings as requested. Video resolution is set as the size of the browser by default, while you can change it to the max of 1920x1080. If you are a gamer, you want a smoother and silkier video, you need to up yours up to 60 frames per second.
The fourth feature is the cloud storage. Once you have signed in this online application, all recordings captured by this app will be automatically saved to Google Drive. You don't have to concern about the abnormal terminations which can cause missing videos anymore. And you are allowed download the recordings in the cloud anytime and anywhere. But how Screencastify edges out other online screen recorders? It allows users to export a video in MP4, GIF, MP3 and WebM video profiles for free. In our experience, most online tools can only export video in WebM.
Last but not least, there is a built-in video editor that can trim, combine, crop and add text over clips.
How to Use Screencastify
Step 1. Download and add the Screencastify to the Google Chrome. Then click the extension to launch the app.
Step 2. Sign in with a Google account. Because they use Google Drive to store clips later.
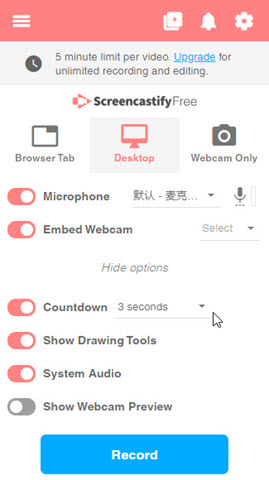
Step 3. Select to capture browser tab, display activity or webcam. You can record microphone, webcam, computer sound at the same time. Countdown time can be adjusted to 3s, 5s or 10s. If you want to enhance your video, then try annotation tool.
Step 4. To record crystal clean videos, click on the wheel-shaped icon on the top-right corner. Then push both resolution and frame rate to the limit (1080p@60FPS).
Step 5. Click on the Record button to get recording started. If you choose to record the display, and a window will prompt what section you will share. The entire screen or an active tab only. The other two recording modes record immediately.
After a few second countdown with tic-tac sound, recording starts.
Step 6. When you finish recording, a new window will automatically pop up and save your clips to the Google Drive.
If you want to get some simple edits, click on the white button and go to the video editor where you can cut, crop, merge and add titles to the clips.
And there are some options you can share your videos. Copy the link to your friends, share to your teacher through Google classroom, post on your YouTube channel or send it through email.
Best Screen Recorder #10. CamStudio
- OS: Windows
- Price: Free and Open source
There are tons of impressive screen recorders available on the market, while most of them are paid programs that would have watermark or restricted length on output videos. CamStudio is another free and open-source screen recorder that allows users to capture screen, speaker sound, system sound, webcam or other things happening on your desktop.
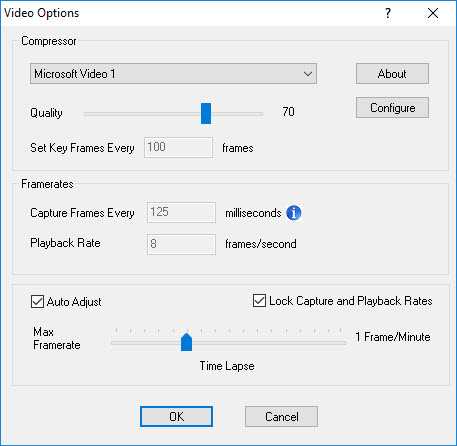
If you would not satisfy these basic features, CamStudio comes with more surprising elements that make you "wow". The first is that CamStudio can create super clean videos by enabling the lossless codecs such as Cinepak Codec by Radius, Intel IYUV codec, Microsoft Video 1 and more. Let say you need a clean demonstration video for burning onto DVD CamStudio, you can push video quality to its maximum. However, you have to be very careful when increasing video quality. If it is too high, it might create a choppy video.
Second, it offers three different recording formats options: MP4, AVI and SWF. It's better to to choose MP4 that is used internationally as recording format unless you have a particular purpose.
It's fair to say that CamStudio works so well on screen recording as a open source screen recorder. Unfortunately, it does not come with any video editing feature, so you have to turn to third party application for further editing. And what's worth remembering is that if you need any help about this software, go to CamStudio Support Forum.
How to Use CamStudio
Step 1. Download this freeware by going to CamStudio and install it following the screen instruction. Once the installation has been complete, then launch CamStudio. And you'll see a collection of menus and options on the top of window.
Step 2. Next, you need to configure the recording settings. To select a lossless video codec, navigate to Options and click on Video Options in the list. It is a good option to go for Microsoft Video 1 with default quality. For container format, move to the orange gear on the screen, and select MP4 format.
Step 3. Enable audio and webcam. If you are making a demonstration video being more interactive, you can add your narration and a webcam. To record microphone sound, go to Options and select Record Audio from microphone.
Then, add facecam to recording by going to Tools and select Video annotations. And a facecam window pops up, then you can move the window whatever section of the screen.
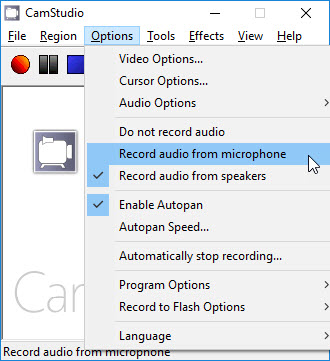
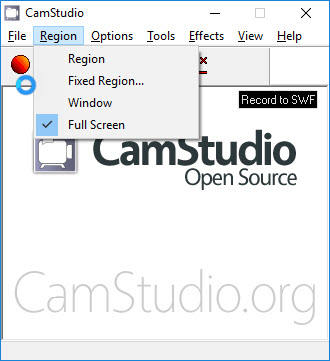
Step 4. Select a recoding mode. If you capture whatever section/application on the screen, move to Region and select a recoding mode from the list. You should set it to Full screen in most of the situation unless you have a particular reason.
Step 5. Start recording. Click on the Red icon for recoding. To pause recoding, click on the Black icon. If recoding has been finished, click on the Blue icon. After you stop recording, there is a pop-up window. Give the recoding a name and select an output directory.

Best Android Screen Recorder #11. AZ Screen Recorder
- OS: Android
- Price: Free, but there are some limited features which are only for the Pro version
AZ Screen Recorder must be the most powerful Android screen recording app among all items which we have tested. If anyone is looking for a screen recorder for his/her Android device, I would definitely recommend this one. OK, let's see what exactly AZ Screen Recorder has.
First one, no root. Users have no need to root their devices for using this application. I have to say that when we choose the best screen recorder for Android, this one must be on the check-list. We don't want the users to take any risk causing from the rooting. Then, the recorded video quality. AZ Screen Recorder provides the highest quality with 1080p resolution, 60FPS, and 12Mbps, which can makes sure of the recorded video playing quite smoothly. Surely, if you plan for other lower parameter for the video, AZ Screen Recorder can also help you with it.
No matter internal sound or external one can be captured in AZ Screen Recorder. But you need to notice that the internal sound recording is only available on Android 10 and later. When recording, you can enable the front camera (Facecam) to put yourself in the recording window, with an overlay small window, which you can adjust its location on the screen and size. During recording, you can also draw on the screen with it unique Draw pen. However, this feature is only available for the pro version. But don't worry. All pro features require only $3, which is pretty cheap and totally worthy.
What really surprises and convinces us choosing it as the best screen recorder for Android is a set of video editing features in its arsenal. Surely, some of them are included in the pro version. Anyway, what exact editing features does AZ have?
- Draw on the screen, which we have mentioned above;
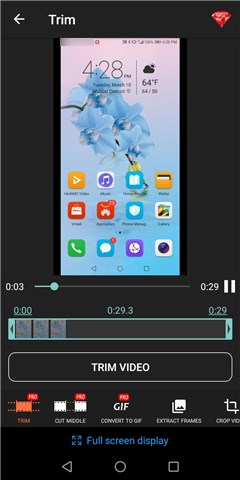
- Trim, to remove the unwanted beginning and ending parts of the video;
- Cut Middle, to remove the unwanted part which locates in the middle of the whole video;
- Convert to GIF, with which you can change the video file to a GIF;
- Crop Video, to choose any part of the screen you want;
- Rotate Video for 90 degrees or 180 degrees;
- Edit Audio, where you can select a background music to add to the video and change its volume;
- Add Text, where you can insert some words to the frame, and you can change the text font, color, and background color;
- Sticker, which enables you to add some pictures to the frame of the video;
- Merge Video; if there are some other video files which you would like to paste to the recorded video becoming one video, then this feature will help you a lot;
- Time-lapse to speed up or slow down the video playing;
- Text and logo, where you can create your own text style and import logo pic which will display on your recorded video;
- etc.
What Features Are Only Available for the Pro Version?
- Magic Button which can be used to pause, resume, or stop the recording without showing anything on screen;
- Trim and cut video;
- No advertisement and watermark;
- Facecam or rear camera supported;
- Disable review pop-up;
- Draw on screen;
- GIF converter.
How to User AZ Screen Recorder
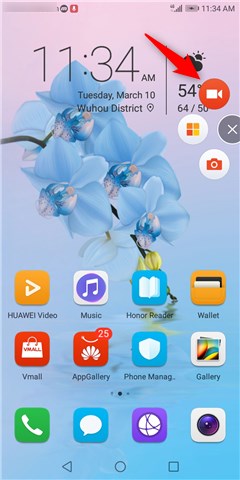
Step 1. After you have installed this app on your Android device, there would be a tiny icon on the screen. Tap it and it would show you five options. From the top one to the bottom one, accordingly, the first one is the setting menu where you can change the encoder, turn on the magic button, adjust the resolution, frame rate, and bit-rate, remove ads, and more; the second one is the screenshot feature; the third one is the recording option; the third one is the library where you can find the recorded videos and screenshots; the fifth one is the AZ market where you can find some other games and applications. So for us, we just need to tap on the recording menu.
Step 2. After 3 counting-down seconds, it would start recording the screen.

Step 3. After the recording finishes, you need to pull down the notification page, and choose the stop button to end this work.

Step 4. Go to the library page, find the recorded video, choose the editing pen.
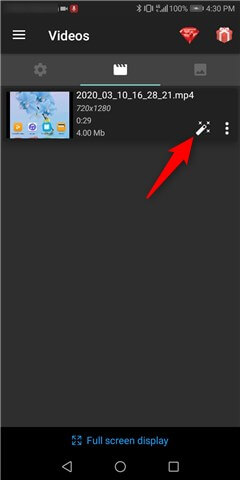
Step 5. Then we will go into the editing page, and there you will find all the editing features, which we have explained to you above.
Best Android Screen Recorder #12. Mobizen Screen Recorder
- OS: Android 4.4 and Above (No Rooting Required)
- Price: Free with Ads, and offers in-app purchases
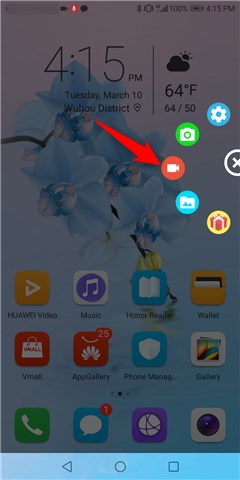
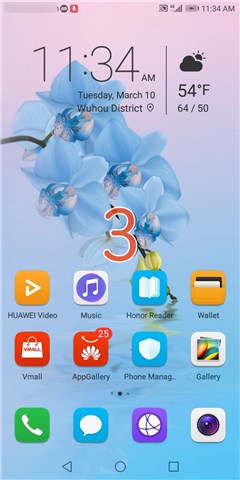
Mobizen Screen Recorder must be the NO. 1 recording app for Android devices in ease of use. Unlike some other similar apps, which we have tested, hiding itself from the home screen, Mobizen will put itself just on the home screen, and you can access it at your fingertip.
The biggest highlight of Mobizen would be that it has no requirement for rooting your device if it runs on Android 4.4 and above. Yes, rooting happens for many recording apps base on our testing. If you do not get the device rooted, you cannot use it; while, if you you root the device, there would be some other serious problems that you would face with, like the data safety issue. This is really disturbing, honestly. Luckily, Mobizen would save our lives.
With Mobizen, you can record your screen in 1080p, 12.0Mbps, and 60 FPS, which I guess is the highest quality that recording apps can provide by far. Both system sound and your own voice can be recorded at the same time, no lag. Recorded file can be saved both internally and externally, like the SD card. So you have no need to worry about the long video recording job.
Surely, as a qualified recording app, it has to hold some editing features which can help users polish their work. Mobizen enables users to fundamentally trim and cut some parts of the video. Also, there are some advanced features like adding your favorite background music and an intro & outro video to make the recorded video much more personalized. More details of the features would be explained in the following steps.
Mobizen is free. This is fantastic, isn't it? It is free for not just some one feature, but all the features, recording, capturing, and editing. And there would be no watermark in its Clean Recording Mode, which is also free.
The bad thing of Mobizen is the Ads within it, which I guess is happening in most free apps, not just the recording app. Because they need to make some money and survive. Ads are annoying indeed, but personally I totally understand it.
How to Use Mobizen
Step 1. After downloading and installing Mobizen from the Google Play store or some other app markets, there would be the Mobizen app icon on your home screen. Tap it and three other options would come out. From the top to the bottom, they are correspondingly the recording feature where you can start and stop the recording, the setting feature where you can find the recorded and captured videos and images, and some other regular settings, like the Clean Recording Mode mentioned above, and the capturing feature to take a screenshot of the screen.
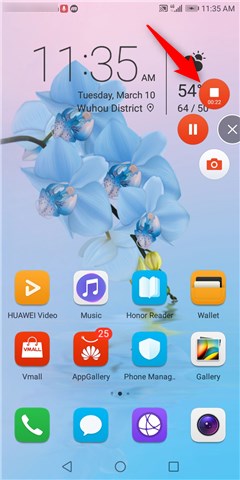
Step 2. So just tap the recording feature, and it will say the recording journey would start in 3 counting-down seconds. So I would recommend you first open the screen which you would like to record, and then tap the recording button.
Step 3. After recording finishes, just tap the app icon and the recording button to stop. Then the recorded file would be saved in the app.
It will automatically pop up another screen to ask if you are going to watch or delete this video. Obviously, we choose the watch option for the next step.
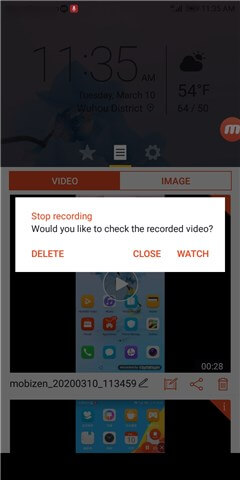
You can also directly go its setting feature, as we have said above, where the recorded file would be saved.
Step 4. After finding the file, choose the video editing button, which will lead you into another page.
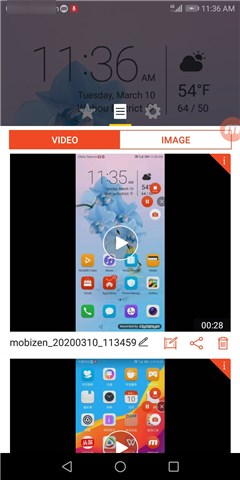
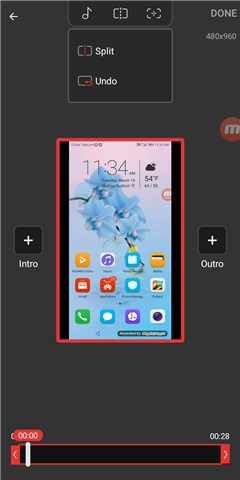
Step 5. Now you are in the editing page. At the top of the page, there are music adding, screen splitting, and screenshot taking features. Right ahead and after the video, there are intro and outro features to paste some other videos into it. At the bottom of the page, there you can move the starting and ending bars to locate the images which you want to save. After all your editing operations are done, just click the DONE button to finish.
Best Android Screen Recorder #13. Google Play Games
- OS: Android
- Price: Free
Honestly, this app is not mainly for recording, but with more interesting features designed for games. Google Play Games is an online gaming service and application, where you can have your gamer profiles, cloud saves, social and public leaderboards, achievements, and more. The recording is just one tiny feature of its and helps gamers to save the precious images for social sharing.
It is free, which is good. There is no need to root your device. It will not leave any watermark on the image. However, there would be no editing features to make the recorded video better-looking. And obviously, you cannot use it for other screen recording, since this feature is equipped in the app. So why we add it in this list? Because there are so many users who has downloaded this app, over 10 million according to the stats from the Google Play store. If you are one of them, Google Play Games can be one of your best options to keep the game playing experience recorded.
Best Screen Recorder for iPhone #14. iOS Built-in Screen Recorder
- OS: iOS 11 and later
- Price: Free
Since iOS 11 launching, Apple has added a screen recording feature or tool into the operating system. The tool is kind of a basic version, not like other tools that we have talked about having numerous extra functions. It only helps you with the recording job. However, luckily, with the help of some other features of iOS, you can do some fascinating things. And we will show them in the following words.
It supports both system audio and voice over recording. However, you might find that iPhone recordings have no sound occasionally, largely because of the DRM (Digital Rights Management) protection
The recorded foogtage will be saved in the Camera Roll folder, so if you plan to record a super long video, the storage should be enough. Then, let's get started with how this iOS built-in screen recorder helps us with the job.
Before the detail steps, we have to make sure of this feature being added to the Control Center, if you have not yet, so you can access it much more easily. Here are the instruction;
1. Tap the Settings app, find the Control Center option, and choose Customize Controls menu.
2. Find the Screen Recording tool, tap the green button ahead of it, and it will be saved into the Control Center.
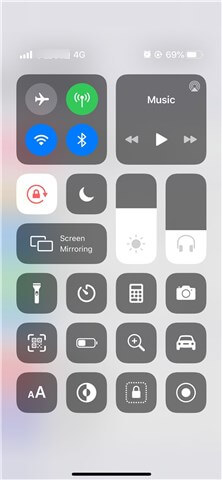
Now you can access the Screen Recording feature from the Control Center. It is time to show you how to use it;
Step 1. Land on the screen which you would like to record, swipe up from the bottom of the screen for the iOS devices prior to iPhone X and swipe down from the right upper corner of the screen for iPhone X and later, and then the Control Center would be displayed. Tap the Screen Recorder button. Surely, you can also first turn on the recording, and then jump to the screen that you would like to record. However, there will be some useless images in the beginning of your video. We will show you how to remove this part in the following. No worries.
Step 2. Please note that if you want to turn on/off the Microphone, please tap the Screen Recorder button for a little longer, and you will see the function.
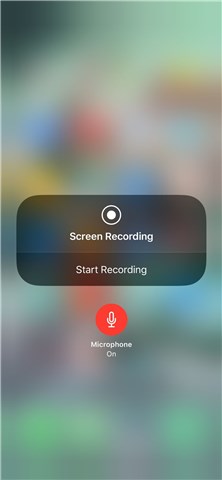
After three seconds counting down, the recording would start.
Step 3. After the recording finishes, just tap on the red button which says how long you have recorded the screen. Then choose Stop to end recording.
If you plan to do some editing on your recorded video, then please keep on reading;
Step 4. Find the recorded file in your Camera Roll folder, and tap the Edit feature, which will show you some basic editing features.

Step 5. When the editing panel pops up, you can find the editing features including clipping in the VIDEO option, adjusting brightness, black point, saturation, vibrancy, etc. in the ADJUST option, adding filters in the FILTER option, and resetting the video position and dimension in the RESET option.
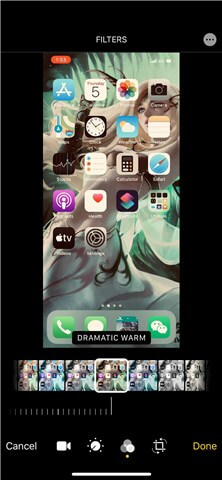
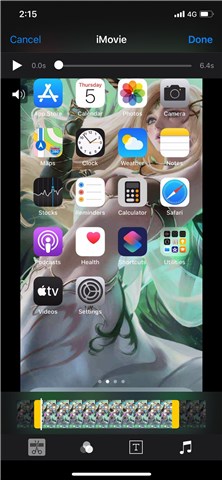
Step 6. If these features cannot help make your great work, no worries, and there iMovie is ready to get the job done. Just click the three-dot menu in the right upper corner and iMovie would show up. Tap on it into this software.

Step 7. And now you are in the iMovie, which loads numerous and advanced video editing features for your masterpiece. Features include trimming, color adjusting, text adding, background music inserting, and more.
Best Screen Recorder for iPhone #15. Siri Command
- OS: iOS 16.5 Beta 1
- Price: Free
Now screen recording has been added to Siri's list of capabilities in iOS 16.5 beta 1. By speaking to Siri, you can capturing what's going on on the screen like using iOS built-in recorder. But on the other hand, it might be too simple to fulfill other needs, such as recording specific area, allowing you to choose the source audio, etc. Tests show that, it needs clear, loud, and specific command. Otherwise, you'll fail to enable the recorder.
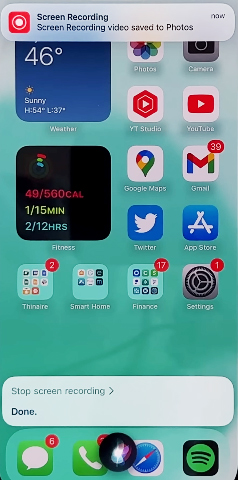
Step 1. When you want to record the screen, just say "Hey Siri, record screen" to your iPhone.
Step 1. It will start to record your iPhone screen without countdown.
Step 1. When you want to end screen recording, just tell Siri "Stop recording" or tap on Dynamic Island. Now you can find the recording in the Photos app.
Best Screen Recorder for iPhone #16. TechSmith Capture
- OS: iOS 11 and later
- Price: Free
Honestly, this one is kind of like a copy of iOS built-in Screen Recorder. Sorry, TechSmith. However, if we only talk about recording, it is still a wonderful application. With it, you can record the phone calls, presentations, tutorials, etc. easily. You can also import the video files from other applications on your iOS device, like the Camera Roll, and share it to Camtasia, Snagit, and Relay, another three TechSmith tools for better tuning.
What it differs from the iOS built-in Screen Recorder is that it has no editing features. We know that after we record a video with the iOS built-in Screen Recorder, there are Camera Roll and iMovie to help us make the images lovely. But with TechSmith Capture, you need the Camtasia. Surely, we can still get the job done, but it is not so convenient.
How to Use TechSmith Capture
Step 1. After you download and install it from the App Store, just open it, and you will see its interface. The red button is the menu for recording, the + button is helping you add files from other locations, and the gear setting button includes the share destinations of Snagit, Camtasia, and Relay.
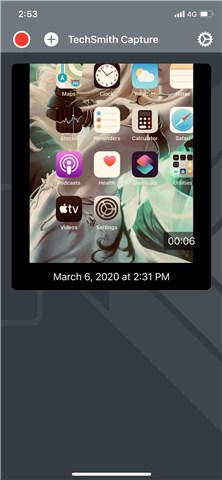
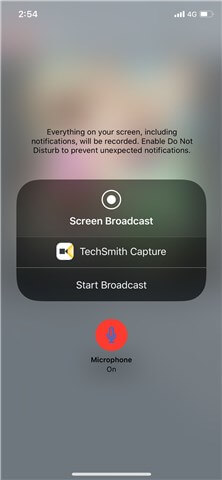
Step 2. Just tap the red button and it will show you the recording page, where you can set the Microphone on or off. And then choose the Start Broadcast button to begin.
Tip: TechSmith will record everything on your screen, include the notifications. If you do not like them to be recorded, please enable Do Not Disturb mode.
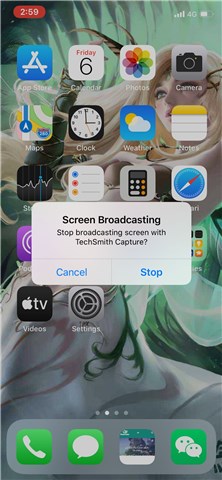
Step 3. After you finish the recording, just like the iOS built-in Screen Recorder, tap the red button which locates on the right upper corner of the screen all the time, and choose Stop button.
Tip: The recorded file will not be saved in Camera Roll, but you can find it directly in the Capture app.
Conclusion
Even though we have narrowed down the list with only 15 options, there are still much more than we can make the decision, right? If you are suffering from make a choice, personally I would recommend OBS as the NO.1 option for the desktop users, AZ Screen Recorder as the best option for Android users, and the iOS built-in screen recorder perfect for iPhone/iPad users.