Changing video speed is arguably a must-have procedure when editing. Maybe you need to speed up a video clip to convey time passage or skip less important/repeated parts of a video. Or maybe you need to slow down a video that was shot at an inconsistent frame rate unintentionally to match your delivery requirements.
However, some of you might be thinking that changing video speed during editing can be a difficult beast. I hear your concern, but don't worry. This article will show you step-by-step tutorials to speed up or slow down a video easily.

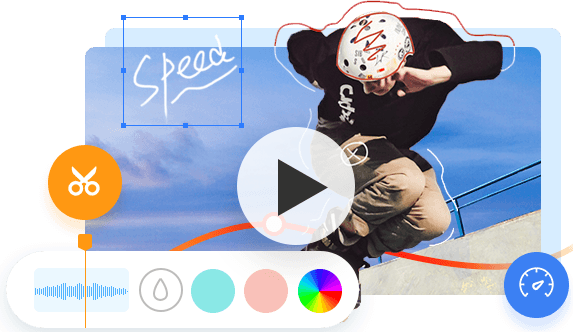
How to Speed Up or Slow Down Videos in VideoProc Vlogger
Platform: Windows, macOS
Pricing: Free
VideoProc Vlogger can enable users to speed up and slow down a video in both numbers and variable way.
However, VideoProc Vlogger can help your more. It is one of the best video processing software for both beginners and more advanced users. Because it includes advanced features such as re-time controls, watermark/video filter/subtitles adder, video stabilizer, background noise remover, as well as the basic editing features like trimming, cutting, splitting, cropping, etc., to meet all your needs for building your story with a few clicks. Another sweet spot is GPU-based encoders that can get faster decoding and encoding as we work. This feature also helps aging computers handle processor-intensive media efficiently. More importantly, VideoProc Vlogger comes with a large video/audio codec library that recognizes a wide range of file formats. But the most important one is that VideoProc Vlogger provides you with all these features for free.
VideoProc Vlogger - Speed Up and Slow Down Videos in One Click.
- It supports re-timing videos to 16 times faster or slower.
- GPU acceleration powered by Quicksync, NVENC, and AMF.
- It supports a wide array of file formats.
- More than just speeding up and slowing down video, you can use it to do more to polish the file, like effects, filters, etc.

Step 1. After you download VideoProc Vlogger on your computer, install it. Then launch it and create a new project.

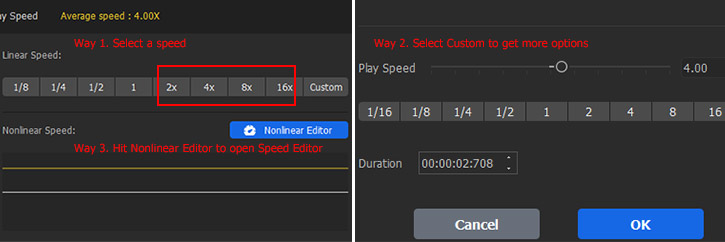
Step 2. Import the source video file > Drag it from library into the timeline > Jump to the right side and find the Play Speed feature > Choose the speed option to speed up or slow down your video. If the default number is not what you like, you can click on the custom menu. For more advanced video speed features, please click on the Nonlinear Editor.
How to Speed Up a Video in Shotcut
Platform: Windows, macOS, Linux
Pricing: Free and open source
Shotcut is an open source video editing software that is totally free and will not leave watermark on your output files. Also, low PC requirements are why people use it. I guarantee that Shotcut should work with most computers, even pretty average PCs. Therefore, it's an ideal option for starters to speed up or slow down videos. All that is left to do tweak the speed and duration on the Properties panel. Check the details down below.
Step 1. Create a new project or continue your MLT project file in Shotcut.
Step 2. To divide the clip into parts, move the playhead to the place where you would like to separate > hit the S key on the keyboard to perform splitting (or right-click on the clip and select Split At Playhead from the menu).
Step 3. Select one or more clips and change to the speed or duration needed. The clip being speeded up will shrink in the timeline, and vice versa. You can bring other clips together to make your video uniform.
Step 4. Save and export your project.

How to Speed Up a Video on iPhone
Platform: iPhone, iPad
Pricing: Free
If you are looking for ways to speed up a video on iPhone, then iMovie may be your first option to go. As an official video editing tool for iOS devices, iMovie offers a bunch of features to help users process their videos in an easy and effective way. Here let's check the detailed steps to speed up a video on iPhone with iMovie.
Step 1. Open iMovie on your iPhone and tap Create Project.
Step 2. Choose Movie and choose the video from your iPhone.
Step 3. Click Create Movie to import video to iMovie.
Step 4. Tap on the Video in the timeline, and you'll see the speed changing icon below.
How to Speed Up or Slow Down Videos in Adobe Premiere Pro
Platform: Windows, macOS
Pricing: $20.99/mo
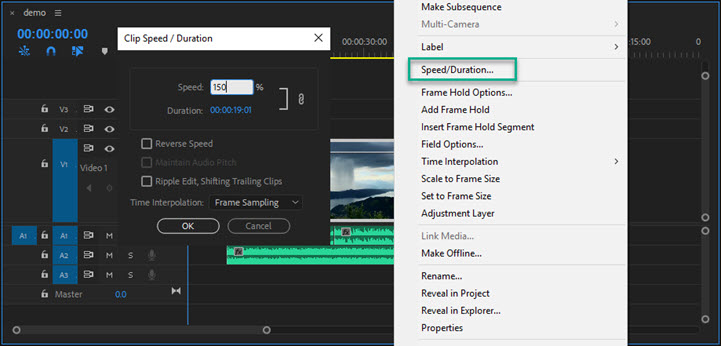
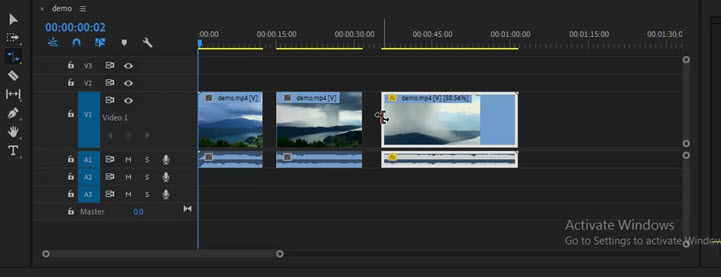
Adobe Premiere Pro, one of the industry standard video editing software, provides three different methods to make speed alternation, covering Speed/Duration, Rate Stretch tool, and Time Remapping. The first tool allows you to rate clip's speed at a higher/lower speed percentage or longer/shorter duration; the second tool is a quick method to change the speed and duration of a clip right in the timeline area; Time Remapping can fast forward/slow down parts of a video with keyframes.
To make videos fast/slow using Speed/Duration.
Step 1. Select a sequence or clip(s) in your project panel or timeline area.
Step 2. Right-click your mouse > go for Speed Duration in the list.
Step 3. Regulate the speed or duration of a sequence or clip > confirm the changes by clicking OK.
To make videos fast/slow using the Rate Stretch tool.
Step 1. In the timeline area, select the Rate Stretch tool on the sidebar.
Step 2. Drag either end of a clip inward or outward in the timeline area to make speed alternation.
To make videos fast/slow using Time Remapping.
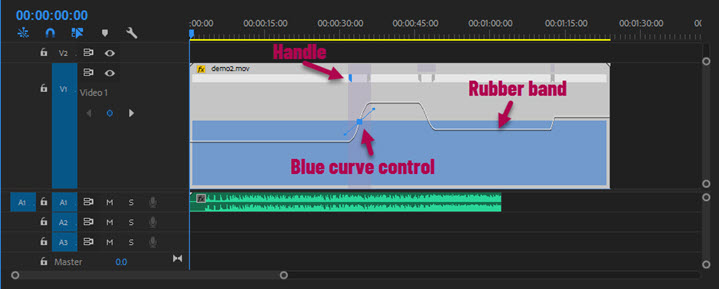
Step 1. Right-click the fx button on a clip > Time Remapping > Speed
Step 2. Ctrl- click on the rubber band (the line across the center of the clip) to set keyframes.
Step 3. Move the rubber band between keyframes to speed up/slow down parts of a video.
Step 4. Adjust the handle and blue curve control to make a smooth speed transition.
How to Speed Up or Slow Down Videos in VSDC
Platform: Windows
Pricing: Free; Pro version at $19.99
VSDC has a free version, but it's almost the same as the pro version. It possesses lots of editing features like altering the speed of a video, applying video/audio effects, adding shapes, extracting/adding audio tracks, inserting subtitles, etc., which satisfies me greatly. Only problem is that it uses a confusing operation philosophy that is different from other video editors. Anyway, altering the video's speed in VSDC is extremely simple. The steps below will walk you through how to create gradual speed up/down effects in VSDC.
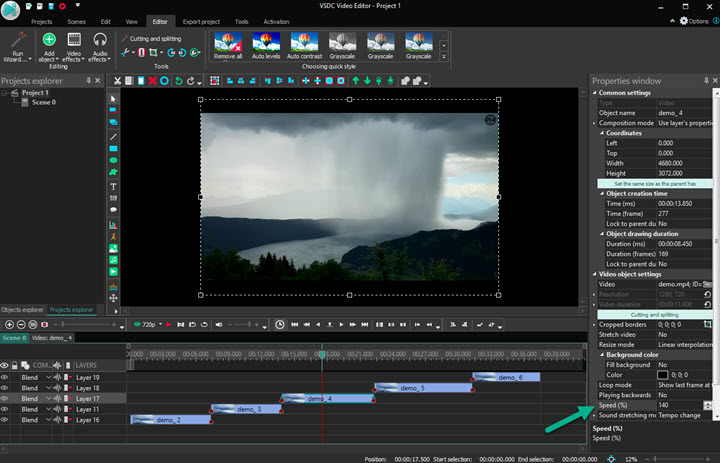
Step 1. Create a new project with needed video settings.
Step 2. Import footage to the timeline. Then separate it to fragments using Split into parts hidden in the Editor on the top.
Step 3. Select the clip in the timeline and set a required rate in the Properties windows.
Step 4. Set a higher or lower speed rate to achieve gradual alternation effects.
How to Speed Up or Slow Down Videos in iMovie
Platform: macOS
Pricing: Free
iMovie is a must-have video editor for Apple users. It perfectly works and produces nice results when it comes to speed alternation. There are two ways to change clip speed in iMovie: the speed pop-up menu and the speed editor. The first one gives you full controls of clip speed, including custom speed adjustments, fast and slow modes, free frame, reverse and preserve pitch. The speed editor allows you to alter clip speed directly in the timeline. Moving the speed slider to left accelerates a clip with a shorter duration; moving the speed slider to right slows a clip with a longer duration.
To make videos fast/slow using the speed pop-up menu.
Step 1. Open iMovie and create a new project > import video clips > add clips to the timeline.
Step 2. Split the clips into parts so that you can alter parts of the clip speed.
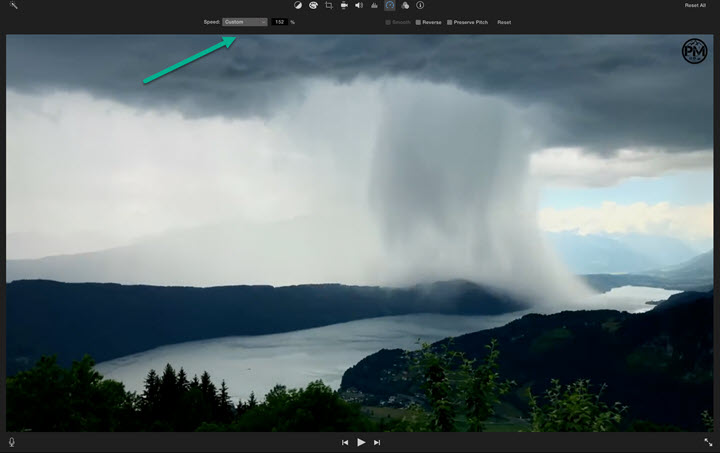
Step 3. Make a selection to the clip you would make speed adjustments > head over to the menus above the viewer > Select Speed.
Step 4. Increase or reduce the clip speed to your will.
To make videos fast/slow using the speed editor.
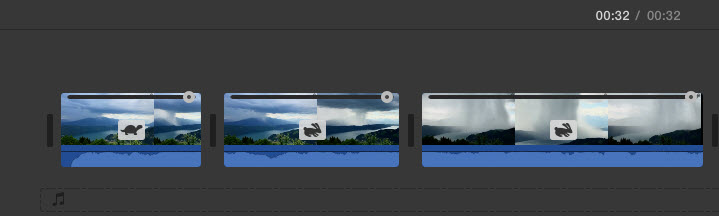
Step 1. Right-click on the clip > Show Speed Editor. Then a speed slider shows up at the top of the clips.
Step 2. You can increase the clip speed by dragging the speed slider to left or reduce the clip speed by dragging the speed slider to left. There will be either a turtle or a rabbit icon on the clip telling you the clip speed has changed.
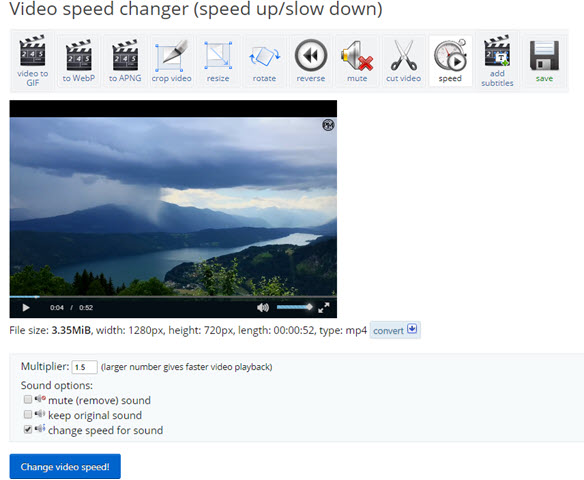
How to Speed Up & Slow Down Videos in Ezgif [Online Tool]
Platform: Website
Pricing: Free
Altering the video speed with Ezgif can be quite simple. You don't have to download extra apps to your computer and you are allowed to handle either a local file or any online video by pasting a video URL to the site. Moreover, Ezgif packs with other features for editing videos, such as video to GIF converter, video cropper, subtitles adder and many more.
Step 1. Navigate to the Ezgif online video speed changer via a browser.
Step 2. Choose a video from your computer and upload it.
Step 3. Change the video speed by modifying the playback value in the field. You can opt for one of the sound options below for greater results.
Step 4. Click the Change video speed button and preview the output video below.
Step 5. If your output video goes well, hit the three dots icon and select Download to save the altered video.
How to Speed Up & Slow Down Videos in Windows Movie Maker
Platform: Windows
Pricing: Free
Windows Movie Maker is awesome for video editing starters to fast forward/slow down videos. It is a flat learning curve that requires less training to master the editor and combines a host of features, such as speed controller, splitter, trimmer, adding transitions, background music, texts, filters and many more. Plus, Movie Maker is completely free to use. However, you should be aware of the fact that it limits the video output to 1080p, which might be prohibitive to some.
Step 1. Download and install Windows Movie Maker. Then launch it and click anywhere in the timeline panel to import media files.
Step 2. To speed up/slow down parts of video, you need to split the clip first. Navigate to Edit on the top > move the playhead to the place you would like to split > select Split.
Step 3. Single-click the part you would like to make it fast/slow > change to the speed percentage needed.

Final Words
There are some insights in the closing paragraph of my article. If you need a speed changer designed for starters, go with VideoProc or the online tool Ezgif. If you need more advanced features, consider either Windows Movie Maker, iMovie, Shotcut or VSDC. And Premiere Pro fits the needs for making commercial videos or blockbusters.


