
4K screen recorders are in much demand these days with the increasing support for 4K videos across devices and social media platforms. Video recordings in 4K resolution store around four times more pixels than HD 1080p, therefore they look sharper and crisper even on large displays. Besides, there are more details in the frames to edit with and you can crop or zoom in on your software tutorial recordings or gameplay recordings without losing much visual quality.
Before you start recording screen with a random pick from the list of best screen recorders, do yourself a solid and look through this review. We will unveil some screen recorders that support 4K resolution and have no watermark/time limit on PC and Mac. Let's get started.
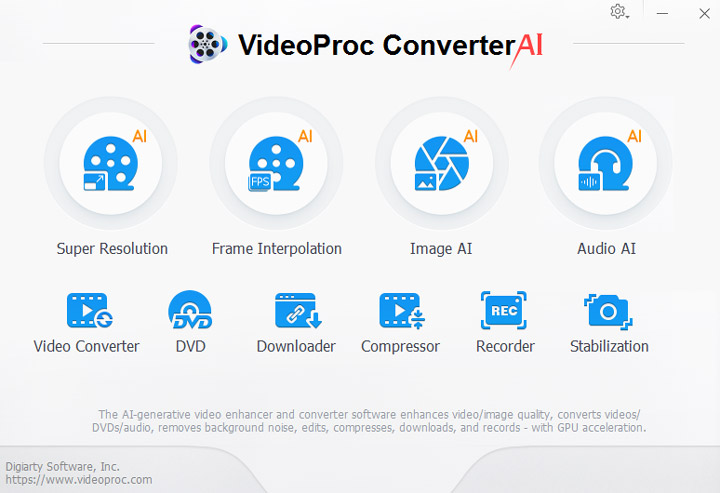
1. VideoProc Converter AI
VideoProc Converter AI is a leading 4K video processing program. With its powerful 4K screen recording feature, users can record 4K sports lives, 4K gameplay streams, 4K films, high-quality screencasts, and beyond at zero cost.
Meanwhile, its efficient 4K processing technologies allow recording the screen in 4K 60fps with lower impact on other applications running at the same time. When the recording is over, you can cut, split, merge, add your brand logo, and add subtitles to your screen in one stop because it also functions as the best 4K video editor.

VideoProc Converter AI - Best 4K Screen Recorder Free Download
- Record 4K ultra-HD (3840x2160) screen and webcam footage at up to 60 fps.
- Various recording options: screen, pip, webcam, facecam, green screen.
- Video quality enhancer by AI: super resolution, frame interpotation, stabilization. NEW
- Customizable recording quality, format, hotkeys, and audio recordings.
- Real-time recording tools: drawing, texts, lines, shapes, arrows…
- Killer features for 4K recordings: scaling up/down, edit, convert, and compress.
![]() Excellent
Excellent ![]()
Free Download and Install VideoProc Converter AI to Record Screen in 4K Now!

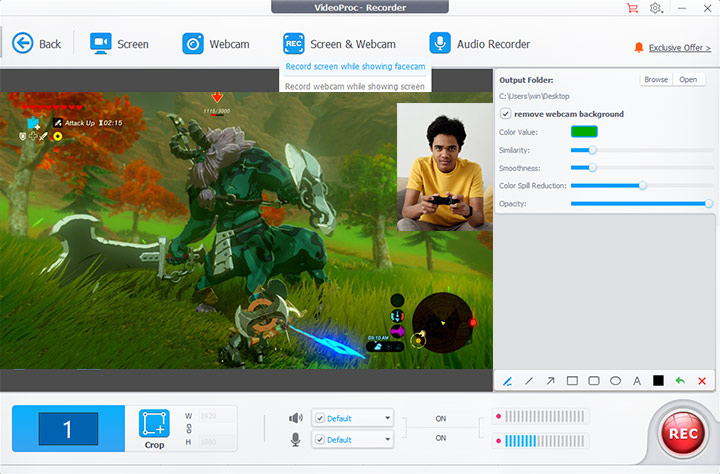
Step 1. Open the screen recorder in VideoProc Converter AI.
Launch VideoProc Converter AI and choose "Recorder" in the interface. Click "Desktop" to enable its screen recorder.
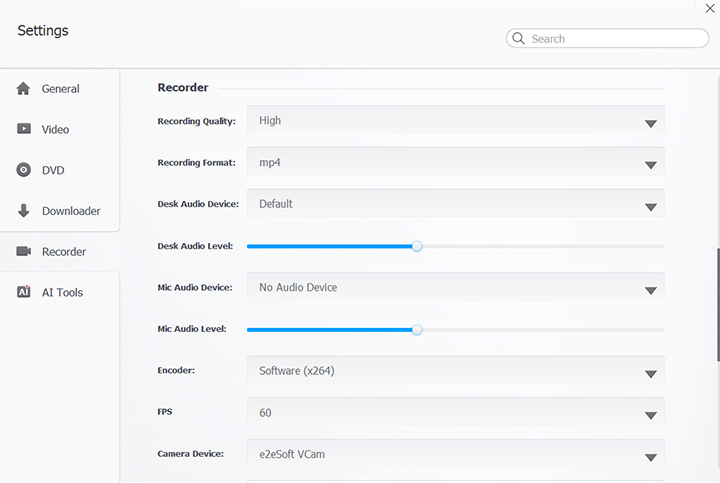
Step 2. Set screen recording options.
By default, the resolution of the screen recording is 4K which you can tell from the pixels count in the recording area.
Now you just need to click "Options" to finish several settings. Change video quality to "High" because it allows a higher bitrate for the recording. Then drag the slider to set the fps you need for the 4K recording.
Step 3. Start recording the screen in 4K.
Click the REC button. VideoProc Converter AI will hide its window and start recording in 5 seconds. To end the recording, click the recording icon minimized on the top right corner. At last, open the recording under the Output Folder option.
Tips: If you want to make further explanations on your screencast, software demo, or presentation, you can add notes or highlight your content with recording tools minimized in top right corner.
How to Record Screen in 4K without 4K Monitors
While, if you are using a device without a 4K monitor, you can upscale screen recordings to 4K with the AI video upscaling feature in VideoProc Converter AI which unitizes the latest AI Super Resolution model to increase video resolution with enhanced details.
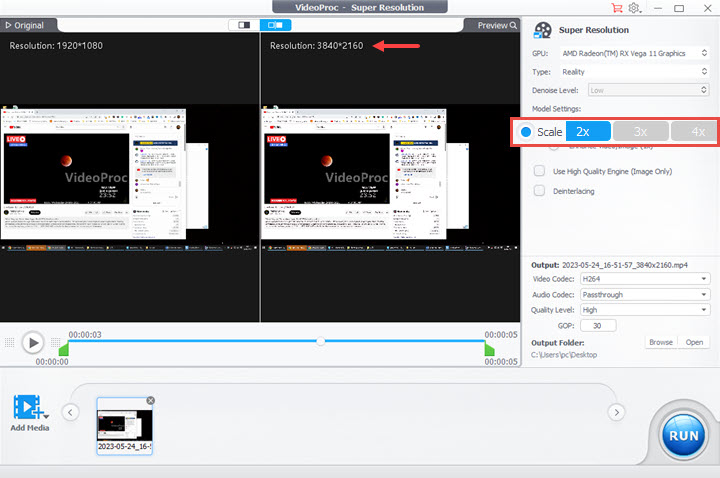
Step 1. Exist from the screen recorder, open "Super Resolution" on the main interface.
Step 2. Drag and drop the screen recording to it. Choose a scale, 2x, 3x, or 4x. You can check the final resolution and result in the preview window.
Step 3. Click "RUN" to export.
2. QuickTime Player
Supoorted OS: macOS
Best for: Recording 4K screen for free on Mac with a 4K display
QuickTime Player is a built-in application on Mac computers that can be used for screen recording, including recording in 4K resolution. In the recording settings, you can choose to record your entire screen or a selected portion of it. You can also select the microphone or other audio input source for your recording.
Pros:
- Free and simple to use.
- 4K screen recording with audio from microphone and apps.
- Save 4K screen recordings in MOV and MP4.
Cons:
- Lack of advanced recording and editing tools.
- Can't upscale non-4K recordings
How to Record Screen in 4K with Quicktime Player
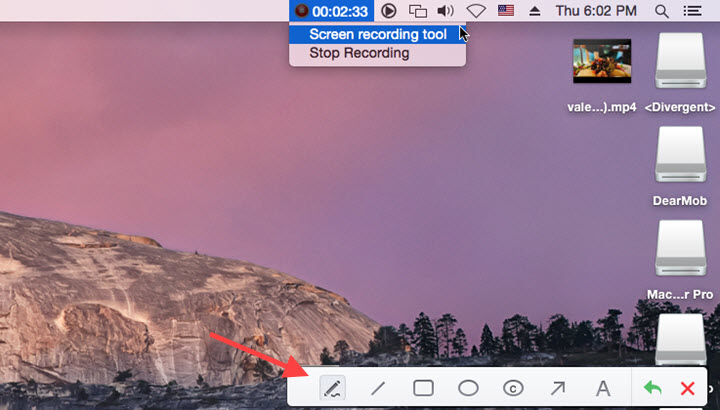
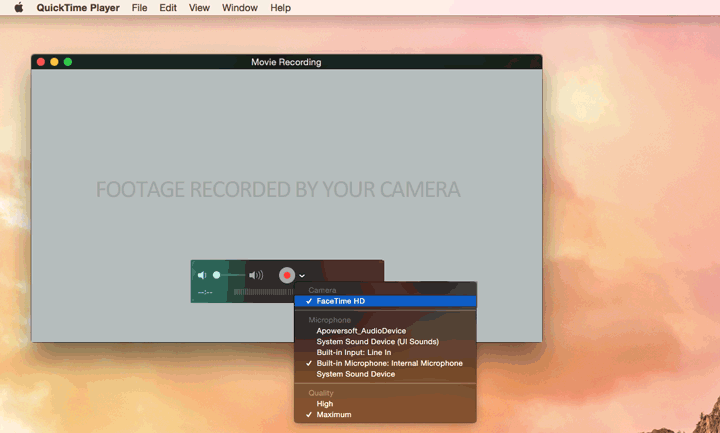
Step 1. Launch Quicktime Player on your Mac. Click File > New Screen Recording. Then the recording toolbar shows up on the screen.
Step 2. Expand the drop-down menu of Options to adjust recording settings, e.g. the recording area, and output file folder.
Step 3. Click the record button to start and end the recording.
3. ShareX
Supoorted OS: Windows 11, 10, 8, 7
Best for: Recording screen in 4K on Windows with a 4K monitor
ShareX is a great open-source screen recording tool, but it may not be optimized for 4K recording out of the box. However, you can adjust the settings to ensure that it captures your screen at the highest resolution possible.
Pros:
- Support 4K, HD 1080p, 720p, and custom recording resolutions.
- Many output formats like MP4 and GIF.
- Versatile recording tools to draw and highlight while recording.
Cons:
- Lagging and dropping frames while recording 4K games at a high FPS.
How to Record Screen in 4K with ShareX
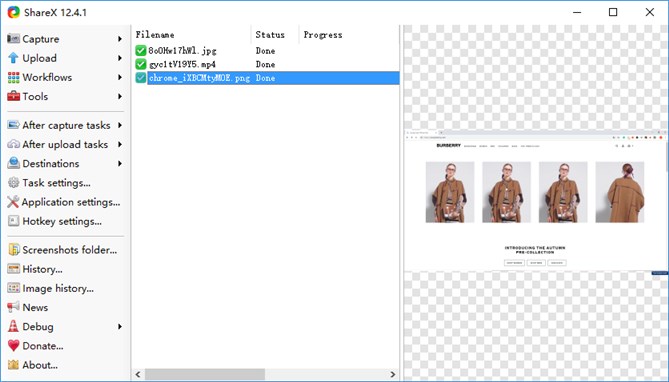
Step 1. Click Capture on the sidebar and select Screen recording.
Step 2. Customize the dimension to record, i.e. the full 4K screen.
Step 3. Then the recording gets started.
4. Icecream Screen Recorder
Supoorted OS: Windows 11, 10, 8, 7
Best for: UHD 4K screen recording on Windows
Icecream Screen Recorder is a screen recording tool that can capture your screen in 4K resolution as well. Without complicated settings, it allows you to customize the recording area up to 4K so long as your monitor supports.
Pros:
- It has many free features.
- Simple and intuitive to use.
- Flexible resolution options for recordings.
- Multiple recording annotation tools.
Cons:
- Performance issues or lag during the recording process.
- Its free version has a recording time limit of five minutes.
How to Record Screen in 4K with Icecream Screen Recorder
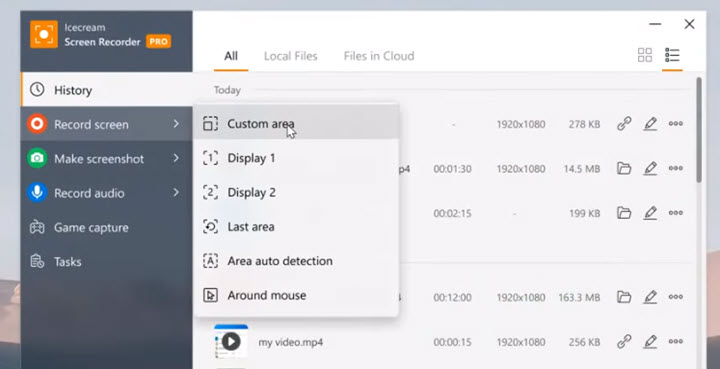
Step 1. Launch Icecream Screen Recorder. Open Record screen on the sidebar and choose Custom area.
Step 2. Drag to select the entire 4K screen. Hit the Rec icon to start capturing the screen.
Step 3. During the recording, you can pause and end whenever you want. When it finishes, you can find the recording in the History tab.
5. Readygo
Supoorted OS: Windows
Best for: Recording 4K films, video conferences, and games played in the full-screen mode
Readygo is a handy and lightweight screen recorder that can record screen and take screenshots in 4K on Windows 10/8/7 with 4K displays. Meanwhile, it allows you to record screen at varied frame rates, for example, 24fps, 30 fps, and 60fps. Though it comes without any extra features like others, it's one of the most beginner-friendly screen recorders.
Pros:
- Lightweight and easy-to-use.
- Allows recording 4K screen at 60fps.
Cons:
- Limited frame rate options.
- No real-time drawing tools.
- No editing features.
- Won't hide automatically when recording starts.
How to Record Screen in 4K with Readygo
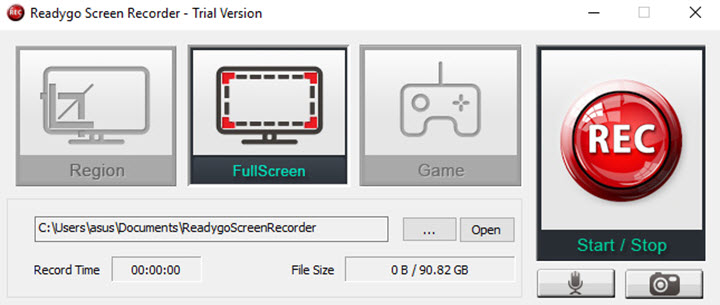
Step 1. Launch Readygo screen recorder on your PC.
Step 2. Choose Full-Screen to let it capture your 4K display.
Step 3. Select a frame rate and change the recording quality to High or Highest in the video settings.
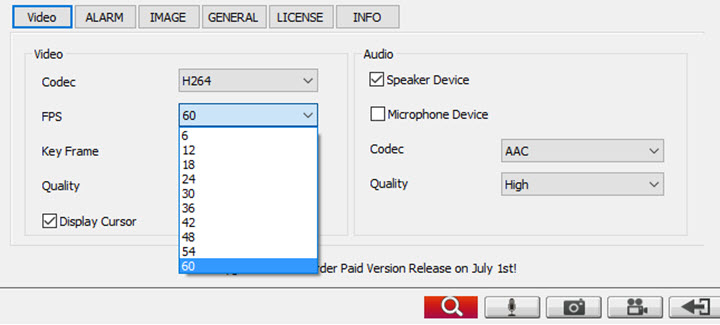
Step 4. Hit the REC button and minimize its interface.
Step 5. When it's done, open the Readygo Window and hit the REC button again to stop.
6. ShadowPlay
Supported OS: Windows
Best for:Recording 4K game plays
If you are a hardcore gamer that configures your PC with an NVIDIA graphics card, ShadowPlay is definitely a good gameplay screen recorder that is integrated with the GeForce Experience app. It supports 4K screen recording at 60fps and 8K at 30fps. Targeting veteran gamers, ShadowPlay has a unique feature called NVIDIA Highlights that can automatically capture kills and great moments from a game. Besides, it can capture screenshots and streaming lives on Twitch and YouTube.
Pros:
- Free and no watermark.
- Support HDR 4K 60fps screen recording.
- Instant replay and direct social share.
- Costume settings for quality, resolution, frame rate, and bitrate.
Cons:
- Heavy loads on GPUs might drag down games' performances.
- Unavailable on many computers except Windows PC with high-end NVIDIA processors.
How to Record Screen in 4K with ShadowPlay
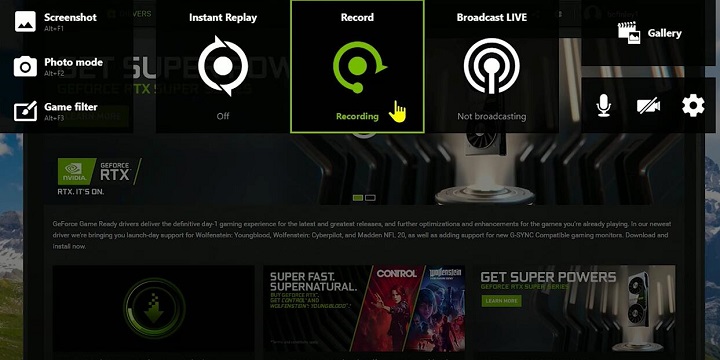
Step 1. Check if your PC meets Geforce Experience minimum system requirements. If yes, download and install it on your Windows.
Step 2. Open this application. Click the gear icon at the top right corner and click GENERAL > IN-GAME OVERPLAY to activate ShadowPlay.
Step 3. Click the settings option in the widget on the right side to let it record the screen in 4K @60fps.
Step 4. Click the Recording button to start recording and hit it again to stop screen recording on your PC.
7. Bandicam
Supported OS: Windows
Best for:Recording 4K screencasts and 2D/3D games
Bandicam is a screen capture tool for Windows 10, Windows 8, and Windows 7. It allows 4K screen recording on your computer and external devices like Xbox, PlayStation, and IPTV. With DirectX/OpenGL/UWP/Vulkan hooking and hardware acceleration technologies, Bandicam can record gameplay on PC at up to 144fps. During the recording, you can easily draw on the screen to highlight and annotate something with its recording widgets, thus it's also popular among online trainers.
Pros:
- Scheduled screen recording.
- Comprehensive options for 4K screen recording.
Cons:
- Watermarks and time limits on the free version.
- Only AVI and MP4 are supported.
- Screen recording and editing are not packed in one application.
How to Record Screen in 4K with Bandicam
Step 1. Open Bandicam on your PC. Click Video on the sidebar and open video settings.
Step 2. Change video size to Full Size.
Step 3. Set FPS according to the frame rate of your game. Otherwise, high FPS is not recommended because it will impact budget systems severely.
Step 4. Keep the rest options as the default if you do not have other specific needs. Hit the red recording button to start capturing what's going on your screen.

8. OBS Studio
Supported OS: Windows, macOS, Linux
Best for: Power users who want quality 4K 60fps screen recording
OBS Studio is one of the best screen recorders and broadcasting programs collaborating with live platforms like YouTube and Twitch. And it's also powerful to record screens in 4K on Windows, Mac, and Linux for free. If you are willing to learn, it offers tons of settings to customize the output format, video resolution, frame rate, bitrate, and audio source. After setting up the scenes and media sources, OBS starts to work in the background and won't appear in the final recording.
Pros:
- Free and cross-platform.
- Customizable resolution settings for screen recording.
- Capture 4K screen at up to 60fps on PC and Mac.
Cons:
- Steep learning curve for novices.
- Lags when capturing screen at a high frame rate.
How to Record Screen in 4K with OBS Studio
Step 1. Open OSB. Click Scene to choose the area you want to record, for example, Game Capture, Display Capture, or Media Source.
Step 2. Go to Settings > Video. Double-click in the options of Base (Canvas) Resolution and Output (Scaled) Resolution and input 3840x2160. Apply the changes.

Step 3. Resize the canvas by dragging the edges to the full screen. Click Start Recording to capture your desktop screen in UHD 4K (3840x2160). Hit Stop Recording to end it.
9. Snagit
Supported OS: Windows, Mac
Best for:Recording 4K screencasts
Snagit from TechSmith is well-known for its powerful screenshots functions, while it also includes a decent screen recording utility and supports 1080p 30fps and 4K 20fps screen recording since Snagit 13 and Snagit 2018. When the recording is completed, it lets you save the recording in MP4 or GIF. But note that, versatile editing features for screenshots are not available for the video, so you are only enabled to trim the video.
Pros:
- Simple and intuitive.
- Many share destinations like YouTube, Dropbox, and Google Drive.
- Variable capture frame rate to optimize performance.
Cons:
- 4K 30fps and 4K 60fps are not supported.
- Lags on 4K monitors on occasion.
- No real-time annotation tools during recording.
How to Record Screen in 4K with Snagit
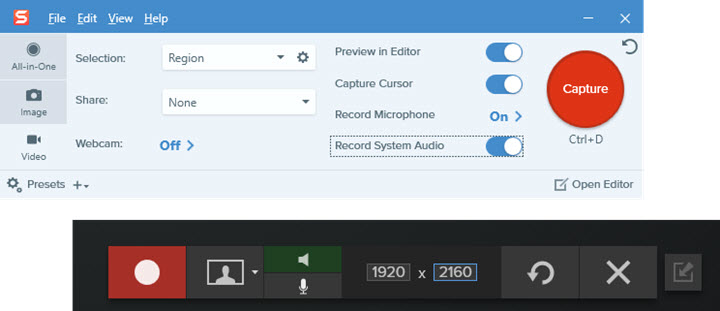
Step 1. Run Snagit on your PC or Mac, and click Capture to activate its screen recorder. Select Video on the left side.
Step 2. Adjust settings of microphone, cursor, system audio, and webcam. Click File and Capture Preferences in the top menu bar, and then, choose High Quality for the screen capturing utility.
Step 3. Hit the Capture button and select the full screen of your 4K monitor.
Step 4. Now Snagit will record your screen in 4K @20fps.
10. D3DGear
Supported OS: Windows
Best for:Recording 4K movies, gameplay, and VR
D3DGear is a paid 4K screen recorder that runs on all versions of Windows. It used to support up to 2K screen recording, but in the latest version, it captures PC screens up to 4K (3840x2160) 120fps. In addition to screen recording and screenshots, you can use it to broadcast videos on Twitch, YouTube, Facebook, and alike.
Pros:
- Lightweight and low impact on system performances.
- Full list of video quality and codec settings for professionals.
Cons:
- Conflict with some games protected by anti-cheating software.
- No intuitive recording options like its peers.
- Watermarks in the free trial.
How to Record Screen in 4K with D3DGear
Step 1. Open D3DGear on your PC.
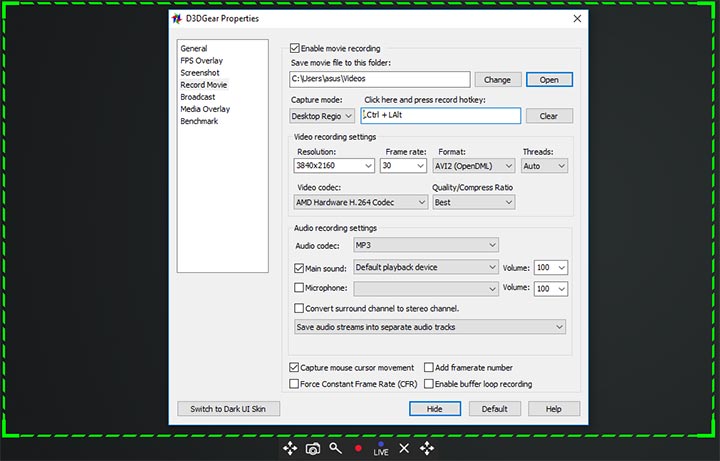
Step 2. Open the Record Movie option on the sidebar. Choose a capture mode, Desktop, Desktop Region, or Game. Set the recording resolution, frame rate, and video format.
Step 3. Start recording by pressing the record hotkey (F8 by default). You can also customize it in advance.
Step 4. Drag the green edges to include the whole 4K screen in your recording. Hit the red dot to start recording.
Step 5. Hit the red dot again to stop recording and open the file folder to preview the video.
Best 4K Screen Recorders Comparison Chart
| OS | Impact on System [1] | Watermark | Editing | Price | |
|---|---|---|---|---|---|
Mac, Windows |
Low |
No |
Yes |
Free trial; $34.95/year |
|
QuickTime Player |
Mac |
Low |
No |
No |
Free |
ShareX |
Windows |
High |
No |
No |
Free |
Icecream Screen Recorder |
Windows, Mac |
Low |
No |
Yes |
Paid |
Readygo |
Windows |
Medium |
No |
No |
$35 |
ShadowPlay |
Windows |
High |
No |
No |
Free |
Bandicam |
Windows |
High |
Yes |
No |
$64.9/year |
OBS |
Windows, Mac, Linux |
High |
No |
No |
Free |
D3Dgear |
Windows |
Medium |
Yes |
No |
$29.85 |
Snagit |
No |
High |
No |
Only Trim |
$39/year |
1. Impact on system in the context means to what degree the screen recording software affects the compters' performance, especially on budget systems. Negative impacts include FPS drops, lags, and alike.
Frequently Asked Questions about 4K Screen Recording
Can you record screen in 4K?
Yes, you can record your screen in 4K resolution. To do so, you typically need a screen recorder that supports 4K output and a display that supports 4K resolution (or use a workaround to achieve 4K recording on a lower-resolution display). VideoProc Converter AI is an easy-to-use 4K screen recorder worth trying.
Do you need a 4K monitor to record screen in 4K?
No, you don't necessarily need a 4K monitor to record your screen in 4K resolution. There are ways to record 4K without a 4K monitor, such as capturing the raw output from your GPU, using a 4K video capture card, or upscaling the recording to 4K afterward, etc. But a 4K monitor is indeed ideal for viewing and interacting with content at that resolution.


