Summary: Wanting to know how to record your Screen? Then you've landed on the right page. To save you the hassle, this guide focuses on how to record your screen on Windows, Mac, iPhone/iPad, Android with 32 different screen recorders. See which one works best for your devices and for needs.
Why do you record your screen? There are a host of reasons. Maybe you want to capture a screen tutorial and upload it to your YouTube channel, or want to record and watch online courses after the expiration of subscriptions.
Or, maybe you want to send your grandpas/grandmas a screen instruction on how to use Skype on the mobile.
But do you know how to record your screen using various machines or devices?
On a PC, the built-in Xbox Game Bar gets my vote. But it's in short of advanced features currently. If you want more controls to your recordings, you can shift to other screen recorders.
While recording screen on Mac could be completely different for someone, because Apple's macOS uses another operation philosophy, compared to Windows OS...
Then scroll down and check what app to use and how to record your screen on Windows, macOS, Linux, Android, iOS.
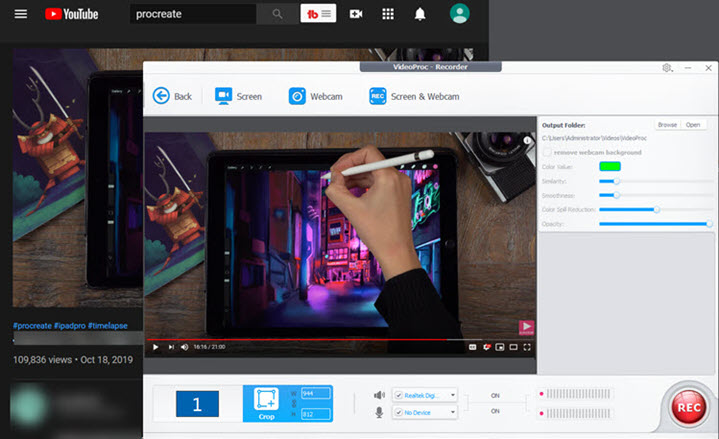
Solution 1. How to Record Your Screen with VideoProc Converter AI
VideoProc Converter AI had to be one of the best that I used. It is simple, lightweight and high quality.
More so, the trial version is nearly identical to the paid version, so you can test it out with nearly all the features for free, sucu as screen recording with webcam, internal and external sound, Chroma keying, as well as some nifty video editing tools.

Platform: Windows, macOS
Pricing: Try for free. Or annual plan for $34.95, lifetime plan for $54.95 (one-off payment).
Step 1: Launch VideoProc Converter AI and select Recorder on the main interface.
Step 2: Select a recording mode on the top.
Step 3: Click on the wheel-shaped icon on the top right corner to set up video settings.
Step 4: Choose to record the entire screen or part of the screen at the lower-left corner.
Step 5: Enable audio device(s).
Step 6: Click on the REC button to start recording. When everything is OK, click on the Stop button to end.
Solution 2. How to Record Your Screen with Xbox Game Bar
Compatible with any PC games that you have, Xbox Game Bar is a built-in, customizable and free overlay designed for capturing gameplay, sharing, chatting, etc. in Windows 11/10.
That said, you can instantly access to a high definition screen recorder by hitting Windows and G key.
There's a Performance widget that allows you to keep track of your CPU and GPU performance in real time.
Beyond that, Spotify is also brought into the Game bar. So you can control the music without ever leaving the game.
Platform: Windows
Pricing: Free
Step 1: You don't need to install it, because the Game bar comes with Windows 11/10. But you should ensure you are on the Windows 10 of version 1809 or higher. And you can hit the Windows and G key to bring it up.
Step 2: Considering that the Game Bar is widget-based, which means you can choose the widget that you want to see and move them to whatever section on your screen.
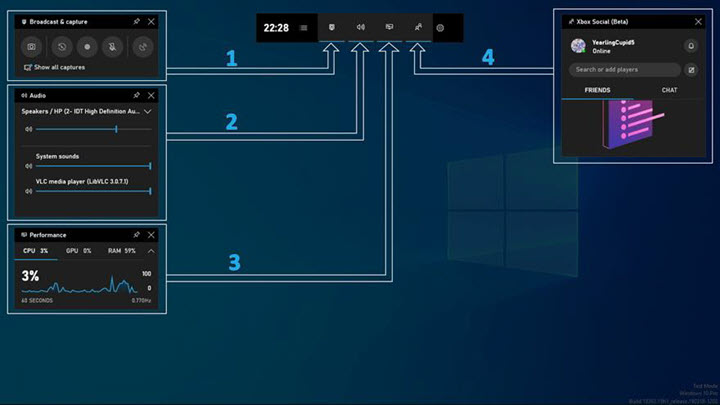
Besides, you can set up audio settings, shortcuts, notifications and others in the Game Bar.
Step 3: Click on the Record button to start recording at the Broadcast & Capture widget (or press the Windows + Alt + G). And you will get a timer on the right side of your screen.
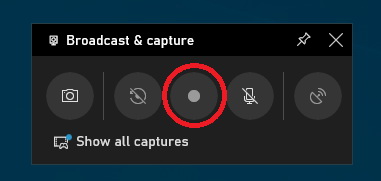
Step 4: The recordings will be automatically saved in MP4 format. And you can find the footage by heading to the Broadcast & Capture widget > Show all captures.
With all these video recordings at hand, you can edit the recordings together, for instance, making a gameplay montage and sharing them with friends.
Solution 3. How to Record Your Screen with PowerPoint
Believed it or not, you can even use Microsoft PowerPoint to record your screen.
It's the perfect balance between ease of use and power. Its video recording feature, coupled with simple editing tools, such as trimming, color adjustments, posters, etc., helps you make the best presentations, tutorial videos, reaction videos, online webinars, and the likes!
Platform: Windows
Pricing: Free
Step 1: Launch PowerPoint and build a blank presentation. Now, you will head to Insert on the top > click Screen Recording on the far-right.

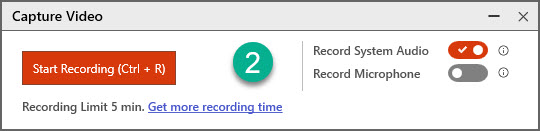
Step 2: It will bring up a Control Dock where you can start/pause/stop recording, choose to capture full screen or a specific part of it, enable/mute audio, and show/hide the cursor.

Step3: Once recording settings are configured, click on the Record button to start recording. To stop screen recording, hold down Windows +Shift +Q.
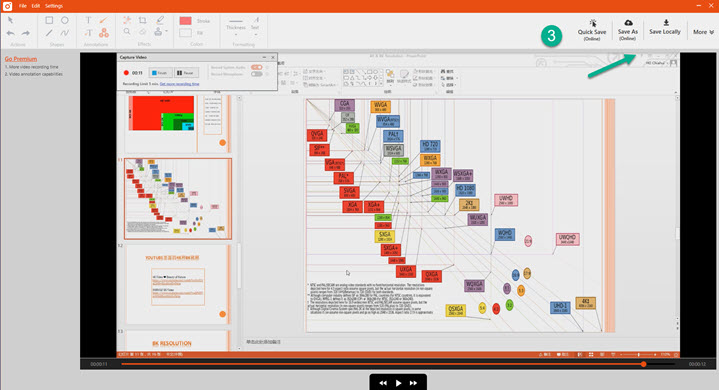
Step 4: After you stop recording, you can make some simple edits in the PowerPoint. To export your recording, right-click on the video > Save Media as > modify the file's name. And your video will be automatically saved in MP4 format.

Solution 4. How to Record Your Screen with Bandicam
Bandicam works pretty well on recording screen activities. They have multiple options to play with.
You are allowed to capture either the entire computer screen or a certain area, external devices like microphone, webcam, PS4, etc., screenshots, as well as customize recording settings. It also has both a free and a paid version. But they don't come with any editing feature.
Platform: Windows
Pricing: $39/PC or try for free.
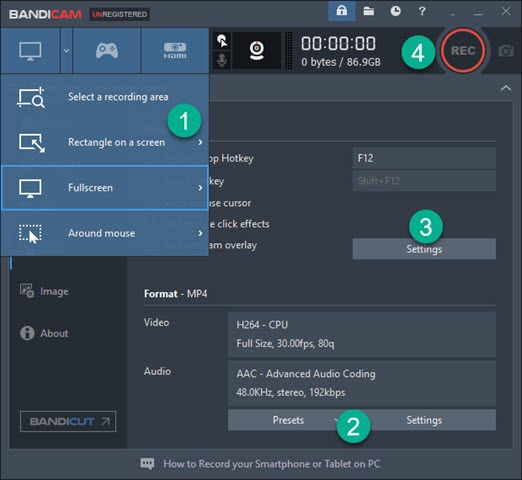
Step 1: Free download Bandicam at Bandicam.com. Then open Bandicam and select a recording mode. You can either record the full screen or a partial area of your screen.
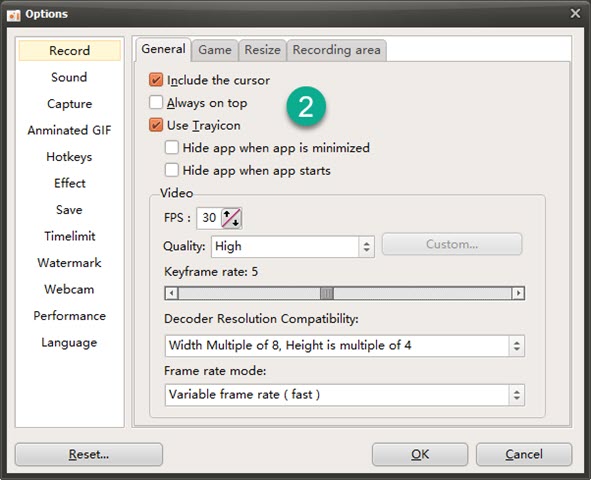
Step 2: You will configure file format, including container format, encoder, bitrate, frame rate, quality and many more. You can choose a preset format as a matter of course.
Step 3: You will set up recording settings next, like enabling sound device(s), webcam, keystroke effect, or adding texts and watermarks.
Step 4: Press F12 or click on the REC/Stop button to enable/stop the screen recorder.
Solution 5. How to Record Your Screen with Captura
Developed by Mathew Sahin, Captura is a free and open-source screen capture tool where you can do the things like making a screencast for your work, capturing the entire screen, specific areas or windows, grabbing a screenshot quickly by hitting the hotkeys configured. More importantly, its simplicity lets you master in no time.
Platform: Windows
Pricing: Free and open source
Step 1: You will download the most recent version of Captura from Github.
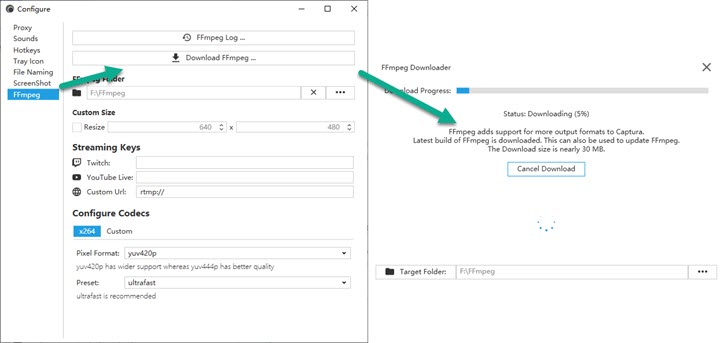
Step 2: You will have to download FFmpeg to your PC next, because without them, Captura won't work. To get FFmpeg installed, you need to go to Configure > FFmpeg > select Download FFmpeg.
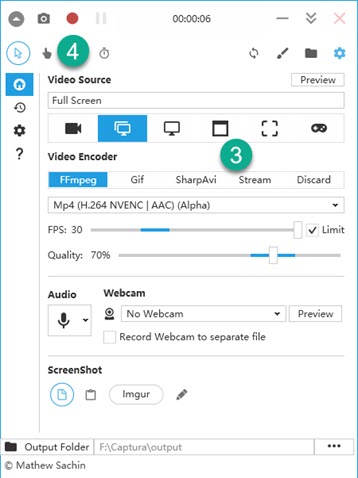
Step 3: You will set up recording settings on the home page, including a target display, full screen/partial screen, encoders, frame rates, quality, and sound/camera device(s).
It would be better if you select another destination to store files.
Step 4: To start/end recording, you will click on the Record/Stop button on the top. Once the recording is done, your video will be automatically sent to the directory you've set.
Solution 6. How to Record Your Screen with ShareX
When attempting to record your screen, Share X is an ideal option, which is an open source app that adds the functionality you need to grab either the whole screen or any area of your screen. ShareX also has a lot of helpful keyboard shortcuts to help you enable any feature without using your mouse.
Platform: Windows
Pricing: Free and open-source
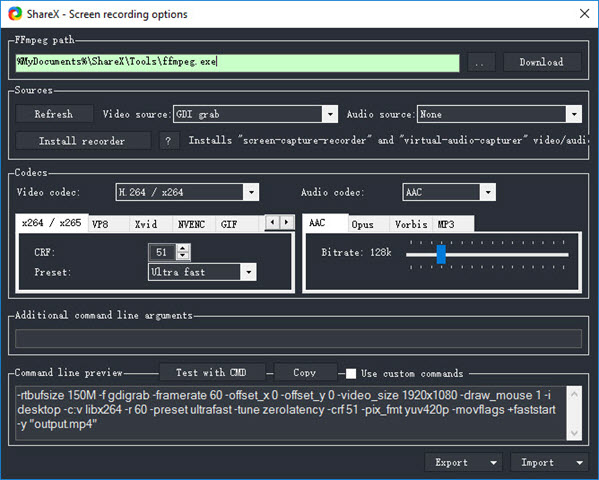
Step 1: Download ShareX at Getsharex. Open ShareX and configure proper encoding settings in the first place. On the main interface, click on Task settings > Screen recorder > Screen recording option.
Now, you can enable external devices, customize video/audio file format, bitrate, frame rate in this tab.
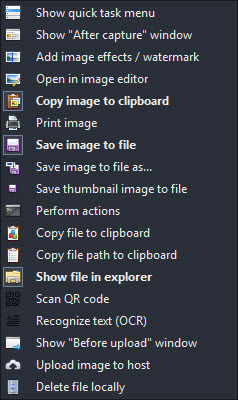
Step 2: To easily access your recordings, you can navigate to After capture tasks and select Show files in explorer.
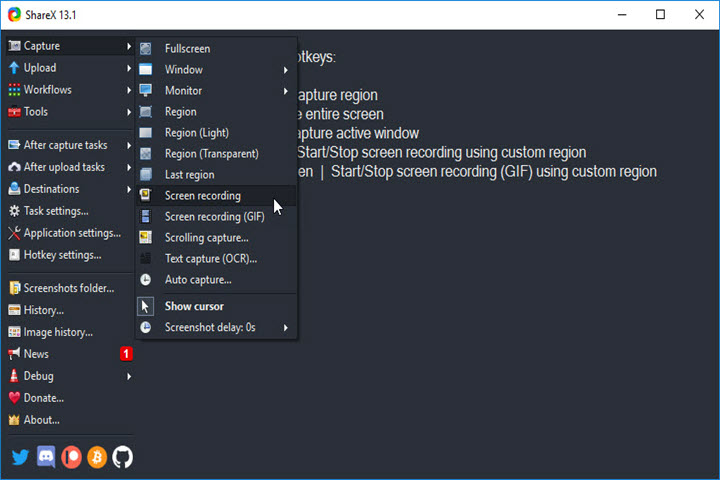
Step 3: To enable recording, go to Capture in the sidebar > Screen recording > select to record either the full screen or part of your screen.
When everything is over, go for the Stop button. The footage will automatically pop up.
Solution 7. How to Record Your Screen with CamStudio
Released as an open-source product in 2001, CamStudio is a lightweight, simple and intuitive screen recording app that renders videos in MP4, AVI and SWF formats. Beyond that, you can record full screen or regional area, speaker sound/system sound, webcam and use other practical features.
Platform: Windows
Pricing: Free and open-source
Step 1: Get CamStudio at camstudio.org. Launch CamStudio on your PC. Now, you will opt for Options > Video Options to customize video and audio settings.
If you would like to record your microphone/system sound, or record without audio, do choose one from the drop-down menu.
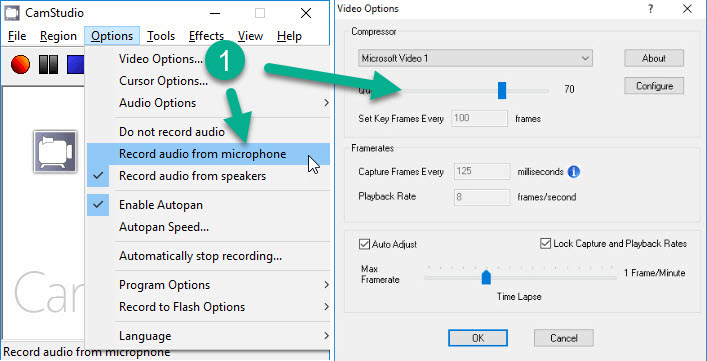
Step 2: Toggle on the sun-shaped icon to render videos in AVI, MP4 or SWF format.
Step 3: CamStudio supports resizable region. You will go for Region on the top > Full Screen/Region mode.
Step 4: To start recording your screen, click on the red button. If you have picked up the regional mode, you will be customizing an area of your screen before recording.
When recording is finished, click on the blue square icon to stop, and choose a destination to store your file.

Solution 8. How to Record Your Screen with FlashBack Express
FlashBack Express by Blueberry Software is a straightforward screen recorder that allows you capture video, audio, from your computer screen in a few clicks. You'll have the option to make your recordings either local or in the cloud. 10 GB of storage quota in FlashBack online service is free of charge.
Platform: Windows
Pricing: $49
Step 1: Download FlashBack Express at Flashbackrecorder and launch it on your computer.
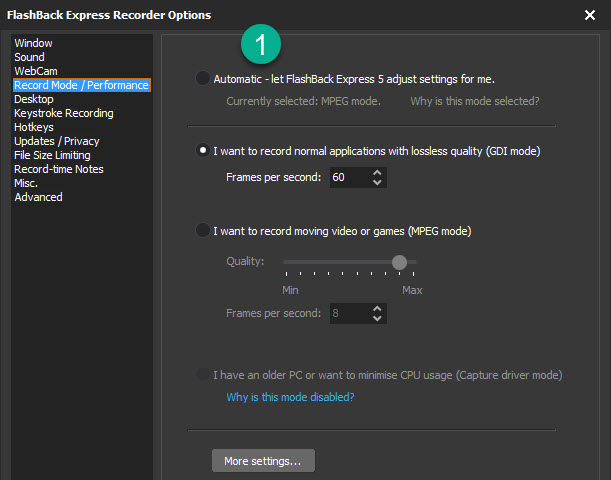
Step 2: For better recording quality, navigate to Settings > Record Mode/Performance and regulate the parameters you need. If you are new to recording settings, set the values by default.
Step 3: On the main interface, select to record a windows/full screen/regional area of your screen, audio device(s), and webcam.
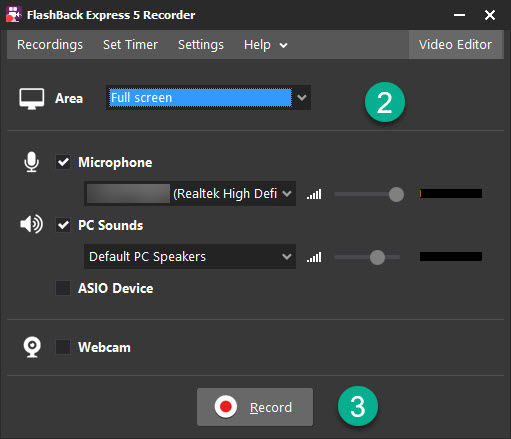
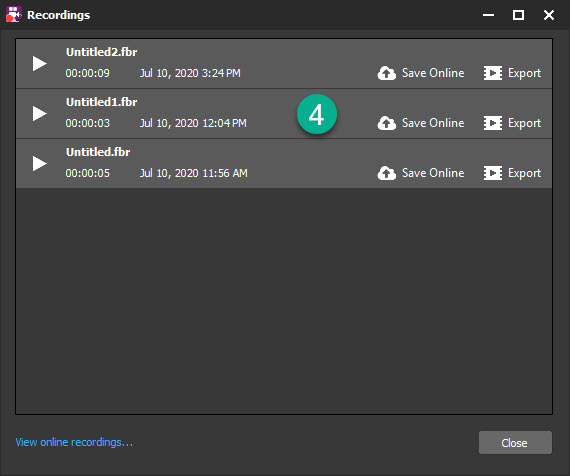
Step 4: Click on the Record button to get the recording started. Once the recording is finished, click on Recordings on the top left corner and save your videos either local or online.
Solution 9. How to Record Your Screen with Fraps
Fraps is a benchmarking and screen capturing utility for Windows, which you can easily understand the performance of your machine by monitoring FPS when gaming. It also has in-game screenshots and video capture abilities. Plus, it records videos in the uncompressed AVI formats with high quality and dropping frames.
Platform: Windows
Pricing: Free trial is available (with watermark); USD 37.
Step 1: Free download the latest version at Fraps.com.
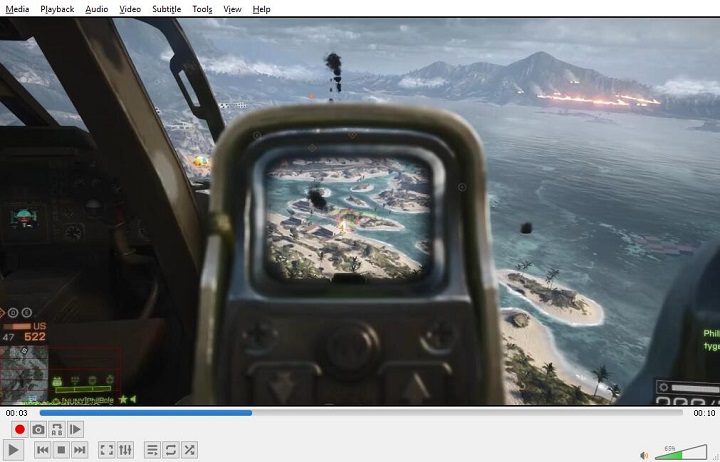
Step 2: When you fire up Fraps on your computer, you will find four tabs on the main interface. To enable the FPS tracking, move to the FPS tab and put the FPS overlay in any corner you like.
Next, you will move to the Movies tab where you can set up the recording audio, maximum frame rates, and more.
It's worth noting that all controls in Fraps can be done through hotkeys. Therefore, you can make Fraps to be your own Fraps.

Step 3: After you open an application, you will find there's an FPS overlay at the corner and you can enable video capturing using the hotkey you made.
When the video recording is done, you can view the benchmarking data and screencasts through the output path.

Solution 10. How to Record Your Screen with Ezvid
Supported by donation, Ezvid makes it extremely easy to capture screen, voice-over and video simultaneously from your PC. Therefore, it could be used for a number of things - including computer tutorials, gaming sessions, walkthroughs, etc.
Even if you're not doing a screen recording, you still can customize your videos with watermark, texts, speed warping that anyone can use.
Platform: Windows
Pricing: Free
Step 1: Free download the screencasting tool at Ezvid.com.
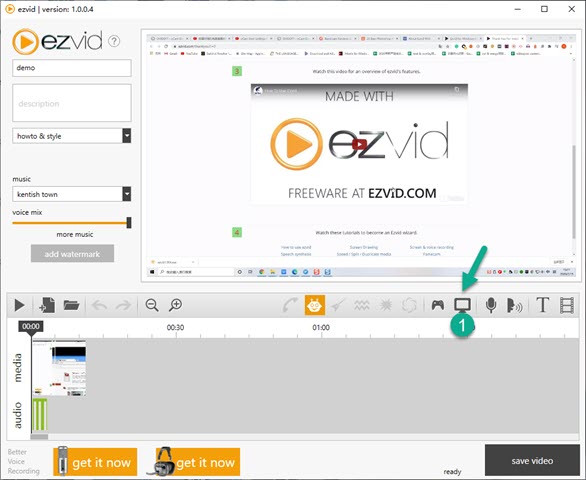
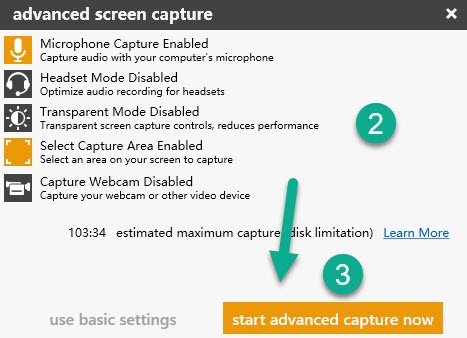
Step 2: Double-click Ezvid to run it on your computer. Click on the capture screen button > use advanced settings > enable the options you need > start advanced capture now.
Step 3: Let's say you have enabled regional recording, you will need to draw a capture area before recording. After a few seconds countdown, screen capturing gets on.
In the middle of recording, you can add annotations, stamps, etc. by clicking on the Draw button.
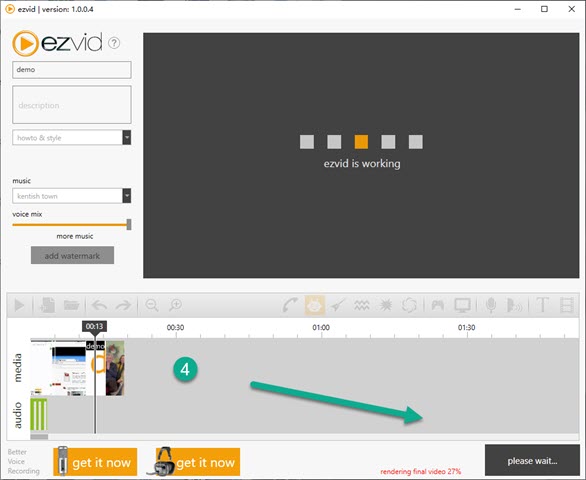
Step 4: When you stop recording, you can make some edits on the timeline by adding texts, background music, and pictures to your video. At last, click on the Save video button to save your video on your hard drive.
Solution 11. How to Record Your Screen with Ocam
Ocam is one of the lightweight and user-friendly tools which can record your screen with one click and no watermark. This is one of the best tools which is available for free.
There is also a paid version with the same features but no advertisements at all. You will find advertisements are overwhelming in the free version.
Platform: Windows
Pricing: Free or USD 39
Step 1: Download and install the latest version of Ocam from Ohsoft.
Step 2: After you open Ocam, opt for Menu at the top left corner > Options. Now, you can regulate various recording settings as you wish in this panel, covering recording effects, audio device, webcam, hotkeys, output path, encoder, and more. Or you can make it by default.
Step 3: To record your screen, you will click on the Resize option to customize the recording area of your screen. There are some presets that aromatically configure the resolution for you.
Step 4: Click on the Record button to start recording, and you will find there's a timer on the right once the recording is on.
To end recording, click on the Stop button. Now, you can get your videos by selecting the Open option on the home interface.

Solution 12. How to Record Your Screen with VLC media player
VLC is well-known for streaming and playing all types of file formats and transcoding a file from one to another. Yet VLC does much more beyond that.
As an all-rounder, VLC also allows you to record your screen within the app rather than bouncing out to another app. It's worth noting that VLC can only record the entire screen.
Platform: Windows, Linux, macOS, Unix, iOS, Android
Pricing: Free, open-source
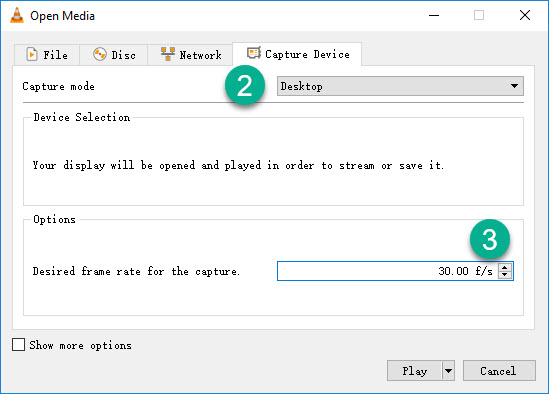
Step 1: Download VLC at VideoLAN > launch VLC and click on Media at the top > Open Capture Device (or you can press Ctrl + C on the keyboard either). And a dialog box will pop up.

Step 2: Click on the Capture mode tab and make sure that Desktop is selected. Change video's frame rate to whatever you want in the lower area. Then click the down-shaped arrow and choose Convert.
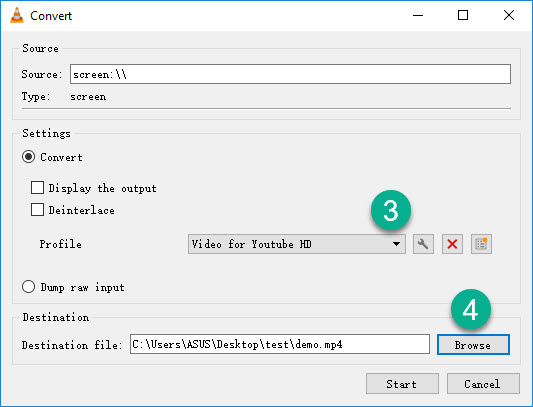
Step 3: In the next dialogue box, select or make a profile for your recording, and set a location for storing files. Then click the Start button to enable capturing.
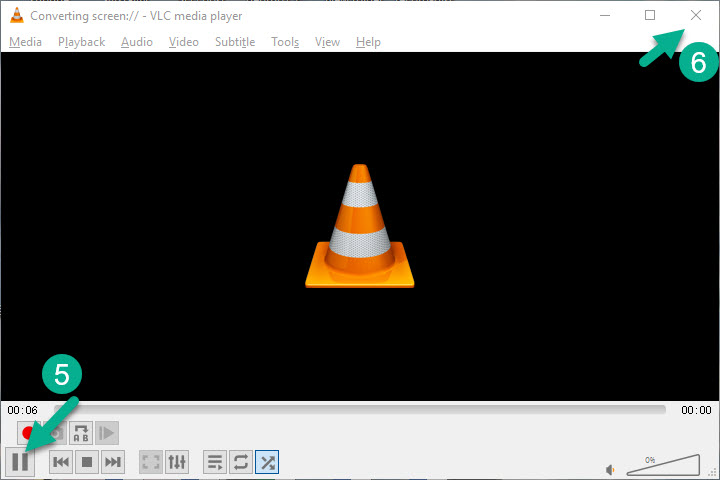
Step 4: When you are done, click on the Pause button and close VLC. Your video will be automatically saved to the location you've set.
Solution 13. How to Record Your Screen with OBS
If you are a streamer, you might have knowledge of OBS. It's a free screen recorder and streaming application. That said, with OBS, you can either capture whatever things happing on your screen offline or broadcast content to your fans via a live-streaming service such as Twitch, YouTube, etc.
Platform: Windows, Linux, macOS
Pricing: Free, open-source
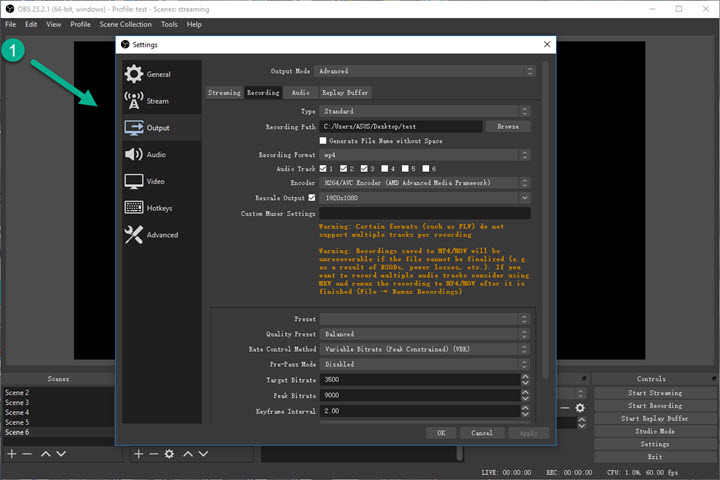
Step 1: Download OBS at OBS Project > Open OBS, and click on File > Settings > Output > Output mode: Advanced. Now, in the Recording tab, you can configure all kinds of video settings, including container format, encoder, resolution, bitrate and more.
Step 2: In the Scene column, click on the plus icon to build a new scene. In the Sources column, also click on the plus icon to organize what app/browser/video devices/audio devices you would like to mix.

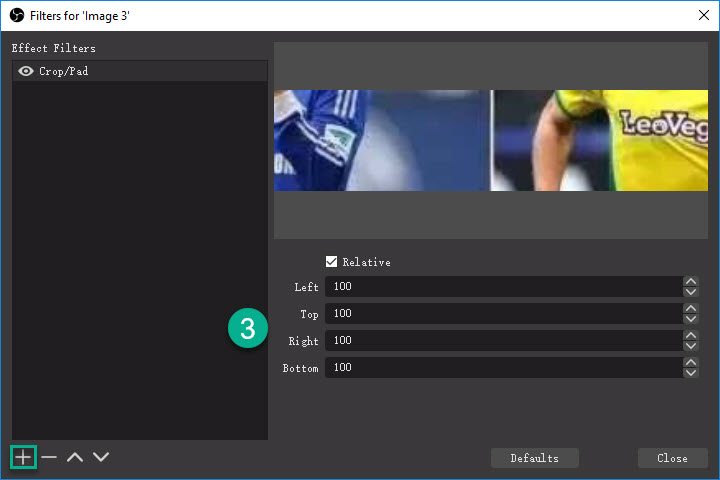
Step 3: Let's say you would like to record part of the screen. Right-click the source in the viewer > Filters > at the bottom of the Effect Filters, click on the plus icon add a Crop/Pad filter. Now you can reduce the size of the screen by bringing down the pixels on the right.
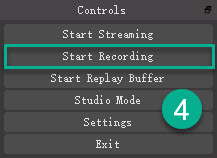
Step 4: Select Start Recording to enable recording. And Click on Stop Recording to end.
Solution 14. How to Record Your Screen with TinyTake
TinyTake, developed by MangoApps, is a software application that lets you capture computer screen, facecam, system sound/microphone sound, as well as annotations simultaneously. Once you're recorded the screen, you can save it on your computer in MP4 format or in the cloud (2GB storage is freely available), or directly upload recordings to your YouTube channel.
Platform: Windows, macOS
Pricing: Basic plan for free. $29.95 of Standard plan, $59.95 of Plus plan, $99.95 of Jumbo plan.
Step1: Free download TinyTake at tinytake.com. Open TinyTake and sign in with an account, because the software app allows you to save content in the cloud directly.

Step 2: To enable the screen recorder, click on the Capture button > Capture Video (or press Alt and V key on your keyboard).
Now you will specify a particular area of your computer screen that will be captured, and capture either your microphone sound or computer sound. At last, click Start Recording to get the screen recorder running.
Step 3: Once you have screen recording finished, you can opt for keeping videos locally or uploading to online storage service.
Solution 15. How to Record Your Screen with Snagit
Developed and distributed by Techsmith, Snagit is a reliable, safe, and easy to use tool to capture screenshots and record a video off of your computer screen. The best feature of Snagit is that the full screen or half of the screen can be picked on your own.
When your recording is done, Snagit compresses your video into MP4 format, so you have no issues sending videos to social networks, online storage service, etc.
Platform: Windows, macOS
Pricing: $49.95 (one-off fee)
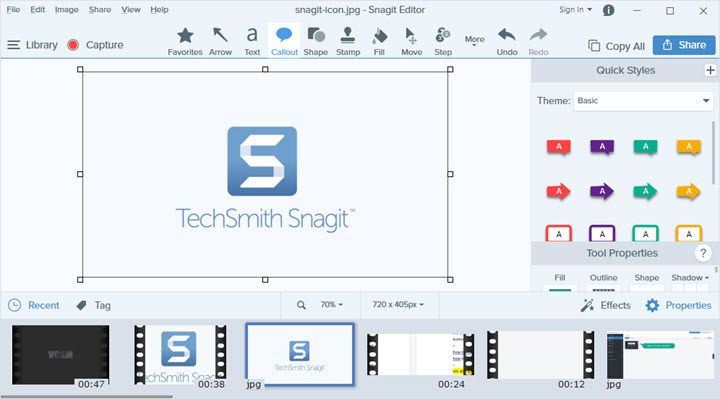
Step 1: Download Snagit from TechSmith onto your computer at the get-go. You will get two separate applications. Snagit Editor is where you can edit and organize your media files, and Snagit Capture makes screencasts and screenshots.
Step 2: To record your screen, you will open Snagit Capture. And a small and intuitive interface appears.
Step 3: On the main interface, select Video from the top navigation bar on the left. And then you will set up recording settings on the configuration panel.
Step 4: Click on the Capture button > choose to capture the full screen or specific zone on your screen > toggle on or off webcam or audio device(s) > click on the Record button to start recording your screen.
Step 5: Once the recording is done, your video will be sent to the Snagit Editor. You are allowed to edit it, save it in MP4, or share it directly in the editor.
Solution 16. How to Record Your Screen with Filmora Scrn
With Filmora Scrn, you can record professional videos from your computer screen and webcam along with audio at the same time. More so, you also have the option to record videos in 15-120 FPS, which is an optimal choice for capturing gameplay.
Because of the higher the frame rate, the silkier the video. Also, it gives you GPU acceleration that reduces CPU usage to avoid any lag when recording gameplay.
Platform: Windows, macOS
Pricing: One year license for $19.99, lifetime license for $29.99.
Step 1: You will download Fimora Scrn at the get-go. And install it on your computer following the screen instruction.
Step 2: Launch it and select Get Started. You will adjust recording modes and video settings as you wish, including common mode/game mode, selected area/full screen, encoder, shortcuts, etc.
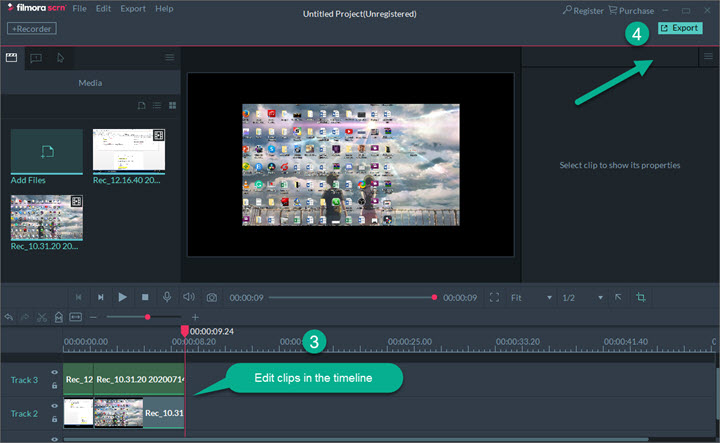
Step 3: To start recording your screen, you will head to Capture > Start capturing button.
Step 4: When the recording is finished, Filmora Scrn Editor opens automatically. You are allowed to make easy edits in the editor like cutting, cropping, pasting, adding voice-over, etc.
At last, you will either save it on your computer or upload to social media platforms by clicking on the Export button.
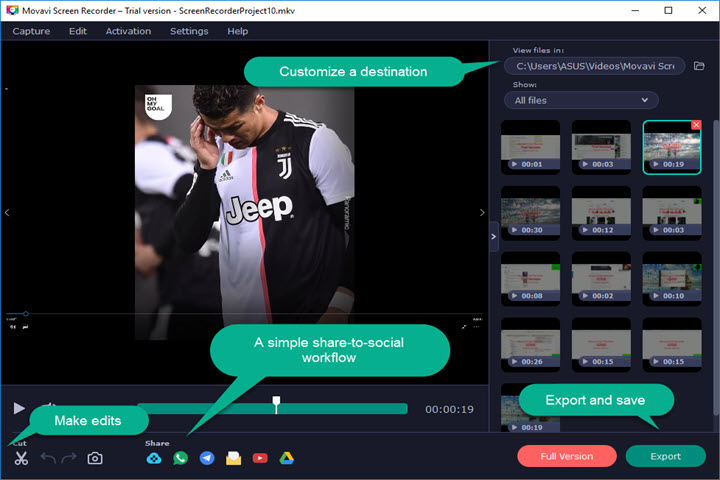
Solution 17. How to Record Your Screen with Movavi Screen Recorder
With Movavi Screen Recorder, it's possible to record the webcam, voice narration, computer sound, as well as your desktop screen.
Plus, it is an overlay that allows you to control all the features and more without ever leaving your ongoing window. That said, you don't have to switch between screen recording app and desktop demonstration.
Platform: Windows, macOS
Pricing: $39.95/PC (one-off payment)
Step 1. You're needing to download and install Movavi Screen Recorder on your computer at the beginning.
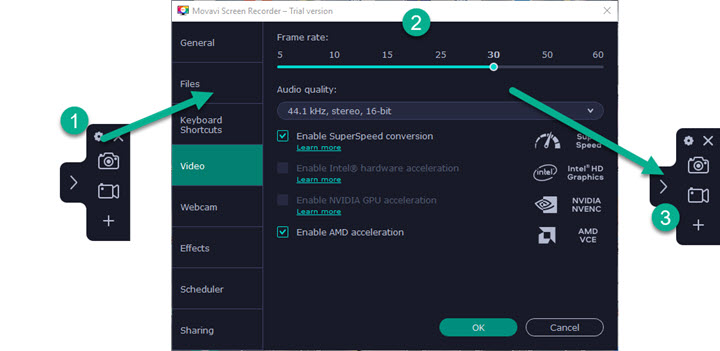
Step 2. When the recorder launched, you will get a widget attached on the right side of the screen. Now, you can hide it by clicking on the arrow-shaped icon, or customize recording settings by clicking on the wheel-shaped icon.
Step 3: To bring up the screen recorder, you can hit F10 > select to record the entire screen or a specific portion of your screen > enable the device(s) or effect(s) if you need > hit F10 again.
Step 4: when capturing is over, there will be a window where you can make edits, share to social media platforms, export and save on your computer.
Solution 18. How to Record Your Screen with ScreenRec
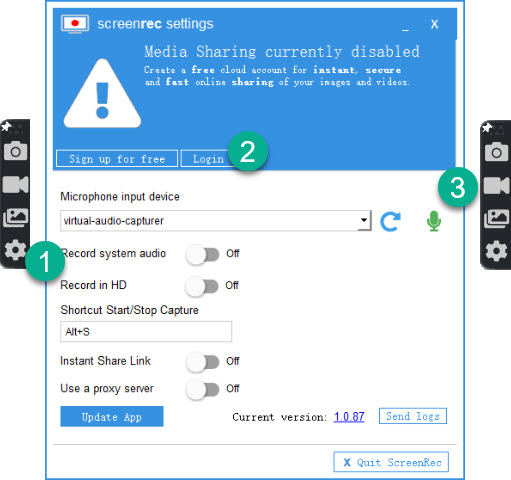
ScreenRec is free, lightweight and decent screen capture software that comes with instant sharing and online storage service with an even flat learning curve. When ScreenRec is opened, you will get a widget on the right side of your screen.
There are a few options on the widget: pin-icon, screenshot, screen recording, history, and settings. You can use it to capture anything like your desktop, VOD, game, etc. with no watermark.
Platform: Windows, Linux, macOS
Pricing: Free
Step 1: To start, you will download and ScreenRec on your computer.
Step 2: Once launched, you will see an overlay floated on the right side of your screen. If you need to get instant sharing, cloud storage service and more controls, you should create a new account and log in by selecting the settings option.
Step 3: Click on the Start recording button and draw an area of your screen that you want to record. You are allowed to record voice narration and computer sound as well.
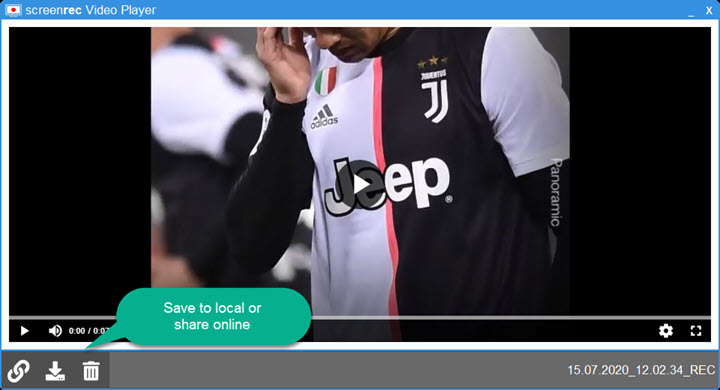
Step 4: Once recording completed, the program will prompt you to either save your videos locally or share them to social networks instantly.
Solution 19. How to Record Your Screen with Camtasia
Packed with screen recording and countless video editing features, Camtasia gives you everything to create professional videos like product demonstrations or presentations whether you're an expert or green-hand.
However, its price tag at the other end will be prohibitive to some, while it's definitely worth trying out during the trial period.
Platform: Windows, macOS
Pricing: $249 (one-time fee)
Step 1: You will download and install Camtasia on your PC or Mac by navigating to TechSmith via a browser at the very beginning.
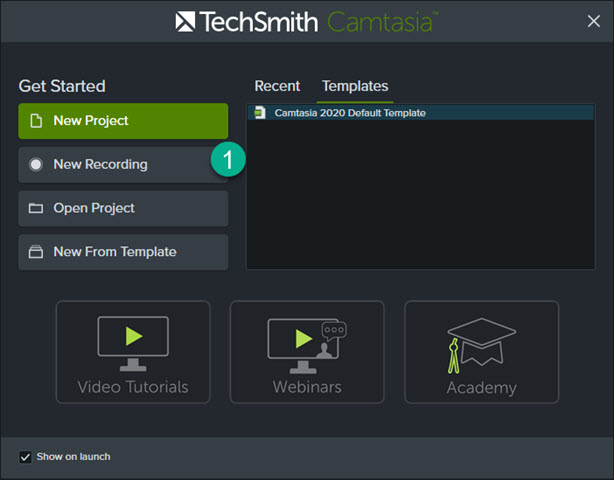
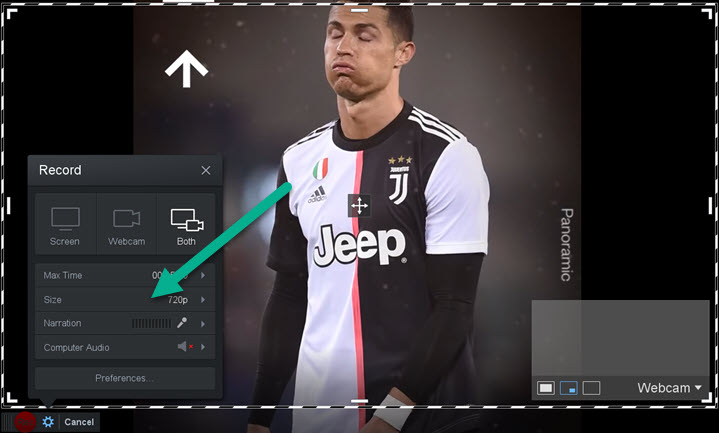
Step 2: To get 30 days free trial of Camtasia, you will have to create a new account and sign in. Once Camtasia gets started, you will choose the recording mode in the initial panel > New Recording.
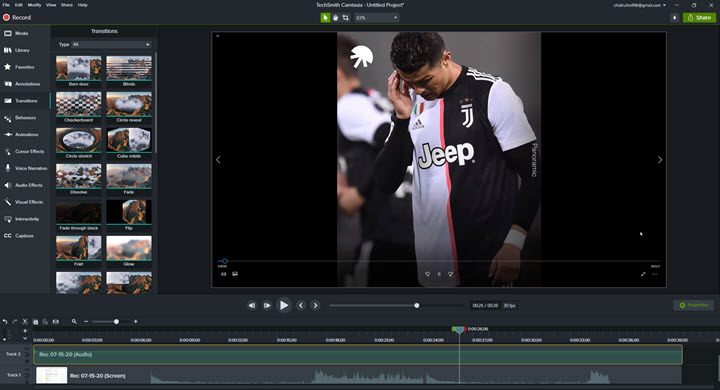
Step 3: It will bring up a small box at the lower right corner.
Camtasia screen recorder captures the entire screen by default, while you can customize a selected area of your screen by unlocking the lock icon and draw an area of your screen you would like to capture.
You can regulate other recording settings in this tab as a matter of course.

Step 4: Once the recording is done, the editor gets into your screen and you are allowed to make professional videos by leveraging editing tools.
Solution 20. How to Record Your Screen with Screencast-O-Matic
Screencast-O-Matic is a browser-based screen recording tool widely used in video creation for its accessibility, simplicity, and power. The configuration panel is extremely simple and intuitive, you can modify recording devices, resolution, audio and more.
Another sweet spot is the integration with Google Drive, Dropnox and YouTube, which simplifies and optimizes the workflow of sending files to these online services.
Platform: Web
Pricing: Delux plan of $1.65/month, and Premier plan of $4.00/month. Or you can try it for free.
Step 1: Build a new tab and navigate to the website of Screencast-O-Matic. On the home page, click on the Start recording for free > Launch Free Recorder (for the first time, you have to download a screen recorder launcher).
Step 2: Set up recording settings in the configuration panel, including capture device(s), full screen/partial screen mode, hotkeys and more. When settings are good to go, click on the Rec button. The screen recorder will start recoding in 3 seconds.
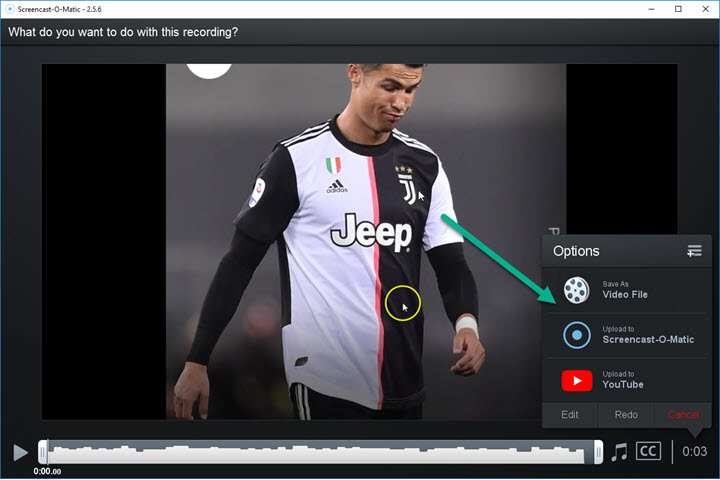
Step 3: Once the recording is finished, click on Done on the far right. On the free version, you should opt for Save/Upload. Now, you are allowed to add music to videos and upload them to Google Drive, DropBox or YouTube.
Solution 21. How to Record Your Screen with TechSmith Capture
TechSmith Capture, formerly called Jing, is a free utility to capture both screencasts and screenshots. Its simplicity and ease of use make it perfect for beginners that are tired of complex software.
Platform: Windows, macOS
Pricing: free
Step 1: Let's get started by downloading the screen recorder from TechSmith.
Step 2: Create a Screencast.com account and log in TechSmith Capture. The Screencast.com account is where your recordings are stored.
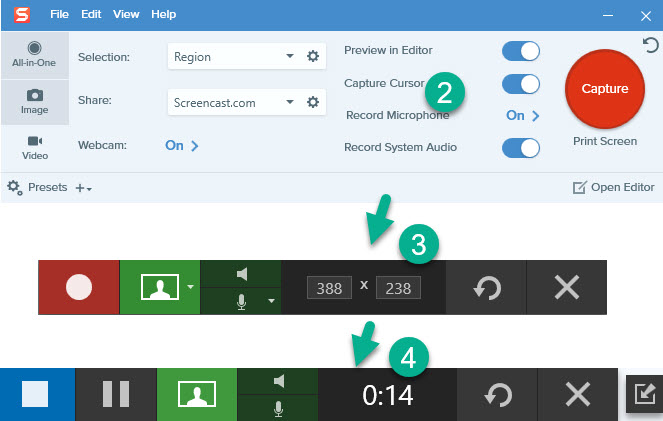
Step 3: Once you've signed in TechSmith Capture, you will find a small interface appearing on the desktop.
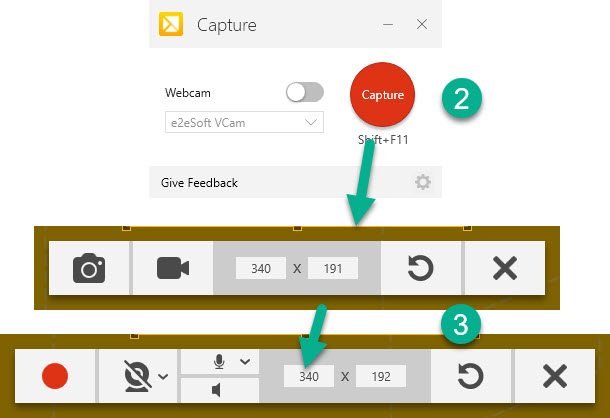
When the recording mode is selected, go for the Capture button > select a capture area of your screen > select the video icon > toggle on/off webcam and audio device(s) > click on the Record button to start recording.
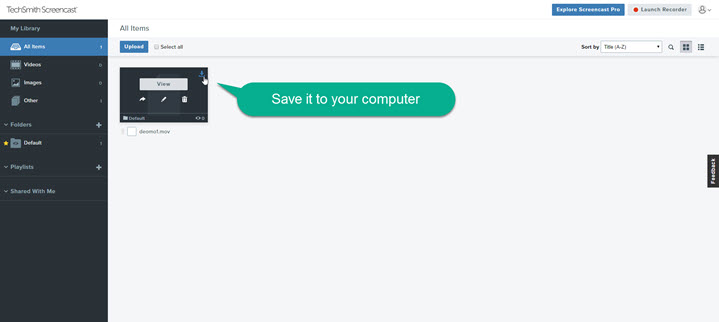
Step 4: When you have the recording stopped, your footage will be automatically sent to Screencast.com. You can either copy the media link and share it or navigate to Screencast.com to download the video you created.
Solution 22. How to Record Your Screen with Screencastify
Integrated with Google Chrome, Screencastify is an extension that allows you to easily record your screen from the Chrome browser as well as share clips instantly. In addition, it can capture a particular tab or the entire screen, sound narration, embed webcam with a maximum 60 FPS.
Platform: Web
Pricing: Free or $49 per year
Step 1: Add Screencastify to your Chrome browser at Screencastify.com.
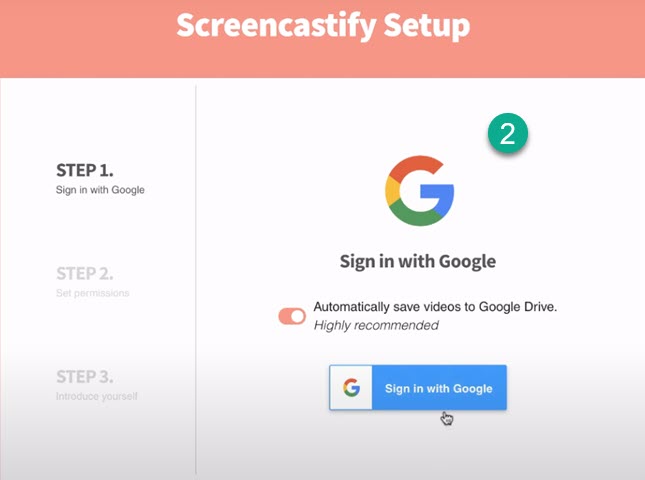
Step 2: Once it's installed, you are going to click it on the browser. And it will bring up a new tab where you're going to go through the Screencastify setup, including logging in with Google and enabling audio device(s) and annotation tools.
Step 3: At this point, you can start recording by heading to the add-on > record a browser/the entire desktop screen/a particular window > enable microphone/system sound/webcam > click the Record button > choose what content you would like to capture > hit Share.

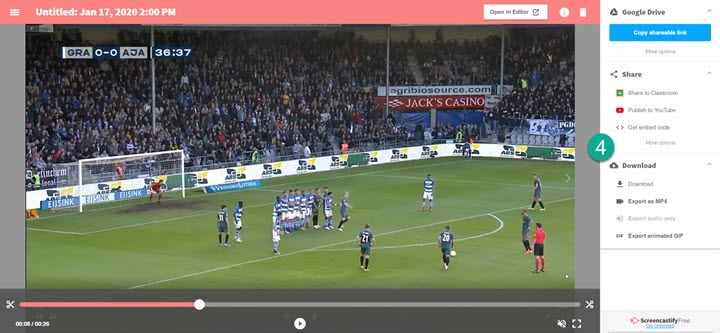
Step 4: Whenever you want to finish your recording, hit Stop Sharing at the lower area. It will load a new tab where you can edit a video, share a video, or save it either locally or in the cloud.
Solution 23. How to Record Your Screen with RecordScreen.io
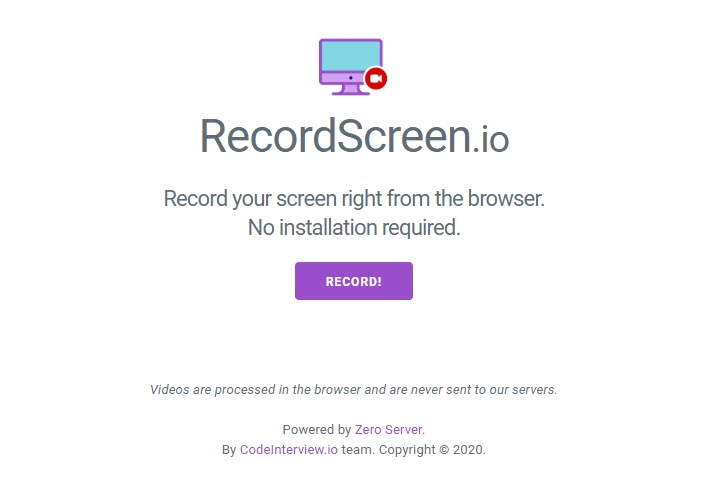
No software installation is required, RecordScreen.io is a screen recording utility that is flexible to record all operations on your computer, such as an active browser/window, tutorial, product demonstration, etc. The best part of it is extremely simple to use even for a non-technical person.
Platform: Web
Pricing: Free
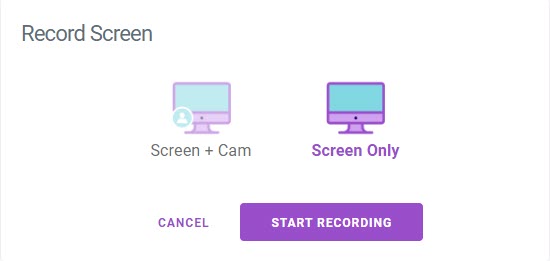
Step 1: Build a new tab and navigate to the website of RecordScreen.io. Hit the Record button then.
Step 2: Select to record either your screen and webcam or your screen only.
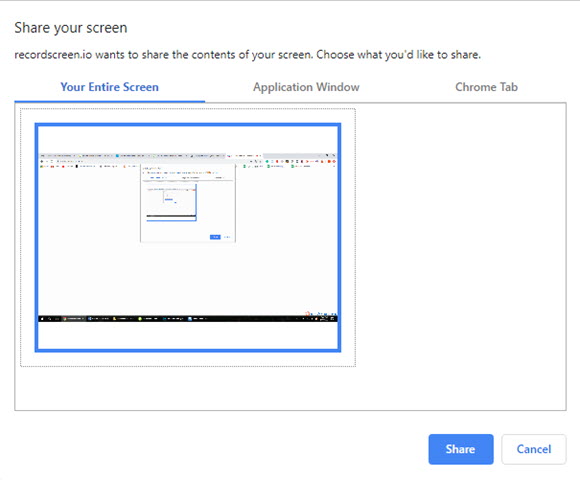
Step 3: Choose what content you would like to share. And click Share to start recording.
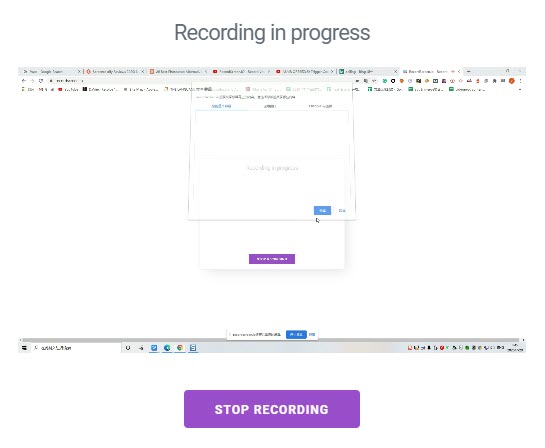
Step 4: Click on Stop recording to end recording.
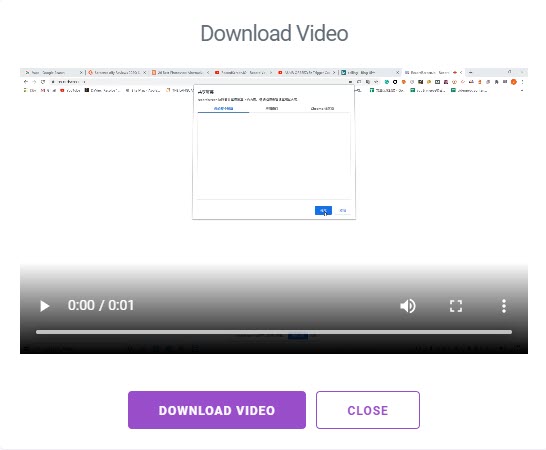
Step 5: Hit Download to save the video to your computer.
Solution 24. How to Record Your Screen with Apowersoft
Apowersoft is an online screen recorder that can capture the screen recording for web applications as well as desktop operations in a few clicks. Everything is pretty simple to use and very quick. More importantly, this web-based tool is completely free to use with no time limitations, advertisements, or watermarks.
Platform: Web
Pricing: Free
Step 1: You will download and install the tool launcher at the get-go at Apowersoft.
Step 2: After the installation is done, click on the Start Recording button on the website and the screen recorder automatically pops up.
Step 3: Select to record full screen or regional area of your screen, adjust audio settings, webcam, encoders and start capturing whatever you need.
Step 4: Save your video locally or share it with an instant sharing feature.

Solution 25. How to Record Your Screen with Native Screen Recorder on Mac
If you are using macOS Mojave or higher, there's a native screen recorder on your Mac. You can bring it up by hitting Shift-Command (⌘)-5 on your keyboard and record a video of what's happening on your screen.
Platform: macOS
Pricing: Free
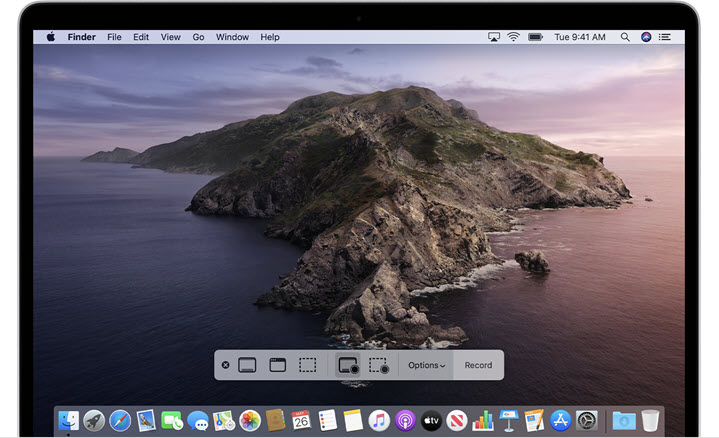
Step 1: To bring up the native screen recorder, hit Command + Shift + 5 on your keyboard.
Step 2: Now, you have the controls for recording and taking screenshots. To record the entire screen, you should click the Fullscreen Record button; to record a selected area of your screen, click on the Selection Record button and draw a box of your screen you would like to record.
Step 3: Click on the Record button to start recording. And click on the Stop button at the menu bar to stop recording.
Step 4: You will get a video thumbnail in the lower right corner. You are allowed to click it to watch it back, edit it or share it.
Solution 26. How to Record Your Screen with QuickTime
People might be thinking of QuickTime is just a media player for video and audio files. But it also gives you the ability to capture your desktop, webcam, mobile screen along with sounds. Let's take a look at how it works.
Platform: macOS
Pricing: Free
Step 1: Please ensure you are on the QuickTime of version 10 or later. You can upgrade it by heading to the App Store.
Step 2: Launch QuickTime from Launchpad or Applications.
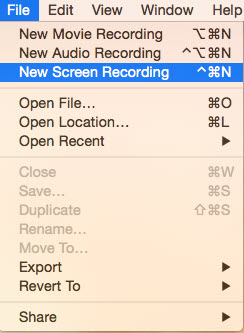
Step 3: Once the QuickTime is opened, you will head to the menu on the top > Click on File > choose one recording mode out of three.
New Movie Recording records the built-in facecam or external cameras.
New Audio Recording is for recording sound from microphone and system sound.
New Screen Recording is to record your screen.
Step 4: Once a recording mode is selected, click on the Record button to start recording. You can either record videos in full screen or part of the screen.
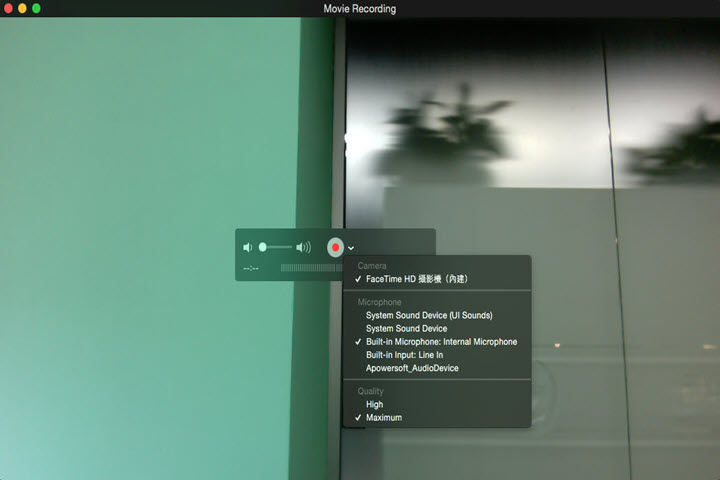
Step 5: To stop recording, click the Stop button at the top bar.
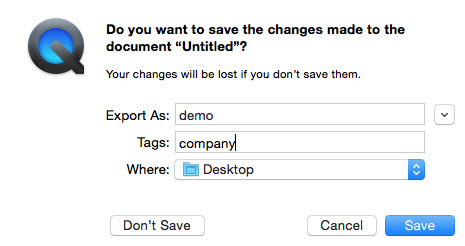
Step 6: After you stop recording, you'll have options to make it either local or in the cloud.
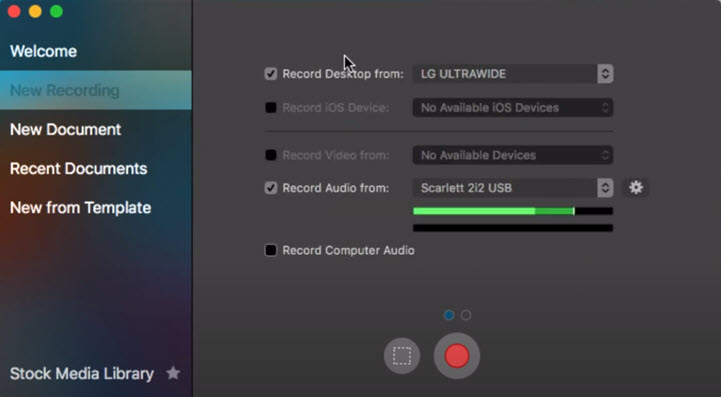
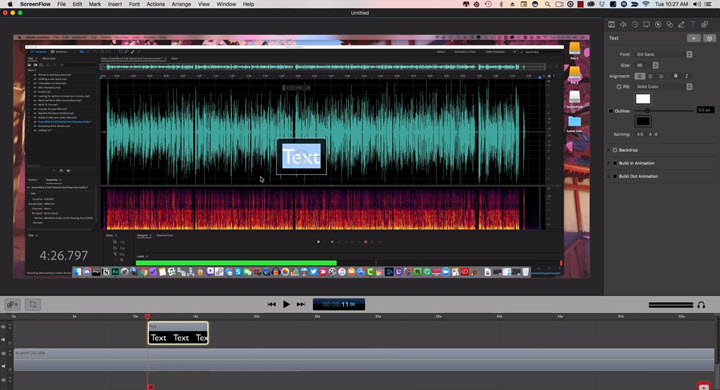
Solution 27. How to Record Your Screen with ScreenFlow
ScreenFlow is all-around screencasting software designed exclusively for macOS. It has a pretty thorough preference and settings, and the ability to capture audio narration, facecam, and screencast at the same time, as well as video editing features.
Moreover, ScreenFlow continues adding an array of features, such as multiscreen recording, click effects, proxy, etc., which makes it get better increasingly.
Platform: macOS
Pricing: $129 (one-off fee)
Step 1: You can either download ScreenFlow from App Store or its official site.
Step 2: Once ScreenFlow is launched, you should set up recording settings on the configuration panel, including video devices, sound devices, resolution, frame rates and others.
After the configuration is good to go, click on the Record button to start recording. For stop recording, navigate to the video icon at the top menu > select Stop Record.
Step 3: At last, you will be working with your footage in the ScreenFlow video editor where you can create engaging videos.
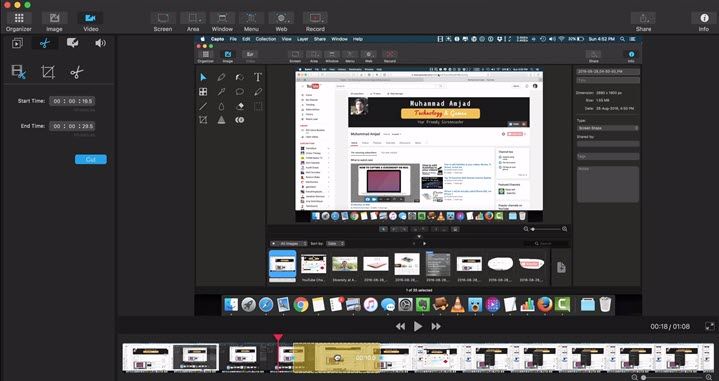
Solution 28. How to Record Your Screen with Capto
More than a simple screen recording utility, Capto is an app suite packed with a plethora of features, covering screen recording, screen capturing, video editing and many more, which makes it really easy to create professional marketing and tutorial videos for your business or just archiving.
Platform: macOS
Pricing: $30 (one-off fee). Or if you are a member of the Setapp plan ($10/month) already, you can have Capto for free.
Step 1: Download Capto from Global Delight to your Mac. Or you can find it on the Setapp.
Step 2: After you open Capto, a clean and intuitive interface appears. You will head to the Record option on the top, and select to record the entire screen or part of the screen. Furthermore, you need to configure video settings for your recordings in the pop-up window.
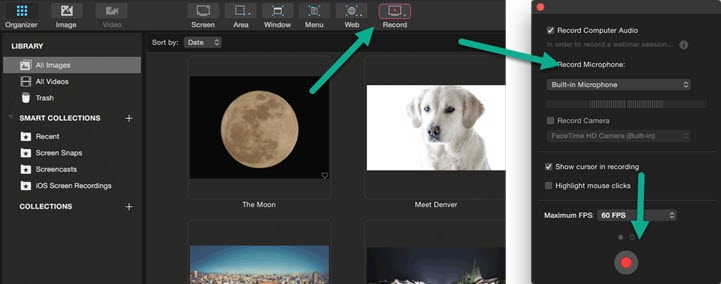
When everything is ready, click the button in the lower area of the pop-up window. After 3s countdown, the Capto screen recorder goes on.
Step 3: When you have finished what you want to record, hold down Command + Shift + Esc. The clips will be automatically saved into smart collections. And Capto also offers some simple editing tools to touch up your footage.
Solution 29. How to Record Your Screen in SimpleScreenRecorder
Developed by Maarten Baert, SimpleScreenRecorder is a Qt-based screencast software designed for Linux operating systems, which intended to make as an easier alternative to programs such as FFmpeg/avconv, VLC, and OBS.
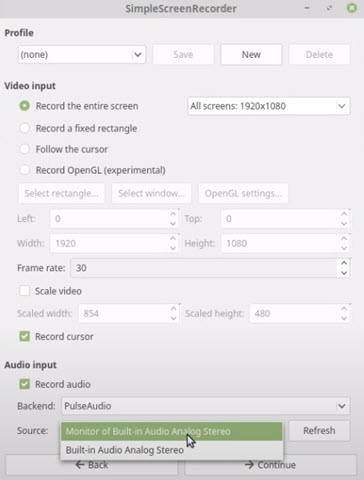
With SimpleScreenRecorder, you can easily capture the entire screen or a fixed area of your screen, cursor, audio narration/system sound and more. It also supports a wide array of file formats like MP4, OGG, MKV and WebM.
Platform: Linux
Pricing: Free and open-source
Step 1: First and foremost, you will download and install SimpleScreenRecorder on the Software Manager or at Maartenbaert.
Step 2: Once it's installed, launch it on your computer.
Step 3: Configure your screen recording settings, such as the area/window/browser recording, frame rates, audio device(s).
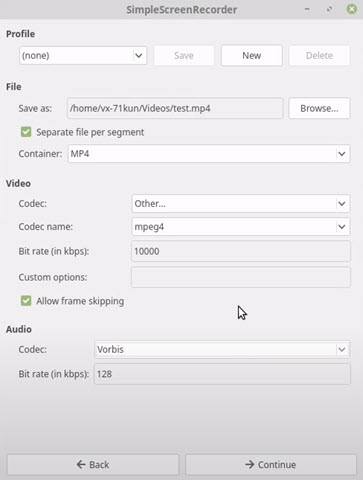
Step 4: Configure video settings in the next tab, including video/audio codecs, container formats, bit rates, output path, etc.
Step 5: Click on the Start recording button to activate the screen recording. When you have done recording, click Cancel recording to end the screen recording.

Solution 30. How to Record Your Screen with recordMyDesktop
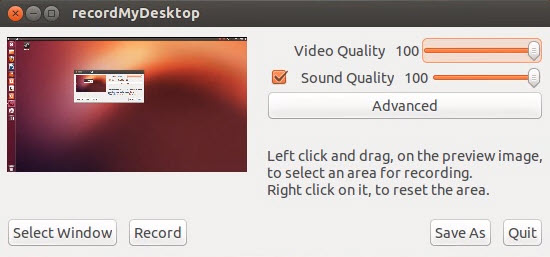
recordMyDesktop is a Linux software that allows you to record full screen, a specific region of your screen or a particular window in high resolution with or without audio, keystrokes and mouse cursor. And the videos that recordMyDesktop creates are in Ogg Theora.
Platform: Linux
Pricing: Free and open-source
Step 1: If you are using the Ubuntu of Linux, you can command to install recordMyDesktop by typing: sudo apt-get install gtk-recordmydesktop.
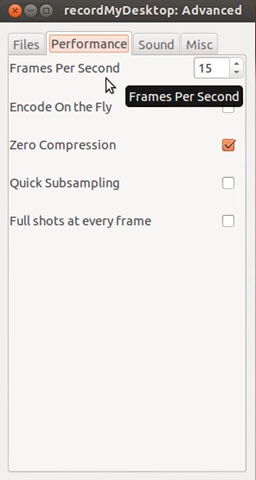
Step 2: Fire it up on your computer. On the home page, you can see a scroll bar where you can regulate the video quality. But it's worth remembering that the higher the quality, the greater the video size, and the slower the encoding speed.
The Select Window option allows you to capture a window, full screen, or a selected area of your screen.
Step 3: You are allowed to reset an output directory, encoder, sound device, etc. by heading to the Advanced menu.
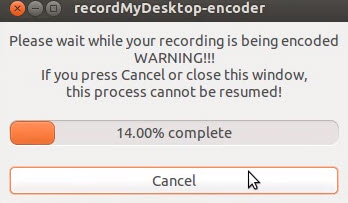
Step 4: Click on the Record button on the home page to start recording. To turn off-screen recording, navigate to the square icon > select Stop from the drop-down menu. Once the encoding is finished, you can view your video through the output destination.
Solution 31: How to Record Your Screen on iPhone/iPad/iPod
In iOS 11 or higher, there comes a free and easy-to-use screencasting utility that allows you to record your mobile's screen with audio in a few clicks.
Platform: iOS 11 or later, and iPadOS
Pricing: free
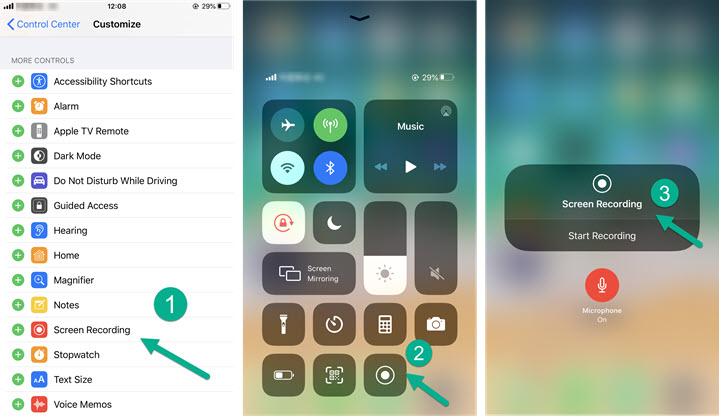
Step1: Generally speaking, the built-in screen recorder is hidden on the Control Center. If you don't find it in the Control Center, you can head to Settings > Control Center > Customize Controls, then tap the plus icon next to Screen Recording.
Step 2: Swipe up from the bottom edge of your screen and press deeply on the screen recording icon. Then turn on/off the microphone sound.
Step 3: To record your mobile screen, tap Start Recording. When you end recording, the video will be automatically stored at the Photos app.
Solution 32. How to Record Your Screen on Android
You used to have to use third-party applications to record your Android device screen prior to Android 10. But now, if your Android devices are running Android 10 or later, you can capture your screen by enabling the built-in screen recorder that is new to Android OS.
Platform: Android 10 or later
Pricing: free
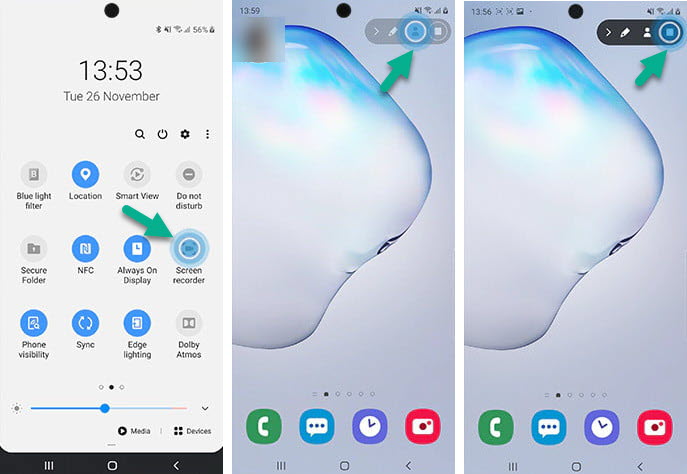
Step 1: Swipe down from the top edge of your screen twice, until you get all the icons. Then tap Screen recording/Screen recorder. (If you cannot find this title, you may need to swipe right to left for the next page.)
Step 2: When the icon gets blue, you will have options to record no sound, media sound, media sound and microphone sound simultaneously.
Step 3: Tap Start recording. After 3s countdown, the screen recording starts. You also get a toolbar at the screen corner where you can make annotations, enable facecam, etc.
Step 4: To end screen recording, click on the Stop button on the toolbar.
TL;DR
By far, this post has carefully picked up 32 screen recording tutorials that work with Windows, macOS, Linux, iOS, Android. Hope you enjoy the post and please feel free to contact me either by email or social networks if you have any question or suggestion to the post, I shall be glad to help.


