
 VideoProc Converter AI
 New AI features are available



 Listed in
 How to upscale video efficiently? Whether you are preparing 480p legacy footage for high-resolution 4K displays or correcting low-quality 720p recordings for YouTube, video upscaling is the process of enhancing resolution while preserving visual integrity. This post will show you the effective ways to upscale videos to 1080p or 4K with or without AI.
Quick Decision Guide: Which Method is Best for You
Not all upscaling tools serve the same purpose. Before you begin, identify your needs to choose the right workflow:
- For General Users (Fastest & Best Quality): Use AI-powered tools like VideoProc Converter AI. It excels at restoring low-resolution SD videos (480p/720p) to 4K by intelligently predicting and reconstructing details.
- For Professional Editors (Precise Control): Use Adobe After Effects if you need to integrate upscaling within a complex post-production workflow using layer-based masking or specific sharpening effects.
- For Tech-Savvy/Batch Users (Free & Automated): Use FFmpeg if you require a command-line solution for batch processing multiple files without a graphical interface.
Below, we provide a step-by-step walkthrough for each method.
Method 1. How to Upscale Video in VideoProc Converter AI
Best for: beginners and semi-professionals who need all-in-one multimedia solutions and powerful AI upscaling
VideoProc Converter AI is an all-in-one multimedia solution that combines traditional transcoding capabilities with advanced AI features. Its Super Resolution tool is specifically engineered to use AI to upscale 480p or 720p SD to HD, FHD and UDD, bridging the gap between low-resolution video files and modern HD or 4K displays.
Key AI Models for Custom Restoration:
- Gen Detail: Optimized for texture extraction and sharpening. It is the primary choice for upscaling old DVDs or low-resolution footage where you want to emphasize fine detail and edge clarity.
- Real Smooth: Prioritizes visual fidelity, noise reduction, and flaw elimination. This model is ideal for footage that requires a cleaner, more polished appearance with smooth gradients and balanced color saturation.
Note: This tool supports both video and image enhancement, including support for AI-generated art and real-world photographs.
Next, let's see how it can help us with this job.
Step 1. First, download and install VideoProc Converter AI on your Windows or Mac computer.

Step 2. Launch the application and select Super Resolution from the main interface.
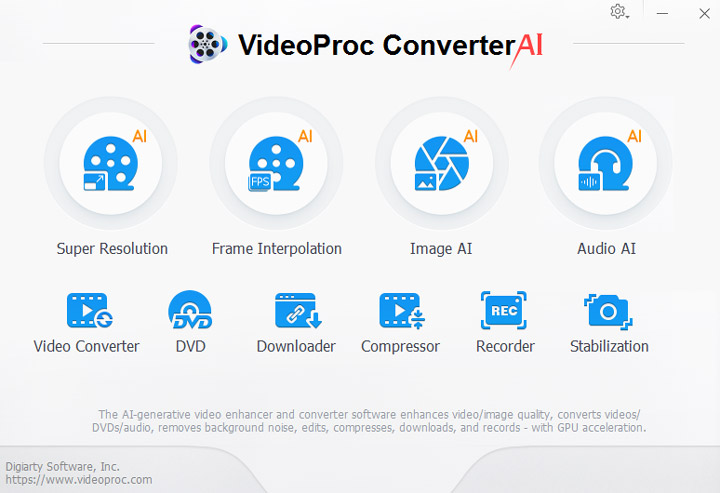
Step 3. On the new window, click the Add Media button, which is located in the left lower corner, to import your video.
Step 4. After the importing finishes, go to the right side and first choose the device to process the whole job. GPU would be highly suggested and the job will be finished sooner. Then choose the model you prefer. If you still feel confused about it, we would recommend you try the Gen Detail and Real Smooth mode.
Next find the resolution numbers that you want to upscale your video to. For example, to upscale 1080p to 4K, select 2X in the Scale list after importing the 1080p video.
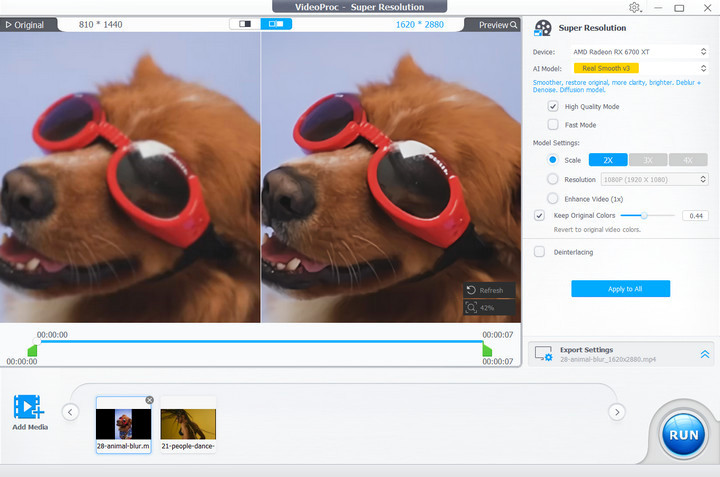
Step 5. Choose the video codec that you want your output video file will be. For now, VideoProc Converter AI only supports H.264 and HEVC. Then set the output saving folder and click the RUN button to start upscaling your video.
Method 2. How to Upscale Video in After Effects (without AI)
Best for: Editors seeking native, highly customizable resolution scaling within Adobe After Effects without requiring third-party plugins or cloud AI credits.
For editors who require precise control over their post-production pipeline, Adobe After Effects offers a native Detail-preserving Upscale effect. Unlike basic linear scaling, this effect uses advanced edge-detection and detail-preservation algorithms to calculate new pixel values while preserving edge sharpness. It is an efficient solution for high-quality zooms or adapting low-resolution assets within professional editing workflows.
Follow these steps to upscale your video using this effect:
Step 1. Import your low-resolution video into After Effects and drag it into a new composition (or onto the New Composition From Footing icon).
Step 2. Go to Composition > Composition Settings and update the resolution (Width and Height) or select your target preset (e.g., 4K or 1080p).
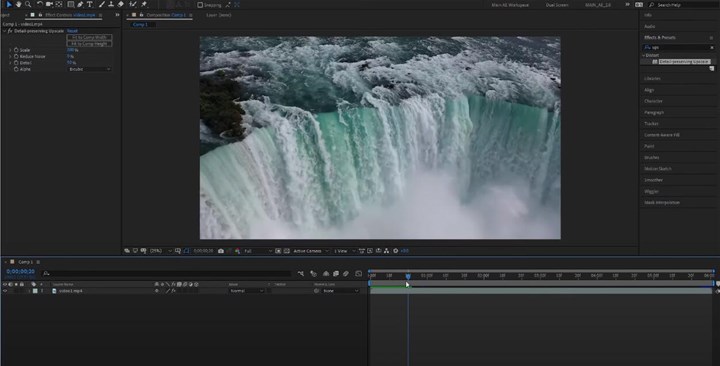
Step 3. Open the Effects & Presets panel, search for Detail-preserving Upscale, and drag it onto your video layer.
Step 4. Adjust the key parameters in the Effect Controls panel on the left:
- Fit to Comp Width: Automatically adjusts the scale percentage so the clip's width matches the composition width.
- Fit to Comp Height: Automatically adjusts the scale percentage so the clip's height matches the composition height.
- Scale: Manually adjusts the magnification ratio (100% represents original size).
- Reduce Noise: Applies noise reduction prior to scaling. Increasing this value prevents compression artifacts or image noise from being mistaken for fine detail.
- Detail: Controls edge sharpness and contrast. Higher values enhance sharpness, but setting this too high may introduce ringing or halo artifacts. Lower values keep edges smooth and natural.
- Alpha: Specifies how the alpha channel is processed independently from color channels. Selecting Bicubic or Bilinear can optimize render speed without sacrificing color quality.
Step 5. For most projects, clicking Fit to Comp Width or Fit to Comp Height provides an immediate baseline. You can then fine-tune the Detail and Reduce Noise sliders while checking the preview window to achieve the best visual result.
Method 3. How to Upscale Video for Free in FFmpeg (without AI)
FFmpeg is a powerful, open-source command-line framework preferred by developers and technical professionals for batch processing and automated video workflows. Unlike AI-driven tools, FFmpeg relies on built-in scaling algorithms to resize footage efficiently without heavy computational overhead.
Choosing the Right Scaler:
FFmpeg provides multiple scaling algorithms via its libswscale library. For video upscaling, the most common options include:
- Lanczos (Recommended): Uses a sinc windowed function to deliver exceptional sharpness and detail preservation, making it the preferred algorithm for general upscaling.
- Bicubic: A fast, reliable alternative that offers a smooth result, balancing processing speed and visual quality.
- Bilinear / Nearest-Neighbor: Generally not recommended for standard video upscaling as Bilinear produces overly soft/blurry results, while Nearest-Neighbor causes heavy pixelation (though it is useful for retro pixel art).
All of these algorithms are built directly into FFmpeg. Make sure you have downloaded and installed FFmpeg on your system before proceeding.
Step 1. Open Command Prompt (Windows) or Terminal (macOS/Linux).
Step 2. Navigate to the folder containing your source video by running the cd command:
cd "path/to/your/video/folder"Step 3. Run the following command to upscale your video to 1080p using the Lanczos algorithm:
ffmpeg -i input.mp4 -vf "scale=1920:1080:flags=lanczos" -c:v libx264 -crf 18 -c:a copy output_1080p.mp4Parameter Breakdown:
-i input.mp4: Specifies your input video file name.-vf "scale=1920:1080:flags=lanczos": Sets the output resolution to 1920x1080 and applies the Lanczos scaling algorithm.-c:v libx264 -crf 18: Encodes the video stream using the H.264 codec with a Constant Rate Factor (CRF) of 18, achieving visually lossless quality.-c:a copy: Copies the original audio stream directly without re-encoding, preserving quality and saving processing time.
Pro Tip: To upscale while preserving the original aspect ratio, replace fixed dimensions with scale=1920:-1 (or scale=-2:1080 to keep macro-block compatibility). If your source file is heavily compressed, consider applying a denoise filter (e.g., hqdn3d) before scaling to prevent artifacts from being magnified.
Method 4. How to Upscale Video in CapCut (with AI)
Best for: Content creators, influencers, and casual users looking for a fast, free AI video upscaler to enhance mobile clips for social media platforms.
CapCut is a popular mobile and desktop video editor that features a native AI Video Upscaler designed to boost resolution without sacrificing visual clarity. Powered by deep learning algorithms, CapCut analyzes low-resolution footage frame-by-frame. It effortlessly upscale video resolution, enhances video clarity and allows seamless export in high-definition (HD) or UHD optimized for TikTok, YouTube, and Instagram.
Follow these simple steps to upscale your video using CapCut's desktop app:
Step 1. Launch CapCut on your PC or Mac, create a new project, and import your low-resolution video to the timeline.
Step 2. Select the video clip on the timeline, then go to Video > Basic in the right-hand panel.
Step 3. Scroll down to Enhance quality and turn it on. Choose HD or UHD based on your desired level of AI enhancement. You can also enable Reduce image noise separately if your footage contains noticeable grain or noise.
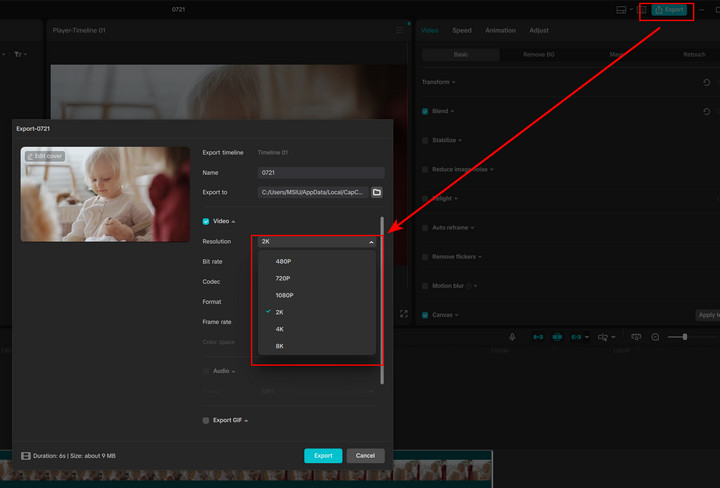
Step 4. Once the enhancement is complete, click Export in the top-right corner. Choose your desired output resolution, frame rate, bitrate, and other export settings, then click Export to save the enhanced video.
Method 5. How to Upscale Video Online in Canva (With AI)
Best for social media creators and casual users who want a convenient way to increase video resolution online.
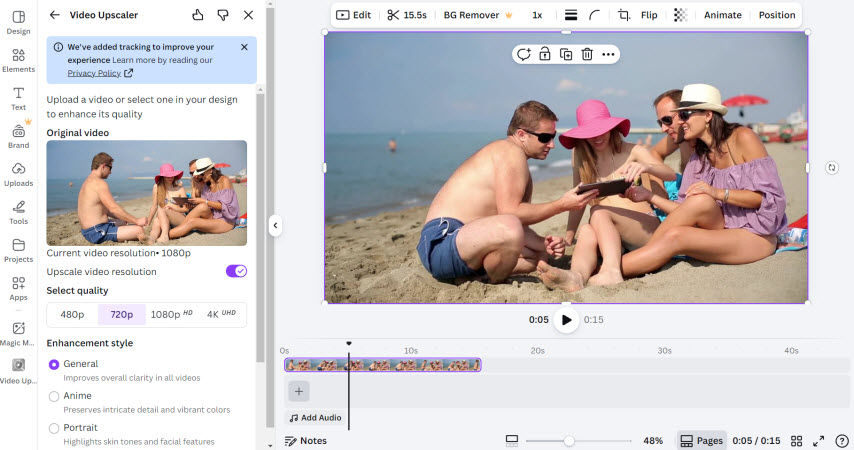
Canva includes an AI-powered Video Upscaler app that can upscale videos to higher resolutions, including up to 4K. After upscaling, you can continue editing the video with Canva's built-in video editor and other tools.
How to Upscale Video Online with Canva
Step 1. Open Canva and create a video project. Click Apps in the editor side panel and search for Video Upscaler.
Step 2. Upload your video, then select the desired resolution and enhancement style. Click Upscale video to start the AI enhancement.
Step 3. Once the upscaled video is ready, add it to your design. You can then use Canva's built-in video editing tools to further adjust or enhance your clip.
Step 4. Click Share > Download and save the finished video as a high-quality MP4.
Why Choose AI Over Traditional Upscaling
Traditional upscaling relies on simple mathematical interpolation (such as bicubic or bilinear filtering), which essentially "stretches" existing pixels, often leading to blurriness or loss of detail.
Unlike traditional methods that apply fixed filters uniformly across frames, AI-powered upscaling and enhancement employs neural networks (like Convolutional Neural Networks) to analyze contextual patterns in your footage. This adaptive intelligence allows three key distinctions:
- Cognitive Restoration: AI reconstructs missing details by referencing millions of learned video patterns, while traditional upscaling simply stretches pixels.
- Dynamic Temporal Processing: Modern AI models adjust enhancement parameters frame-by-frame based on scene content, ensuring visual consistency and removing artifacts that legacy software often misses.
- Automated Efficiency: Modern AI tools achieve Hollywood-grade results in minutes through automated workflows, eliminating intensive manual color grading.
VideoProc Converter AI utilizes deep learning models to predict and reconstruct missing data points while upscaling videos, resulting in a significantly sharper and more natural output.
Best Practices & Troubleshooting: Maximize Your Upscaling Results
Achieving high-quality upscaling requires more than just the right software; it requires a strategic approach to source material and hardware.
1. Prioritize Source Quality
Upscaling cannot "invent" details that were never captured. Start with the highest quality source available—minimally compressed formats like ProRes or AVI are superior to highly compressed MP4s. If your source has noise or heavy compression artifacts, apply a light denoise filter before upscaling to prevent those flaws from being magnified.
2. The "Incremental Upscale" Rule
Avoid "leaping" from 480p directly to 4K. For professional results, upscale in steps (e.g., 480p → 720p → 1080p → 4K). This incremental process allows algorithms to refine details gradually, minimizing the risk of jagged edges or "over-smoothed" plastic-looking textures.
3. Hardware Requirements
AI upscaling is a resource-intensive task. To avoid crashes and long processing times:
- GPU: A dedicated NVIDIA RTX (or equivalent) GPU is highly recommended for hardware-accelerated processing.
- RAM: Aim for a minimum of 16GB (32GB for 4K projects).
- Storage: Use an NVMe SSD to ensure fast data read/write speeds, especially for large 4K files.
4. Troubleshooting Common Issues
- Diminishing Returns: There is a point where upscaling stops adding value. Bumping a sharp 1080p video to 4K may result in a massive file size increase with no noticeable visual improvement on most displays.
- Visual Artifacts: If you notice unnatural textures or haloing, adjust your "Detail" or "Sharpening" settings. Less is often more; avoid over-sharpening, which can introduce distracting digital ringing.
- Processing Time: If upscaling takes hours, consider testing your settings on a 10-30 second representative clip first. This prevents hours of wasted processing time on a full-length file that may not meet your expectations.
What to Do Next
All methods that we applied here are all about stretching what is in this original video file, since we cannot add extra information. So if the resolution difference before and after is huge, the image would look blurry.
It would be like taking a small image and stretching it out. It goes from appearing curved to having visible pixels because the illusion of a curve made of squares only worked at a smaller resolution.
There's really no way to stretch it out without it looking blurry or looking pixelated. You can only get away with it if you already start with a high quality image, i.e. something 1080p that was recorded on a 4k sensor and a good lens and a good codec, you can manipulate that, and it might still look okay for most people.
However, if you really want to upscale a very small resolution video file, like 360p, to 4K resolution, the trendy AI up-scaling programs can help you.
FAQs about Upscaling Videos
1. Can I upscale 480p or 720p video to 4K?
Yes, you can. Modern AI-based tools like VideoProc Converter AI can upscale 480p/720p to 4K by using deep learning to reconstruct details. However, the final visual quality depends on the clarity of the original footage; AI can enhance existing data but cannot fully "create" information that was never captured.
2. Does upscaling make a video look "real" like native 4K?
Not necessarily. AI upscaling significantly improves resolution and sharpness, but it is technically an enhancement process. While it makes videos look much better on 4K displays by reducing pixelation and noise, it may not perfectly match the raw clarity of footage shot natively with a 4K camera and lens.
3. Why is my video processing taking so long?
Video upscaling, particularly with AI models, is a highly resource-intensive task. Processing speed depends on your GPU power, CPU cores, and the resolution/length of the file. To speed up the process, ensure you have hardware acceleration enabled and, if possible, perform the task on a machine with a dedicated graphics card (NVIDIA or AMD).
4. Is it better to upscale using AI or traditional interpolation?
AI upscaling is generally superior for "restoration" tasks (e.g., fixing old DVDs, low-quality home videos) because it interprets and recreates textures. Traditional interpolation (like Bicubic or Lanczos) is better for simple scaling tasks where you want to keep the footage looking as close to the original as possible without "AI-generated" changes.
5. Will upscaling my video increase the file size?
Yes. Increasing resolution requires more data, which leads to larger file sizes. If storage space is a concern, you can use high-efficiency codecs like HEVC (H.265) during the export process to maintain high quality while keeping the file size manageable.