This post offers update-to-date instructions on how to install FFmpeg on Windows, Mac, Ubuntu and Debian-based Linux, with tips to deal with problems you might encounter during the installation.
Before we get started, here is a brief introduction on FFmpeg.
FFmpeg is an open-source multimedia framework that consists of ffmpeg, a command-line based tool to convert media files; ffplay, SDL and FFmpeg library-based media player; and ffprobe tools for multimedia stream analysis.
With FFmpeg, you can transcode video and audio, mux and demux multimedia, stream, play and filter content created on Windows, Mac, and Linux.
1. How to Install FFmpeg on Windows
You can easily install FFmpeg on Windows with the following 8 steps. Detailed instructions are covered here from downloading the right version for your specific needs (choosing Git master or Release builds, and essential or full builds), adding path to Environment Variables, to using the command prompt.
Step 1. Go to FFmpeg download page of FFmpeg.
On the official download page https://ffmpeg.org/download.html here you can find all versions available currently for Windows, as well as for Linux and Mac.
Step 2. Choose Windows EXE files.
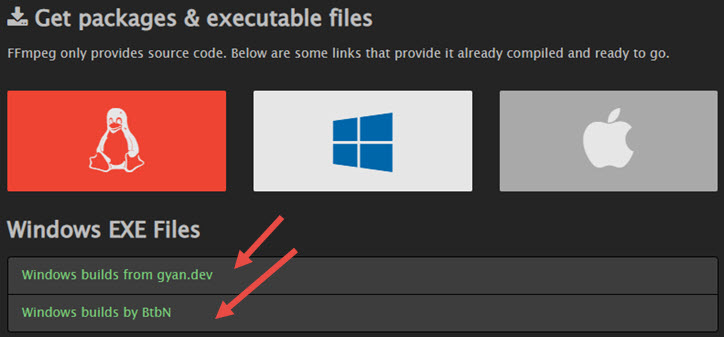
Hover your mouse to the Windows icon, and here you shall see builds from gyan.dev and BtbN.
Gyan.dev vs BtbN for FFmpeg, What's the Difference?
The main difference is the external libraries, or more specifically, the codecs available for each set. You can go with one of them. If you don't know which to choose, simply choose gyan.dev.
Step 3. Download the build according to your specific needs.
Once you clicked on the gyan.dev, it will take you to the developer's page with several kinds of builds to download.
Git Master Builds or Release Builds for FFmpeg
Git master builds are more up-to-date and less stable. It is published more often, almost every time when an update is submitted. Therefore, you can enjoy the latest features added, while being vulnerable to bugs and crashes.
Release builds are more stable with bug fixed, and are released less often than Git master builds.
Taking an analogy from iOS versions, the FFmpeg Git master build is to iOS beta versions as Release build is to iOS public release.
Note: If stability is your priority concern, go with the Release builds. If you are eager to enjoy certain cutting-edge features in the latest update, use Git master builds.
Essentials or Full Builds for FFmepg
Under Git master builds or release builds, you also have to choose whether to use essentials or full builds.
Full builds has a larger set of libraries (more codec support) than essentials, the latter includes commonly-used libraries.
You can scroll down below on the gyan.dev builds page, in the libraries section, to check supported codecs to read and write. As you can as, full build has additional libraries as compared to the essential build.
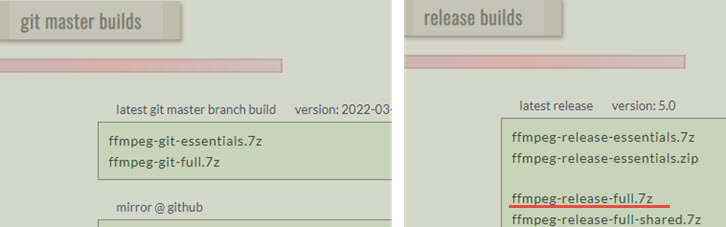
In this case, since we want a more stable build with a larger library, the option is to download FFmpeg release full version. That is the file: ffmpeg-release-full.7z
Step 4. Use 7-Zip to unzip the FFmpeg file.
Since the full release version is compressed by 7-Zip, with the extension .7z, you need to have 7-Zip on the computer to decompress the file.
- Go to the official page of 7-Zip to download this file extractor and install it.
- Right-click on the downloaded ffmpeg-release-full.7z and hit Extract Here.
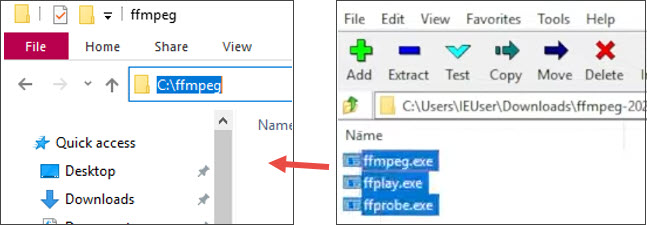
Step 5. Install FFmpeg on Windows computer.
- Go to the C:\ drive (Local Disk C:) and right-click to create a new folder with any name you like. For convenience of use, we name the newly created folder as ffmpeg.
- Copy and paste the extracted file into this ffmpeg folder.
- Copy the root path where you store the FFmpeg executable files. In this case, it is C:\ffmpeg, and you will use it later in step 8.
Step 6. Open Environment Variables in System Properties.
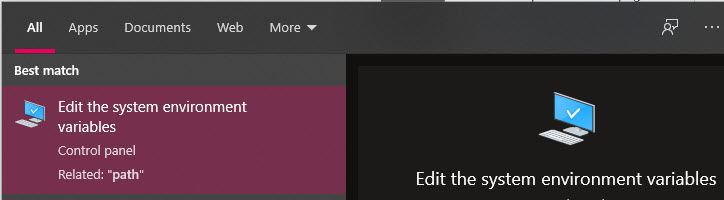
- Click the Windows Start (shortcut Windows Key+S) menu, and type in "path" to initiate the search function.
- Click Edit the system environment variables to open up the settings window.
Step 7. Add FFmpeg to Path in Environment Variables.
- Click the Environment Variables button.
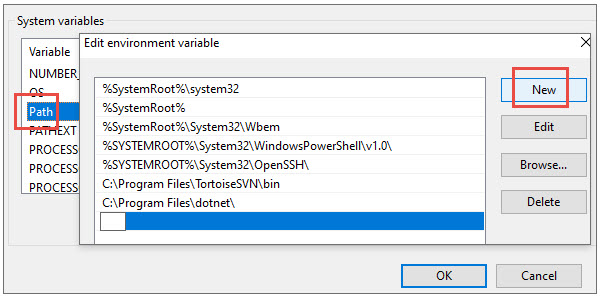
- Click on Path under the "User variables for pc" section, and hit Edit… button
- In the newly opened window, click New, and paste the path from step 5. In this case, it is C:\ffmpeg

Note:
- When you copy and paste the extracted files, if you copy the bin folder, the path will be C:\ffmpeg\bin
- If you go inside the bin folder, and just copy out the FFmpeg executable right under the ffmpeg folder, then the path will be merely C:\ffmpeg
If you want to install FFmpeg for all the users on this computer, you can add path under the System variables, instead of adding it under the User variables.
Step 8. Run FFmpeg in Command Prompt.
In order to check if FFmpeg is successfully installed, you can check it with Command Prompt.
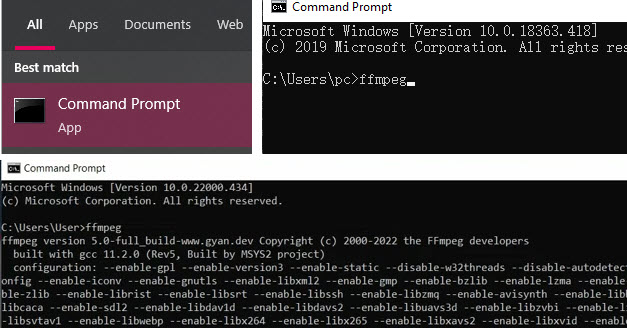
- Click Windows Start menu and type cmd.
- Click the command prompt tool to launch it.
- In the command line, type ffmpeg and hit Enter on the keyboard.
- If you see a response like the following screenshot, ffmpeg is successfully installed on Windows.
Tip: You can type in ffmpeg -codecs to see a list of all the supported codecs in the build you are currently using.
2. How to Install FFmpeg on Linux
2.1 How to Install FFmpeg on Ubuntu
At the time of writing this post, the current version of FFmpeg in the Ubuntu 20.04 repositories is 4.2.x. To install FFmpeg on Ubuntu via the apt method, make sure you are a root user or sudo user on Ubuntu.
Step 1. Press the shortcut Ctrl+Alt+T to open the terminal.
Step 2. Fetch the packages list by running the update commands like below:
sudo apt update
Step 3. Install FFmpeg by typing the following command.
sudo apt install ffmpeg
Step 4. Check whether FFmpeg is successfully installed by printing out its version.
ffmpeg -version
You shall see something like the following:

To check all the codecs available, use the following command:
ffmpeg -encoders
2.2 How to Install FFmpeg on Debian
Installing FFmpeg on Debian is more or less the same as on Ubuntu. You will need to be a root user or has sudo privileges before proceeding.
Since FFmpeg packages are contained in the Debian repositories, you can easily use the apt package manager to fetch the packages.
Step 1. Update the package list with the command:
sudo apt update
Step 2. Install FFmpeg on Debian:
sudo apt install ffmpeg
Step 3. Print the FFmpeg version to validate the installation.
ffmpeg -version
Print all available FFmpeg's encoders and decoders:
ffmpeg -encoders
ffmpeg -decoders
Tip: To be able to utilize hardware acceleration for video encoding and decoding, and relieve the burden on CPU, you can install FFmpeg with NVIDIA GPU Hardware Acceleration on Linux.
3. How to Install FFmpeg on Mac
There are generally three ways to install FFmpeg on Mac:
- Go with a package manager such as Homebrew or MacPorts, and install FFmpeg via the package manager.
- Extract and run the static build downloaded from https://ffmpeg.org/download.html
- Compiling FFmpeg, and installing dependencies with or without homebrew.
The following guide will provide detailed steps to install FFmpeg on Mac using package manager Homebrew and MacPorts respectively.
If you prefer to download the static binary, or compiling FFmpeg by yourself, you can refer to the Compilation Guide on FFmpeg.
3.1 How to Install FFmpeg on Mac via Homebrew (Lower than v2.0)
You can use package manager such as Homebrew or MacPorts to quickly install Homebrew. Note that you only need to pick one of the package managers. Take Homebrew as an example:
Step 1. Open up the Terminal on your Mac.
You can press Command+Space to use the search tool, type in Terminal, and click to fire it up.
Step 2. Check whether you have Homebrew installed.
brew –v
Type in the above command to check the version of Homebrew. If the Terminal says command not found, it means you don't have Homebrew installed on Mac.
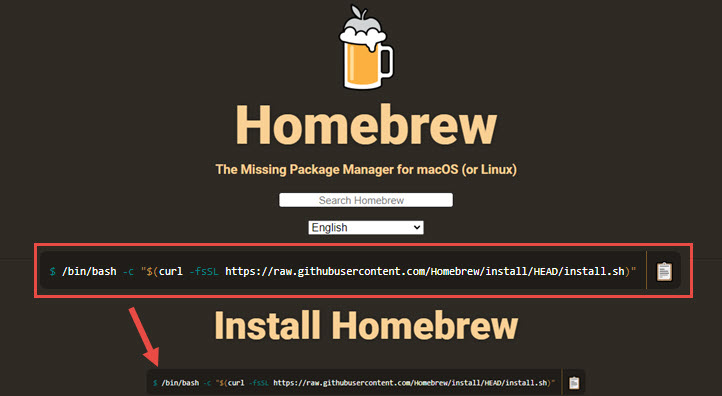
Step 3. Install Homebrew with the following command in Terminal:
/usr/bin/ruby -e "$(curl -fsSL https://raw.githubusercontent.com/Homebrew/install/master/install)"
You can visit brew.sh to copy the command line:
Tip: You can ask the terminal to print brew –v again to verify whether Homebrew has been installed successfully.
Step 4. Use the following command to install FFmepg with Homebrew:
brew install ffmpeg
3.2 How to Install FFmpeg on Mac via Homebrew (v2.0 or higher)
If your Homebrew version is 2.0 or higher, additional libraries need to be added with the taps from third-party repositories, which are not maintained by Homebrew.
Although you can go with the command line brew install ffmpeg, it doesn't come with additional libraries, and later when you are trying to convert, transcode, or stream, you might find certain codecs not supported, x264 and vp9.
To use the so-called taps command, follow these steps:
Step 1. Type the taps command in the Terminal:
brew tap homebrew-ffmpeg/ffmpeg
Step 2. Enter the following command:
brew install homebrew-ffmpeg/ffmpeg/ffmpeg
Step 3. Print the options available in the respository:
brew options homebrew-ffmpeg/ffmpeg/ffmpeg
Step 4. Go brew install by copying these options from step 3.
brew install homebrew-ffmpeg/ffmpeg/ffmpeg --with-chromaprint --with-fdk-aac --with-...
## < Rest of the command truncated >
Step 5. Check whether ffmpeg is successfully installed by printing its version.
ffmpeg -version
Tip: Run the following command to update the FFmpeg to the latest released version.
brew update && brew upgrade ffmpeg
If you installed the Git Master version (brew install ffmpeg --HEAD), then run the following line to update:
brew upgrade --fetch-HEAD ffmpeg
3.3 How to Install FFmpeg on Mac via MacPorts
MacPorts is a command-line package manger that can install open-source and Unix utilities. To install FFmpeg via MacPorts, you need to make sure MacPorts is installed on your mac before using the sudo command.
Step 1. Read the MacPorts Documentation and follow the instructions to install MacPorts according to your specific scenarios.
Step 2. Run the following command in the Terminal:
sudo port install ffmpeg
4. Key Takeaways
Below are some examples of using the command lines after installing FFmpeg on Windows, Mac, or Linux.
Convert mp4 to webm:
ffmpeg -i input.mp4 output.webm
Convert mp3 to ogg:
ffmpeg -i input.mp3 output.ogg
Specify the encoders when transcoding, for instance, use libopus as the encoder when converting mp3 to ogg:
ffmpeg -i input.mp3 -c:a libopus output.ogg
For detailed information and use cases, you can read the official FFmpeg documentation.
FAQs
1. It says ffmpeg: command not found - how to fix it?
The error message ffmpeg: command not found means that the ffmpeg program is not installed on your system or is not in your PATH environment variable.
To fix this, you can install ffmpeg on your system and add it to your PATH environment variable. Check step 5 and step 6 in part 1 above.
2. How to check if ffmpeg is installed successfully?
Run command in the terminal/prompt window:
Windows: Open a command prompt window, type ffmpeg -version, and press Enter. If the output says "command not found", you will have to install FFmpeg.
Mac/Linux: Run ffmpeg -version.


