
Recording your PowerPoint presentation with audio can help you avoid any awkward moments in front of your audience. Instead of relying solely on your instincts, you can assess your tone, appearance, gestures, and how well you articulate your ideas. Asides, There are various scenarios in which you might need to record the PowerPoint presentation with audio and video, for instance, when creating training materials for new employees or conducting webinars, workshops, or seminars, especially for participants unable to attend in real-time. Thus, in this post, let's have a look at the 2 easiest ways to record a PowerPoint presentation with audio and video.
5 Major Benefits of Recording a PowerPoint with Audio
Flexibility and Accessibility: Recorded presentations can be accessed at any time and from anywhere, making it easier for participants to review the content or for those who couldn't attend the live session to catch up. This flexibility is especially valuable for remote or asynchronous learning/work situations.
Time Savings: Recording a presentation eliminates the need for multiple live sessions, reducing the time and resources spent on scheduling and organizing events. It also allows for a single, high-quality presentation that can be shared with a broad audience.
Content Reusability: Recording presentations ensures that valuable content is preserved for future reference. This content can be repurposed, updated, and reused for different audiences or purposes.
Presentation Skills Refinement: It's often challenging to gauge your performance while speaking. By recording the presentation with audio, you can pinpoint aspects like the smoothness of your tone, areas where your pitch might need adjustment, and whether you tend to mumble or use filler words.
Avoid Distractions: Live presentations often contend with distractions that can disrupt your flow. Recording your presentation in a controlled environment and your message can get through without interruptions.
Record a PowerPoint Presentation with Audio: What Do You Need
To record a PowerPoint presentation with audio, you need a microphone. If you want to video record yourself while presenting a PowerPoint, a webcam is also needed. And most computers come with a built-in microphone and webcam. However, suppose you don't have them or you'd like to record higher quality video or sound, then you may also need to purchase and install an external webcam and microphone.
PowerPoint 2016, PowerPoint 2019, and PowerPoint 365 offer the built-in recorder for recording the presentation. However, if you don't own any of these versions or you need more versatile options to take the record, then a capable screen recorder software like VideoProc Converter AI is needed.
2 Methods to Record PowerPoint Presentation with Audio
Method 1. Use PowerPoint Built-in Recorder
The first and most straightforward solution is to utilize Microsoft PowerPoint on its own. This tool provides the capability to record presentations with both audio and export them as videos. However, it's important to note that the Record feature is exclusively available in PowerPoint 2016, PowerPoint 2019, and PowerPoint 365. If you don't have access to any of these versions, you'll have to opt for an additional screen recording software to capture your PowerPoint presentation with both audio and video.
Note:
The audio recording quality might be a concern, as complained by a Reddit user who noted,
"The quality of the recorded audio in PowerPoint is rather poor, and there doesn't appear to be a method for adjusting audio settings, other than selecting a different audio input."
Similar complaints are commonly seen on various platforms, including Microsoft's official forum.
Step 1. Open the slide you want to start recording from. Navigate to the top menu bar. Locate and click the Record button. A new tab pops up, click Record to proceed.

Step 2. By default, you're recording yourself while presenting a PowerPoint. Suppose you don't want to show your face, then turn the camera on. Ensure you turn on the Microphone for recording your voice as well.
Step 3. Navigate to the top right corner of the screen to find Settings. Click it to access the options for setting the microphone and camera recording devices.
Step 4. Click on the Record button and Microsoft PowerPoint will count down for 3 seconds to get you ready.
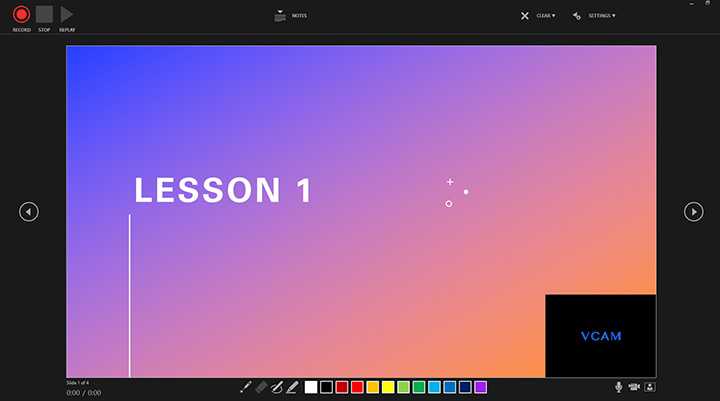
Step 5. Click the directional arrow buttons to switch slides. When you're recording your presentation with video and audio, it's important to keep your audience engaged and emphasize key points. To do this effectively, you can utilize onscreen tools such as a pen, highlighter, and eraser provided by Microsoft PowerPoint.
Step 6. You can click the pause icon to pause the recording whenever you need. When you want to finish the recording, simply click the Stop icon.
Step 7. Click the Replay button to preview the recorded presentation. Exit this window when you're done reviewing the video.
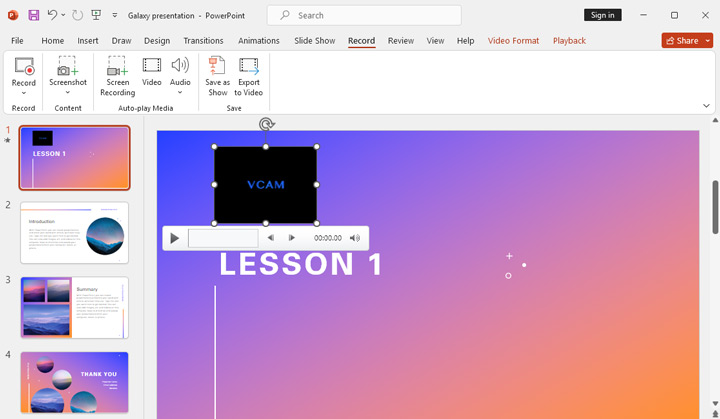
Step 8. The recorded videos will be embedded in all the slides you opened during the recording session. You can reposition the video window within each slide by simply dragging and dropping it around.
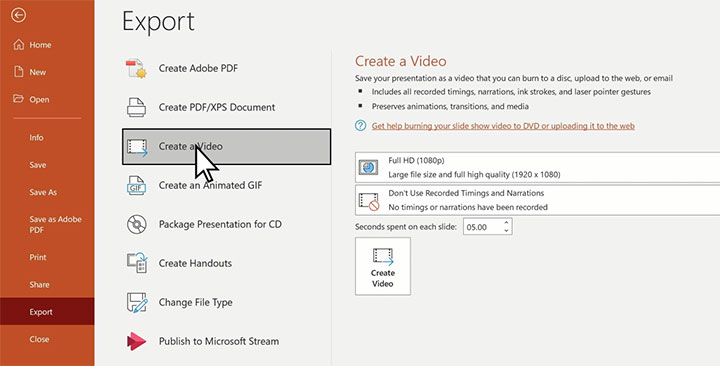
Step 9. Click on File and choose Export > Create a Video. Select the desired resolution. I recommend you choose Ultra HD(4K) or Full HD (1080P) for getting the best picture quality. Choose Use Recorded Timing and Narrations.
Step 10. Hit Create Video to enable PowerPoint to start exporting your recording as an MP4 video.
Note: In my case, with only 4 slides and Full HD (1080P) resolution, the exporting process takes over 3 hours. This is a common issue, and some users have reported similar slow export times in PowerPoint.
Method 2. Use VideoProc Converter AI
If you lack access to PowerPoint's recording feature, need top-quality video and audio, quick exports, or wish to edit your recordings, I recommend you use VideoProc Converter AI. This lightweight yet powerful screen recording software lets you record your PowerPoint presentations with audio (system sound, narration, or a combination of both) and your face at top-notch quality. It provides an array of intuitive drawing tools, making it a breeze to add eye-catching arrows, annotations, outlines, notes, and more to your presentations. What's more, it boasts a variety of editing features such as cropping, trimming, rotating, and adding watermarks, so you can easily refine your recordings to perfection without going elsewhere.
Why Should You Record Presentation with VideoProc Converter AI
- Quick export (within 1 second). Self-explained interface. No ads
- 4 recorder modes: Screen, Webcam, Screen & Webcam, Audio Recorder
- Adjsut the recording volume, format, quality, and more with ease
- Real-time drawing of annotations, outlines, texts, arrows, and more
- Also let you convert, compress, edit, and download video files

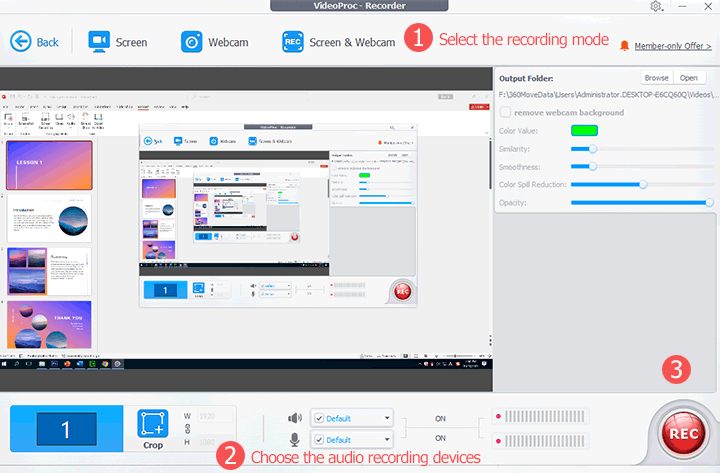
Step 1. Download and install VideoProc Converter AI on your Windows or Mac computer. Choose Recorder to open the screen recording feature.
Step 2. Select Screen if you want to record the PowerPoint presentation without your webcam. If you want to record the PowerPoint presentation along with a webcam, then choose Screen & Webcam.
Step 3. Open the PowerPoint presentation you wish to record, and you can use the Crop tool to select to record a part of your screen if needed.
Step 4. Select the microphone you want to record from. In my case, I want to record a PowerPoint presentation with only the audio from the microphone, so I disable the system sound and enable the microphone.
Note:
Suppose you want to record the system sound, then you should enable the specker sound, and select the device used for playing the system sound.
You can check the signal bar to confirm that you've selected the correct audio recording device. For example, if you want to record your voice using a microphone, speak into the microphone. If the signal bar flickers, it indicates that you've chosen the right device.
Step 5. Click on the Rec button to start recording. The recording will start in 3 seconds. During this period, play the slide show in full screen mode by clicking Slide Show. You can use the shortcuts 'Ctrl+Alt+Shift+T' to bring or hide the painting tools during recording. Once finished, click the Stop button to stop recording.


