Summary: VLC once planned an official video editor called VLMC, but the project never materialized. Fortunately, VLC Media Player itself includes several basic video editing features. This article shows you how to use VLC to trim or cut a video as well as apply other edits.
VLC has long been known as a free and reliable media player. In addition to playback, it comes with several built-in tools for basic tasks. These tools include video conversion and DVD ripping, as well as simple video editing, which is what we'll focus on in this guide.
Though the video editing tools are limited and not as powerful as Adobe Premiere Pro, iMovie, or even the built-in editor in Windows 10 and 11, they are perfect for quick adjustments when you just want to trim a clip, rotate a video, crop a frame, or merge multiple files without installing extra software.
In this guide, we'll walk you through all of VLC's video editing features step by step. You'll learn how to trim or cut in VLC to remove unwanted sections, and how to apply other edits to level up your video, such as cropping and merging.
Trim/Cut Videos via VLC: Key Limitations
Before you rely on VLC for all your editing needs, here are the hard facts about its trimming capabilities:
⛔ No middle cuts: If you’re trying to remove an awkward pause, a mistake, or an unwanted section in the middle of a clip, VLC won’t help. It can only trim from the beginning or the end, not cut a section out and stitch the rest back together.
⛔ Possible quality loss: When you trim a video in VLC, the file is re-encoded. That means the output video may look slightly worse than the original, and the format or codec may change without you realizing it.
⛔ No true trim tool: If you’re expecting a simple scissors icon or a timeline where you can drag and cut, you won’t find it here. Trimming in VLC relies on recording or conversion workarounds rather than a proper editing interface.
⛔ No batch trimming: If you have several clips to trim, you’ll need to process them one by one. VLC doesn’t support batch trimming, which can quickly become time-consuming.
To bypass these limitations, VideoProc Converter AI offers a robust alternative. It allows you to batch trim, crop, and precisely cut unwanted segments from the start, middle, or end of any video. Powered by GPU acceleration, it ensures smooth performance and features an 'Auto Copy' mode for editing without re-encoding or quality loss. Additionally, it serves as an all-in-one toolkit for converting, downloading, and AI video enhancement.
How to Trim/Cut Video with VLC in 2 Methods
VLC provides two ways to trim or cut videos. The most common method involves recording the segment you want while it plays. The second, less-known method uses the video conversion feature, which allows for millisecond precision but lacks a preview. Here is the step-by-step guide for both methods.
Method 1. Trim/Cut Video with VLC by Recording
Technically, this isn't "true" cutting. Instead, VLC re-records a specific segment of the video while it plays. While this method is intuitive because the preview window lets you see exactly where your clip starts and ends, it comes with significant frustrations.
The Trade-offs:
- ⛔ Not Precise: You cannot cut at a specific frame. You rely entirely on your hand speed to click stop.
- ⛔ Slow: To trim a 10-minute clip via VLC, you must wait 10 minutes for it to play. No instant export.
- ⛔ Quality Loss: The recording process re-encodes the video, which inevitably degrades the quality.
- ⛔ No Batch Processing: You can only trim one video at a time manually.
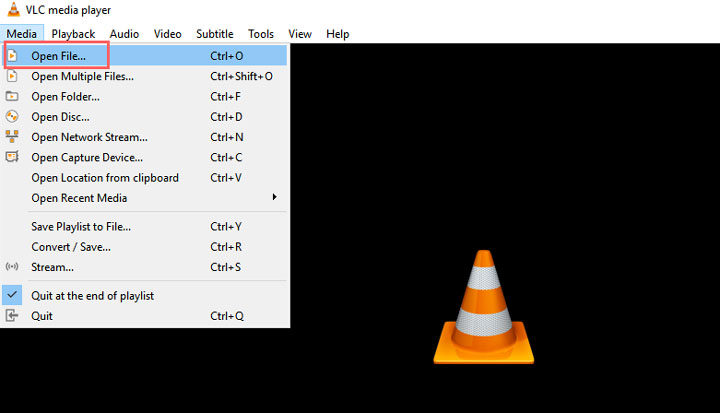
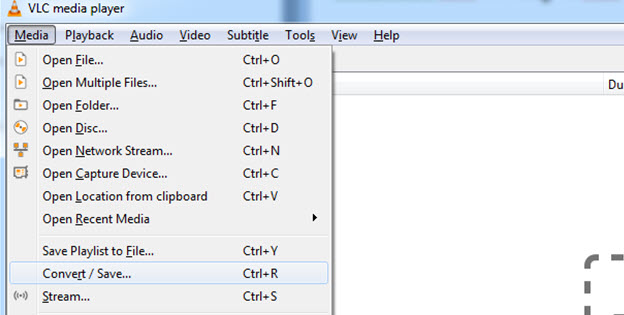
Step 1. Go to the top menu bar. Hit Media > Open File and then choose the video you want to trim to open it in VLC.
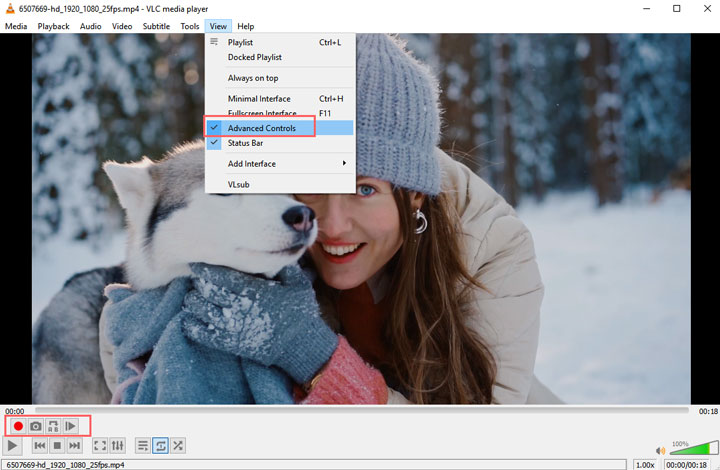
Step 2. Click View in the menu bar and turn on Advanced Controls.
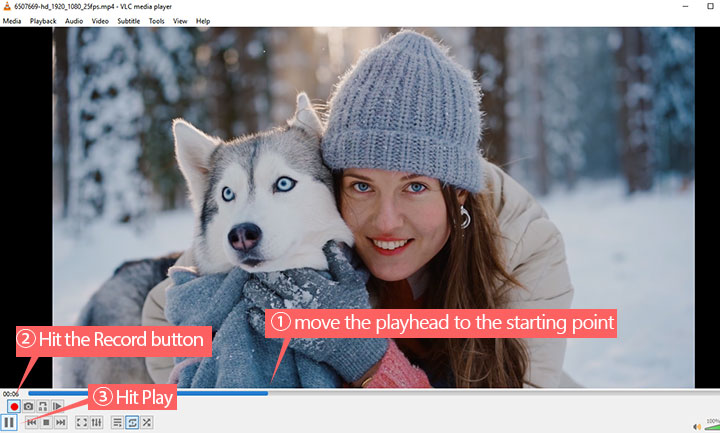
Step 3. Use the playback slider to navigate to the start of the segment you want. Click the Record button and the Play button to begin recording, then click Record again when you reach the end of the desired clip.
Step 4. Your trimmed video will be saved automatically in the Videos folder (or My Documents on some systems).
📌 Tips: If you want to change where VLC saves your trimmed videos, follow these steps:
- Step 1. Go to Tools > Preferences from the VLC menu. On a Mac, go to VLC > Preferences.
- Step 2. In the Preferences window, click Input / Codecs.
- Step 3. Under Record directory or filename, click Browse to choose the folder where you want your trimmed videos to be saved.Click Save to apply your changes.
Method 2. Trim/Cut Video with VLC by Converting
Trimming a video in VLC using the built-in conversion feature is very precise, down to the millisecond, because you can set exact start and end times. However, it also comes with some annoying drawbacks.
The Trade-offs:
- ⛔ No Preview Window: You are editing blindly. You must check the timestamps beforehand and type them in manually.
- ⛔ Quality Loss: This process also re-encodes the file, causing the drop in original quality.
- ⛔ Not Beginner-Friendly: The feature is hidden deep in menus and requires manual configuration.
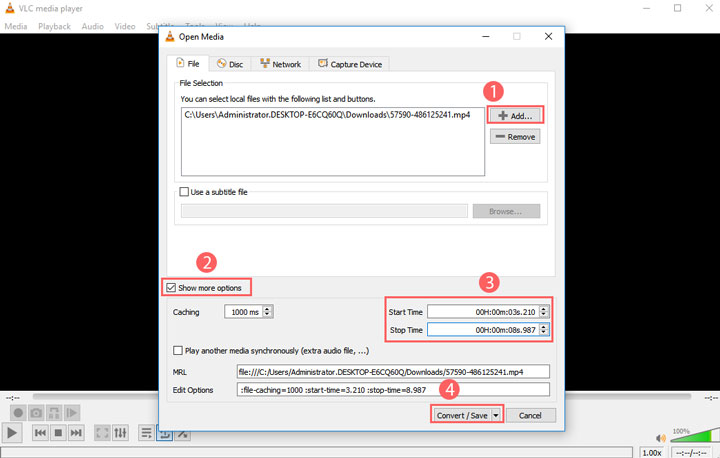
Step 1. Go to the top menu bar and click Media > Convert/Save.
Step 2. Click Add and select the video file you want to trim.
Step 3. Click Show more options, then enter the start and end times of the segment you need.
Step 4. Click Convert/Save, then choose the output profile. MP4 (H.264 + AAC) is usually the safest choice.
📌 Note: This step is crucial. Some users encounter black screens or missing audio/video. This usually happens because the output profile is set incorrectly or the selected format/codec isn't supported by the device or platform you plan to play the video on.
Step 5. Click Browse to select the output location, then hit Start to begin trimming your video via VLC.
How to Edit Video in VLC (Crop, Rotate, Etc)
#Crop Video VLC
There are two ways for you crop video with VLC media player:
Method 1. Quick Aspect Ratio Change
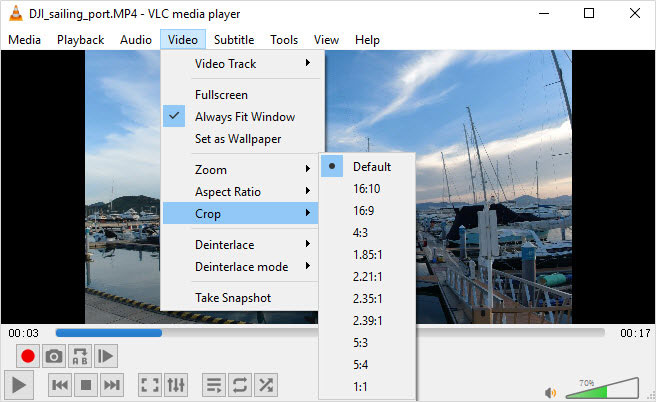
Step 1. Click Video in the menu bar. Move down to Crop.
Step 2. Select a specific aspect ratio, like 16:10, 4:3, 1.85:1, 1:1, etc.
Step 3. Then video will be cropped for playback at that aspect ratio.
Method 2. Custom Cropping
Step 1. Scroll down to the bottom of the player.
Step 2. Click "Show extended settings" in the toolbar.
Step 3. Switch to "Video Effects" tab > Crop.
Step 4. Set different values in the four positions (left, right, top and bottom). Save the settings.
📌 Note: As you can see, using VLC to crop unwanted areas of a video is not easy. You can read here for alternative ways to crop a video on Windows, easily and straightforwardly.
#Merge Videos in VLC
You can merge video in VLC either using the command line or its graphical interface. Follow the steps below to merge multiple videos into one in VLC.
Step 1. Open VLC. Go to Media > Open Multiple Files in the menu bar.
Step 2. Import the videos by clicking the Add button.
Step 3. Press Alt+O on the keyboard to bring up the Convert window.
Step 4. Choose a format from the Profile drop-down list.
Step 5. Click Start to combine videos.
#Rotate Video in VLC
You can change video orientation using the Transform or Rotate features found in the "Video Effects" > "Geometry" tab.
Step 1. Transform: Allows you to rotate by fixed degrees (90, 180, 270) or flip horizontally/vertically.
Step 2. Rotate: Allows you to set a specific rotation angle using a dial.
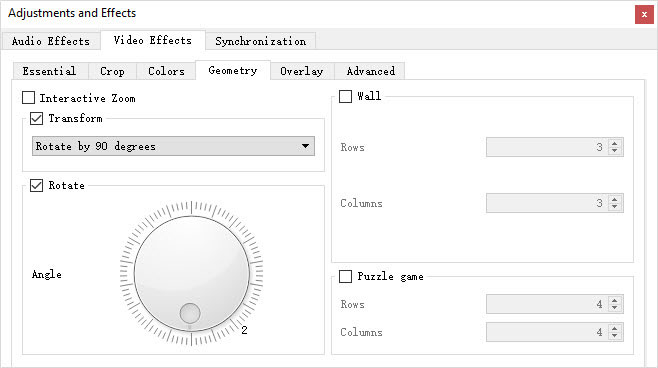
📌 Tip: Enable Transform and Rotate simultaneously only if absolutely needed, otherwise you may end up rotating the video at a cropped aspect ratio.
VLC Video Editing Features Overview
Before we conclude, here is a quick summary of the hidden video editing tools available in VLC Media Player. While limited, they cover the basics for quick fixes.
| Feature | Details |
|---|---|
Trim / Cut |
"Cuts" video by recording or converting. |
Crop |
Crops video borders (Top, Bottom, Left, Right). |
Rotate |
Rotates by 90/180/270 degrees, flips, or transposes. |
Image Adjust |
Adjusts Brightness, Contrast, Gamma, Hue, and Saturation. |
Colors |
Applies basic filters like Sepia, Gradient, Posterize, and Threshold. |
Overlay |
Adds a static logo or text overlay (Complex setup required). |
VLC Video Editing Review: Is It Worth Using
Now that you know what VLC can do, the question is: Is it actually good for trimming/cutting videos or applying other edits. The short answer is: VLC is a world-class media player, but it is not designed for editing workflows.
Pros:
- No watermarks or hidden costs.
- Great for quick tasks if you already have it installed.
- It can open and record almost any video file type.
Cons:
- Trimming is technically "recording" or “converting” which is imprecise and can lower quality.
- You can't see what your crop or rotation looks like until you save the file.
- If you make a mistake, you have to start all over again.
- Simple features like cropping are buried deep in settings.
Bypass VLC Trimming Limitations: Try VideoProc
If you find VLC's limitations frustrating, especially because you need a real cut rather than the recording method, or if you need a preview and more editing features, VideoProc Converter AI is the beginner-friendly alternative. Unlike VLC's complex recording method to trim or cut video, VideoProc Converter AI lets you trim videos visually.
Step 1. Drag & Drop your video into VideoProc. Hit the Trim button.
Step 2. Slide the green knobs to keep exactly what you want.
Step 3. Check Auto Copy to trim losslessly. Click Run to export.

Edit Video: VLC Media Player vs VideoProc Converter AI
Here is a side-by-side comparison of why a dedicated video editor makes a difference:
| Feature | VLC Media Player | VideoProc Converter AI |
|---|---|---|
Trim / Cut |
Recording Mode: Hard to be precise; Can't cut middle section; Quality loss. |
Frame-Precise: Cut exactly where you want; supports Lossless copy. |
Preview |
No Preview: Cannot see edits in real-time. |
Real-Time Preview: View changes before saving. |
Crop |
Complex setup in settings. |
Drag-and-drop crop box. |
Rotate |
90/180/270 degrees & Flip. |
90/180/270 degrees, Flip & arbitrary angles. |
Stabilize |
No (Cannot fix shaky video). |
Yes (AI Stabilization for GoPro/Drone). |
4K/Large Files |
May lag or stutter. |
GPU Accelerated: Smooth editing for 4K/HDR. |
Toolbox |
Basic Playback filters. |
Compress, Download, Record Screen, AI Upscaling. |


