With the fast growth of 8K and UHD 4K DSLRs, drones, action cameras, and smartphones, it is not rocket science for average people to capture high-quality videos. But we all know it is at the cost of sacrificing much storage space.
A 10-minute 4K @60FPS video recorded on an iPhone 16 can easily take up several gigabytes of storage (around 4GB). Therefore, when freeing up space or sharing videos on platforms like Instagram, TikTok, or X (Twitter), video compression becomes essential.
But this brings us to a common challenge: how do you compress a video without sacrificing quality? In reality, video compression is always a trade-off between file size and image fidelity. Our goal, therefore, is to reduce video size while minimizing any loss in quality, ideally to a point where it's not perceivable. And yes, achieving a significantly smaller file size without noticeable quality degradation is possible.
Now let's start the tutorial on how to compress video without losing quality on Windows, Mac, online, and mobile phones.
The Overall Best Way to Compress Video Without Losing Quality
VideoProc Converter AI stands out as an all-in-one toolkit for media processing and enhancement, with the capability of handling everything from format conversion and video editing to movie downloading and AI-powered image/video enhancements. With Max-Quality Compression Engine and high-efficient codecs, it is taken as the best video compressor that shrinks video file size while keeping the maximum visual quality.
It caters to users of all levels, offering both a simple 1-click compression method (directly specify the target size or compression ratio) and detailed custom settings for precise control over the output. Need more ways to trim down size without sacrificing quality? You can use it to cut, split, remove extra audio and subtitle tracks as well.
What's more, its performance is significantly boosted by the world unique level-3 GPU acceleration technology, providing broad support for over 470 formats like MP4, MOV, AVI, and MKV. This ensures the up to 47x faster compression speed even on less-powerful computers.
Rating:
 4.8/5 by OneHourProfessor
Download VideoProc Converter AI to compress large videos with no perceivable quality loss!

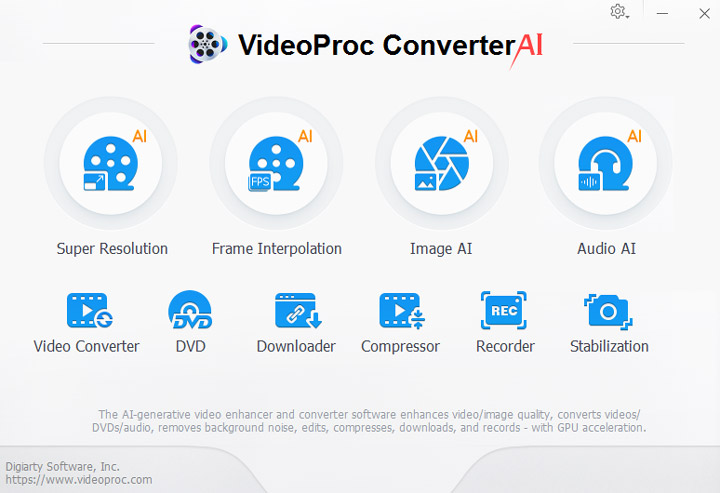
Step 1. Open VideoProc Converter AI. Click "Compressor" in the main interface. Then drag and drop the source video(s) to it.
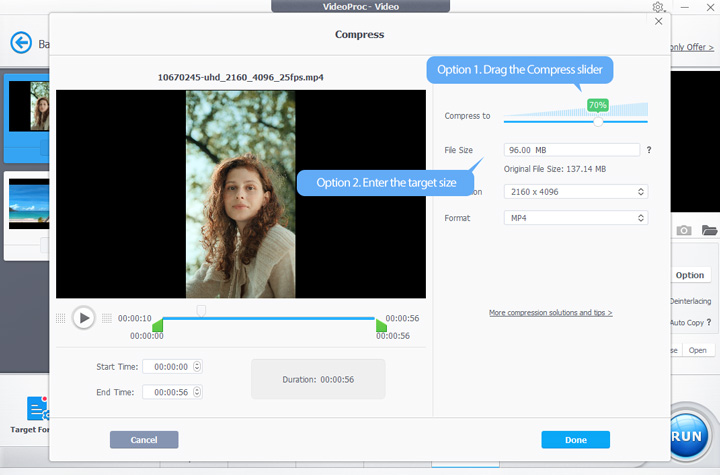
Step 2. Now you can compress the video by dragging the slider or entering a specific size. A compression ratio around 70% delivers effective file size reduction as well as good image quality.
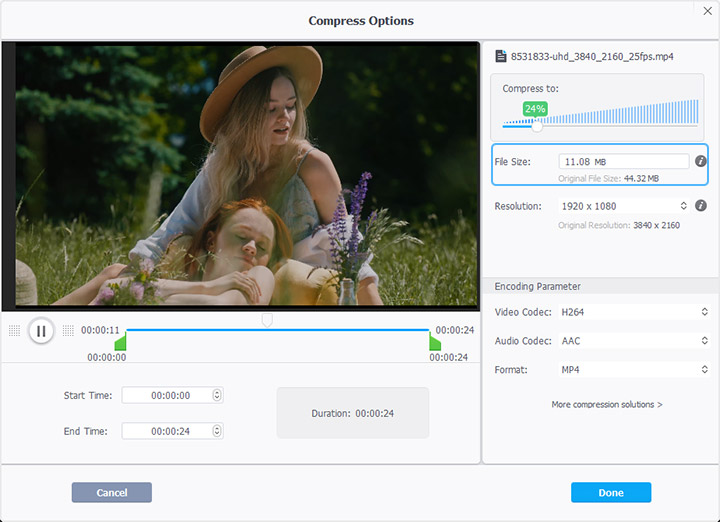
Step 3. Click on the Option icon next to the video to adjust parameters. Click "Done" to save the changes.
Tips:
- You can choose HEVC or AV1 codec to reduce file size without compromising visible quality. But please note that those codecs have poorer compatibility when compared with H264.
- You can also try other compression methods in VideoProc to shrink your videos with the least quality loss.
Step 4. Browse a folder to save the output file. Click "RUN" to export.
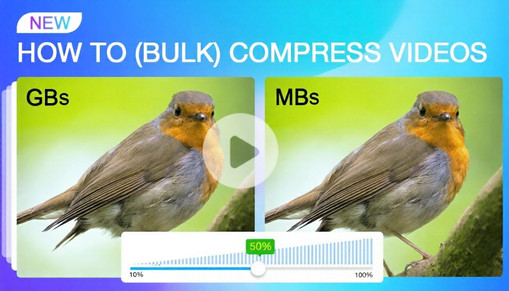
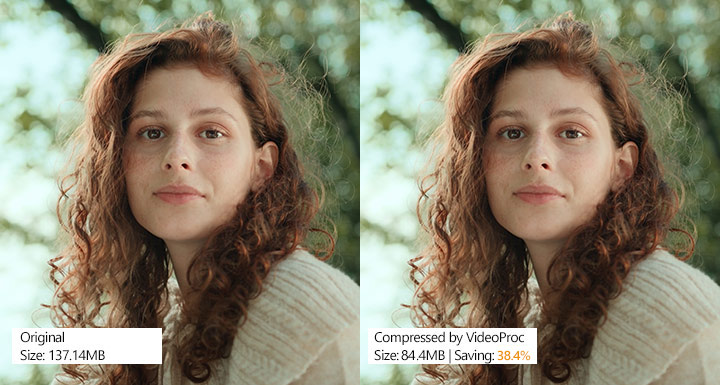
Let's check the side-by-side comparison of the video before and after compressed via VideoProc Converter AI – no visible loss in quality at all.
Bonus: More Options to Reduce a Video without Losing Quality
Let’s say you want to even large reduction in size, for example, compressing multi-gigabyte ProRes down to megabytes, then you can adjust the coding settings to get the job done effortlessly. Here’s how:
- Add your videos to VideoProc Converter AI.
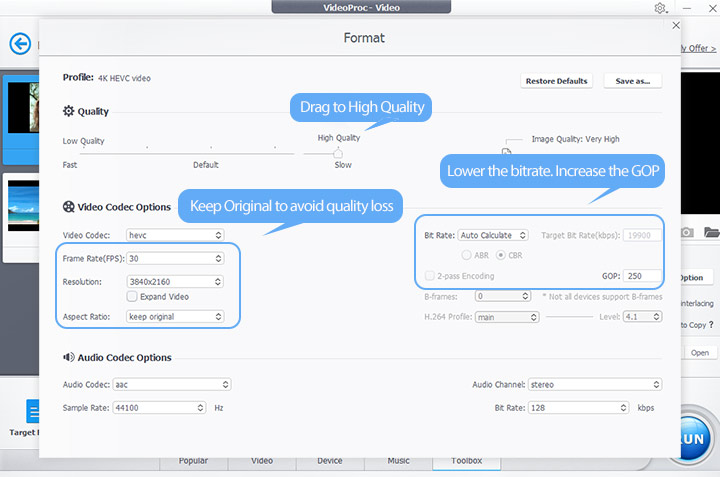
- Click Target Format. Choose the format option that is tagged with HEVC.
- Click the gear icon. Drag the quality slider to High Quality. Set Resolution, Frame Rate, and Aspect Ratio to "Same as Source". Advanced users can also adjust the GOP length to control the output size.
Real-world example:
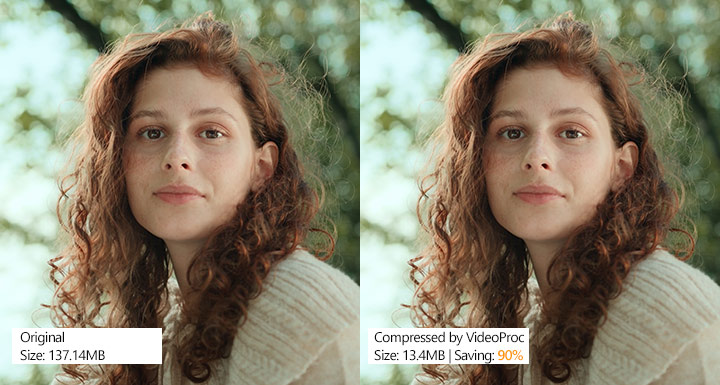
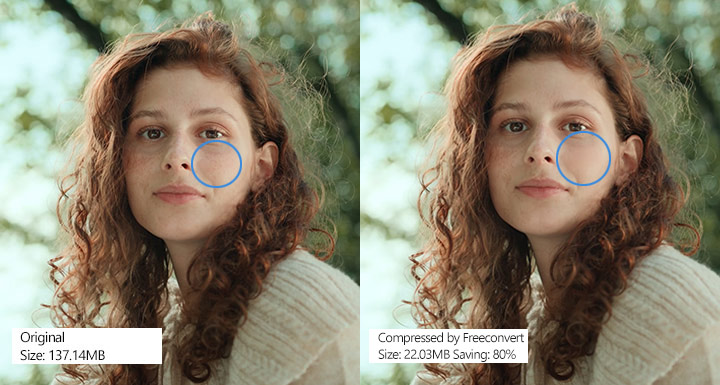
I tried switching the video codec to HEVC, and the results were pretty mind-blowing. A 137.14MB video dropped down to just 13.4MB — that’s a 90% reduction — and the picture quality still looked great.
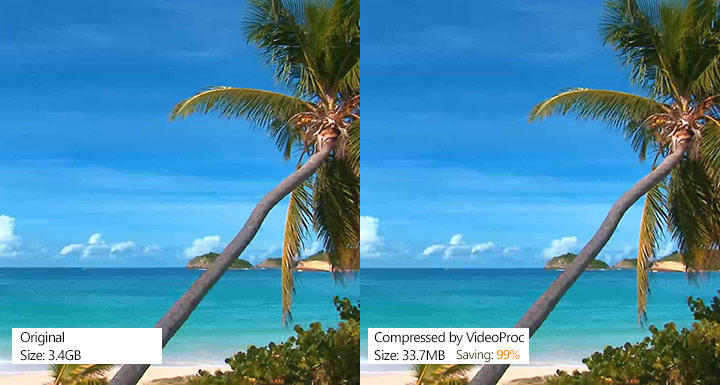
To keep pushing the boundaries of this method, I tried it on a massive 3.4GB 4K ProRes video. After switching the codec, setting the quality to high, and leaving the rest of the settings untouched, the file shrank to just 33.7MB — that’s over 99% saved! The video still looked excellent. It’s crazy how much you can compress videos without sacrificing quality.
2. Compress Video Without Losing Quality Online
Most online video compressors tend to simplify video compression as much as possible. This method is suitable for beginners and users in a rush. Without downloading and installing any tool on your computer, the whole process can be completed over the Internet.
However, web-based free video compressors have strict file size limits (generally up to 500MB). Only the minority, like Freecovnert, support video files up to 1GB. So the following guide on how to reduce file size without quality loss is demonstrated with FreeConvert.
Rating: ![]() 3/5 by Mywot
3/5 by Mywot
Step 1. Go to the official website of FreeCovert video compressor. Import a video to it. You are allowed to upload a video from your computer, Dropbox, Google Drive, and URL.
Step 2. Choose an output format. It supports MP4, FLV, MKV, AVI, MOV, 3GP. And among them, MP4 and MOV are the best video formats compatible with effective codec H.265/HEVC. So you can choose either of them.
Step 3. Click the gear icon beside the output format to open its advanced settings. Choose "H265" in the codec option. Then set the compression method to "Target a video quality" which promises the least video quality loss in the compression. And keep other settings as default.
Step 4. Click "Apply Setting" > "Compress Now". It starts to compress your video. Depending on the original footage size and the network condition, it may take minutes to hours to get the job done. When it finishes the compression, click "Download" to save it to your computer.
See the comparison here, showing the video before and after it was compressed using an online tool. While the quality loss is slight, it is indeed noticeable. On the plus side, however, this process did achieve a significant 80% size reduction.
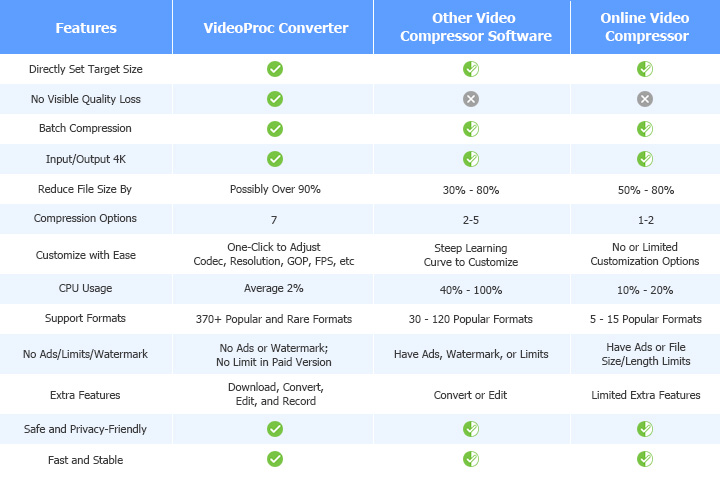
VideoProc Converter AI vs Online Video Compressors
3. Compress Video Without Losing Quality in HandBrake
HandBrake is a free and open source program for video conversion. Also, it can function as a free video compressor on Mac, Windows, and Linux. Based on FFmpeg video decoding and encoding libraries, it can compress large videos with common encoders, like H.264 (x264), H.265 (x265), MPEG-4, and MPEG-2.
HandBrake provides mainly two modes of video encoding: the Avg Bitrate option for more control over the output file size while sacrificing the video quality, while the Constant Quality does the opposite.
Rating:  4/5 by TechRadar
Since the video quality is emphasized in this post, we'll take full advantage of its Constant Quality option and other parameter settings to keep the original video quality as much as possible instead of relying on its beginner-friendly presets. Here's how.
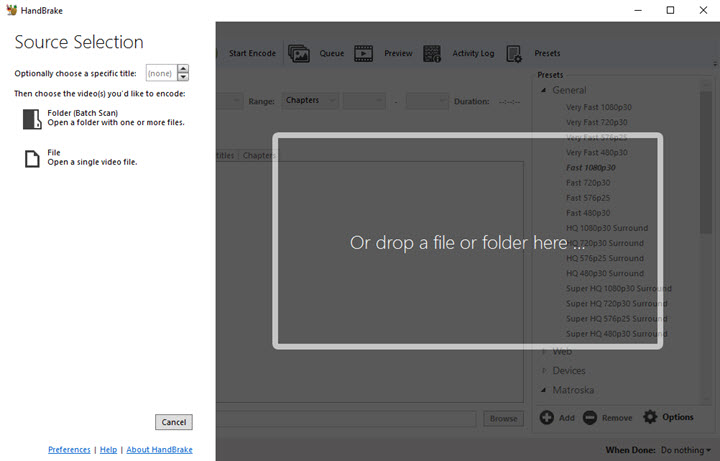
Step 1. Download HandBrake and launch it on your computer. Click "Open Source" on the upper sidebar to load the source video to it. It supports compressing MP4, MOV, AVI, and MKV videos to smaller sizes.
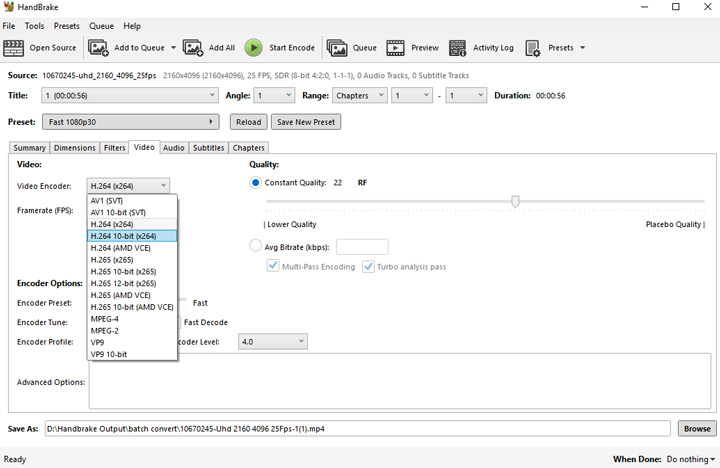
Step 2. In the "Summary" tab, select MP4 as the target format. After that, come over to the Video tab to configure the compression settings.
- Video Codec: You'll want to pick an efficient video codec. While AV1 10-bit gives you the absolute best compression, its support on mainstream devices and platforms is still quite limited. For that reason, H.265 10-bit (x265) is usually the suggested option; it's the next most efficient and works far more widely.
- VFramerate (FPS) and Resolution: Set these two to Same as Source.
- VQuality: Select "Constant Quality" and adjust the RF slider. For 720p/1080p videos, a good starting range is typically RF 18-22 for H.264 (x264) or RF 19-23 for H.265 (x265).
- VEncoder Preset: Choose a slower preset like Slow or Slower.
Step 3. (Optional) Although adjusting the audio sample rate and channel number can decrease file size, be aware that the human ear is quite sensitive. For the best audio quality, it's usually best not to alter these settings.
Step 4. At the bottom of the HandBrake window, specify where you want to save the compressed file by clicking "Browse". Once all settings are configured, click the "Start Encode" button on the top toolbar. HandBrake will begin compress your video without bring noticeable quality loss.
Comparing the original video with the HandBrake-compressed version reveals impressive results: overall, there's no visible quality loss.
HandBrake or VideoProc Converter AI
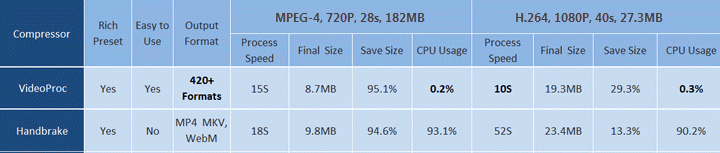
HandBrake and VideoProc Converter AI both provide feasible solutions to convert video to smaller size without losing quality. To give you more hints about which one to use, our team has made a well-rounded test.
And the data below shows that VideoProc Converter AI compress MP4 videos in the same quality while shrinking them into much smaller sizes and taking up less CPU usage.
4. Compress Video Without Losing Quality on Mobile Phones
When you put video quality at the top of your list, the best way to decrease video file is, undoubtedly, to use professional programs like VideoProc Converter AI, and then transfer the video to your mobile. But for people who stick to mobile methods of converting video to a smaller size with the least quality loss, we still have made tutorials workable for Android and iPhone individually.
How to Compress Video Files without Losing Quality in Android
Step 1. Download a video compressor from Google Play, e.g. Video Compressor Panda. It has been rated 4.5 out of 5 in the app store.
Step 2. When the installation is done, launch this video compressor on your Android phone. Choose yes when it asks for your permission to access the local multimedia library. Next, find and tick the video you want to compress.
Step 3. Choose to compress it into a "Small File", "Medium File", or "Large File". We'd recommend the last one because it keeps the original video quality and produces the best result. But it'll shrink the video slowly at a lower compression ratio. The bonus feature is "Fit to Email" which empowers you to compress videos for email in one single tap.

Step 4. Wait for it to squeeze your file. Finally, you have multiple choices to save, share, or replace the video.
HandBrake or VideoProc Converter AI
HandBrake and VideoProc Converter AI both provide feasible solutions to convert video to smaller size without losing quality. To give you more hints about which one to use, our team has made a well-rounded test.
And the data below shows that VideoProc Converter AI compress MP4 videos in the same quality while shrinking them into much smaller sizes and taking up less CPU usage.
How to Compress Video Files without Losing Quality in iPhone
Step 1. Open APP Store and download Video & Photo Compressor Pro. After installing it on your iPhone, allow it to access the Photos app.
Step 2. Choose "Compress Video" on its main UI. Add a video to this compressor app from your iPhone. Tap "advanced Mode" > "Superior quality" > "Try". This is going to utilize its advanced algorithms to decrease the video file size with minimal quality loss. This is a paid feature. If you want a free service, choose "Normal Mode", and ads will pop up in the following steps.
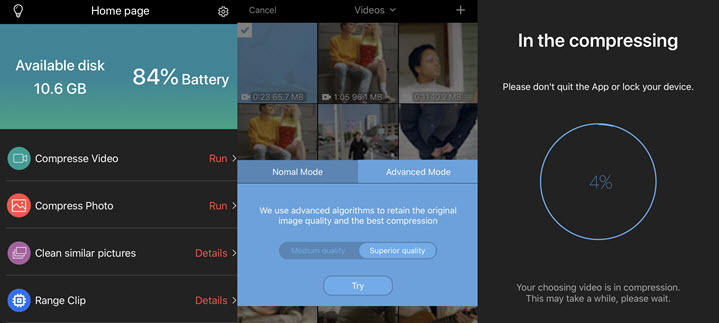
Step 3. Then it'll start to compress the video. Wait and do not quite the app. When it finishes the compression, it provides a preview and a comparison of these two files in terms of the resolution, bitrate, and file size. Finally, you can save it to the photo album or share it via SNS.
Pro Tips:
Open the Settings app on your iPhone, and find Camera > Record Video. Changing UHD 4K @ 60fps to 4K @24fps or 1080P HD @ 60 fps. Then video you shoot in the future will get smaller while keeping smooth.
Factors That Determine Video File Size and Quality
Video file size = Time (sec) x Frames per Second (fps) x Pixels per Frame (resolution) x Bit Depth
We can tell from the formula that, for a raw video of a certain length, its size was determined by the frame rate, the resolution, and the bit depth. Most videos we use are compressed in some way to shrink redundant info. And the process of video playback or sharing involves encoding and decoding. Now let me explain these factors one by one.
Resolution: The number of horizontal and vertical pixels in one frame. For instance, 4096×2160 (4K) and 1920×1080 (1080P). The higher resolution, the more pixels with color and luminance info (bit depth), thus better video quality, of course, larger size.
Frame rate: It means how many frames are delivered in one second in a video. The higher the frame rate, the smoother the video and the larger file size.
Bitrate: It shows how many bits of data are output from the video per second. Efficient encoders can save more average bitrate, thus make video size smaller.
Coding scheme: The way of how a video is compressed. And the video encoding tech is still in progress. At present, the most efficient video codec is H.266/VVC, but it hasn't been adopted into practice. So today, we are focusing on a universal one, H.265/HEVC. It is capable of reducing video files by 50% while keeping the same quality, compared with its predecessor H.264/AVC.
As compression is a process to reduce data stored in the file, it causes quality loss unavoidably. The rule of thumb is to use the most effective way to re-encoding the video file and keep the resolution, bitrate, and frame rate to a reasonable range.
Apart from the video file per se and hardware configuration, the compression ratio and the video quality also depend on the video compessor software you are using. VideoProc Converter AI excels most peers in both fileds with its timely support for the latest HEVC codec and advanced GPU acceleration tech. Now download and keep VideoProc Converter AI at hand to compress long videos or large 8K/4K/1080P videos without quality loss in a few clicks.


