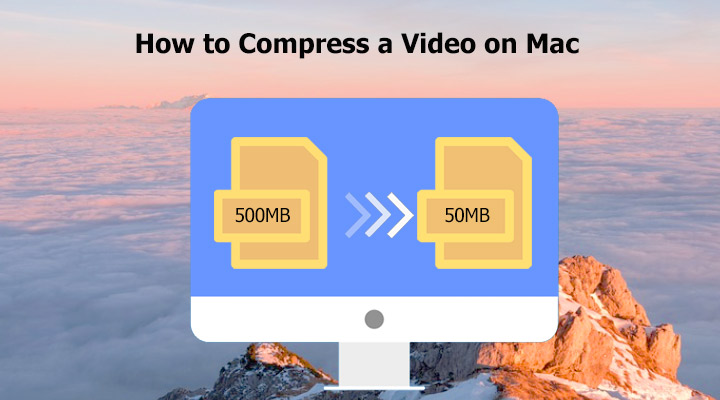
Are you looking for how to compress a video on Mac without compromising its quality?
There are several reasons why you might want to make a video file smaller on Mac - perhaps you need to share a large MP4 file through iCloud or iMessage, or you want to watch 4K UHD videos on your Mac without any lag. Additionally, compressing MP4 on Mac can help free up storage space. Thus, in this post, let's explore some of the easiest and fastest ways to compress a video on a Mac.
Is It Possible to Compress a Video on Mac without Losing Quality
Many video compressors claim they are able to compress a video on Mac without losing quality. However, the truth is it's not possible to achieve. It's the decrease of the bitrate, resolution, frame rate, or other image details that make a video smaller. Thus, the process of video compression always involves the compromise of certain details. But, that's not anything biggie as our real goal is compressing video files on Mac without visible quality loss, which is easy to do.
How to Compress a Video on Mac without Visible Quality Loss
VideoProc Converter AI is a fast, easy-to-use, and full-featured video compressor available on Mac and Windows. It lets you compress videos on Mac with a simple move of your mouse, requiring no previous knowledge. It holds the ability to manage multiple videos at the same time, namely, you can compress hundreds of videos on Mac at once.
Best Video Compressor on Mac - VideoProc Converter AI
- Effortlessly compress. Drag a compression ratio slider or enter the target size
- Reduce video size by 90% of the original without visible quality loss
- Customize the size and quality by adjusting codec, resolution, bitrate…
- Compress 370+ formats in HD 1080P, UHD 4K, or whatever resolution
- Stable and fast. 47x faster compression speed than the real-time play
- Also has AI features to enhance, upscale, smooth, denoise, and stabilize

How to Compress a Video on Mac Using VideoProc Converter AI
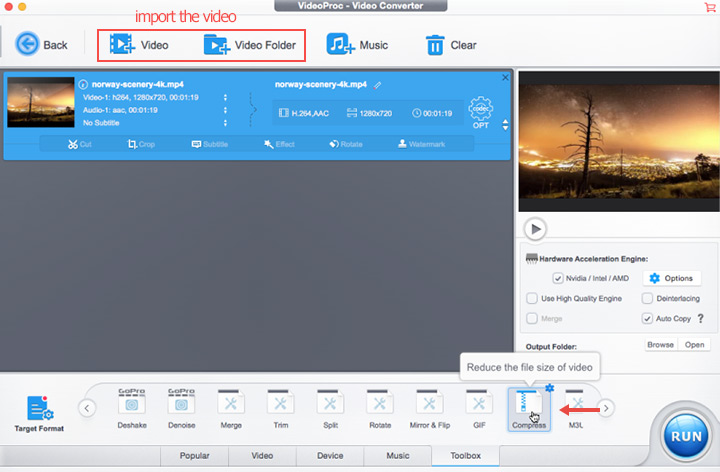
Step 1. Import the Video
Go to the official site and free download VideoProc Converter AI on your macOS, and then install it. Drag your video(s) to this capable video compressor for Mac. Click Toolbox at the bottom and double-click Compress.
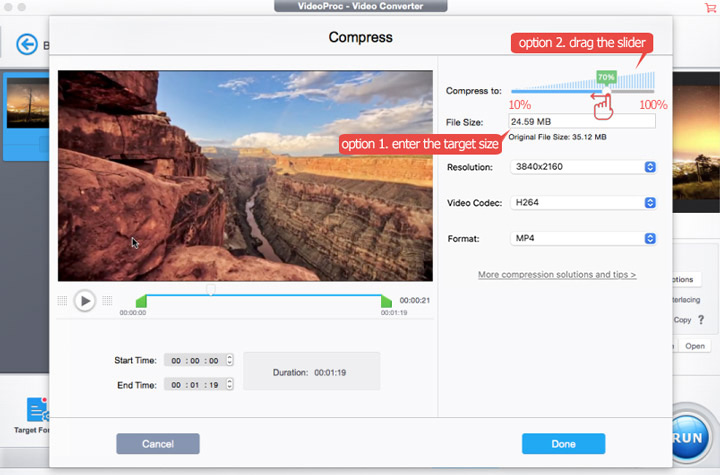
Step 2. Specify the Target Size
Directly enter the target file size in File Size. Alternatively, drag the slider to specify the compression ratio. You can move the green knobs under the preview window to delete unwanted parts for making your video smaller. Click Done to confirm your settings.
Tips:
- A 70% compression ratio balances file size and image quality.
- For the best picture quality at the target size, it's recommended to choose AV1 first, followed by HEVC, and then H.264. However, keep in mind that while AV1 offers superior compression, H.264 is the most compatible across devices, with HEVC also widely supported but less universal than H.264.
- You're allowed to choose a lower resolution to compress a video on Mac, such as downsizing 3840x2160P to 1920x1080P which can save about 75% of the size.
Step 3. Compress Your Video on Mac
Click Browse and assign a folder for saving the compressed video file. Click RUN to start compressing your video on Mac.
Tips:
VideoProc Converter AI also offers a few other easy manners to compress a MOV file. For instance, convert your video to a more efficient codec like MP4 H.264 and MP4 HEVC, decrease the frame rate from 120FPS to 60FPS, 60FPS to 30FPS, 30FPS to 23.7FPS, specify a lower target bitrate, etc. Click to check the detailed guide.
How to Compress a Video on Mac with iMovie
If you've ever used this built-in editing software on Mac, you probably wondered at some times, "Is it possible to compress my video on Mac with iMovie?". Yes, Absolutely. iMovie is typically developed for making simple video edits, but it can also be utilized to compress MP4 on Mac.
iMovie compresses your video on Mac with the help of CPU only. iMovie might burst up the CPU usage rate to 80% or even higher. Thus, during the long compression process, it's not possible to launch up another program without freezing up your Mac.
Step 1. Launch up iMovie on your Mac. Drag and drop the video files to this basic video compressor for Mac. Alternatively, you come to its top menu bar, find out File, and click this. Hit Import Media to add source videos to iMovie.
Step 2. Once the video is successfully loaded to the video editing screen, you click on File and choose Share. You now obtain a few different ways to share videos, but what you should pick is Export File.
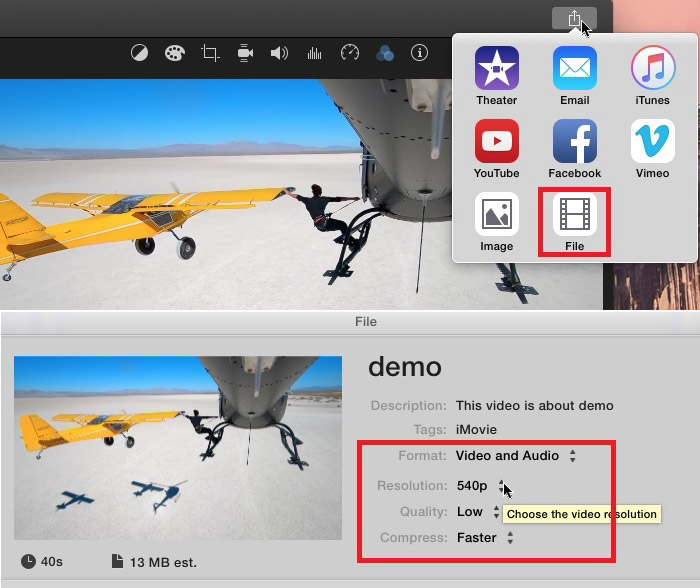
Step 3. The small new window displays the duration, file size, description, tags, format, resolution, quality information of the chosen video. To shrink a video size, you can:
- Reduce the resolution: Hit the down-triangle button next to Resolution to select a lower resolution.
- Select a lower quality: Tap the down-triangle button next to Quality, and pick up the proper one.
- Set the Compress mode as Faster.
Note: Though a low resolution, quality grade, and fast compression speed refers to smaller video file size, these can bring visible quality loss. Thus, don't let the resolution go lower than 720P, or set Low as the quality grade.
Step 4. Hit on Next as soon as you have made up proper settings. On the new panel, you can change the export file name, and it's output folder if necessary. After that, click on Save. iMovie starts making your video file smaller on Mac.
How to Compress a Video on Mac with QuickTime Player
QuickTime Player, as its name implies, servers as a multiple media player to play videos in various formats on your Mac. However, it is also capable of compressing your videos. Unlike VideoProc Converter AI that allows you to compress a video by changing video formats, bitrate, and other properties, QuickTime doesn't leave you much room to adjust the output video size. This built-in video compressor on Mac only allows you to shrink the video by exporting the original video at a lower resolution. How about the picture quality of the yield out video? Unfortunately, visible quality loss is hard to avoid.
The range of QuickTime supports formats is very limited. In most cases, it only enables you to compress videos that are in MPEG-2/4 or H.264 codec without a/v out-of-sync or black screen errors.
Step 1. Open up QuickTime on your Mac to enter the main interface. Hit File > Import to load the original video to this limited video compressor on Mac.
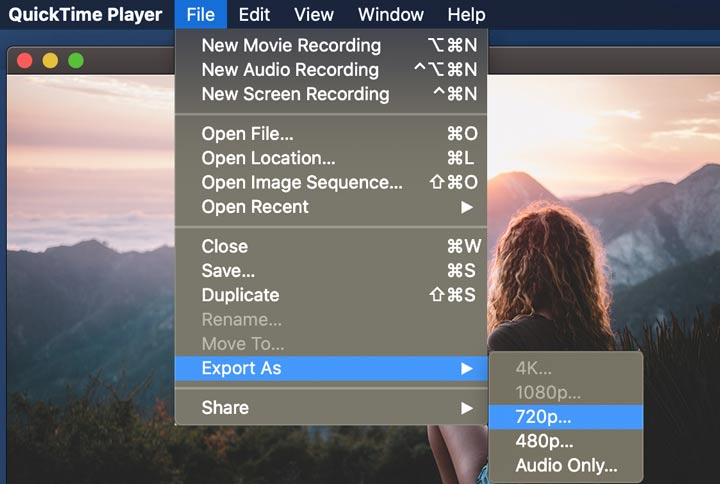
Step 2. Hit File > Export As to obtain the 5 common resolution options, 4K, 1080P, 720P, 480P, and audio only. Suppose the original video files are in 4K, there you're advised to select 1080P or 720p.
Step 3. Suppose you choose the 4K or 1080P, we suggest you choose HEVC as the video file format by checking the HEVC option. If you select iPad, iPhone, iPod touch, and Apple TV…, you'll be led to the Save your movie panel. Pick up the devices that will be utilized for watching the video, and then click on Save.
Step 4. Enter the name for the compressed video file, assign the destination file folder for holding the final video, and hit Save to let QuickTime Player starts to compress your MP4 video file on Mac.
How to Compress a Video on Mac with VLC
VLC media player is another media player listed in this post that can compress a video on Mac. It supports most video formats, including some old ones such as WMV, YUV, and 3GPP2. It offers more options to control the file properties than QuickTime Player does. For example, you can customize the codecs, bitrate, and audio channel.
However, we don't recommend you to play around with these options if you know little about video encoding. Taking a click on a button without knowing its function might lead to A/V out-of-sync, compression failure, and a few other issues.
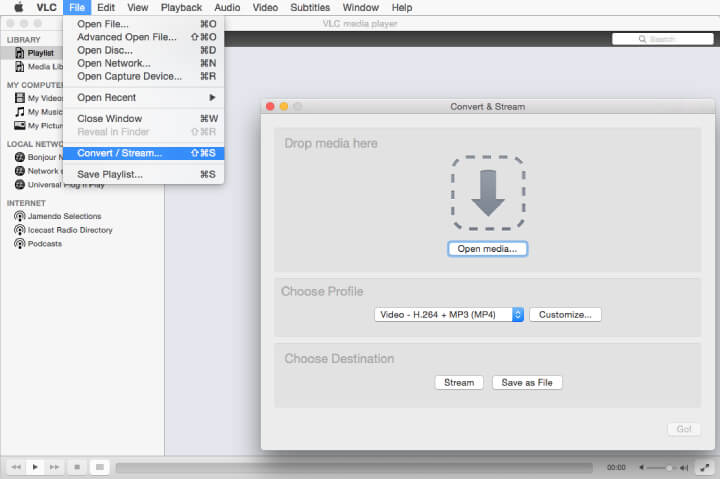
Step 1. Open VLC media player on Mac. Hit the File button located on the top menu bar and hit Convert/Stream.
Step 2. Hit Open media and choose the source video that you want to compress its size on Mac.
Step 3. Go to the Choose Profile section and select Video – H.264 + AAC.
Step 4. Navigate to the Choose Destination section and select the target output file folder.
Step 5. Hit Save. VLC starts to make a video file smaller on Mac.
How to Compress a Video on Mac with Freeconvert
If you don't want to install any extra video compressor for Mac and you feel the existing iMovie and Quicktime Player are too limited in the functions of making a video file size smaller, then take a look at the online video compressors for Mac. And among a wide variety of browser-based video compressors for Mac, Freeconvert is the best to go. With it, you can compress up to 1GB of video files on Safari or other browsers.
Step 1. Open up this free online video compressor for Mac on Safari, Chroma, or any other prevalent browser.
Step 2. Hit Choose Files and select the video that you want to make its size smaller on Mac.
Step 3. Choose MP4 as the target format. Click on the gear button.
Step 4. Scroll down to find the Select Target Size menu, and move the slider to set a target file size as a percentage of the original video. Hit Apply Settings.
Step 5. Press Compress Now. This free online video compressor for Mac starts to compress a video file on Mac.


