
Summary: In this tutorial, we covered easy guides on how to crop a video on Windows 10/11, with detailed steps, screenshots and video instructions. You can also check a list of free video croppers with detailed reviews.
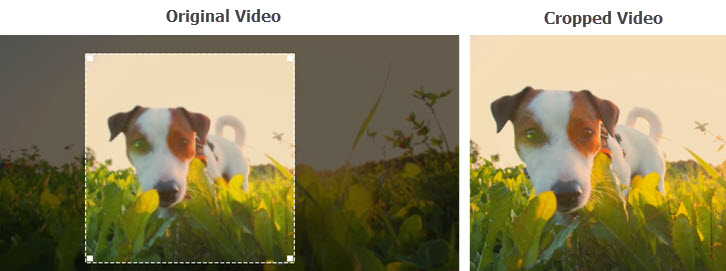
By cropping a video on Windows 10, here it means removing the surrounding parts of the video. For instance, you can zoom in on a video, or crop the edges to remove black bars or objects that you don't want to be shown in the video. Also, you can crop a horizontal video to a vertical one, crop a video into a square shape, or from 16:9 to 4:3, or any free shapes.
I know some of you use the term "cut, trim, and crop" interchangeably. Still, for the sake of clarity, if you only want to trimming off beginning, ending or middle part, please refer to this guide to cut and trim a video instead.
Quick Fact: Does the default Video Editor on Windows supports cropping a video?
The short answer is no. As of 2023, the Video Editor (or the Photos App) still doesn't allow you to crop a video flexibly. Though, it does have a feature to remove black bars, or convert 16:9 to 4:3. You cannot drag and drop a cropping frame to flexibly decide which part to remove or keep.
1. How to Crop a Video on Windows 10 in VideoProc Converter AI
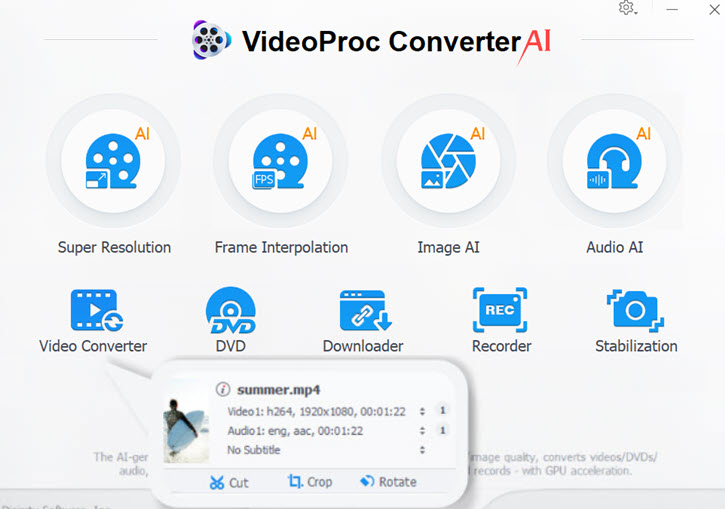
How to crop a video on Windows 10/11/7/8 with high quality? Don't worry if you have zero editing skills. Using VideoProc Converter AI, you can crop a video clip as easy as cropping a picture.
You can use this tool for many scenarios and beyond:
- Crop an unwanted area of a video clip without changing the format or damaging quality
- Crop a landscape video to horizontal (vice versa), or 16:9/4:3 to 1:1 square footage
- Keep the same resolution: cropping to fit the screen (zoom in)
- Keep or change the aspect ratio after cropping
- Crop and enhance video quality with the Super Resolution NEW function
Follow the detailed steps below:
Step 1. Install this video cropping software on your computer.
System requirement: Windows 11/10/8.1/8/7 and macOS. Lightweight for slow computers.

Step 2. Add the video into this cropping tool.
- From the main screen, click Video icon, and hit the + Video icon to add a video. Choose an output format, such as MP4, MOV, MKV, etc.
- VideoProc Converter AI supports 370+ input formats, you can crop MP4 videos, MKV, MOV, AVI, rare formats and demanding codec such as H265/HEVC videos.
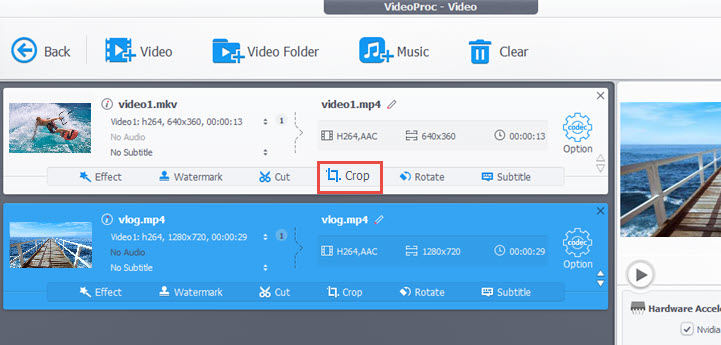
Step 3. Crop the video with the cropping tool.
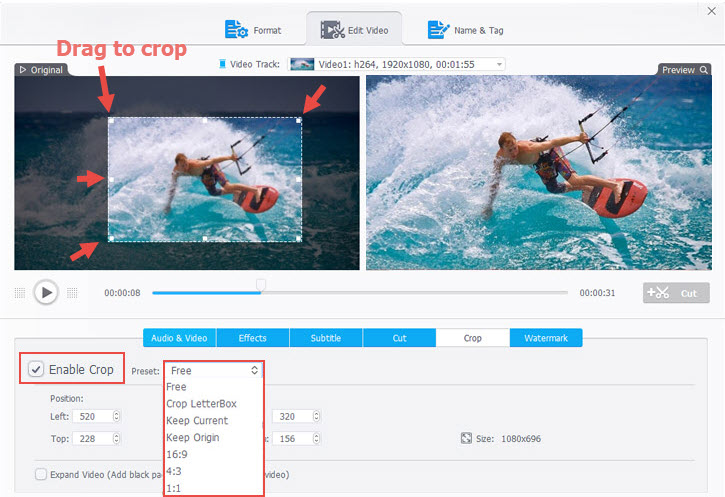
- Click the Crop icon to call out the editing window and tick the Enable Crop box to crop videos.
- Use Free Preset to drag the cropping box flexibly.
- You can also click the Preset icon and crop video at a fixed aspect ratio, such as 16:9, 4:3, 1:1, etc.
Step 4. Export the cropped video.
Once you are happy with the result, click Done to save the editing.
On the right-side panel, you can click Browse to indicate the export path, tick the box to use High Quality Engine, and hit Run to export the video.
Video Tutorial on How to Crop a Video:
📢 Low quality videos when zoomed in? Enhance it with VideoProc Converter AI
After you cropped videos, it becomes smaller. If you want to stretch it to fit the full screen, the video can be pixelated or blurry. With the Super Resolution function in VideoProc Converter AI, it helps you to enhance videos with deep learning algorithms.
- AI enhance video quality, clarity and sharpness at the original 1x resolution.
- AI upscale videos by 2x, 3x, 4x up to 4K UHD resolution with vivid details.
- More realistic and clear than the traditional non-AI upscaling algorithms.
Click the buttons below to download VideoProc Converter AI, and start to easily crop a video with high quality.
2. Cropping a Video on Windows 10 using Windows Video Editor
There isn't a dedicated cropping tool in the Microsoft Video Editor. It doesn't allow you to freely adjust a cropping box to crop the video frame on Windows 10. Though you can use it to remove black bars, convert 16:9 to 4:3, and change a horizontal video to a vertical one.
Therefore, strictly speaking, you can't really crop a video in Windows Video Editor. It only works under very restricted situations.
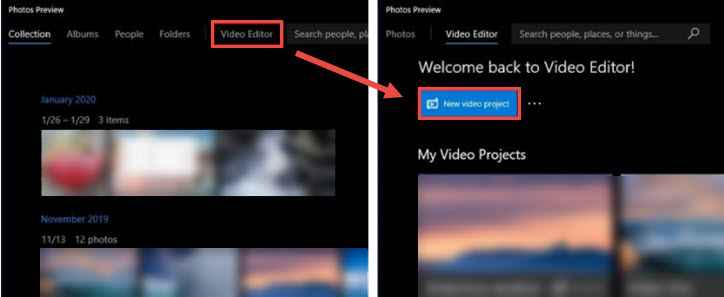
Step 1. Open Windows Video Editor on Windows 10 or Windows 11 operating system.
Here are several ways to launch the Windows Video Editor on Windows 11/10.
- You can click the Windows Start menu, and type in Video Editor to launch it.
- Alternatively, you can open the Windows Photos App, go to more, and click Video Editor.
- You can also directly right-click on the video > Open with > Photos. Then Click Add to in the photos app, and choose to add to new video or existing video, then click View to launch the project.
Step 2. Create a New Project, and import video clips that you want to crop.
Step 3. Drag the newly added clips to the storyboard at the bottom.
- If you only want to crop one video, drag it to the first storyboard.
- If you add multiple clips to the storyboard (the cards at the bottom), these videos will be merged into one upon exporting.
Step 4. Use Windows Video Editor to remove black bars or change aspect ratio.

- If you want to crop the black bars, click the frame-shaped icon on the right side of the speed icon.
- If you want to crop the video to a different aspect ratio, click the three-dot icon in the top right corner, and change 16:9 to 4:3. Under the same menu, you can also make a landscape video vertical.
Step 5. Click the Share icon to save the video.
Note: Based on our tests, videos processed by the Windows Video Editor will end up large in file size. This is probably because this default editor doesn't apply an efficient compression algorithm to reduce unnecessary data. Plus, if you want to crop videos in bulk, you need to create a project for each video manually.
3. Crop a Video on Windows via Windows Movie Maker
Many tutorials claim that Windows Movie Maker can help you to crop a video on Windows 10, but when you follow the guide step by step, you will find that they are actually talking about trimming, or cutting out a section to shorten the video.
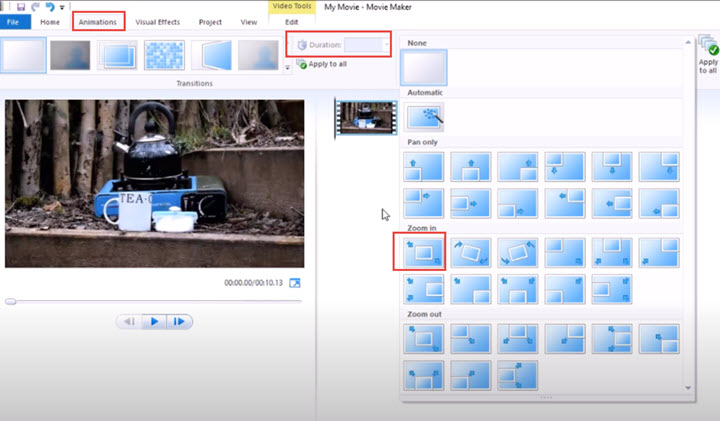
In fact, Windows Movie Maker does not have a cropping tool. You can circumvent it to some degree, still it is not as flexible as using dedicated video croppers. The workaround is to zoom in on the clip.
Step 1. Install Windows Movie Maker and launch it.
Step 2. Drag your footage into the working area, and click Animations tab from the menu bar.
Step 3. Crop video frame by selecting the first effects from the section featuring "Zoom in" effects.
Step 4. Set the Duration time. Make sure it lasts long enough to cover the entire footage.
Step 5. Playback and check if the unwanted areas are cropped by zooming in.
Tips: Since the zoom-in is a process, the beginning part of the video will still stay not cropped.
4. How to Crop a Video on Windows 10 with PowerPoint
Although many users already know that we can crop a video in Windows 10 using PowerPoint, how to export the cropped video with PowerPoint is unmentioned in many tutorials. In fact, it is tricky to export and save the cropped video, since there isn't a direct option.
Follow the steps below to check how the trick is completed when cropping a video in PowerPoint.
Step 1. Launch PowerPoint in Windows 10 (Windows 11) to insert the video.
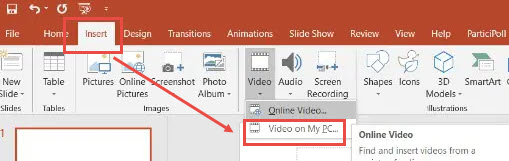
Click Insert > Video > Video on PC, browser and find the video you need to crop, and insert it into the PowerPoint slide.
Make sure you only have one and only slide in PowerPoint, instead of multiple slides.
Tips: There are chances when PowerPoint won't insert a video, saying "PowerPoint cannot insert a video from the selected file. Verify that the necessary codec for this media format is installed, and then try again." It means the codec of the source video is not supported by your PowerPoint version. For instance, PowerPoint 2013 or 2010 cannot insert and playback MPEG-2 encoded videos.
H264 MP4 video (AAC audio) has the best compatibility with PowerPoint. If you have other video formats, refer to method 1 which supports all the popular and rare codecs, way more than PowerPoint.
Step 2. Crop the video in PowerPoint.
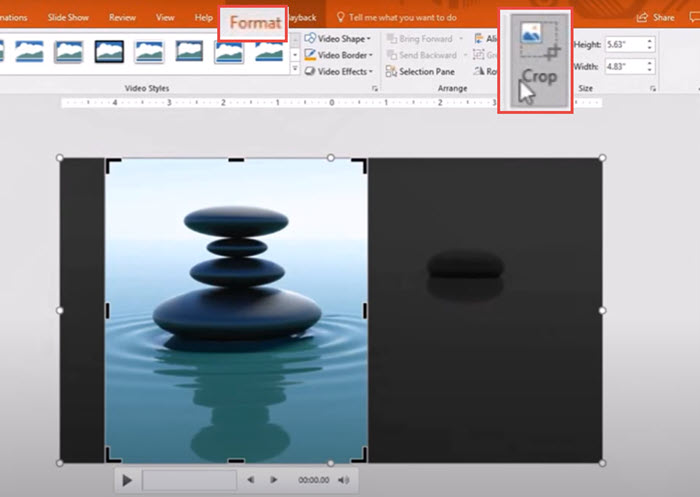
- To do so, you need to click on the video clip to make sure it is selected, and click Crop under the Format tab.
- You shall see a cropping frame appearing around the edges of the video. Drag and resize it to decide the areas to crop.
- Click Crop again to confirm removing the unwanted parts.
Step 3. Adjust the size of the video to fill the full slide.
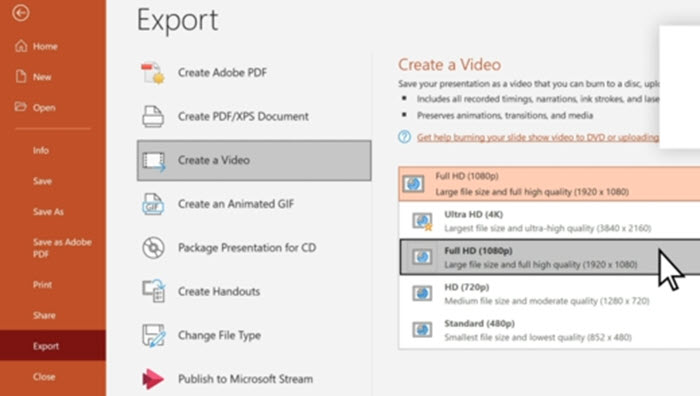
Step 4. Export the cropped video.
Click the File > Export > Create a Video, and choose the video specification. Depending on your PowerPoint version, the available resolutions can be different. For instance, PowerPoint 2013 only supports up to 720p, while higher versions have 1080p and even 4K videos.
Tips: PowerPoint can be slow when exporting the video. If you see the video file in the destination folder, but are prompted with a notice "This file is locked by another app at the moment", it means the video conversion is still in process, and the MP4 video you are seeing now is merely a temporary file. Wait patiently for the PowerPoint to finish cropping and exporting the video. Then you shall be able to playback the cropped video.
As you may already notice, this PowerPoint Cropping trick works because it is turning the slideshow into a video, and the inserted video happens to be part of that slide. For that reason, if you want to crop a video into a square format, you may find PowerPoint's function limited. Because it depends on the shape of the slide page instead of depending on the embedded video.
5. How to Crop a Video on Windows with Premiere Pro
Unlike those video editing software for beginners, the video cropping tool in Premiere Pro is hidden in the Effects panel. You cannot quickly spot the cropping tool on the main interface.
But don't worry, with the detailed steps below, you can quickly learn the tricks to crop a video on Windows using Premiere Pro.
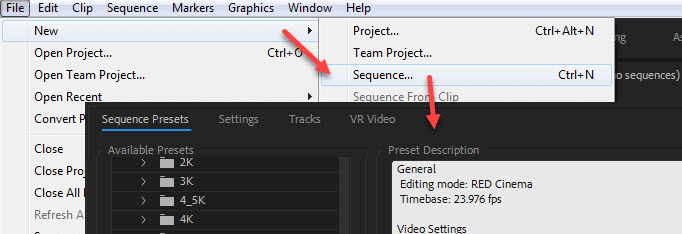
Step 1. Launch Premiere Pro, and create a new project. Then import the video that you want to crop into the media library.
Step 2. Create a sequence for the video. Make sure it matches your source video.
If you don't know which preset to choose, you can directly drag the video from the media library to the timeline. Premiere Pro will then automatically create a sequence based on the specifications of that video.
Step 3. Find the video cropping tool inside Adobe Premiere in the Effects panel.
The effects panel is at the bottom left section of the software, under the Effects tab. If you cannot find it, make sure your workspace is set to the editing layout.

Step 4. Crop the video in Premiere Pro by applying the "Crop Effects".
To do so, you need to search for "Crop" in the Effects panel, and drag and drop it onto the video clip on the timeline.
If you don't drag it onto the video clip, you won't see the cropping parameter appearing in the Effects Control panel.
Now that the cropping effects is applied, you shall be able to find it in the Effects Control panel at the top left section.
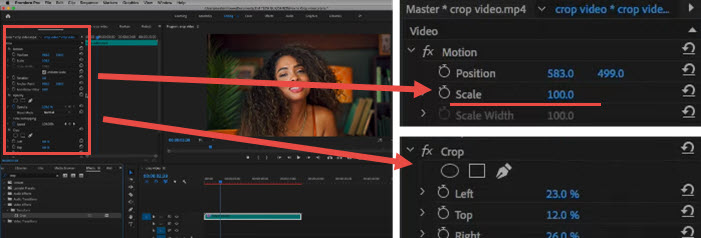
Adjust the Left, Top, Right, Bottom value to crop a video in Premiere.
Alternatively, you can increase the value of the Scale parameter, so that the video will be zoomed in and cropped.
FAQs
Can You Crop a Video in VLC?
You can crop a video in VLC using the Video cropping filter (also known as Video scaling filter in some VLC versions). The filter need to be enabled in Tools > Preferences > All Settings > Video - Filters. For detailed steps with screenshots, check this tutorial.
How to Crop a Video on Mac?
Some of the tools listed above also have an Mac version, with simliar steps. You can check a dedicated guide on how to crop a video on Mac for more free tools and pictorial guidance.


