In-page Navigation
Using Chroma Key (Green Screen) in VideoProc Vlogger
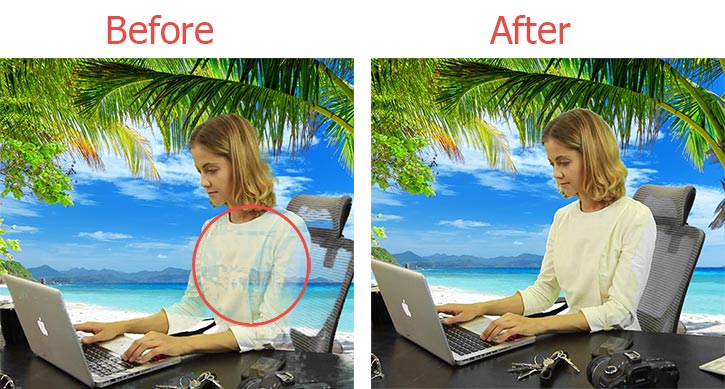
Chroma Key is a post-production technique to change the background of a particular video or image into another scene. In VideoProc Vlogger, it works by segmenting foreground from background, making the original background transparent, and changing into another (virtual) background. By enabling it you can produce innumerable visual results.
Free download VideoProc Vlogger to convert your video with a green/blue screen to a stunning background.
Watch video tutorial on how to use Chroma Key in VideoProc Vlogger, or read text instructions below.
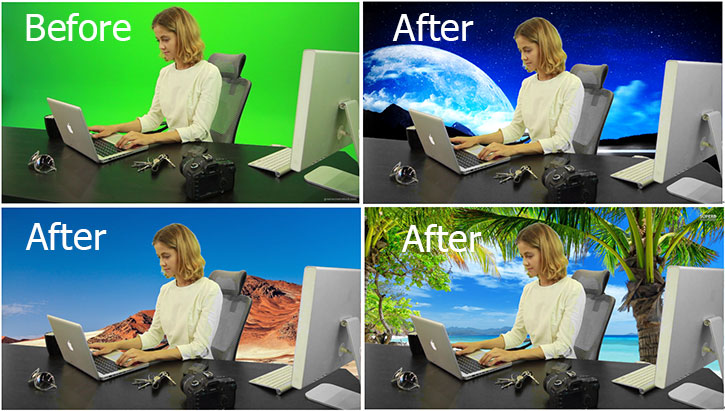
What Effects Can Chroma Key in VideoProc Vlogger Bring to Your Video
Chroma Key effects can make the uninspiring walls in your office or home studio look like on the moon, Mojave Desert, or any place you prefer, when you make a training video or record presentation slides. Doing so will make your video more impressive for your viewers. In this case, you can shoot your video anywhere and replace the background with a graphic, photo, or video element, thus saving a large cost on studio building.
 Editing Tips
Chroma Key (Chroma Key Compositing, or Chroma Keying) is also commonly called Blue Screen or Green Screen, and the Green Screen is used more widely in movies and news reporting than Blue Screen.
Essential Preparation Work before Applying Chroma Key
Before using Chroma Key effects, you should prepare one source green screen video or image which would be used as the foreground, you can either download online or make one yourself. If you choose the latter, 5 steps below for your reference:
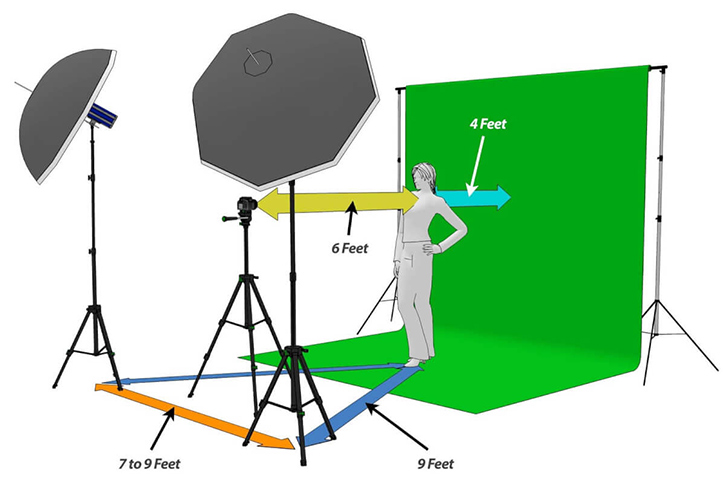
Step 1 Set up a green screen backdrop, allowing the size long enough for body shoots or moving around.
Step 2 Place and light your subject. Light the screen evenly from both right and left side, and place the subject 4 to 10 feet far from the green backdrop will be no spill and shadows.
Step 3 Plan your shots, to decide what shots you are going to use in your background.
Step 4 Start to shoot.
Step 5 Import the footage you captured into software and apply Chroma Key.
How to Use Chroma Key (Green Screen) in VideoProc Vlogger?
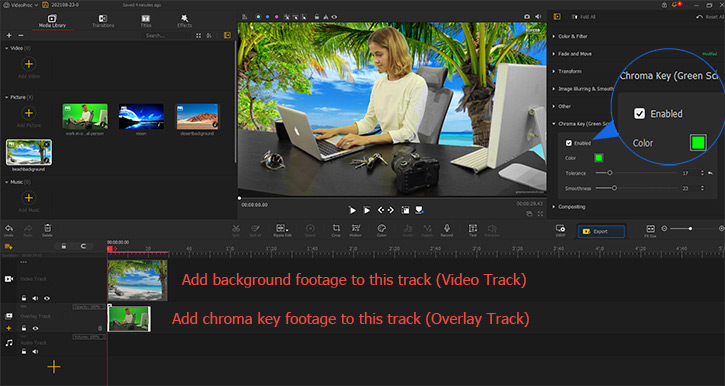
Step 0Create a New Project and import your footage (background clip and green screen clip) into Media Library. Then, add them into a certain track correspondingly.
Step 1 Drag your background footage into Video Track (Main Track).
Step 2 Drag your green screen footage into Overlay Track.
Editing TipsIf the green screen partially covers the frame, you need to click ![]() under Preview Window to make it full frame.
under Preview Window to make it full frame.
Step 3 Enable Chroma Key effects in Inspector Panel. Drag green screen footage into Overlay Track, and you can see Chroma Key effects available as the last option in Inspector Window; ticking it, you will see the original background disappears and is replaced by the background footage on the Video Track.
Parameters Settings
Option 1. Change the Background Color of Green Screen Footage
Click Color, and a color library window will pop up that you can select a color close to the background color of your green screen video. For instance, if the background is blue, all you have to do is click Color, select the brightest portion of blue and click on it to change the original background to an engaging one.
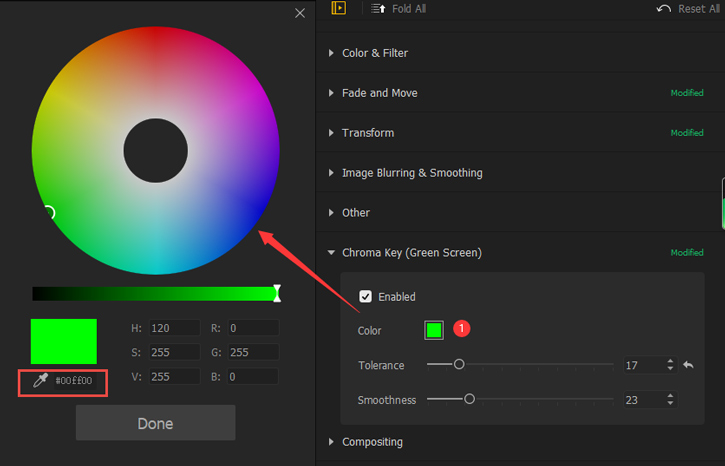
Option 2. Modify Parameters under Inspector Window
- Tolerance & Smoothness - by dragging the bars from left to right, you can get a better overall effect that a subject with a green screen is better blended with the target background.
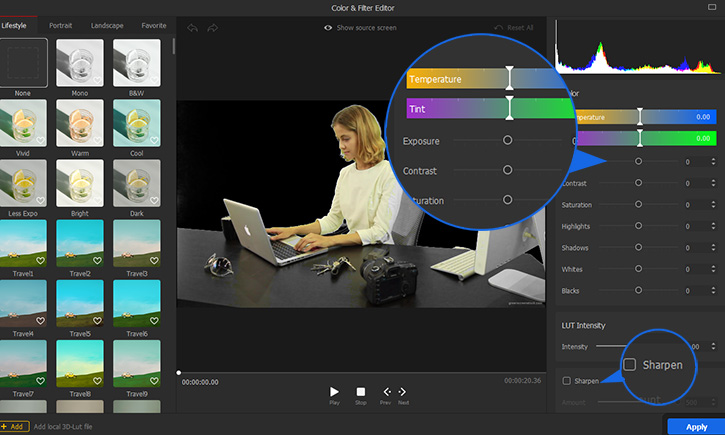
Option 3. Modify Parameters under Edit Panel
After clicking Color in Edit Panel, an advanced color adjustment window pops up on the screen like below. By applying these options you can produce a more vivid finished product.
- Filter - retouch the appearance of green screen footage.
- Temperature & Tint - a color render tool to make the video looks cool or warm.
- Exposure - change how bright or dark your footage appears.
- Contrast - make the subject and background look more distinct.
- Saturation - to increase, the color appears to be purer; as it decreases, the color appears to be more washed-out or pale.
- Sharpen - fix and soften the subject edges.
Now free download and install VideoProc Vlogger to try Chroma Key(Green Screen) to change your video background with ease.
Related Guides:
- > Variable Speed Effects | Speed ramping
- > Motion | camera movement effects
- > Picture-in-Picture
- > Split Screen
- > Keyframing
For more guides of VideoProc Vlogger, please visit this page >
If you have any question, please email us or visit ![]()
![]()
![]()
Is this page helpful?
