


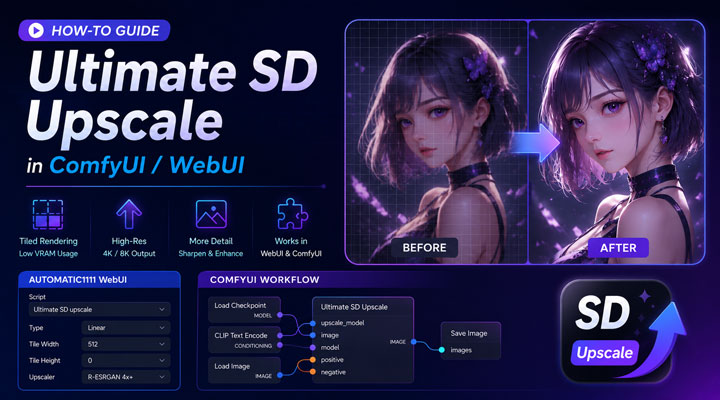
Generating high resolution images in Stable Diffusion often feels like a gamble between visual quality and system stability. While the standard Highres fix works well for minor enlargements, it frequently leads to out of memory errors when pushing toward 4K or 8K resolutions. The Ultimate SD Upscale script solves this by using a tiled rendering approach. This method breaks a large image into smaller sections, processes them individually, and stitches them back together. This allows users with standard consumer hardware to produce massive, detailed prints without crashing their software.
- Why Ultimate SD Upscale is Needed for Large Renders
- How to Use Ultimate SD Upscale in AUTOMATIC1111 Stable Diffusion WebUI
- How to Install and Use Ultimate SD Upscale in ComfyUI
- Shared Ultimate SD Upscale Workflows You Can Try
- Dive Deep Into Ultimate SD Upscale Settings
- Advanced Settings and Troubleshooting
- A Simpler Way to Upscale Images Without Stable Diffusion Setup
Why Ultimate SD Upscale is Needed for Large Renders
The main reason to use Ultimate SD Upscale instead of basic resizing is that it gives you better control over large image generation. A simple resize can make textures look stretched, soft, or blurry. Generating a very large image from scratch can also confuse the model, often leading to distorted anatomy, duplicated objects, or unstable composition.
Ultimate SD Upscale reduces these problems by splitting the image into smaller tiles and processing them one by one. This keeps the AI focused on manageable areas instead of forcing it to handle the entire large image at once. As a result, it can better preserve the overall composition and structure while adding more detail during upscaling.
Another benefit is VRAM control. Since the GPU only needs to process one tile at a time, memory usage stays much more manageable, even when the final image is very large. This makes Ultimate SD Upscale a practical choice for users who want to go beyond the usual 512px or 768px limits of base Stable Diffusion models.
Keep in Mind:
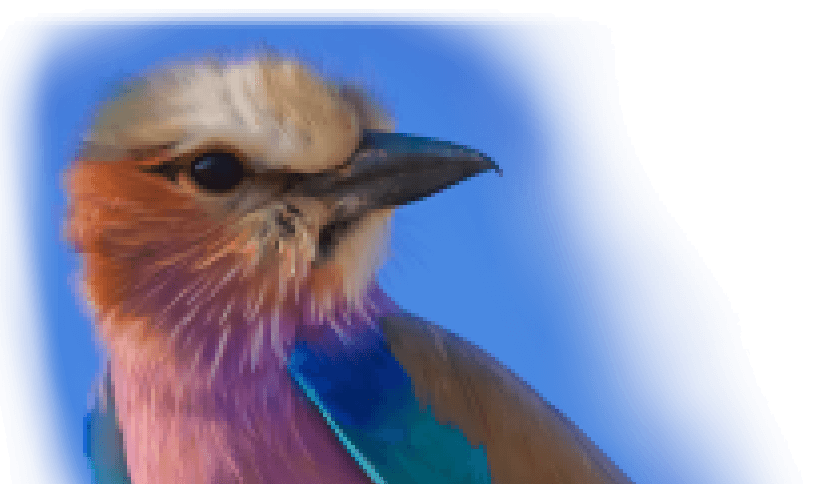
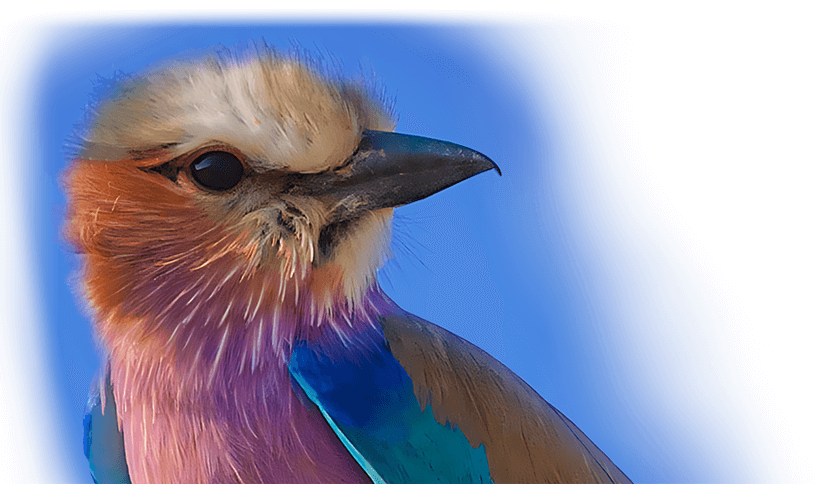
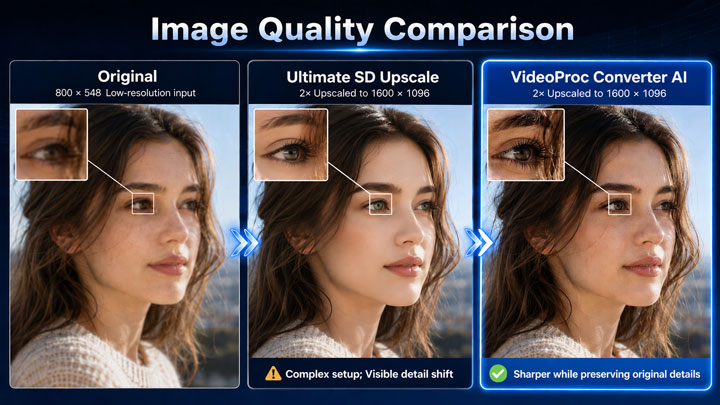
Ultimate SD Upscale is not a simple one-click tool. You still need to set up Stable Diffusion, choose the right model, adjust tile size and denoising strength, and deal with possible seams or VRAM errors. Also, because the tool redraws parts of the image during the upscaling process, it may slightly change small details such as textures, facial features, text, or tiny objects. In other words, it is strong at keeping the overall image structure stable, but it may not always preserve every original detail perfectly.
If you want an easier method that requires less setup and better preserves the original look of your image, VideoProc Converter AI is worth trying.
Free Download VideoProc Converter AI to upscale images to 8K/10K with natural details.

How to Use Ultimate SD Upscale in AUTOMATIC1111 Stable Diffusion WebUI
Before you start, make sure you have already installed and launched AUTOMATIC1111 Stable Diffusion WebUI. There are 3 easy methods to install Ultimate SD Upscale script:
To Install Ultimate SD Upscale in WebUI
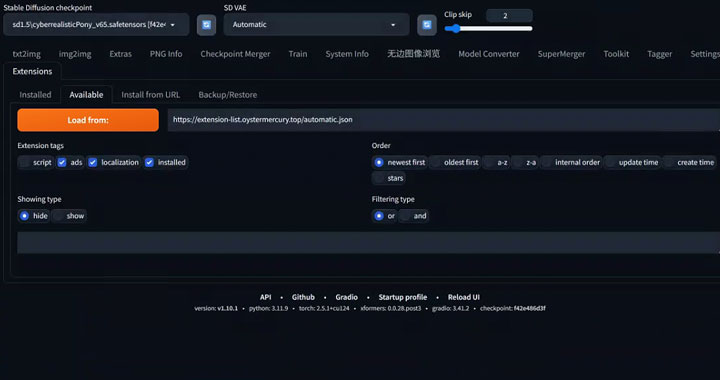
Step 1. Open AUTOMATIC1111 Stable Diffusion WebUI. Go to the Extensions tab.
Step 2. Click the Available tab, then click Load from to refresh the extension list.
Step 3. Search for Ultimate SD upscale. Click Install next to the extension.
Step 4. Once the WebUI restarts, go to the img2img tab, scroll down to the Script section, and open the drop-down menu. If you can see Ultimate SD upscale in the list, the installation was successful.

Aternatively, Install Ultimate SD Upscale with URL
If you cannot find Ultimate SD Upscale in the extension list, you can install it manually from its GitHub repository.
Step 1. Go to Extensions > Install from URL.
Step 2. Paste the following URL into the URL for extension’s git repository field: https://github.com/Coyote-A/ultimate-upscale-for-automatic1111
Step 3. Click Install and restart the WebUI.
To Use Ultimate Upscale Script in WebUI
After installing Ultimate SD Upscale, you can use it in the img2img tab of AUTOMATIC1111 Stable Diffusion WebUI. It works by upscaling the image in tiles, which helps improve details while reducing VRAM usage compared with processing the whole image at once.
Step 1. Open the img2img Tab
Launch AUTOMATIC1111 Stable Diffusion WebUI and go to the img2img tab. You can either send an image from txt2img to img2img, or drag and drop a local image into the img2img image area.
Step 2. Choose the Target Size Type
For Target size type, choose Scale from image size. This option lets you upscale the image based on a scale value, such as 2x or 4x. Starting with 2x is safer because it is easier on your hardware and helps you check whether the result looks stable. Higher values, such as 5x, take longer and may increase the chance of artifacts, seams, or unwanted detail changes.
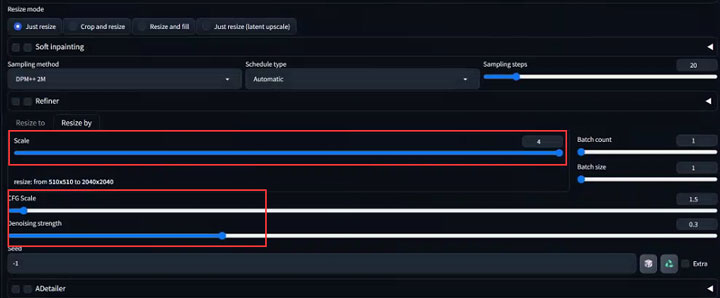
Step 3. Use Recommended img2img Settings
Use the following img2img settings as a safe starting point:
- Sampling method: Euler or DPM++ 2M Karras
- Sampling steps: 16 to 25
- Denoising strength: 0.15 to 0.25 for close preservation, or 0.3 to 0.4 for stronger detail enhancement
- CFG scale: 6 to 8
These settings are not fixed rules, but they give you a stable starting point for most images. If the result looks too different from the original, lower the denoising strength. If the image looks too soft or lacks detail, increase the denoising strength slightly or try a different upscaler.
For a deeper explanation of these settings, go to Understand Ultimate SD Upscale Settings >>.
Step 4. Select Ultimate SD Upscale
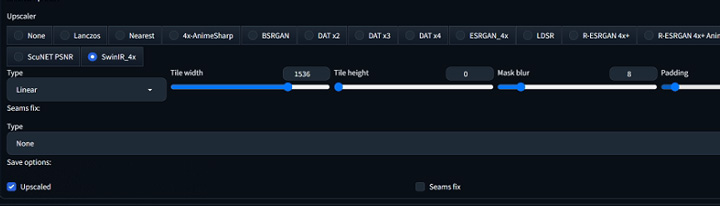
Scroll down to the Script section. Open the drop-down menu and select Ultimate SD upscale. This will bring up several settings, including Upscaler, Type, Tile Width, and Tile Height.
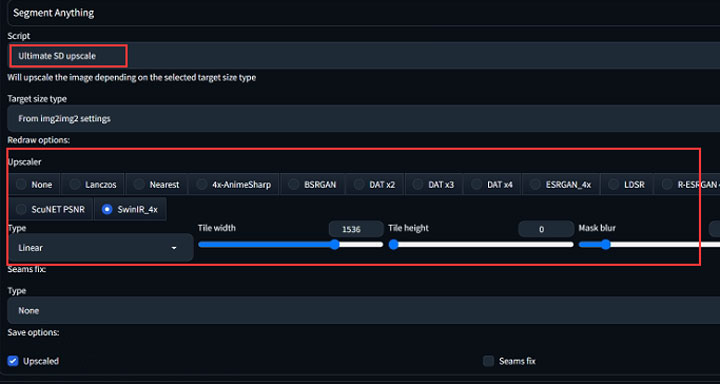
For beginners, a safe starting point is:
- Type: Linear
- Tile Width: 512
- Tile Height: 0
If you notice visible seams or grid-like artifacts, try:
- Type: Chess
- Tile Width: 512 or 768
- Tile Height: 0
For a detailed explanation of what these parameters mean and how to adjust them, see the next section >>.
Step 5. Keep Seams Fix at Default First
Leave Seams Fix at the default setting for your first run. If you notice visible tile borders, inconsistent textures, or strange transitions between areas, you can come back and adjust the Seams Fix settings.
Step 6. Enter a Prompt
You can use the original prompt if the image was generated in Stable Diffusion. For local images, write a simple prompt that describes the image. You can also add a negative prompt to reduce unwanted artifacts: blurry, low quality, distorted face, extra fingers, bad anatomy, artifacts
Step 7. Generate the Upscaled Image
Click Generate to start the upscaling process. Ultimate SD Upscale usually take longer than normal img2img because it processes the image in tiles. The larger the scale value and image size, the more time and VRAM it may require.
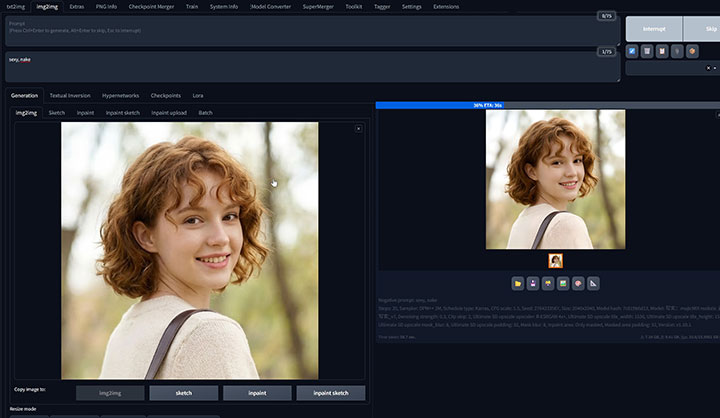
After the image is generated, check the result carefully. If the image looks too different from the original, lower the Denoising strength. If the image looks too soft or lacks detail, slightly increase the denoising value or try a different upscaler.
Keep in Mind:
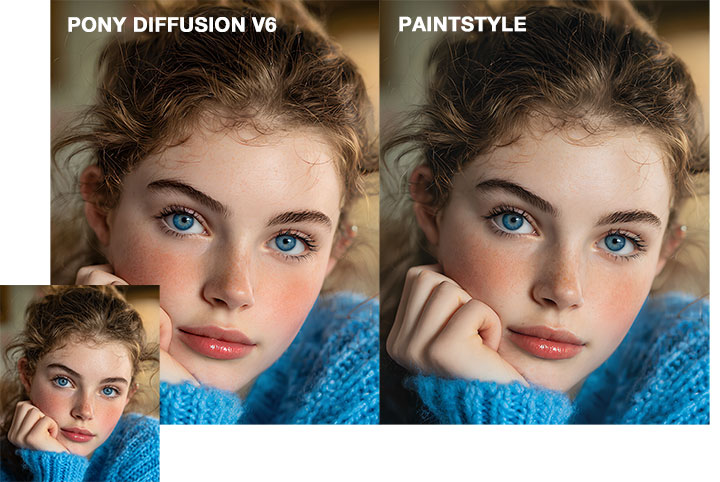
Ultimate SD Upscale is not a standalone AI model. It works through img2img and uses the currently loaded Stable Diffusion checkpoint to redraw details during tiled upscaling. This means the final result depends not only on the upscaler, tile size, and denoising strength, but also on the base model you choose. For realistic photos, use a realistic checkpoint. For anime or illustration-style images, use an anime-focused checkpoint. If the checkpoint does not match the image style, the result may look unnatural or drift away from the original.
How to Use Ultimate SD Upscale in ComfyUI
Ultimate SD Upscale is also available for ComfyUI through the ComfyUI_UltimateSDUpscale custom nodes. Unlike AUTOMATIC1111 WebUI, ComfyUI does not use the img2img Script drop-down menu. Instead, you need to install the custom nodes and add the Ultimate SD Upscale node to your ComfyUI workflow.
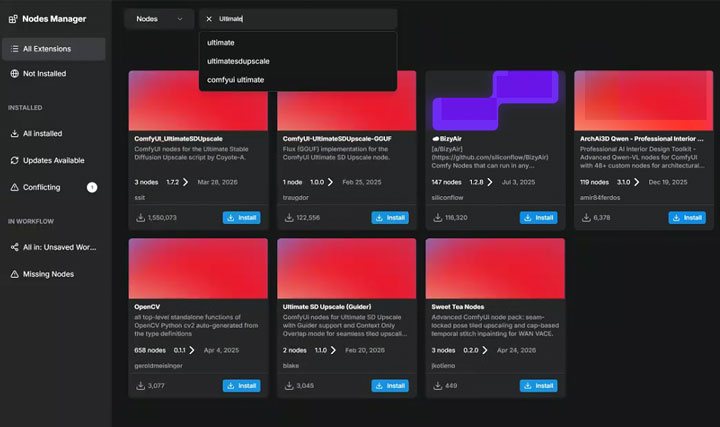
Step 1. Install ComfyUI_UltimateSDUpscale
Open ComfyUI Manager, choose Custom Nodes Manager, search for UltimateSDUpscale, and install the latest version. Restart ComfyUI when prompted.
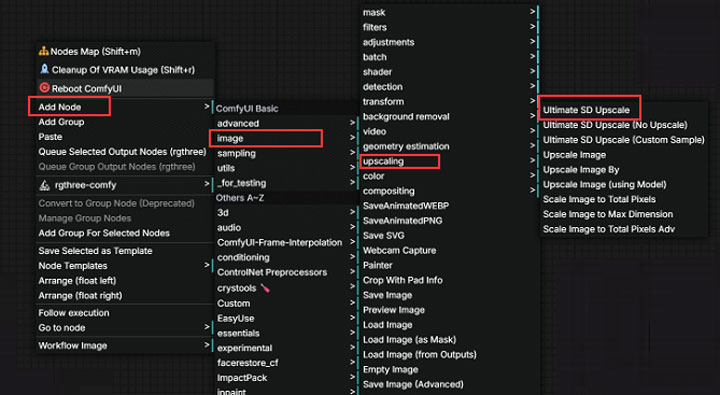
Step 2. Add the Ultimate SD Upscale Node
Right-click in the ComfyUI canvas and find the node under image/upscaling
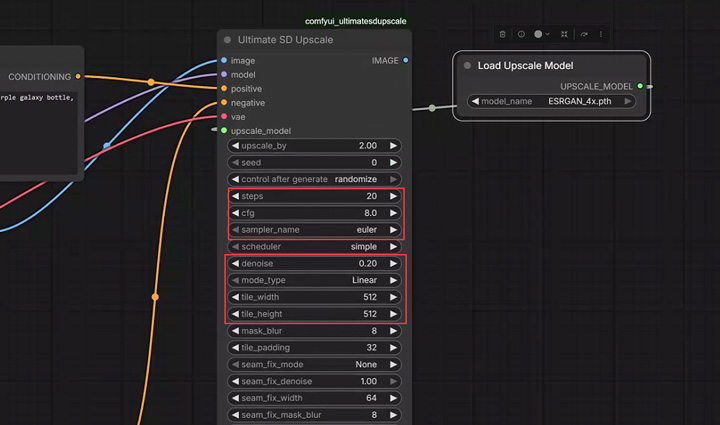
Step 3. Connect the Required Inputs
In a normal workflow, you load a checkpoint with Load Checkpoint, encode your prompt with CLIP Text Encode, load an upscaler model with Load Upscale Model, and then connect everything to the Ultimate SD Upscale node. The node performs an image-to-image diffusion process on large images in tiles, which helps improve details while reducing hardware requirements.

Step 4. Set the Upscale and Tile Settings
For a first test, you can start with settings like:
- Upscale by: 2
- Tile width: 512
- Tile height: 512
- Steps: 16–25
- Denoise: 0.15–0.35
- CFG: 6–8
- Mode: Linear
- Seam fix: Off or default
For a deeper explanation of what each setting means and how to adjust it, see the section below.
Step 5. Queue the Workflow
Once the nodes are connected and the settings are ready, click Queue Prompt to run the workflow. ComfyUI will upscale the image in tiles instead of processing the entire large image at once. If the result shows visible seams, try increasing tile overlap or padding-related settings if available, lowering denoise, or switching the tile mode from Linear to Chess. If you run into VRAM errors, reduce the tile size or upscale by 2x first instead of jumping directly to 4x.
Optional: Use Ultimate SD Upscale No Upscale
ComfyUI_UltimateSDUpscale also includes a No Upscale version of the node. This is useful when your image is already upscaled and you only want to run tiled image-to-image refinement. The project documentation describes this as a version that skips the upscale inputs and assumes the input image is already enlarged.
Shared Ultimate SD Upscale Workflows You Can Try
If you do not want to build an Ultimate SD Upscale workflow from scratch, you can also start with shared workflows created by other Stable Diffusion users. This is especially useful in ComfyUI, where workflows can be saved, imported, and modified more easily.
- 4k Resolution Upscale (8x) + ControlNet Tile Resample: In depth with resources
- Wan 2.2 Text2Video with Ultimate SD Upscaler
- Ultra-High Resolution with Ultimate SD Upscale Workflow
However, do not treat every shared workflow as a perfect one-click solution. Different workflows may use different checkpoints, VAEs, upscalers, ControlNet models, LoRAs, tile sizes, denoising values, and custom nodes. Before running a workflow, check which models and custom nodes it requires, and adjust the settings based on your own image style and hardware.
Understand Ultimate SD Upscale Settings: Dive Deep
The settings in Ultimate SD Upscale may look different in AUTOMATIC1111 WebUI and ComfyUI, but the core logic is similar. You are choosing how much to upscale the image, how large each tile should be, how strongly Stable Diffusion should redraw the image, and how closely the final result should follow the original.
1. Upscaler
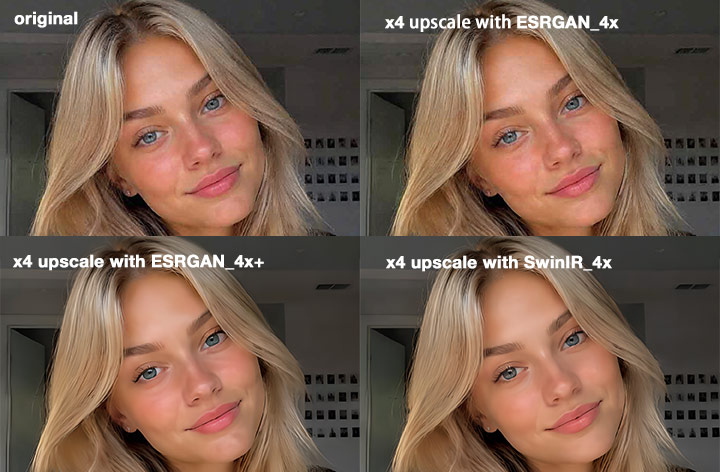
For Upscaler, choose an upscaling algorithm based on your image type and desired result. For general use, start with R-ESRGAN 4x+. For anime or illustration-style images, try an anime-focused upscaler if available. Different upscalers produce different levels of sharpness, texture, and detail, so it is worth testing a few options.
2. Scale or Upscale By
Scale, or Upscale by in ComfyUI, decides how much larger the final image will be. A value of 2 means the image will be enlarged to 2x its original size. For beginners, 2x is a safer starting point because it is easier on your hardware and gives you a chance to check the result before going larger. A 4x upscale can produce a much larger image, but it also takes longer and may increase the chance of seams, artifacts, or unwanted detail changes.
3. Type or Tile Mode
Type controls how Ultimate SD Upscale redraws the image tiles. Linear processes tiles one by one and works well for most images. Chess processes tiles in a checkerboard pattern and may help reduce visible seams. None disables the redraw step, so it is usually only used when you want to run a seam-fixing pass on an already upscaled image.
4. Tile Width and Tile Height
Tile Width and Tile Height set the size of each tile processed at a time. Larger tiles give the AI more surrounding context and may reduce artifacts, but they also require more VRAM. Smaller tiles are easier on your hardware but may increase the chance of seams or inconsistent details. For a first test, 512 is a practical starting point. In AUTOMATIC1111, setting Tile Height to 0 makes it follow the Tile Width value.
5. Sampling Method
Sampling method controls how Stable Diffusion performs the denoising process during img2img upscaling. There is no single best sampler for every image. Euler and DPM++ 2M Karras are both good starting options. The best choice may vary depending on your checkpoint, image style, and desired sharpness.
6. Sampling Steps
Sampling steps decide how many denoising steps Stable Diffusion uses during the redraw process. More steps can sometimes improve details, but they also increase processing time and do not always produce a better result. For Ultimate SD Upscale, 16 to 25 steps is a practical starting range for most images.
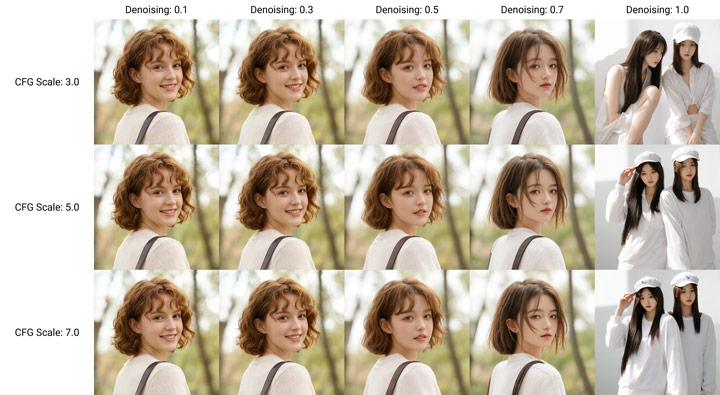
7. Denoising Strength
Denoising strength is one of the most important settings in Ultimate SD Upscale. It controls how much Stable Diffusion is allowed to redraw the image.
If you want to preserve the original image closely, use a lower denoise value such as 0.15 to 0.25. If you want stronger detail enhancement, try 0.3 to 0.4. Higher denoise values can create more detail, but they may also change faces, textures, text, small objects, clothing, or background elements.
8. CFG Scale
CFG scale controls how strongly Stable Diffusion follows your prompt. For Ultimate SD Upscale, 6 to 8 is usually a safe starting range. Since the goal is upscaling rather than creating a completely new image, avoid setting CFG too high. A very high CFG value may make the output over-follow the prompt and drift away from the original image.
9. Prompt and Negative Prompt
The prompt helps guide the details Stable Diffusion adds during tiled upscaling. If the image was generated in Stable Diffusion, you can reuse the original prompt. For local images, use a simple prompt that describes the image, such as “a detailed portrait photo, natural skin texture, sharp details, soft lighting.”
A negative prompt can help reduce unwanted artifacts. For example, you can use terms such as “blurry, low quality, distorted face, bad anatomy, artifacts.” The higher your denoising strength is, the more important the prompt becomes.
10. Seam Fix
Seam Fix is used to reduce visible tile borders or grid-like artifacts. For your first run, it is usually fine to leave it off or at the default setting. If you notice seams between tiles, you can enable or adjust Seam Fix, increase padding or mask blur, try Chess mode, or slightly reduce denoising strength.
11. Base Model or Checkpoint
Ultimate SD Upscale is not a standalone AI model. It uses your current Stable Diffusion checkpoint to redraw details during tiled upscaling. This means the final result depends heavily on the base model you choose. For realistic photos, use a realistic checkpoint. For anime or illustration-style images, use an anime-focused checkpoint. If the checkpoint does not match the image style, the result may look unnatural, over-stylized, or drift away from the original.
Advanced Ultimate SD Upscale Settings and Troubleshooting
Once you are familiar with the basic Ultimate SD Upscale workflow, you may still run into a few common issues when working with larger images. The most common problems include visible seams between tiles, CUDA out-of-memory errors, slow processing, or unwanted changes in fine details. This section covers a few advanced Ultimate SD Upscale settings and workflow tips to help you reduce tiling artifacts, improve stability, and preserve the original image structure more effectively.
How to Fix Ultimate SD Upscale Seams and Tiling Artifacts
The most common issue with tiled upscaling is the appearance of faint grid lines where the tiles meet. These seams occur when the AI processes two adjacent squares with slightly different lighting or noise interpretations. To fix this, you must adjust the Padding and Mask Blur settings within the script.
Padding tells the AI to look at a small area of the neighboring tiles to get context before it starts drawing. Setting this to 32 or 64 pixels is usually enough to ensure color consistency across the borders. Mask Blur further assists by softening the edges of each tile, allowing them to blend together more naturally. You should also consider changing the Upscale Type to Chess. This staggered processing order is often more effective at hiding seams than the standard linear row by row method.
How to Prevent Ultimate SD Upscale Crashes and VRAM Errors
Even though Ultimate SD Upscale renders the image in tiles, crashes can still happen near the final export stage. This is often caused by the VAE decoding step. After the image is generated, the VAE needs to turn the latent result into the final visible image, and it may try to handle the whole large image at once. That sudden memory spike can easily cause VRAM errors, especially on 8GB or 12GB GPUs.
A simple fix is to install and enable the Tiled VAE extension. It breaks the final decoding process into smaller parts, just like tiling does during the upscale itself. In most cases, it runs quietly in the background and does not affect the look of the final image. It simply reduces the memory load, making large exports, including 8K images, much more stable on lower-VRAM systems.
A Simpler Way to Upscale Images Without Stable Diffusion Setup
Ultimate SD Upscale is great if you want to micro-manage every pixel, but its complex settings and generative repainting process can sometimes alter the original image details. If you want a simpler way to get high-fidelity upscaling results, VideoProc Converter AI is a more practical option. It lets you upscale images with a simple click, without a steep learning curve or complicated setup. More importantly, it focuses on enhancing the original image rather than repainting it from scratch.

VideoProc Converter AI - What I Love Most About It
- 1-click image/video upscaling: No complicated setup/workflow/tweaking.
- Upscale images to 8K/10K while fixing noise, blur, and more artifacts.
- Keep the natural look and feel of your photo. No artificial-looking details.
- Rich AI tools: restore faces in photos, colorize images, enhance videos to 4K...
- All-in-one: Convert, compress, edit, downlaod videos, and more.
Summary of the Optimal Workflow
The best results come from a patient, layered approach. Rather than trying to upscale an image by 4x in a single pass, it is often better to do two separate 2x upscales. This gives the AI two opportunities to refine the details. Start by sending your image to img2img, set your scale to 2, choose 4x-UltraSharp, and keep your denoising at 0.35. Once that is done, take the resulting image and run the process one more time. This cumulative method builds a depth of texture and sharpness that a single large jump simply cannot match. By mastering these specific parameters, you can consistently produce high resolution AI art that maintains its quality even when viewed at full size.


