Key Takeaway: Numerous factors can cause Premiere Pro audio not playing. If the sound is missing from all clips, the problem is most likely with the default audio device of your system. If your audio not playing in Premiere Pro only with specific clips, re-encoding the audio to a compatible format is a one-shot fix.
Open a project and find no sound in Adobe Premiere Pro? Is Premiere Pro MP4 audio not working halfway through the edit? Drag the video to the timeline, and it did get imported, but the audio doesn't show in the timeline?
Why is my audio not playing in Premiere Pro? A range of different reasons can cause these issues, and any of them can be frustrating. So here in this article, we list all the possible and proven solutions to the Premiere Pro audio not playing problem. Follow this troubleshooting checklist to fix the issue quickly and effectively.
Premiere Pro Not Playing Audio through Headphones
Your computer may have multiple devices that play audio, such as internal speakers, external speakers, headphones with microphones, etc. Audio hardware issues are common when moving between these devices. If the device is wrong, there may still have no sound in Premiere Pro.
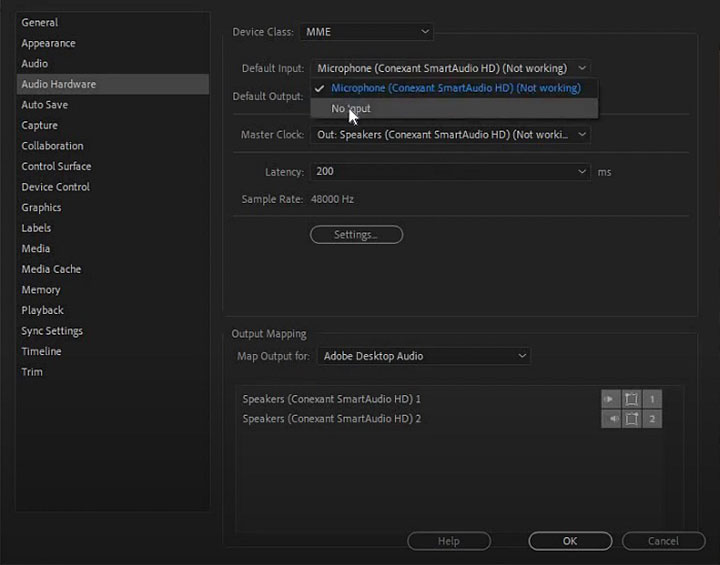
Change the System Default Audio Device
If the premiere pro audio track not playing problem is caused by multiple audio devices, set your preferred device as the Default Input device in Premiere Pro should work. Go to Preferences > Audio Hardware, and check the system's default sound playback device. You may need to change the device, then test one by one if there's more than one device connected.
Premiere Pro Audio Not Showing in Timeline
Besides the no sound during playback issue, you may also encounter the situation where Premiere Pro audio not playing in timeline. You drag an MP4 video clip to the timeline, but the audio track just doesn't show up. One of the most likely causes is the A1 source patching toggle is disabled. All you need to do is to go ahead and enable it.
Select the Audio Channel
The A1 and V1 furthest to the left will determine what you can import into the timeline. So if only the V1 toggle is selected, you can only import the video to the timeline. This will cause your MP4 to have no audio in Adobe Premiere Pro. Conversely, if only the A1 option is selected, you'll only be able to import audio.

Re-encode the Video File with Compatible Codecs
If you've completed the steps above and still got no audio, your video clips could have been encoded with an incompatible codec. Premiere may have trouble importing files with a codec that is not supported. So the final method is to check for incompatible formats and codecs, and if so, re-encode the file with a versatile transcoder. Even better, this transcoder's AI audio cleaner supports a wide range of formats, including OGG, MKV, and other formats that Premiere Pro does not support yet.
VideoProc Converter AI - Transcode Video Files Quickly for Further Editing
- Runs under both windows and macOS.
- Supports 370+ codecs and 420+ file format conversion.
- Transcodes almost any files at high speed with Hardware Acceleration.
- Handles 4K/8K/HDR uncompressed video formats from professional camcorders.
- Removes background noise from audio/video automatically with AI noise remover for recordings...

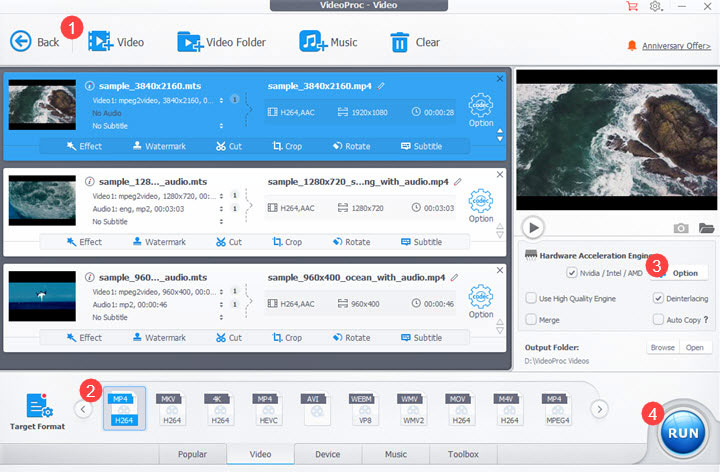
Follow the steps below to re-encode your video files and fix Premiere Pro audio track not playing.
- Launch VideoProc Converter AI and choose the Video icon on the main interface.
- Import your video file by clicking the +Video button or simply dragging and dropping it.
- Choose the most common format (MP4 H.264) as the output format.
- Tick off NVIDIA/Intel/AMD to enjoy faster conversion boosted by GPU acceleration.
- Click RUN to start re-encoding.
Premiere Pro Audio Not Playing
Numerous factors can cause audio not playing in Premiere Pro in timeline or through headphones. If none of the above methods work, here are some other workarounds. Perform the following steps to fix the Premiere audio not playing issue.
1. Play in VLC to Check
Ensure there's no problem with the imported file itself first. It doesn't have to be VLC. Any media player will do. The purpose is to check for muted or low track volume.
For Mac users, installing QuickTime Player can also help solve the MP4 no audio in Adobe Premiere issue. Just install QuickTime Player and quit. Then re-import the video file to Premiere, and you may fix the problem.
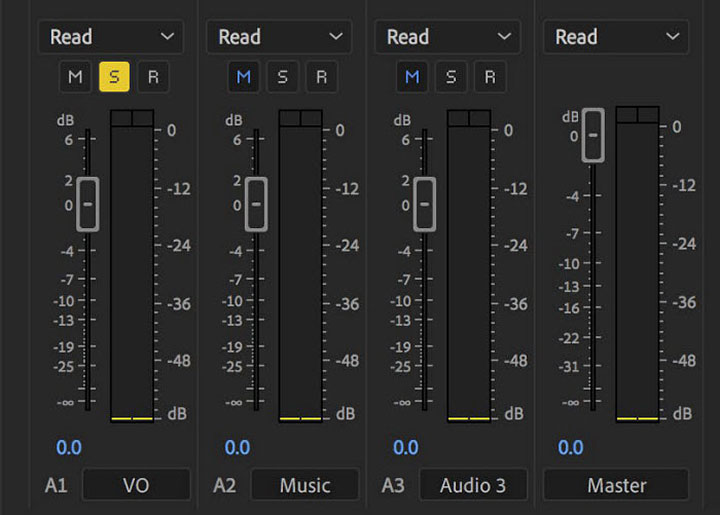
2. Solo and Unsolo the Track
Another reason that may cause Premiere no sound is the Mute and Solo button. You can easily silence all other tracks temporarily with the button. Make sure to solo and unsolo (or mute and unmute) each audio track to check if you selected it accidentally and unintentionally.
Also, don't forget to check the master volume panel. Toggle off the S button if you've accidentally selected it by mistake. Thus, you can fix the video with no audio issue.
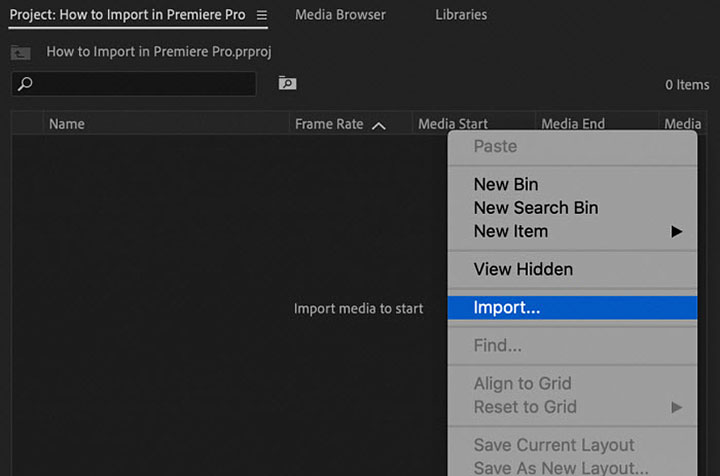
3. Use the Media Browser to Import Media
The video and audio tracks may store separately for some file formats, including MTS, MOV, and MP4. If you use the import dialog to load files, Premiere may import the video from one directory and ignore the audio in another directory. It may also cause the Adobe Premiere Pro audio not working problem.
Delete the clip and re-import it using the Media Browser, as opposed to the Import Dialog. You may get your audio back.
4. Clear the Media Cache Files & Database
Premiere creates cache files for faster performance once you import and work with the media files. These cache files will have CFA and PEK extensions. Besides, links will also be created for these cache files in the Media Cache Database. The longer the time, the larger the database and media cache files will be. It may help solve the audio not playing issue to delete these cache files and database, then re-import and re-link the clips.
Step 1. Exit Premiere and other Adobe programs.
Step 2. Go to the corresponding file path.
- Windows: C:\Users\\AppData\Roaming\Adobe\Common\Media Cache Files
- Mac: /Users//Library/Application Support/Adobe/Common
Step 3. Clear the Media Cache Files and Database by deleting the folders.
Step 4. Relaunch Premiere and open your project.


