
Screenshots are incredibly useful for a variety of reasons. Whether you want to share information with others, create tutorials, report bugs, or simply save something for later reference, knowing how to take a screenshot on your Chromebook is a valuable skill.
And luckily, in this guide, we'll walk you through 3 different methods to capture screenshots on your Chromebook easily and effectively.
How to Screenshot on Chromebook? Jump to the Solution for detail steps:
- Method 1: Use Keyboard Shortcuts
- Method 2: Use the Screen Capture Tool
- Method 3: Use a Chrome Extension
Method 1: Use Keyboard Shortcuts to Screenshot on Chromebook
First, Chromebooks have a handy feature that allows you to capture screenshots using keyboard shortcuts.
For Full-Screen Screenshot
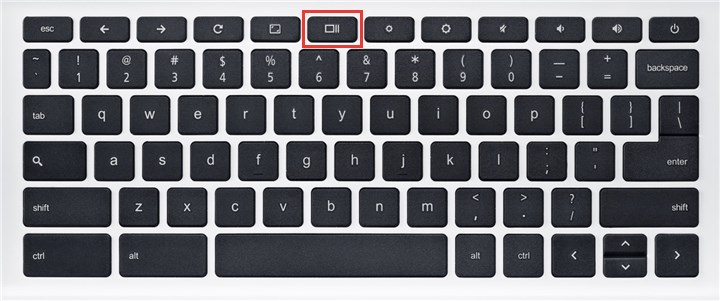
To capture a full-screen screenshot on your Chromebook, simply press the Ctrl and the Show windows keys simultaneously. The Show windows key is typically located in the top row of your keyboard, between the Fullscreen and Brightness down keys. When you press these keys together, a screenshot of your entire screen will be saved.
For Partial Screenshot
If you only want to capture a specific area of your screen, you can use the Ctrl, Shift, and Show windows keys. Press and hold these keys, then drag your cursor to select the desired area. Once you release the keys, a screenshot of the selected area will be saved.
Copy Screenshot to Clipboard
If you want to copy the screenshot to your clipboard instead of saving it as a file, you can use the Ctrl + C shortcut. After taking the screenshot using one of the methods mentioned above, press Ctrl + C to copy it to your clipboard. You can then paste the screenshot into any application or document using the Ctrl + V shortcut.
Tips and Tricks for Using Keyboard Shortcuts
1. Finding the Show Windows Key: The location of the Show windows key may vary depending on the model of your Chromebook. Look for an icon that resembles a rectangle with two vertical lines on either side. This key is typically located in the top row of your keyboard.
2. Accessing and Editing Screenshots: By default, screenshots are saved in the Downloads folder on your Chromebook. You can access and edit them by opening the Files app and navigating to the Downloads folder. From there, you can rename, move, or delete your screenshots as needed.
3. Changing the Default Screenshot Format: By default, Chromebooks save screenshots in the PNG format. If you prefer to save them as JPG files, you can change the default format in the Settings. Go to Settings > Keyboard > Screen capture > Save as > JPG.
4. Capturing Screenshots of Specific Monitors: If you have multiple displays connected to your Chromebook and want to capture a screenshot of a specific monitor, you can do so using the keyboard shortcuts mentioned above. Simply press Ctrl + Show windows key and the number of the monitor you want to capture (e.g., Ctrl + Show windows key + 1 for the first monitor). For partial screenshots, use Ctrl + Shift + Show windows key and the monitor number before dragging the cursor.
Method 2: Use the Screen Capture Tool to Screenshot on Chromebook
Besides the keyboard shortcuts, there is a built-in screen capture tool in Chromebook which can help us take a screenshot.capture tool.
To begin, open the Quick Settings menu by clicking on the time in the bottom right corner of your Chromebook's screen. From there, you'll see a variety of icons, and one of them is the Screen capture icon. Click on it to open the screen capture tool.
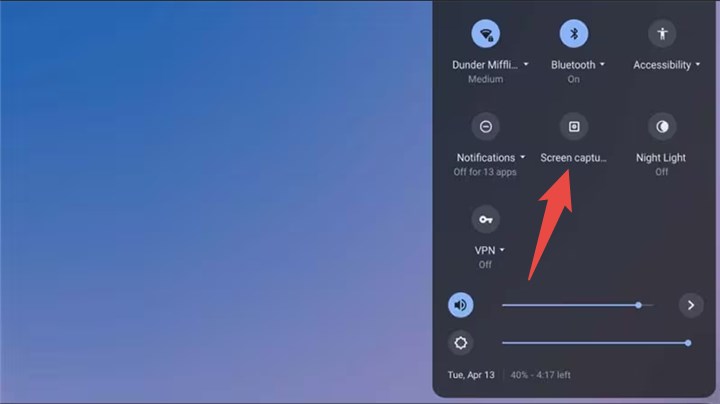
Tip: If you can not find this tool there, you may have disabled it by accident or for some reason before. Anyway, here is how to enable it: Click on the Customize button in the Quick Settings menu, then scroll down to the Quick settings section. From there, you can toggle the Screen capture switch on to enable it again.
Once the tool is open, you'll have the option to choose your capture mode. You can select between full-screen, window, or partial capture, depending on your needs. After selecting the desired mode, simply click the Capture button to take a screenshot.If you want to add some annotations or make edits to your screenshot, you can do so using the annotation tools provided in the screen capture tool. Once you're satisfied with your edits, you have the option to either copy the screenshot to your clipboard or save it directly.
The screen capture tool on Chromebook offers several advantages that make it a valuable tool for taking screenshots. Firstly, it provides more options and features compared to keyboard shortcuts. With the screen capture tool, you can easily annotate your screenshots, set a timer for delayed captures, and even capture audio using the microphone.
Additionally, the screen capture tool is great for users who prefer a visual interface and find it easier to navigate through menus rather than memorizing keyboard shortcuts. It's also a useful tool for users who may not have physical keyboards, such as those using Chromebooks with touchscreen capabilities.
While the screen capture tool offers a range of features, it does have a few drawbacks. One disadvantage is that using the screen capture tool can be slower and less convenient compared to using keyboard shortcuts. With keyboard shortcuts, you can take a screenshot with a simple key combination, whereas with the screen capture tool, you need to open menus and navigate through options.
Another disadvantage is that the screen capture tool requires an internet connection to function. This means that if you're in an area with limited or no internet access, you won't be able to use the tool to take screenshots.
Method 3: Use a Chrome Extension to Screenshot on Chromebook
The third way is about using some Chrome extensions to take screenshots on a Chromebook, with more flexibility and functionality.
Step 1: Install a Chrome Extension
To get started, you'll need to install a Chrome extension that allows you to take screenshots. There are many options available, here Nimbus is recommended.
Nimbus is a versatile and powerful tool that allows me to capture screenshots and record videos of any web page or app on my chromebook. I can easily choose the capture mode, edit the screenshots and videos, and save or share them online. The extension has a user-friendly interface and customizable settings that suit my preferences and needs.
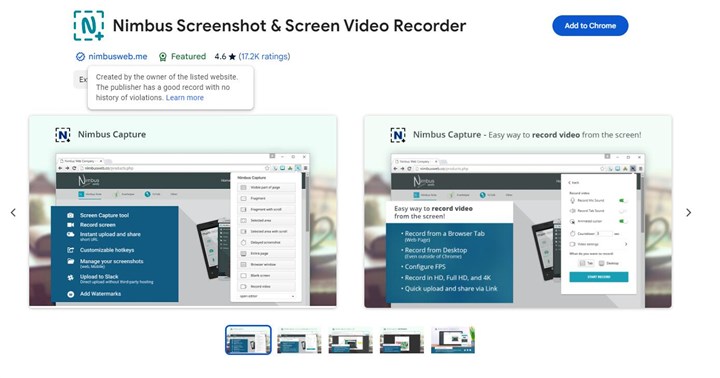
Some of the things that I like about Nimbus Screenshot & Screen Video Recorder are:
- It supports horizontal scrolling and full-page capture, which is very useful for long web pages.
- It has a built-in editor that lets me annotate, crop, resize, blur, and add graphics and text to my screenshots and videos.
- It can record video from my screen and webcam, and also add my own watermark and microphone sound.
- It can convert video to gif and mp4 formats, and also trim and crop the video recordings.
- It can upload and share my screenshots and videos to various platforms, such as Nimbus Note, Google Drive, Dropbox, Youtube, and Slack.
You can find some other extensions in the Chrome Web Store. Simply search for the desired extension, click on "Add to Chrome," and follow the prompts to install it.
Step 2: Open the Screenshot Menu
Once the extension is installed, you'll see an icon for it in the browser toolbar. Click on the icon to open the screenshot menu.
Step 3: Choose Capture Mode
In the screenshot menu, you'll have the option to choose the capture mode. Depending on the extension you're using, you can select full-screen, visible part, selected area, or entire page.
Step 4: Capture the Screenshot
After selecting the capture mode, click the "Capture" button to take the screenshot. The extension will capture the screen according to your chosen mode.
Step 5: Edit and Save the Screenshot
Many Chrome extensions also offer editing tools to enhance your screenshots. You can crop, resize, annotate, or blur the screenshot as needed. Once you're satisfied with the edits, click the "Save" or "Download" button to save the screenshot to your device.
Note: Using a Chrome extension to take screenshots on a Chromebook comes with its own set of benefits and drawbacks.
Pros:
- Flexibility and Functionality: Chrome extensions often provide more features and options compared to the built-in screenshot tool, such as scrolling capture, cloud storage, and sharing options.
- Improved Editing Tools: Extensions like Nimbus, Awesome Screenshot, and Lightshot offer robust editing tools that allow you to crop, resize, annotate, and blur your screenshots, making them more visually appealing and informative.
Cons:
- Installation and Permissions: Chrome extensions require installation and may ask for certain permissions to access your browser and device. Some users may be hesitant to grant these permissions.
- Compatibility Issues: Some websites or apps may not be compatible with certain Chrome extensions, limiting their functionality in certain scenarios.
- Potential Performance Impact: Installing multiple Chrome extensions, especially those that capture and edit screenshots, may affect the performance of your browser and Chromebook.
Conclusion
Taking screenshots on a Chromebook is a simple and convenient process. Whether you prefer using keyboard shortcuts, the built-in tool, or the Chrome extensions, there's a method that suits your needs. Now that you know how to capture screenshots on your Chromebook, you can easily share information, create tutorials, report bugs, and save important information with just a few clicks.


