
In the digital age, images are a fundamental part of communication, art, and information sharing. Whether you're preparing a photo for print, optimizing images for your website, or simply trying to save space on your device, understanding how to effectively change the resolution of an image is a vital skill. However, changing an image's resolution is not a one-click affair—it involves a nuanced understanding of several interrelated factors that can significantly impact the outcome.
In this post, we'll dive into the essential aspects of changing image resolution, including pixel size, DPI (dots per inch), and dimensions, to ensure you achieve the best results without compromising on quality. By troubleshooting these critical elements, you'll decrease and increase image resolution with confidence and precision. Let's embark on this visual journey to mastering image resolution adjustments.

How to Change Resolution of Image in Photoshop
Continuing from the introduction, let's navigate through the process of changing an image resolution in Photoshop, a powerful tool used by professionals and enthusiasts alike. By carefully adjusting the resolution and considering the interplay between pixel size, DPI/PPI, and dimensions, you can tailor your images to meet specific needs without sacrificing quality. Photoshop's flexibility and powerful tools make it an ideal platform for these adjustments, whether for professional printing or optimizing for digital use. Here's how to change photo resolution in it.
Step 1. Import an image to Photoshop.
Open Photoshop. Click "File" and import your image to it.
Step 2. Open Image Size settings.
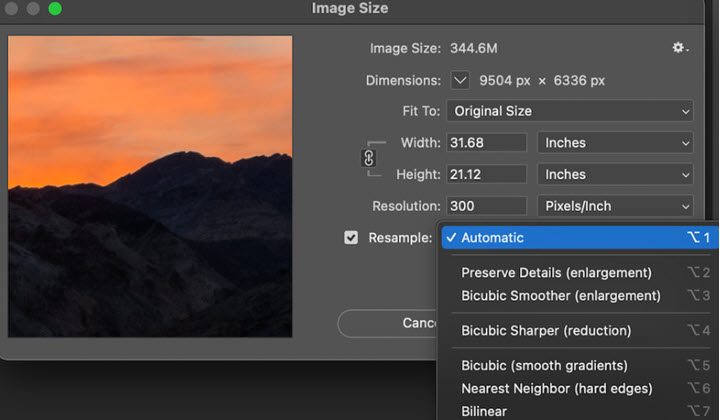
Go to "Image" > "Image Size". Now yo can see multiple options in the Image Size dialog box:
- Dimensions: Displayed in pixels, this shows the current size of your image.
- Resolution: Measured in pixels per inch (PPI), this dictates the quality of your image. Note that DPI is used in the context of printing, whereas PPI refers to screen display.
- Width and Height: Here, you can adjust the physical size of the image, typically measured in inches or centimeters for printing purposes.
Step 3. Change the image resolution.
If you aim to change the size of your image (for example, for a website), check the "Resample" box. This allows you to alter the pixel dimensions directly, which in turn changes the size of the file.
Select a resampling method. "Automatic" works for most cases, but if you're reducing the image's size, "Bicubic Sharper (reduction)" is a good choice. For increasing size, "Preserve Details 2.0" might offer better results.
Enter new values for Width and Height, or simply adjust the Resolution. Photoshop will recalculate and change the other values accordingly to maintain the aspect ratio, unless you deselect the link icon between Width and Height fields.
Tips: To change the resolution (PPI) without changing the image size, uncheck the "Resample" box. This disconnects the number of pixels from the dimensions, allowing you to increase or decrease PPI without affecting the pixel dimensions. This is crucial for print projects where clarity at a certain size is essential.
Step 4. Review and save.
Before applying changes, review the new dimensions and resolution to ensure they meet your requirements. Consider the final use of the image (e.g., print, web) when deciding on these values. Click "OK" to apply your changes.
Go to "File" > "Save As" to save the adjusted image. It's often wise to save a new version to preserve the original file.
Key Outcomes and Considerations
- For Web: Lower resolutions (72 to 150 PPI) are typically sufficient, as screen display requires fewer pixels. Reducing image dimensions can also help with faster loading times.
- For Print: Aim for a higher resolution (at least 300 DPI) to ensure clarity and detail. Remember, increasing resolution with "Resample" checked might not improve the quality of a low-resolution image.
How to Change Resolution of Image in Paint
Changing the resolution of an image in Microsoft Paint involves adjusting its dimensions (width and height) and indirectly affects its pixel size and pixels per inch (PPI). Here's how you can change the resolution of an image in Microsoft Paint, along with considerations for pixel size, PPI, and dimensions.
Step 1. Open the Paint app by searching Windows. Once it‘s open, click on "File" in the top left corner, then select "Open" and choose a picture from your computer.
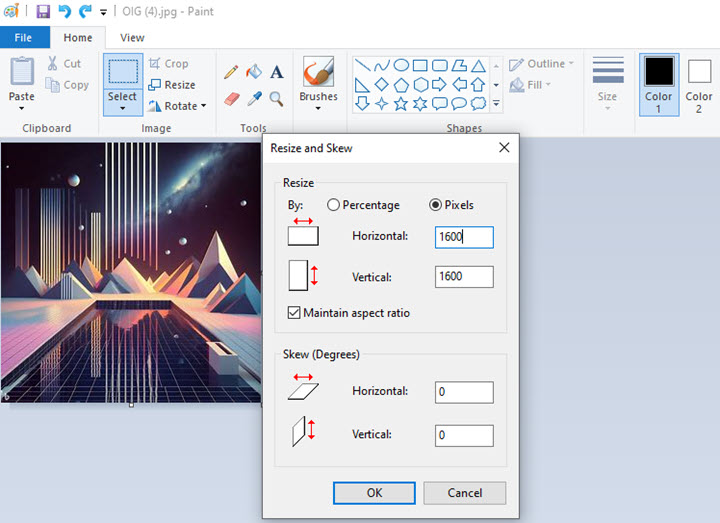
Step 2. Go to the Home tab and click the "Resize" option.
Step 3. Now you have two options to change the image resolution. Choose "Percentage" to scale the size of your image based on a percentage value. Or choose "Pixels" to specify the exact width and height in pixels.
Step 4. If you want to keep the image's proportions the same, make sure "Maintain aspect ratio" is checked. This will automatically adjust the other dimension when you change one, preserving the image's original appearance.
Step 5. Click "OK". Then, save your image by clicking "File" > "Save As", and choose your preferred file format. It's usually a good idea to save the resized image as a new file to preserve the original.
While Microsoft Paint is a useful tool for basic image editing, it lacks the advanced features found in other graphic editing software, such as Adobe Photoshop or GIMP, especially for detailed PPI adjustments. For tasks that require precise control over both pixel dimensions and PPI, considering a more advanced program might be beneficial.
How to Change Resolution of Image Online
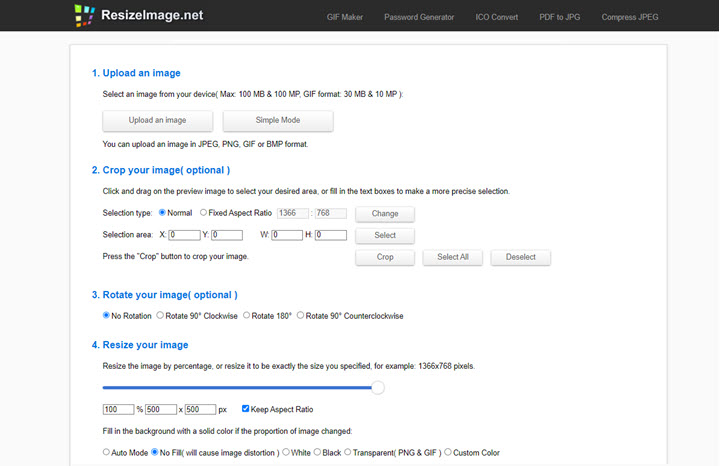
To change the resolution of an image online, you can use various websites or online tools that offer image editing capabilities. One popular tool you can use is resizeimage.net. On this website, you can change the resolution of an image on Mac, Windows, iPhone, and Android with internet connections. Here's how you can use this tool easily.
Step 1. Go to resizeimage.net in your web browser.
Step 2. Click on the "Upload Image" button to select the image you want to resize from your computer.
Step 3. Once the image is uploaded, you will see options to resize the image. Look for options like "Width" and "Height" or "Custom Size" where you can enter the desired resolution.
Step 4. Enter the new resolution values you want for your image. Click on the "Resize Image" button.
Step 5. Download the resized image to your device.
Remember that changing the resolution of an image may affect its quality, so it's essential to choose the new resolution carefully to maintain the image's clarity and sharpness.
How to Change Resolution of Image in VideoProc Converter AI
If you want to increase image resolution with super clarity, traditional image resizers may not work. Thanks to the fast-evolving AI technologies, here comes effective and simple AI tools. And VideoProc Converter AI is one of the best AI image upscalers and is particularly useful when working with low-resolution images and videos that need to be enhanced and displayed on larger screens.
It can identify intricate patterns and details in the source image, and then intelligently calculate necessary additions to the new pixels, leading to a significant up to 400% enhancement in resolution. This enhancement is achieved while maintaining the original details and without introducing any undesired artifacts. Furthermore, it offers various models designed to increase the resolution of real-life images and animated images more effectively, producing the best outcome.

VideoProc Converter AI – Best AI Image Upscaler for Windows 11/10 and Mac
- The latest and constantly updated AI models for pixel interpolation.
- Convert low-res images to high-res up to 10K and videos to up to 4K.
- Upscale, enhance, fix, and colorize old photo with easy clicks.
- Fast batch upscaling and restoring with full GPU hardware acceleration.
- Support images in JPG, JPEG, PNG, WebP, TIFF, BMP, GIF, etc.
![]() Excellent
Excellent ![]()
Free download VideoProc Converter AI and increase image resolution in 3 simple steps!

Step 1. Launch VideoProc Converter AI and click "Image AI" in the main interface. Drag and drop one or multiple images to its interface.

Step 2. Choose the suitable AI model. Set the scale to increase the image resolution by 2x, 3x, or 4x.

Step 3. Choose the output format and file folder. Click "RUN" to export.
Video Tutorial: How to Increase the Resolution of an Image to 4K/8K/10K with VideoProc Converter AI
Review 1: VideoProc Converter AI Super Resolution intelligently reconstructs footage, creating a naturally high-resolution and artifact-free look, unlike traditional upscaling methods that stretch pixels and cause blurriness.
Review 2: Whether you're dealing with real-life footage or animated content, this software revitalizes low-quality videos and vintage images, delivering enhancements without introducing any visual distortions.
![]() Excellent
Excellent ![]()


