Unlike other Windows PCs, the Surface Pro combines the power of a laptop with the portability of a tablet, making it a popular choice for professionals and creatives alike. However, you may get stuck in a basic screenshot feature, wondering how to take a screenshot on Surface Pro. Well, it's quite different from Windows laptops and desktops when taken as a tablet.
In this article, we'll show you several methods to take a screenshot on Surface Pro with and without the keyboard. And at the end of the post, we also show you some tips to make the screenshots clearer and bigger. Just keep reading.
1. How to Take a Screenshot on Surface Pro with Physical Buttons
A lot of people use the Surface Pro as a tablet without keyboards, so using physical buttons is the easiest way to take screenshots. Just keep in mind that different versions of the Surface Pro might have different buttons for screenshots, so knowing the right ones for your device is key.
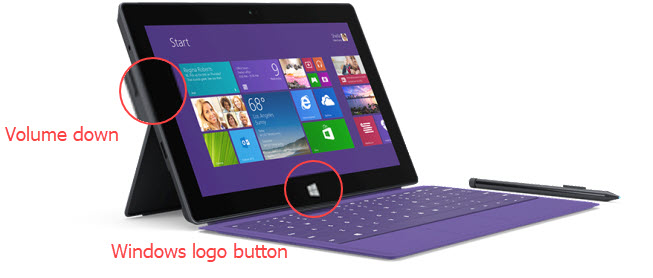
Surface Pro 3 and Earlier
Step 1. Press and hold the volume down button and the Windows logo button simultaneously.
Step 2. Open "This PC" > "Pictures" > "Screenshots", and you can see the captured screenshot.
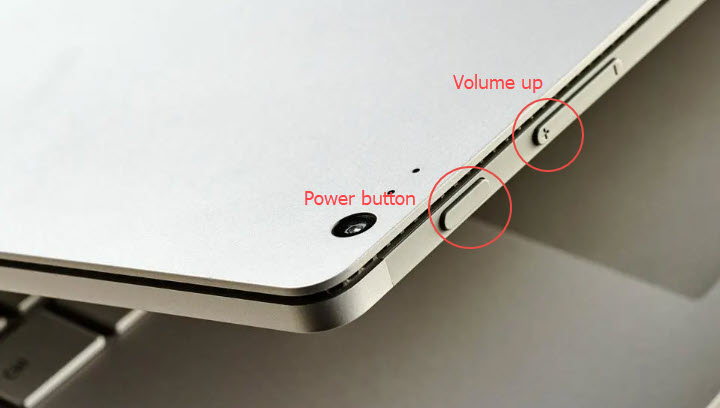
Surface Pro 4 and Later
Step 1. Press and hold the volume up button and the power button simultaneously.
Step 2. Find the screenshot in "This PC" > "Pictures" > "Screenshots".
2. How to Take a Screenshot on Surface Pro with Keyboard
While, if you have a keyboard connected to your Surface Pro, this is nothing different from desktop or laptop computers. In a Surface Pro with Windows 10 and Windows 11, you have three ways to activate the Snipping Tool to take a screenshot with a keyboard.
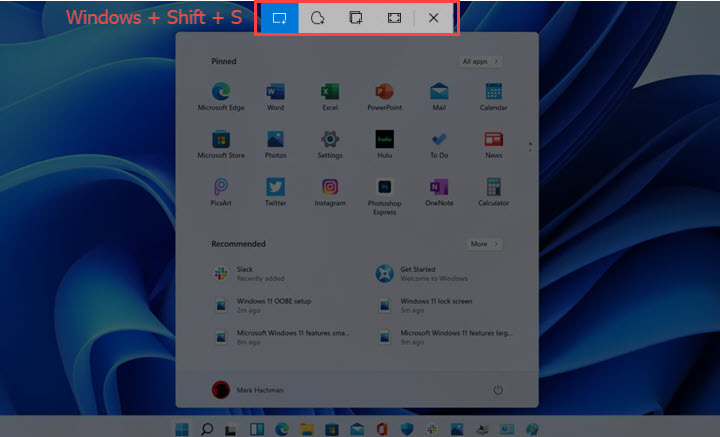
Method 1. Press the Windows logo key + Shift + S on the keyboard. Select a specific area or the full screen. Then paste the screenshot wherever you need it.
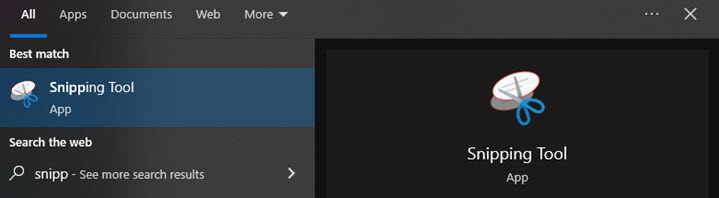
Method 2. Press the Windows logo key + S. Enter and search the snipping tool. Click New and decide on the capturing area. Then you can edit and save the screenshot to your computer.
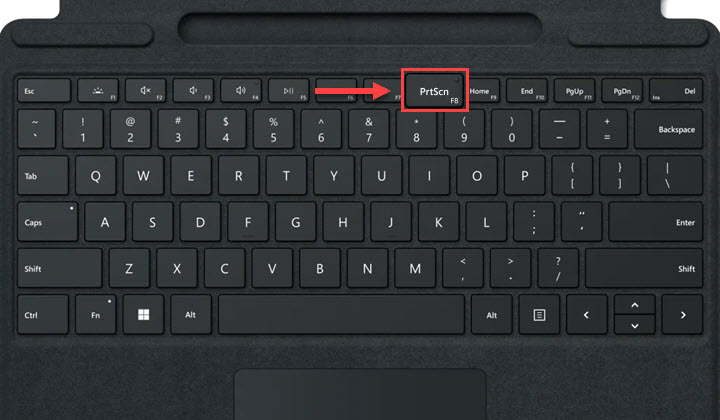
Method 3. Press PrtScn (Print Screen). This is going to grab the whole screen. Then paste the screenshot where you want to share or edit.
Tips: If your Surface Pro is running on Windows 11, press Windows + Shift + R, and you can record screen on Windows 11.
3. How to Take a Screenshot on Surface Pro with a Surface Pen
The Surface Pen is a digital stylus designed for use with Microsoft Surface devices. It uses advanced technology to capture precise pressure sensitivity, tilt, and almost no lag. To capture screenshots on Surface Pro, make sure the pen is paired with it via Bluetooth.
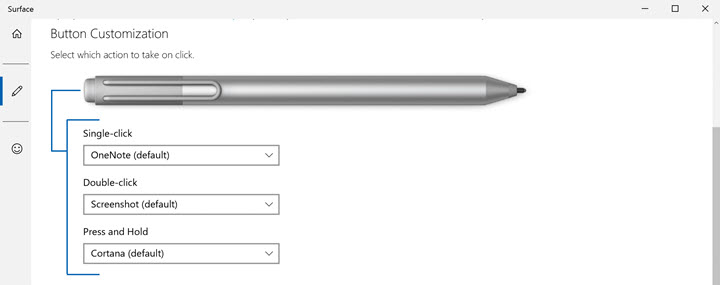
Step 1. Double-click the top button of the pen.
Step 2. Then it will take a screenshot and open it in the Snipping Tool.
Step 3. Edit and save the screenshot.
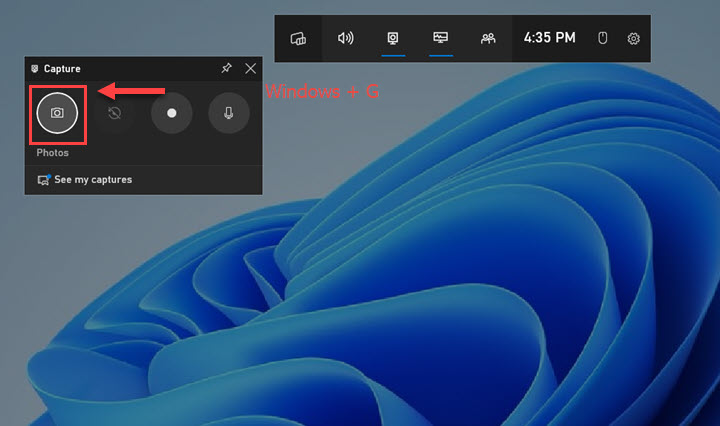
4. How to Take a Screenshot on Surface Pro with Xbox Game Bar
Xbox Game Bar is a built-in screen recorder in Windows 10 and Windows 11 that allows you to take screenshots, record gameplay, and access various gaming features. The only drawback is that Game Bar does not let you customize the screenshot and only takes screenshots of the entire screen on Surface Pro.
To use Xbox Game Bar to take screenshots on a Surface Pro, you can follow these steps.
Step 1. Press Windows and G at the same time.
Step 2. Click the camera icon in the Game Bar widget.
Step 3. Open "This PC" > "Videos" > "Captures". Now you can see the screenshot in PNG format.
Pro Tips: How to Enhance Surface Pro Screenshots with AI
When you take a screenshot, it captures an image of what is currently displayed on your Surface Pro screen. Most Surface Pro devices have a screen resolution of around 1080p or 2K. If you view these screenshots on a larger screen, like 4K or 8K, they may appear slightly blurry, especially when you select a part of the screen to capture.
To enlarge the screenshot without losing quality, try the AI image upscaler, VideoProc Converter AI. It can scale up images up to 10K with crisp and clear details, suitable for screenshots of text documents, small tabs, icons, and so on.

VideoProc Converter AI - AI Video and Image Enhancer for Surface
- Upscale images up to 10K and videos to 8K effortlessly.
- Restore, remove noise, sharpen, and fix low-quality images with AI.
- Batch process, no watermark, 47x real-time faster by full GPU acceleration.
- Support JPG, PNG, WEBP, BMP, TIFF, GIF, MP4, MOV, MKV and 420+ formats.
- HD screen record, edit, convert, download, and compress videos in one stop.
![]() Excellent
Excellent ![]()

Now Download VideoProc Converter AI and upscale screenshots for better viewing easily!
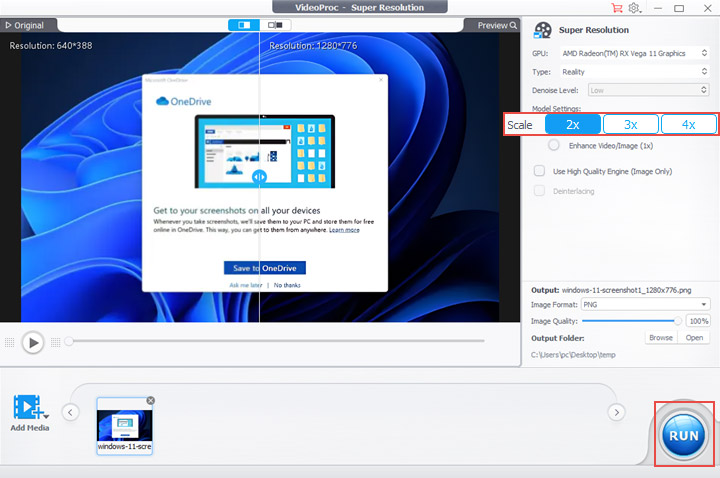
Step 1. Open it and choose "Super Resolution" on the main interface.

Step 2. Drag and drop the screenshot just captured on your Surface Pro.

Step 3. Choose the scale, 2x, 3x, or 4x.
Step 4. Click "RUN" to export.