
Are you looking to trim your video files in Windows 10 but don't know where to start? Perhaps you need to extract a short segment from a lengthy OBS recording, or maybe you're a travel vlogger seeking to cut your travel videos for stitching all highlight moments into one video. Or, perhaps you just want to make sure your videos meet the length requirements for specific social media platforms. The good news is, trimming videos in Windows 10 is easier than you might think. In this article, we'll show you how to trim videos in Windows 10 using the built-in Photos app as well as some other powerful video editors.
How to Trim Videos in Windows 10 via Microsoft Photos
Microsoft Photos is a simple photo and video editor developed by Microsoft and pre-installed on Windows 8/10/11, with which you can view, edit, manage, and share your images, photos, and videos in Windows 10 with ease. It comes with a basic trim tool that allows you to cut out the redundant segments at the start or end of your video.
Note:
Since the Trim tool provided by Microsoft Photos only allows you to cut the start and end of one video, it can be a confusing and tedious process trimming unwanted parts from the middle of your video or cutting multiple parts from your video using this program. See more disadvantages of trimming videos in Windows 10 via Microsoft Photos:
- The output videos come with poor quality, dull color, and low bitrate
- Downgrade 60FPS/120FPS videos to 30FPS, resulting choppy outcomes
- Go crashes when trimming a long or large video in Windows 10
- Slow speed. Take a large number of computer resources and RAM
- Lack of basic editing features, like crop, vertical flip, and transition
Wonder how to trim your video in Windows 10 quickly without visible quality loss? Want to trim a middle part of a video in Windows 10 without hassles? Or you're searching for the easiest way to trim multiple segments from an MP4 video? Try another better way to trim video in Windows 10.
Steps to Trim One Segment in Windows 10
Step 1. Open Photos App
Right-click the video you want to trim in Windows 10, select Open with, and choose Photos.
Step 2. Find the Trim Tool
Click on Edit & Share located on the upper right and choose Trim.
Step 3. Select Needed Segment
Drag the white pins on the progress bar to select the segment that you want to keep in your video. Everything outside of these two pins will be cut from the video.
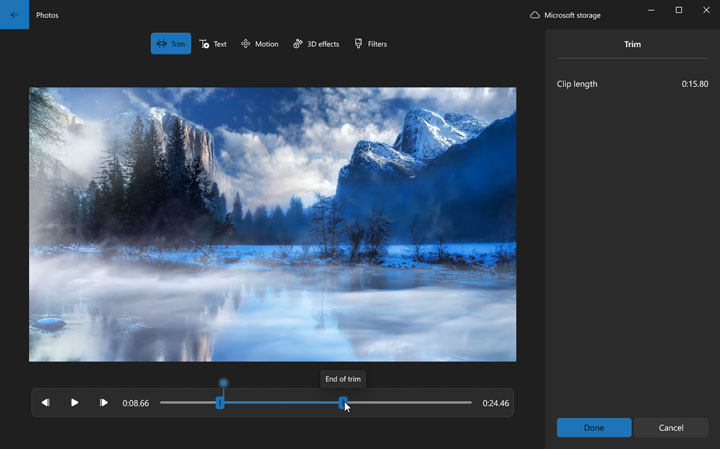
Step 4. Trim the Video
Hit Save a copy located on the top right of the preview window to save the trimmed video.
Steps to Trim Multiple Segments in Windows 10
Step 1. Open Photos App
Right-click the video that you want to trim in Windows 10 and select Open with Photos.
Step 2. Create a New Project
Navigate to the top menu bar to find New video project and click on this. Enter the name of this new project.

Step 3. Find the Split Tool
Drag the source video to the storyboard section. Next, drag the video from the storyboard section to the timeline. Click Split to open a new panel.
Step 4. Split Your Video
Move the pin to the starting point of a wanted segment. Hit Done. Now, the storyboard lists two segments of your video separately. Select the segment that you need to split again, hit Split, and then drag the pin to the ending point of a wanted segment.
Step 5. Cut Out Unwanted Segments
You can repeat step 3 to make more wanted segments separated from your video. Go to the storyboard section, select the unwanted segments, and hit Remove. In this way, you can get rid of all unwanted parts from your video.

Step 6. Trim Multiple Segments
Go to the menu bar, click Finish video, and then choose a quality level. Click Export to save the trimmed video in Windows 10.
How to Trim Videos in Windows 10 via VideoProc Converter AI
VideoProc Converter AI is the best video trimmer that you can access in Windows 10. It makes the process of trimming a video incredibly easy - simply import your video, mark the start and end points, and trim away. Or, you can use the cut tool to remove one or many unwanted sections from the beginning, middle, or end of your video.
The most alluring part is that it doesn't compromise your video's resolution, bitrate, frame rate, or other properties, unless you choose to change them. This means there won't be any noticeable loss in quality after trimming your video.
Reasons to Trim Videos on Windows via VideoProc Converter AI
- Trim multiple redundant clips from any parts of a video
- No re-encoding or quality loss with the Auto Copy feature
- Trim a batch of videos in Windows 10 at once
- Easily stitch the highlights of one or more videos together
- Split a video into several parts and save them as separate files
- Self-explained compress and conversion tools
- Merge, rotate, crop, filters, and more easy video editing tools

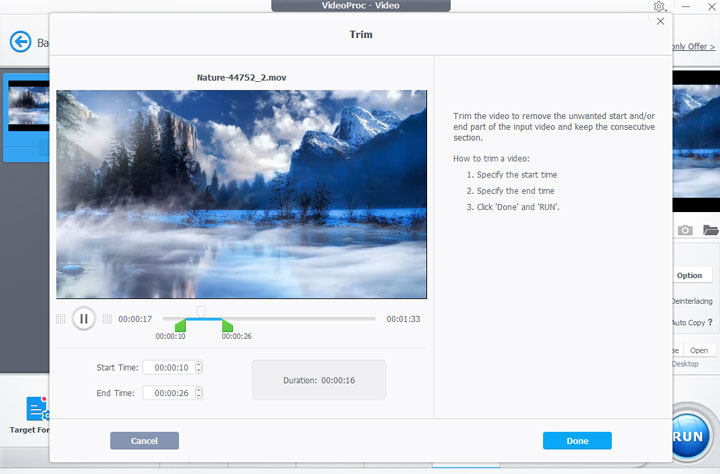
Step 1. Import Your Video
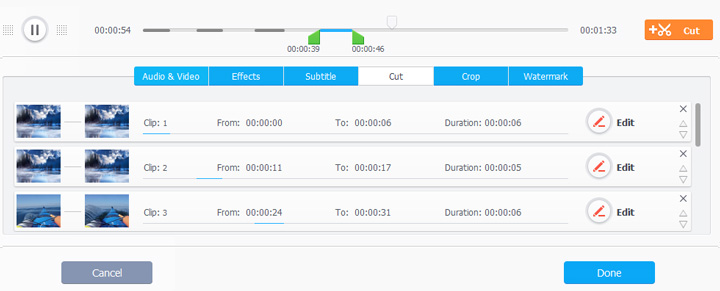
Download, install, and launch VideoProc Converter AI on your PC. Hit Video, and then select the source video that you want to trim in Windows 10. Click Toolbox on the bottom and hit Trim to enter the Trim panel.

Step 2. Trim Your Video
Drag the green knobs to select the part you want to keep. Hit Done to confirm your selection.
Tip:
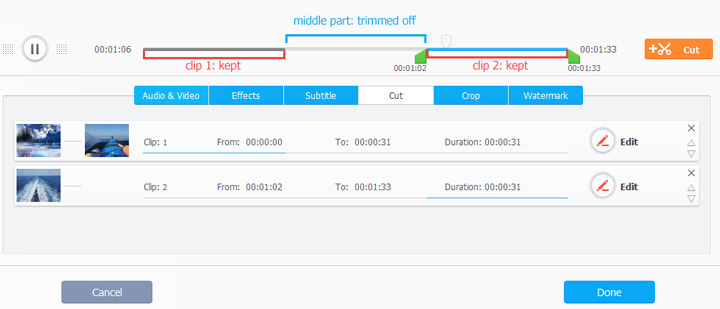
How to Trim Out a Middle Part of a Video in Windows 10
After importing your video to the program, choose the desired output format, hit Cut, and then drag the right green knob to the start time of the unwanted part, and hit Cut. Next, drag the right knob to the end of the video and move the left knob to the point where the unwanted part ends. Hit Cut. Click on Done.
How to Trim Multiple Parts of a Video in Windows 10
After adding your video, select the target format, hit Cut, and then drag the green knobs to select the part that you want to keep. Hit Cut to confirm your selection. You can repeat this step to select other parts you want to keep. Once you're done, click Done.
Step 3. Export the Trimmed Video
Check Auto Copy for trimming your MP4 video in Windows 10 in seconds without re-encoding or quality loss. Click on the RUN button to begin exporting the trimmed video on your PC computer.
How to Trim Video in Windows 10 via Windows Media Player
As you may already know, Windows Media Player is a popular media player software that comes pre-installed on most Windows 10 computers. It offers a range of features for playing and managing media files, such as videos, music, recorded TV, and pictures. However, can you trim a video in Windows 10 with Windows Media Player? The answer in short is, no unless you install an extra paid plugin. This multiple media player itself doesn't come with any editing toolkits. To make some basic edits like trim and cut, you need to install SolveigMM WMP Trimmer which is a paid plugin from Solveig Multimedia Inc.
Step 1. Install SolveigMM WMP Trimmer plug-in
Download and install the SolveigMM WMP Trimmer plug-in. Open Windows Media Player and navigate to the top menu bar to find Tools. Click on this button and choose the plugin we just installed.
Step 2. Enable the Video Trimmer Plugin
Click the Sign up or Login option to complete the authorization. Hit Continue with the current version to trim your video on Windows for free. However, give caution that the free version will add a watermark to the trimmed video. To get rid of the watermark, you need to upgrade to the premium version which costs $34.95.
Step 3. Load the Video
Click on Open Media File and choose the source video that you want to trim in Windows 10 for loading to Windows Media Player.
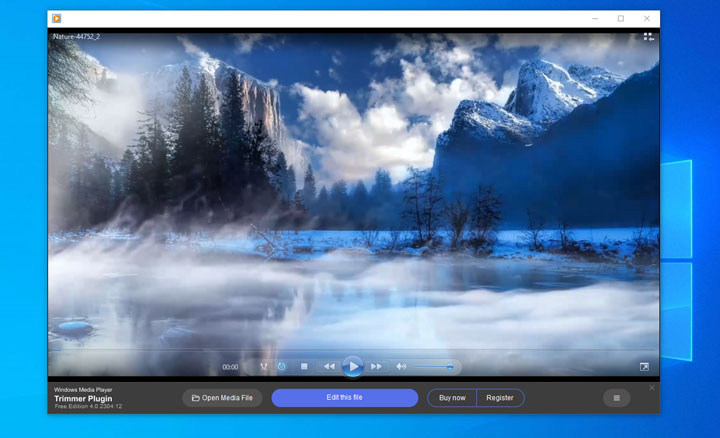
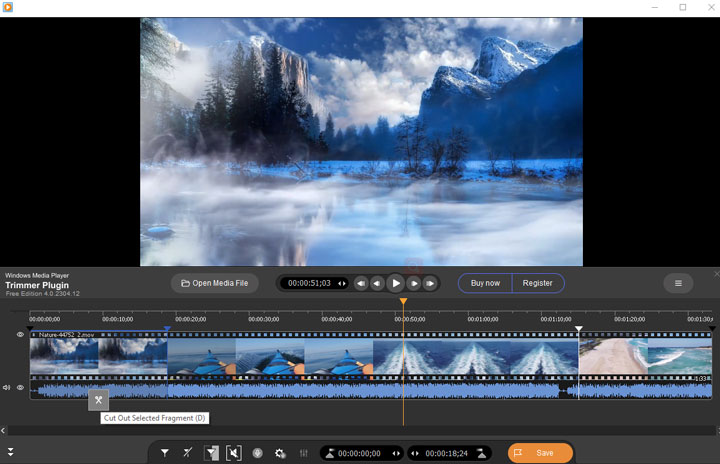
Step 4. Trim the Video in Windows 10
To trim your video, click on Edit this file, move the playhead to the start point of the needed segment, and click Add Marker. Move the playhead (the small line on the timeline) to the beginning of the part you want to keep and click Add Marker. Move the playhead to the end of the part you want to keep and click Add Marker again. Your video will now be divided into three sections: the beginning, the part you want to keep, and the end. Use your mouse to find the part you want to remove. Click on the scissor button to remove it.
Step 5. Save the Trimmed Video
Click Save. Choose the desired output folder. Hit Save to save the trimmed video in Windows 10.
How to Trim a Video in Windows 10 via VLC
Let's extend the list by adding another multi-function tool to trim your video in Windows 10 – VLC media player. This free and cross-platform tool is known for the capability of playing video and audio files in virtually any format on the earth. It doesn't offer a trim tool, but we can make use of the record feature to capture only the necessary part of a video for achieving the goal of trimming videos in Windows 10. However, there are some limitations to this approach. For instance, it is only possible to trim the beginning and end of an MP4 file, multiple segments cannot be trimmed at once, and the picture quality may be compromised. If you are still interested in using VLC to trim your video in Windows 10, read on for more information.
Step 1. Install VLC in Windows 10
Download and install the most recent release of VLC media player. Double-click the VLC icon on your desktop to launch it.
Step 2. Open Your Video
Go to the top menu bar, click File> Open media, and then choose the source MP4 file that you want to play in Windows 10 using VLC.
Step 3. Record to Trim a Video
Click on View located on the top menu bar to display the record button under the progress bar. Move the playhead to the start point of the segment that you want to keep, and click the red record button to start recording. When it reaches the desired endpoint, hit the record button again.
Step 4. Find the Trimmed Video
Go to the output path for VLC in Windows 10 (usually it should be C:\Users\Username\Video) to find the trimmed video.


