In-page Navigation
Editing 101: 10 Cuts and Transitions You Should Know
Cuts and transitions are not just simply removing the redundant clips or putting different scenes together. They are tools for turning a massive mess of stuff into continuous and dramatic storytelling. Let's look at the 10 cuts and transitions that every editor needs to know.
Free download VideoProc Vlogger. Follow the below steps to add cuts and transitions to stylish your videos.
Match Cut
Film creators use match cuts to connect two different scenes on a deep level. These scenes are not intrinsically linked but have similar or correlated objects, colors, shapes, motions, shooting angles, audios, or other elements. Match cuts take advantage of these matched elements in the transition from one scene to the next for improving the continuity of the storytelling.
How to Make a Match Cut in VideoProc Vlogger
Step 0 After creating a new project in VideoProc Vlogger, drag and drop the rough clips to Media Library. Next, drag the video clips to Video Track.
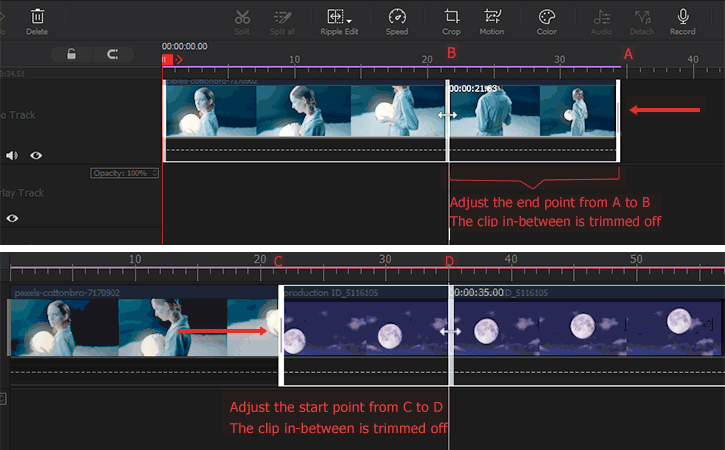
Step 1 Select the first scene. Drag the start or end of the clip to trim off the unwanted segments.
Step 2 Repeat the process in step 1 to delete the unwanted segments in the clip following by.
Jump Cut
Jump cuts happen when you broke a single sequential clip with a cut and remove a piece of footage to make the subjects appear like jumping forward through time. Film creators apply jump cuts to show only the major parts of storytelling while showing the passage of time in order to control the progression of the narrative, amplify tension, convey emotion, reveal how the characters think…
How to Make a Jump Cut in VideoProc Vlogger
Step 1 After creating a new project in VideoProc Vlogger, drag and drop the original video clip from the local disk to Media Library. Next, drag the video to Video Track.
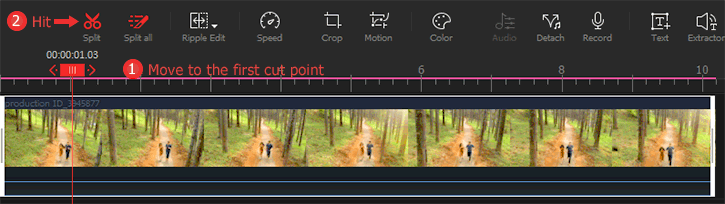
Step 2 Move the playhead to the first cut point and hit Split.
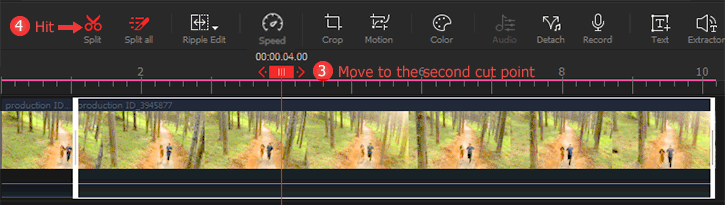
Step 3 Move the playhead to the second cut point and hit Split.
Step 4 Select the clip in-between the two cut points and hit Delete.
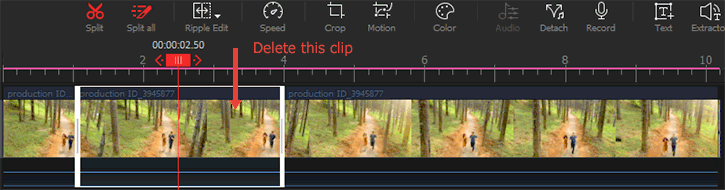
Step 5 You can repeat step 3 to step 5 many times to make more jump cuts.
Cross Cutting
Cross cutting is a common editing technique in filmmaking. It parallels the separated actions that take place in different locations, giving audiences the impression that these isolated actions are unfolding simultaneously. When using cross cutting technique properly, you can increase the tension and stress of the film. It's also a great way to reflect the character's inner world.
How to Make a Cross Cutting in VideoProc Vlogger
Step 1 Import videos to Media Library.
Step 2 Drag them onto Video Track.
Step 3 Move the playhead to the cut point, hit Split.
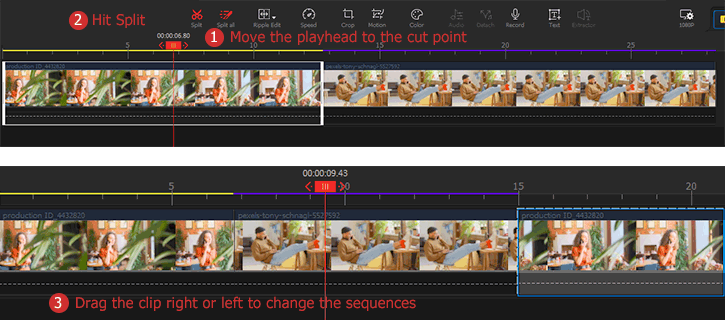
To better illustrate how to do a cross cutting, the first example video is cut into two parts. You can use the Split tool to cut the individual scene into multiple pieces according to need.
Step 4 Move the spliced clip right or left to change the sequence.
Cutting on Action
Cutting on action is usually used in action movies where the video creator cuts different shots together, those shots are filmed from different angles but show continuous actions. It gives the impression that the action is very intense. Cutting on action can also make the transitions in different shots flow and natural.
How to Make a Cutting on Action in VideoProc Vlogger
Step 1 Import the video clips recorded from different angles from the computer disk to Media Library.
Step 2 Drag the clips to Video Track.
Step 3 Drag the clips on Timeline left or right until they are arranged in the right order.
Step 4 Rearrange them to make sure the outcome will play in the order of space or time.
Cutaway Shot
Cutaway Shot happens when you interrupt the main action by inserting a shot from a different time or location and then cut back to the original shot. The inserted shot might be the secondary action that takes place with the main action at the same moments, the details of the objects the characters are looking at, and many other things.
How to Make a Cutaway Shot in VideoProc Vlogger
Step 1 On the editing panel of VideoProc Vlogger, drag and drop the video files to the Media Library of the program for uploading.
Step 2 Drag the clip that shows the main action to Video Track.
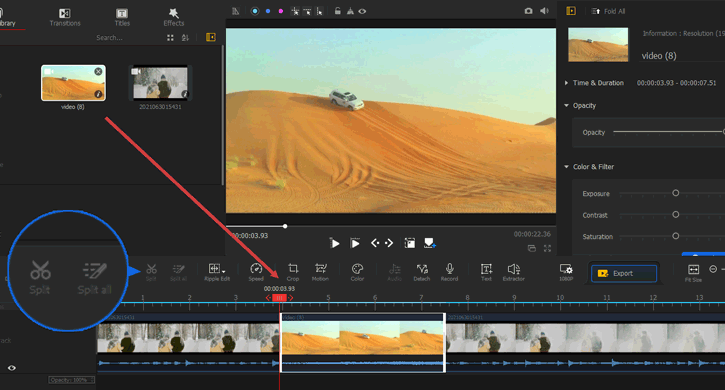
Step 3 Move the playhead to the place where you'd like to insert another shot. Hit Split.
Step 4 Go to Media Library. Drag the shot that you want to insert to the main shot and place it over the split point you just made on Video Track.
Dissolve Cut
Dissolve cuts represent the gradual transition from one scene to the next, giving the impression that two scenes and continuous and belong to the same sequence. Dissolve cuts can be sued to tell the character's personality, show the passing of time, and highlight emotions.
What's worth noting is unlike most editing techniques that can go unnoticed, dissolve cut might be exceptionally noticeable. Thus, it's a cutting technique that you should not overuse.
How to Make a Dissolve Cut in VideoProc Vlogger
Step 1 Import the source video clips to Media Library. Drag the first scene onto Video Track.
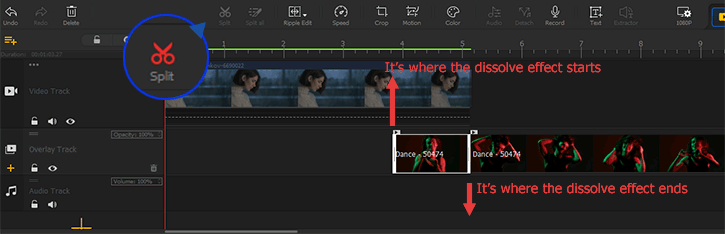
Step 2 Drag the second scene onto Overlay Track. It should be placed at the position that indicates the start time of the dissolve cut.
Step 3 Select the second scene. Move the playhead to the position where indicates the end of the first scene. Hit Split. In this way, you can select the short clip that overlays the end of the first scene.
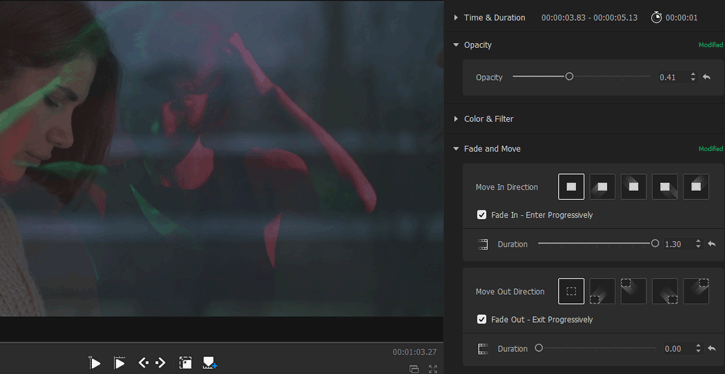
Step 4 Select the separated short clip. Go to the Inspector Panel and find the Opacity menu. Move its slider to change the opacity.
Step 4 Locate Fade and Move and check the option box of Fade In – Enter Progressively.
J Cut
J cuts happen when audio from the latter scene starts before its picture in. In other words, your audience can hear the audio from the second scene on the previous scene. The purpose of this cut technique is to create a more natural transition between two different shots. It's also an efficient way to create suspense and keep the audience guessing what would happen in the next scene.
How to Make a J Cut in VideoProc Vlogger
Step 1 Import the videos to Media Library once you've created a new project. Drag them to Video Track.
Step 2 Select the second video clip and choose Detach Audio.
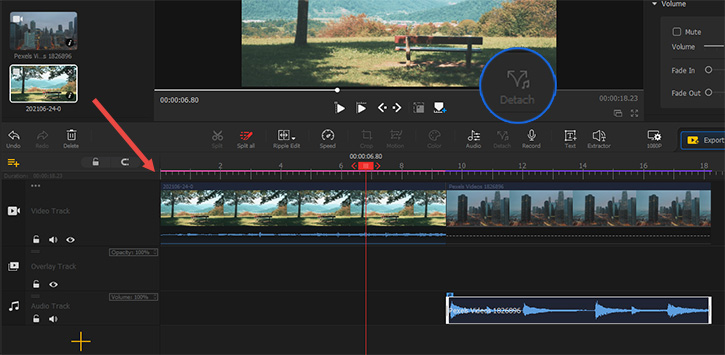
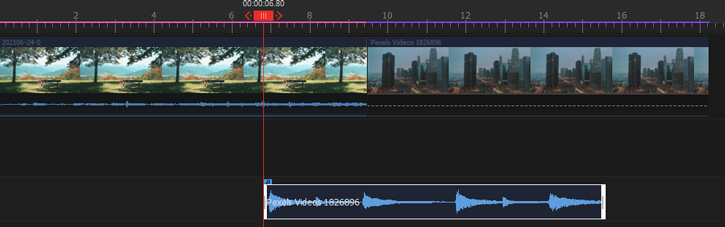
Step 3 Drag separated audio left until it reaches the point where you expect that audio starts to play.
L Cut
An L cut looks like a J cut. However, L cuts happen when the audio of the current scene does not end but the displayed pictures are from the next scene. L cut is a widely used editing technique in making documentaries and movie trailers. It is great for the dialogue scenes of documentary and movie trailer where the filmmakers want to cut the listeners' response.
How to Make an L Cut in VideoProc Vlogger
Step 1 Import two video clips to Media Library once you've successfully created a new project. Next, drag them onto Video Track.
Step 2 Select the first video clip and choose Detach Audio.
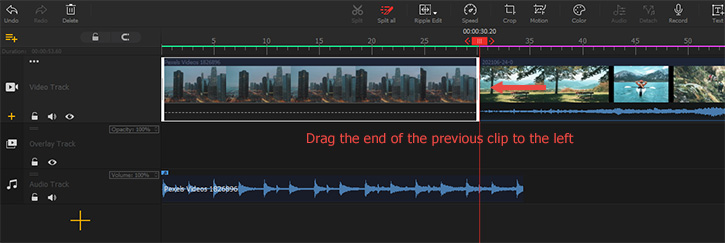
Step 3 Drag the end of the separated video clip left until it reaches the point where you expect the picture from the second clip appears.
Smash Cut
Smash cuts happen when you cut from one scene to another without any transition effects and the previous scene always contrasts in some way with the next scene. A good example is a character waking up terrified from a nightmare. In a word, the smash cut is a very professional editing technique used for emphasizing the dramatic contrast.
How to Make a Smash Cut in VideoProc Vlogger
Step 1 Drag and drop the original media file from the local disc to Media Library.
Step 2 Drag the original video files onto Video Track in the specific sequence. That's it.
Invisible Cut
The invisible cut is an advanced editing technique frequently used in narration films. It takes the advantages of the objects in the shot (the wall, the book cover, the laptop, or more) or the movements of the camera to make invisible and seamless transitions for maintaining the continuity of your storytelling. Film creators often use invisible cuts to simulate the single take.
How to Make an Invisible Cut in VideoProc Vlogger
Step 1 Press the plus button and choose Add Media. Select the source clips that you want to implement invisible cuts on the pop-up Windows Explorer to import.
Step 2 Drag the first clip onto Video Track. Move the playhead to the connection point and choose Split. Select the segment after the split point and choose Delete.
Step 3 Drag the second flip onto Video Track. Again, you move the playhead to the connection point and choose Split. Select the segment before the split point and choose Delete.
Free download VideoProc Vlogger to slice and blend your footage in simple steps.
Related Guides:
- > Cut and Split Video
- > Detach Audio from Video
- > Mute Audio
- > Reduce Background Noise of Video & Audio
- > Adjust Audio Speed without Changing Pitch
- > Add Filters to Audio
- > Using Audio Equalizer in VideoProc Vlogger
For more guides of VideoProc Vlogger, please visit this page >
If you have any question, please email us or visit ![]()
![]()
![]()
Is this page helpful?
