SUMMARY: This is an all-around guide that contains the concept of J-cuts and L-cuts, its example in film, a step-by-step-tutorial to make J-cuts and L-cuts and much more. Without further ado, let's jump into it!
The most basic edit you can do is to cut a video, which is simply switching one shot to another. But how to organize the shots smoothly and avoid discontinuity editing is a problem that every editor, whether you are a pro or a beginner, has to face. Using different editing techniques can also stylize and enrich the story.
This post is going to share two great video editing tricks – J cuts and L cuts – that can add depth and professionalism to your movie and how to use them in a video cutter.
Understanding the Concept of J-Cut & L-Cut
A J-cut is a trick to have the audio lead the video. Simply put, you Hear what's going on before you See what's going on. On the contrary, an L-cut is a way to have the video lead the audio. That said, the audio from the current shot carries to the next shot.
Both J-cut and L-cut are two types of split edits that basically bridge two shots with sound. And they are not the tools that you can find in the effect panel of your video editing software, they are editing techniques that you have to make from scratch.
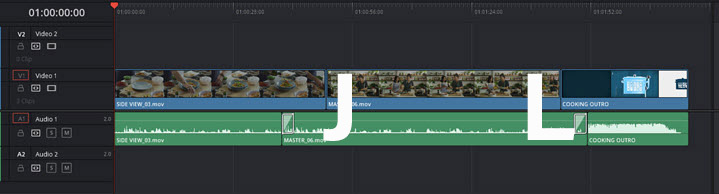
Why the editing techniques called J-cuts and L-cuts? Largely because of the way the tracks display on the timeline. A J-cut makes a J shape and an L-cut makes an L shape. More so, both of them can maintain some level of continuity across the edit point and let the sound guide the audience.
Taking L-cut clips from Fight Club as an example. When Tyler explains the rules of the Fight Club, the shot is not always locked on him, but changes between the expressions and actions of those who are preparing to fight.
In this way, the audiences are not only brought into the space where the character is located by sound, but also obtain the visual information that constructs the entire story through the changing shots. More so, it can convey the tension of the following scene – fights.
J-Cuts vs. L-Cuts: Add Amazing Split Edits in Your Movie
After figuring out the definition of J-cuts and L-cuts, you will get to know how to get these tips and tricks on working in your movie using VideoProc Vlogger in this part. While you can use any piece of non-linear video editing software as long as you like. And the next time you watch film or documentary, see if you can tell these tricks!
How to Use J-cuts and L-cuts Using VideoProc Vlogger
Step 1. Download and install VideoProc Vlogger on your computer, if you have not yet.

Step2. Launch your non-linear video editor - VideoProc Vlogger, and create a project, where you can set the image resolution.

Step 3. Load your media files into the library.
Step 4. Add J-cuts and L-cuts to your movie. Drag your video sources to the timeline. Make a selection to all clips > right-click on the mouse > separating the video clips apart from the audio by selecting Detach Audio (a checkmark in the front). To do so, you can move the video or audio clip individually.
To apply a J-cut that audio starts before the video clip, you should drag and overlay the second audio clip a little, and shrink the second video clip to the point that is in sync. To make an L-cut, do the things in the opposite. Drag and overlay the third video clip a little ahead, and narrow the third audio clip to the point that is in sync.
In order to smooth out the J-cut and L-cut transition, it is recommended to add audio transitions to the edit points among audio clips.
Step 4. Render and Export the output file. Once the transitions are applied, click on the Export button into the exporting window, where you can set the parameters of the exported file and lastly choose the Start button to process the edited file.
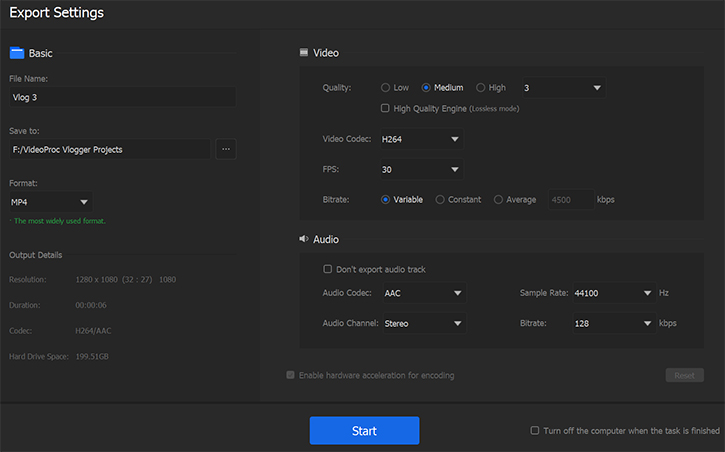
3. Render and Export the output file
Once the transitions are applied, go to the Deliver page > select an output format in the Render Settings window > select Add to Render Queue > Click on Start Render on the left.
J-Cuts vs. L-Cuts FAQs
Where Is the Right Place to Use J-Cuts and L-Cuts?
J-cuts and L-cuts allow you to break up a conversion to create a more natural flow. Therefore, almost every film uses some degree of J-cuts and L-cuts. Besides, J-cuts and L-cuts also work great for the following situations.
- Scene Transitions like dream sequence and flashbacks;
- Powerful opening and closings;
- Strength the meaning of the words, such as recitation and narration.
What Other Types of Cuts in Film?
There are 11 types of cuts commonly using in films. Let's check!
- Jump cut. It appears an abrupt switch between two shots that are similar in content and framing.
- Match cut. A cut that moves a shot to a similar shot that is the same as the action, the composition or even the dialogue.
- Cross cut. It can switch back and forth between the two scenes.
- Smash cut. A transition that moves from the intensive shots to the gentle shots.
- Invisible cut. It is a cut that uses the shadow to hide the scene transition, causing the illusion of the same scene.
- Cutting on action. A transition that switches between two shots while the movement still in frame.
- Cut away. The frame is cut to an insert shot firstly, and then back to the original frame.
- Fade in / Fade out. A transition that goes from one shot to another by turning to black or white to the screen gradually.
- Dissolve. It overlays one shot to another.
- Iris. It is a wipe used to switch shots or zoom in by taking a growing or shrinking circle.
- Wipe. A transition that switches between shots using a special shape.


