


Summary: Looking to fix grainy photos? You're in luck! There are a few simple ways to make a grainy photo clear. In this post, we'll walk you through 5 of the most effective ways to remove graininess from photos, using popular tools like Photoshop, Lightroom, VideoProc Converter AI (which harnesses advanced AI technology for video upscaling and enhancement), and more.
Have you ever taken a photo only to find that it's filled with unwanted grain dots? Grain can sometimes add a vintage and artistic touch to certain photographs. However, in most cases, it can be frustrating, especially when you're looking to capture a clear and high-quality image. Those pesky grain dots, whether caused by insufficient lighting, improper camera settings, or other factors, can detract from the overall visual appeal of your pictures. But fear not! In this post, we will explore the causes of grain in photos, how to avoid it, and most importantly, how to fix your grainy photos using capable tools like Photoshop, Lightroom, AI-powered software, and more.
What Causes Grain in Photos
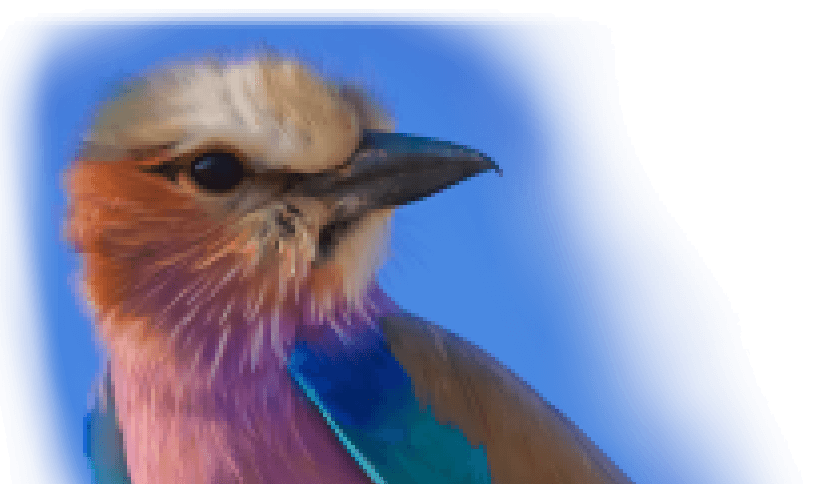
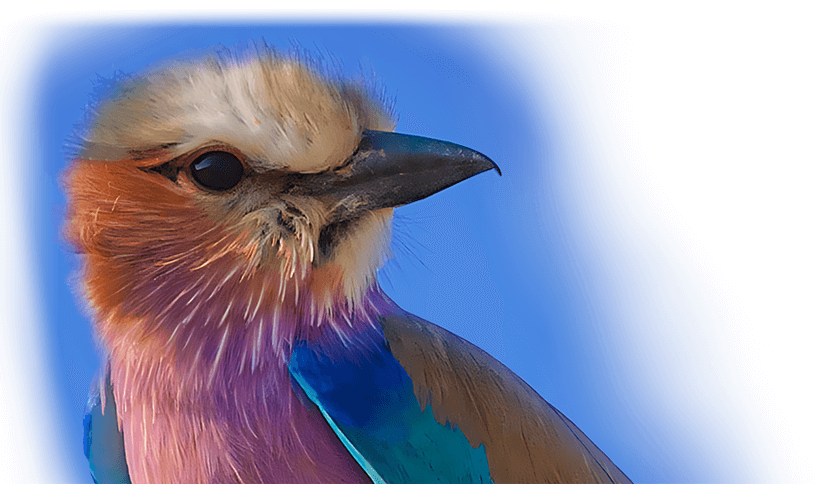
Grain in photos refers to the speckled, rough texture that can make images seem less clear and detailed. Visually, grain appears as tiny dots or particles scattered throughout the photo. There are several common factors that can cause grain in photos, and here are five of them:
Low Light
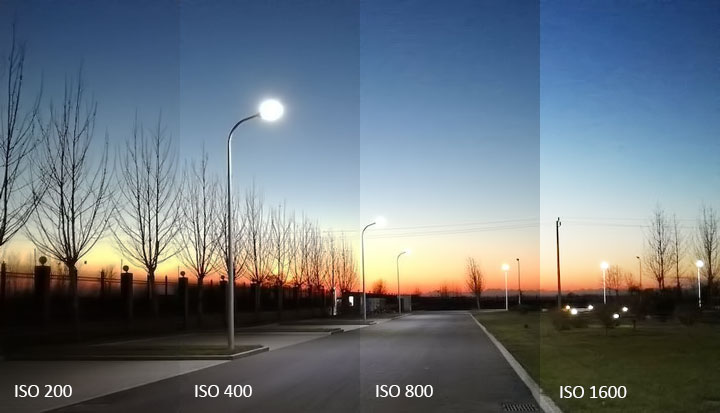
When shooting in low light conditions, the camera may have to use a higher ISO setting to capture enough light. The ISO setting controls the camera's sensitivity to light, and a higher ISO setting can amplify the signal from the camera's sensor, allowing it to capture more light. However, this amplification process can also amplify any noise present in the image, resulting in grain or "noise" in the photo.
High ISO
Even in well-lit conditions, using a high ISO setting can result in grainy photos. The ISO setting controls the camera's sensitivity to light, and as said, a higher ISO setting can amplify the signal from the camera's sensor, which can also amplify any noise present in the image.
Small Sensor
The size of your camera's sensor significantly impacts the quality of your photos. A larger sensor has millions of light-sensitive spots, known as photosites, which are efficient at gathering and recording light information brought in through a lens, leading to less noisy or grainy photos. On the other hand, a smaller sensor, which is common in smartphones and point-and-shoot cameras, has smaller photosites. These smaller photosites are less efficient at capturing light and detail, and therefore, photos taken with a smaller sensor tend to be noisier or grainier.
Long Exposure
During long exposures, DSLR sensors can heat up due to inefficient heat dissipation, which increases the temperature of the CMOS sensor. This rise in temperature can produce what's known as thermal noise. This noise often appears as subtle bright spots, usually red or green, that are not overly prominent but can become more noticeable in certain conditions, particularly during night photography.
Compression
Photos that have been heavily compressed may appear grainy, especially if they have been saved in a low-quality setting. This is because the compression process can remove some of the detail from the image, resulting in a loss of sharpness and an increase in noise.
How to Fix Grainy Photos in 5 Ways
Preventing graininess upfront when photographing a scene is an ideal best practice. However, even careful photographers end up with noise in some shots. Not to worry! Making photos less grainy in post-processing can be as easy as a walk in the park these days. Now we'll show you 5 easy ways to make grainy photos clear, sharp, and visual striking!
1. How to Fix Grainy Photos with AI
Getting rid of grain from your photos while preserving intricate details has never been more straightforward and hassle-free than with VideoProc Converter AI. Trained on an extensive array of images, this smart grain removal tool knows the differences between grain and details, allowing you to effortlessly eliminate graininess from any source - be it low light, high ISO, motion blur, or compression artifacts - while preserving the essential details. Plus, it enables you to transform low-resolution, poor-quality images into crystal clear visuals with up to 10K resolution.
 Highlight Features:
- 1-click to remove grain, noise, and other imperfections from photos
- Preserve edges, textures, sharp structures, and other intricate details
- Enhance videos/images from GoPros, iPhones, DSLRs, AI tools, etc
- Upscale grainy and low-resolution images to up to 10K resolution
- Extra AI tools: frame interpolation, stabilization, faded photo colorization…
- All-in-one: convert, compress, edit, record, and download video files
- Lightweight, low hardware demands, and blazing-fast speed

Step 1. Import the Grainy Photos
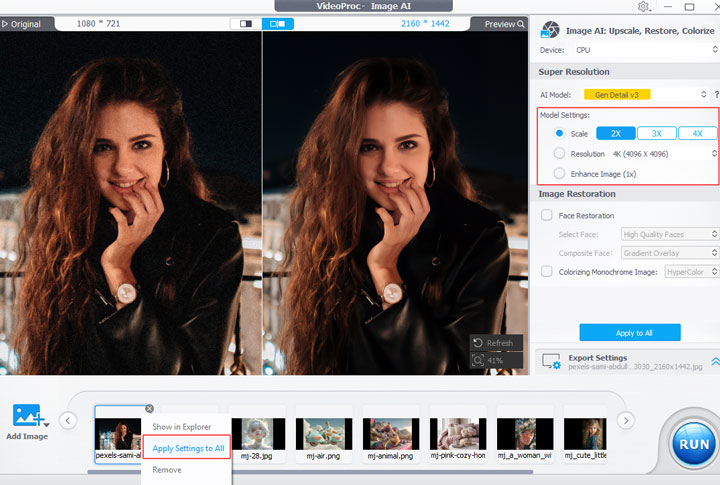
Download VideoProc Converter AI and open the Super Resolution panel. Import grainy photos by dragging them in or clicking the Add Media icon. By default, it will use your GPU to accelerate processing. If your GPU doesn't meet the minimum requirements, switch to CPU computation.
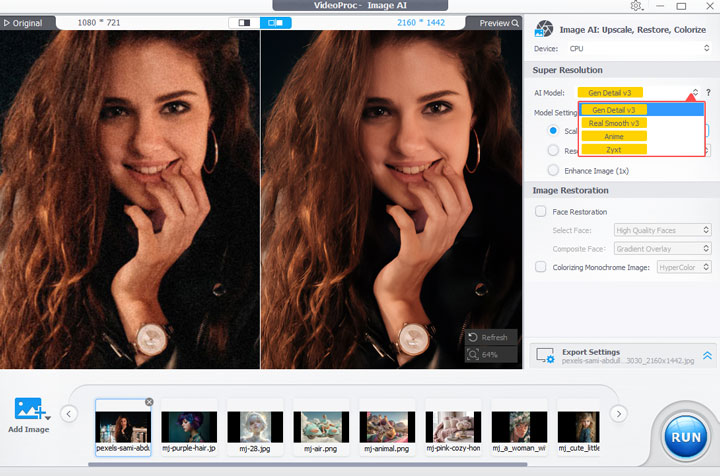
Step 2. Choose the Image Type
Select the AI model that suits your needs. VideoProc Converter AI offers four advanced AI models, each designed to enhance photos efficiently. If you're dealing with grainy photos, Real Smooth v3 delivers excellent results. For images with intricate details, Gen Detail v3 is a great choice to preserve fine textures.
Step 3. Choose the Output Resolution
Pick the desired upscaling factor — 2x, 3x, or 4x — or set a specific resolution like 2K or 4K to upscale your photo to an impressive 10K resolution. If you want to clean up grainy photos while keeping the original resolution, simply choose Enhance Image (1x).
Step 4. Export the Enhanced Grainy Photos
Adjust the output format, quality, and destination folder as needed. You can apply the same settings to other grainy photos without adjusting them individually. To do this, click on the current image and select Apply Settings to All. Once you’re satisfied, click RUN to save your enhanced photos in sharp, high quality.
2. How to Fix Grainy Photos in Photoshop
Adobe Photoshop, priced at $24.99/month, is an industry-level image editing program that offers you a whole range of photo editing tools to fix and retouch your photos. Then can Photoshop make a grainy photo clear? Absolutely! Actually, it lets you fix grainy photos in a couple of ways such as adding the noise reduction filter and then tweaking the result with the Surface blur filter; and adding the Dust and Scratch filter. In this post, we’ll show you the way we love most – Adjust the sliders of Noise Reduction, and Color Noise Reduction under Camera Raw.
Step 1. Download and install the most recent version of Photoshop on your computer.
Step 2. Drag your grainy photo into this powerful program. Press Ctrl and J on your keyboard to duplicate the original layer.
Step 3. Select the duplicated layer, click Filters, and choose Camera Raw Filter to open the Camera Raw panel.
Step 4. Click the unfold option of Detail to access the sliders for controlling the strength of Noise Reduction and Color Noise Reduction. Adjust these two sliders until you're satisfied with the outcome.
Step 5. Hit OK to go back to your main workspace. Go to File > Export, and then adjust settings like Quality, Format, and Image Size. Hit Export to save the clear version of your grainy photo on your computer.
3. How to Fix Grainy Photos with a Plugin
If the complex settings of Photoshop seem daunting, a grain reduction plugin is a more cost-effective fix. One highly recommended plugin is Neat Image. Priced at $39.9, this plugin targets noise reduction in digital images, including film grain, JPEG artifacts, and other issues. It works well with images from digital cameras, scans from negative and positive films, and scans from printed photos. Neat Image is available as both a standalone program for Windows, macOS, and Linux, and as a plugin for popular image editing software like Photoshop, Photoshop Elements, Corel PaintShop Pro, and more. In this guide, we will show you how to use Neat Image with Photoshop to remove graininess from photos.
Step 1. Visit the official website of Neat Image at https://ni.neatvideo.com/ and download the software. Once downloaded, double-click the file and follow the installation instructions to install it on your computer.
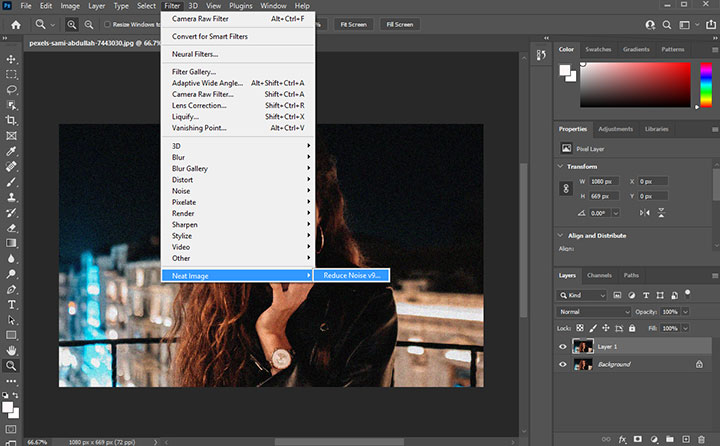
Step 2. Launch Photoshop and open the grainy picture you want to edit. Go to the top menu bar and click on Filters. From the drop-down menu, select Neat Image and then choose Reduce Noise v9... to open the Neat Image plugin.
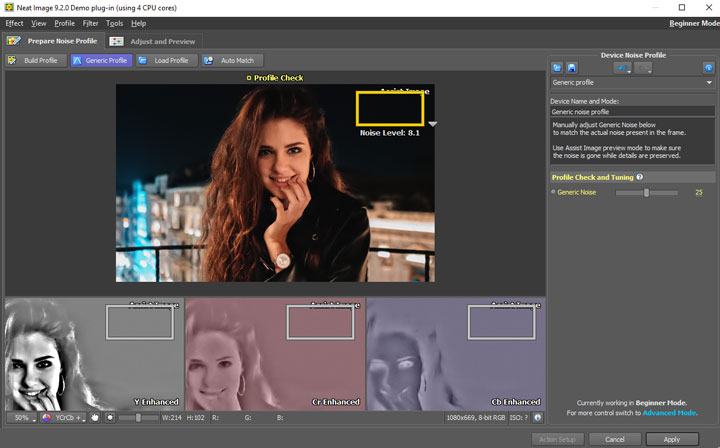
Step 3. In the Neat Image plugin, click on Generic Profile. This will automatically create a profile with the default noise strength. If this is not suitable for your image, you can adjust the "Generic Noise" slider to achieve the desired result.
Step 4. Once you are satisfied with the result and the graininess has been removed, click on Apply. You can then export the degrained photos to your computer from within Photoshop.
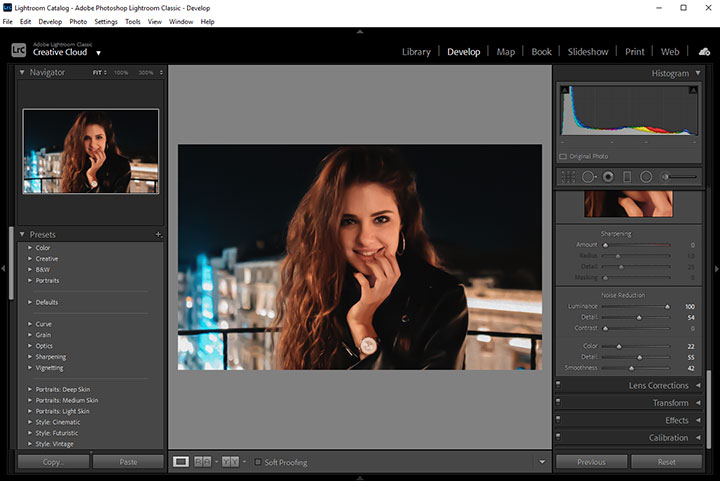
4. How to Fix Grainy Photos in Lightroom
Lightroom by Adobe, priced at $9.99/month, has become an essential tool for photographers seeking to organize, edit, and enhance their digital photos. Both professionals and amateurs appreciate Lightroom's intuitive interface and robust editing capabilities. The latest version incorporates an AI-powered noise reduction feature to efficiently remove grain and visual artifacts from images. However, this leading-edge functionality requires substantial computing resources, placing it out of reach for many users. Fortunately, Lightroom still provides effective noise reduction options accessible to a wider range of hardware. While not as easy as the AI Denoise feature, applying Lightroom's Noise Reduction effect can significantly fix grainy and unwanted textures in photos.
Step 1. Download and install the latest version of Lightroom on your computer.
Step 2. Open Lightroom and drag your grainy photo in to add it to the library. Click on Develop to open the editing panel.
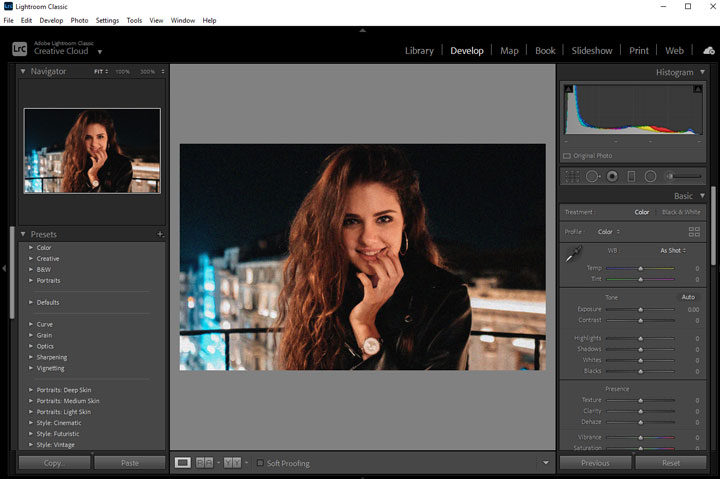
Step 3. Go to the right side of this panel to find Detail. Unfold this menu to access the Noise Reduction option.
Step 4. Adjust the Luminance slider to reduce the grainy, monochromatic luminance noise. Then fine-tune the noise reduction using the Detail slider to control retained detail and the Contrast slider to adjust tonal contrast in the areas affected by luminance noise reduction.
Step 5. Use the Color sliders to minimize random colored specks in your photo. The Detail slider determines how much detail is preserved when reducing color noise. Adjust the Smoothness slider as needed to smooth out blotchy color artifacts that can occur after noise reduction.
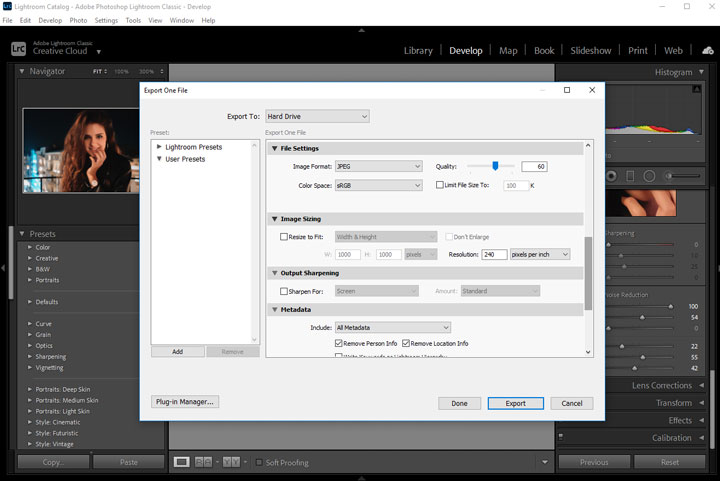
Step 6. Once satisfied with the grain reduction result, go to File > Export. In the export window, adjust settings like file size and image quality as desired. Click Export to save the finished, cleaned up photo to your computer.
5. How to Fix Grainy Photos Online
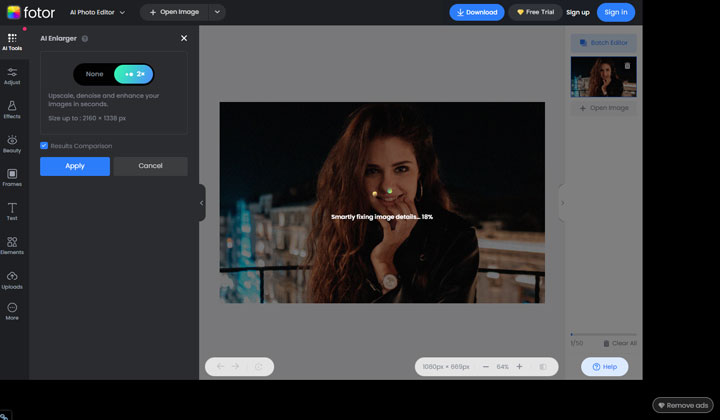
If you want to fix a grainy photo without installing additional software, an easy solution is to use an online photo enhancer. One example is Fotor, an AI-driven graphic design and image editing app. It lets you make photos less grainy by simply uploading them. Beyond fixing grainy images, Fotor provides a full suite of image editing and processing tools - from auto background removal to AI avatar creation. The downsides? Unfortunately, the free account on Fotor does come with some limitations. For example, it restricts HD quality output, doesn't support batch fixing of multiple grainy photos, and adds a watermark to the output.
Step 1. Come over to Fotor's official website, go to the top menu bar, and choose Photo Editing Tools. Click on See All to explore the full range of available image editing features. Look for the Remove Image Noise option, which may require a bit of scrolling through the pages. In my experience, I found it on page 36. Click Remove Image Noise to proceed.

Step 2. Click Remove Noise Now. You may encounter a panel encouraging you to subscribe to Fotor's premium plans. Feel free to either subscribe for additional benefits or simply exit the panel to proceed to the grain remover workspace.
Step 3. Click Open Image and choose the grainy photo that you want to enhance for uploading. Fotor now automatically enhances your grainy photo.
Step 4. After completing the grainy clear-out process, click on Download to save the enhanced photo to your computer.
How to Avoid Grainy Photos
Grainy photos require tedious post-production work to salvage. By understanding the common causes of graininess, we can save substantial editing time and effort later on. With that in mind, let's explore some techniques to prevent grainy photos while shooting.
Use Lower ISO Settings
To prevent grainy photos, pay attention to your ISO setting. Rather than relying on auto ISO or a high setting, see if you can use a lower ISO - ideally 300 or below. Doing so can significantly decrease the likelihood of grain appearing in your photos, particularly in low-light scenarios.
Improve Lighting
In dim lighting situations, it's common to adjust your camera settings to their maximum limits, such as using a wider aperture and higher ISO. However, this can result in grainy photos. To avoid this, you can try adding more light to the scene. For example, move your subject closer to existing light sources, open blinds and curtains, or add supplemental lighting. This will allow you to use lower ISO settings and narrower apertures, resulting in cleaner, less grainy images.
Use a Larger Sensor Camera
Larger sensors can capture more light and detail, resulting in less grain. DSLR or mirrorless cameras typically have larger sensors than compact cameras or smartphones.
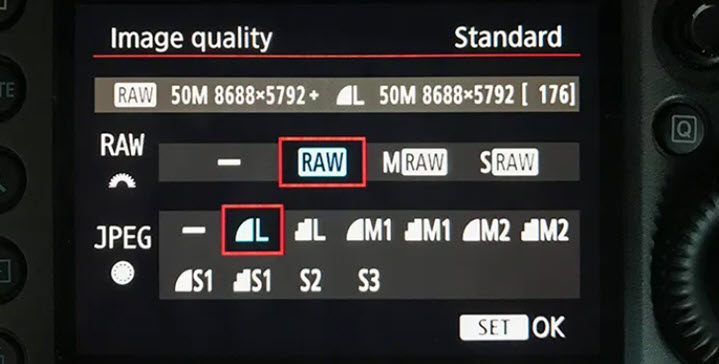
Shoot in RAW Format
RAWs are uncompressed image files which allow for more extensive post-processing adjustments compared to JPEGs due to their uncompressed nature and higher bit depth. With a bit depth of 12 or 14 bits per channel, RAW files contain over 4x more brightness and color data compared to JPEGs. This extra data allows for adjustments like brightening shadows or reducing grain without introducing artifacts commonly seen in heavily edited JPEGs.
Brighten the Exposure
In low-light conditions, darker photos tend to show more visible grain, particularly in the shadowed areas. This can occur even at low ISO settings. Adjusting the shutter speed and aperture to brighten the exposure can help to address this issue and reduce grain. However, it's important to monitor your camera's histogram to ensure that you don't have any blown-out highlights, as this can result in the loss of detail in your image.
Use a Tripod
When shooting in low light conditions or using longer shutter speeds, camera shake can be a contributing factor to the appearance of grain or noise in the image. By using a tripod, you can keep your camera steady and minimize any unwanted movement or vibration. This helps in capturing sharper and cleaner images, reducing the need for higher ISO settings that can introduce grain.
Avoid Digital Zoom
Digital zoom can make photos appear pixelated or grainy. Instead, try to get closer to your subject or use optical zoom if your camera has it.


