Summary: If you are starters who just step into the video editing industry, you won't want to miss Avidemux. As it is free and easy to use, Avidemux is mostly picked by beginners who are fresh to video editing. Although being much praised for its features friendly to novices, it is disfavored for a bunch of excuses as well. Here, we've conducted a full and in-depth review of Avidemux and will walk you through everything that you need to know about this freeware. Start reading now.
Avidemux Overview
Avidemux offers users with many basic edits such as cut, crop, rotate & flip, filter-adding. It is best for beginner users to make quick edits. If you are fresh to video editing, Avidemux may be your safe pick.
Avidemux is one piece of beginner-favored open source free video editing software developed by SourceForge. It can run on various operating systems such as Windows OS: 98 SE, XP, 2000, Vista, 7, 8, ME, macOS X, and Linux. Till now, the application has been upgraded to its version 2.7.5 with some bugs fixed and extra plugins added. Avidemux supports various file types, and media types with the file extension of .MP4, .MKV, .AVI, .MOV, .WMV, .WMA, .ASF, .TS, .OGM, .3GP, .VOB, .WebM, etc. are supported as its input format. However, the output formats are, sort of limited in Avidemux, and container formats, namely ASF, WMV, WMA, MOV, 3GP, VP8, VP9, can't be selected as an output format in it.
Avidemux Version 2.7 Minimum System Requirements
- Operating System: Windows 11/ Windows 10 / Window 8, 8.1 / Windows 7 / XP / Vista; macOS; Linux
- Memory (RAM): 512MB
- Hard Disk: 50MB
- Processor: Intel Pentium IV or above
Download Avidemux: http://avidemux.sourceforge.net/download.html [the latest version]
As for editing features that most users concern, Avidemux offers you basic editing features that you need - you can cut and merge video clips, flip and rotate the whole video, and add filters to recreate a new video content.
As an open-source freeware, Avidemux does well in providing users with engagement in the program. In its official forum, users can free communicate on the site, share sample test, and even report bugs in it.
In order to get the most impartial review on Avidemux, we have run down tests on the application since its version 2.6 and noted down those reports. More than that, we have collected massive feedback (on both bright side and dark side) from its frequent users to get even-handed on the results. On the following page, we will walk you through a thorough review on Avidemux, with no fear or favor, but to offer you the complete assessment on this video editor in the most neutral way. Continue reading.

Review on Editing Features of Avidemux
In this part, we will analyze Avidemux frequently-used editing features and offer you our test results on them.
Avidemux has a rather clean interface, but some users point out that it looks quite dated. Although being regarded as non-linear video editing software, there's no timeline panel available to be detected on its main interface. Therefore, you are not allowed to add separate video and audio tracks to it. The menu settings and its button names aren't very intuitive for a raw beginner as some of its features are hidden inside the function toolbar from which you need to spend time exploring and digging them out. Here we have offered you the most frequently-used features in Avidemux that you will employ and with hints on how to skillfully finish the task.
To Cut a Video in Avidemux, How?
The cut feature in Avidemux can result in two different consequences: either you can cut the desired parts out of the source video, or you may trim the unwanted parts and stitch the rest parts together into one. Notice: don't confuse with the two features when using Avidemux to cut your video, or you may get the very opposite results. Therefore, before you rush to cut a video with Avidemux, you need to make sure that you are with the right feature you pursue.
1. To exert the desired parts out of a source video in Avidemux:
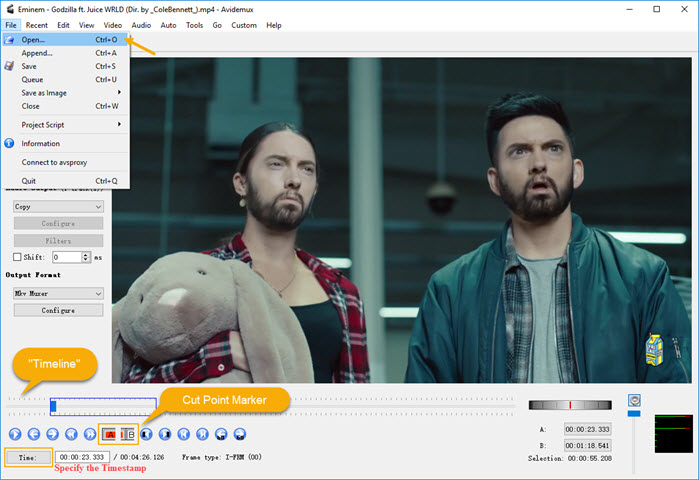
First, you need to import one source video file by clicking on the Open Video button in the top-left interface. (Notice: you are NOT allowed to throw in the whole video folder in it, so remember to add and process it one by one if you have multiple pending videos at hand.)
After the video is loaded it can then be edited: you can set the length to be cut by dragging the blue-ish playhead in the "timeline" (which exists on the interface) and mark the start time and the end time with both start marker A and end marker B under the "timeline". Apart from that, here's another way to fulfill the task: you may hold down the left and right cursor control keys on the keyboard to locate the desired part first, then use the keyboard shortcut keys Ctrl + Page Up to set the start time and Ctrl + Page Down to set the end time, and select the gap. Additionally, if you want a precise timestamp, you can click on the Time button from the left bottom area of its interface where you can pinpoint the time duration by minute, by second, and by frame.
After you've reached the finest degree, you can click the Save Video button on the top left side (which is adjacent to the Open Video button) to save the video clip you just created to the local disc. Later, you can find the clip content you just cut with Avidemux and take it for personal use.
Warm Note: Remember to rename the new content from the original file.
2. To chop away unwanted parts and merge the rest into a new video in Avidemux:
First, set the start time and end time of your source video file as mentioned before.
Second, head to the top menu toolbar and select the Edit tab, choose Cut in the drop-down list (Warm note: here you can use the shortcut key - Ctrl + X to quickly cut out the selected clip).
Third, repeat the process until you are OK with the remained part. Forth, preview the result and make sure you've got the desired outcome.
Last, click the Save Video button on the top left side (which is adjacent to the Open Video button) to save the video clip you just create to the local disc.
Note: Remember to rename the new content from the original file.
Test & Review on the Cutting Feature
In recent times, I was on the halfway to make a short music video on the latest hit music album that I cherish. As I've got over 30 nominees to be mentioned in my video and would like to share the work to my YouTube channel, there's no way that I put all these 30 music videos of its whole length together into one. Therefore, I decided to chop those unwanted parts away and leave my most desired parts. And days ago, I cut some video clips with Avidemux, and I had to say that this free video editor does deserve some credits as well as some curses.
When cutting a video clip, to locate the start and end time of a video clip and cut it precisely is of very importance to us. In Avidemux, I can easily locate the clip by minute or by frame, which really benefits me in clip cutting. What I like Avidemux most is that it can help search all black frames existing in the video for me, so I can directly locate the black frame and decide whether to take it or leave it. Frankly speaking, it helps a lot when I'm clip cut for my music video as I can quickly locate those transitions with black frames and remove them straight away. However, the first time I use Avidemux to cut the selected video clip I want, I only get a clip with everything covered except for the part I desire.
Owing to the fact that when cut a section (to save the desired parts) with Avidemux, there are possible corruptions reported before saving if non-keyframe cut points are selected in the process. Therefore, my own experience tends to agree with using keyframes to set the cut points as there are possibilities that if cutting a section which is not aligned to keyframe the clip may not work properly in later use.
Pros:
- Precisely locate the clip by frame
- Fast search the next black frame
Cons:
- Batch process unavailable
- Intricate and confusing cut features
How to Rotate & Flip a Video in Avidemux
There may be times that you've got some videos that are incorrectly rotated. Under such circumstances, we need to rotate the video clip. Avidemux offers this "Rotate" feature for users, but a lot of people don't even know that as it is a hidden feature inside the menu card. In order to quickly navigate to the rotate feature in Avidemux, here we provide the instructions for you:
First, load the video in Avidemux: you can either choose File > Open from the top menu toolbar or you can click the Open Video graphic icon right under the menu area to find and add the video file.
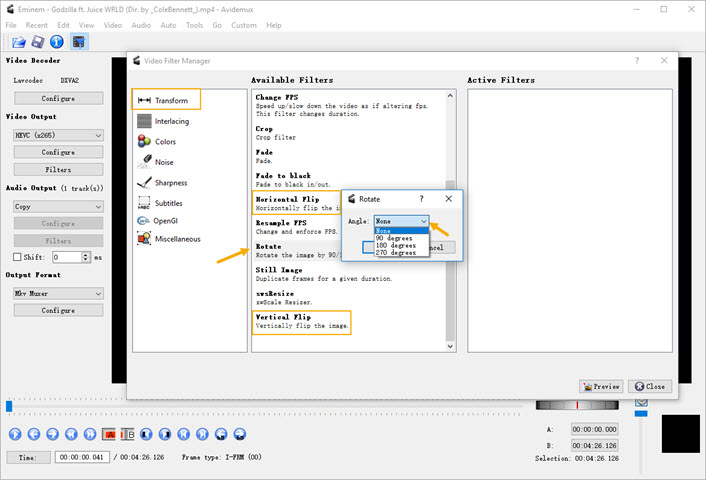
Second, change the video output default settings. (Warm note: if you don't change the video output format, you will not be able to enter its filters interface.)
Third, head to the top menu list again, select Video and choose Filters in the drop-down menu list, then you will enter a Video Filter Manager.
Forth, click on the Transform tab in the left interface then scroll down to find the Rotate feature in the middle area. Next, double-click on the Rotate tab, then pick up the output video angle in 90 degrees/180 degrees/270 degrees.
Test & Review on the Rotating Feature
When I rotate my video in Avidemux, I found that it keeps crash each time I add more than one rotate filter on my video. For example, when I first choose the vertical flip > preview > play, it works well, no error occurs, that's cool. However, when I switch to the horizontal flip > preview > play, guess what? It crashes! At first, I just take it as a small bug, so I restart my project and repeat steps as before. Ironically, it keeps crashing... Then I test it third, fourth, fifth times... And you guess me right, all those trial works ends in the same results - Avidemux crashes again and again. Finally, I decide to quit.
In Avidemux, users are allowed to preview the filtered video after some filters are embedded. That is supposed to happen when I filter my video with a 90 degree rotate, but when I go back to the last interface and tap on the Play button to preview my work...the video played on stays the way it is, and it seems nothing changes ever happens to it!
Then I test Avidemux again on the next day, and this time, all failed trails that I made in the yesterday end up well today. Had to admit that it is really an unstable video editing software.
Cons:
- The feature is uneasy to be detected
- Filters couldn't be previewed properly
- No more than one filter allowed to be applied
- Easily get crashes when switching between different filters
Filters of Avidemux
Apart from what have been mentioned above, Avidemux has collected a bunch of interesting filters (developed constantly) in it, which adds up to more fun in video editing.
In its Transform filter where you can add extra black borders, embed a graphic image on the video, speed up/slow down the video by changing FPS (this changes duration), enforce the video by resampling FPS (this keeps duration and sync), use a crop filter, set a period of a still image for the video, and more.
In its Interlacing filter, you can choose from over 10 types of filters based on your personal needs and customize them as you like.
In its Colors filter, you can make a color adjustment on parameters such as contrast, brightness, saturation, gamma, etc.
In its Noise, Sharpness, Miscellaneous filters, there are various filers available to be chosen from.
In its Subtitles filter, you are allowed to add hardcode SSA/ASS/SRT subtitles to your video with customization available.
All these filters can be added by clicking the filter tab in the left interface > pick up your desired filter in the middle part (Available Filters) with double-clicking on the chosen filter > customize some parameters according to your personal needs > select the one you want to apply for your video on the right side (Active Filters) > close. After you've chosen the selected filter, you will get back to its main interface. Move to the top menu toolbar > Video > Play filtered (or you can tap on the funnel-like graphic icon under View tab), then you can preview the filtered video in the center screen.
Test & Review on the Filters
The most part I feel happy when editing my video with Avidemux is: after I've added different filters to my source video, I can preview the effect in the center panel when I hit the Play button. However, when I click on the Stop button, I noticed that the video played on the screen goes back to normal. With this, I can have a clear understanding of how much my video had been filtered and how many changes it has compared with the previous source file.
Crash Problems of Avidemux
As I have mentioned that when I add different filters on one video > preview the effect > it shuts down automatically, it seems that I'm not the only miserable guy who has faced the crash problem. When I dive in its forum to seek for some help, I find that a crowd of Avidemux users is complaining about its frequent crash issues there.
User Experience & Feedback
First, they were trapped by the media types issues:
- When I extract a section from a DASH MP4 file, Avidemux immediately crashes. The MediaInfo shows no trouble identifying the file's format, and it can be played well in another media player.
Well, Avidemux's old version, aka 2.6.8, did not support this file format.
Others were troubled by the hardware issues or operating system matters:
- When I work on an MP4 file and do something else at the same time, my mouse and keyboard freeze and I can do nothing but to stop the computer and restart it.
As Avidemux does not handle GPU acceleration well, it may not be friendly to PC with a low-configuration.
- For many years, Avidemux works very well for me. A few months ago, I made an update from Windows 7 to Windows 10 Pro, 64-bit, I found that Avidemux crashes when saving edited files! I'm thinking of an incompatibility issue with my Windows updates.
Well, the user made a reasonable guess. The update to a higher operating system on your old computer may bring forth some incompatibility issues on the old-version software.
Last but not the least, users made a wishlist for Avidemux:
- I really hope that Avidemux could take the following into consideration: being able to import a whole source folder and make some progress on the batch process. Although it used to crash ALL the time but is quite stable now, I still love it.
If you've got multiple pending source files, like over 20 files, to be processed in Avidemux, you have to load one file > process > save > wait > rinse and repeat, which makes it a really tremendous workload without one efficient batch process feature endowed.
Avidemux Experimental Version
The good news, is, however, there's an experimental version of Avidemux, which is specially built to relieve its crash issues. If you are interested in its experimental version, you can get to know it on the site.
Here are some must-know tips on the experimental version:
- It is experimental and is slower than the regular version;
- Some functions are disabled and some plugins are NOT compatible with the regular version;
- All of which are Windows executable files, no DMG documents to be found for downloading.
Avidemux Alternatives
From what we've analyzed above, we know that to cut a section from a source file in Avidemux may not be plain sailing. What's worse, the constant crash issue of this unstable software could drive you nuts. Under such circumstances, you may switch to some free alternatives for Avidemux. Wait before you navigate elsewhere. Here, we've offered you with Avidemux best similar software.
#1. VideoProc Vlogger
Recommended for: Beginners and semi-pros
VideoProc Vlogger is an awesome Avidemux alternative that helps users create stunning videos in an easy and effective way. Designed for both Windows and Mac users, VideoProc Vlogger offers a set of features like splitting, trimming, adding music, changing speed, adding overlay, making picture-in-picture video, making green screen video, adding subtitles, recording voice, and more. Besides, it offers a bunch of effects, filters, and styles to help you polish your videos.

#2. OpenShot
Recommended for: Quick Edits
OpenShot is selected to be one alternative for Avidemux as it is best for quick editing as well. OpenShot is a piece of free and open-source video editing software that runs well on Windows, Mac, and Linux operating systems. With OpenShot, you can easily cut the video to the desired length without breaking a sweat. You are allowed to add transitions, filters, effects and have title templates for your video, and export the video with no watermark.
Check out the full review of OpenShot >
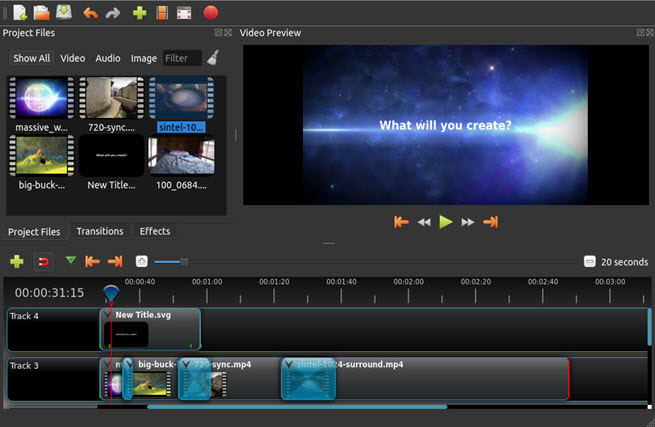
#3. Shotcut
Recommended for: Beginner Users
Shotcut is another recommended Avidemux alternative. It is easy to use and is best for beginner-level users. This open-source video editing software is download-able for Windows, Mac and Linux users. Shotcut has an intuitive interface, which is clear but not dated, with various program elements hidden behind buttons. (Most tasks are easy to be found in its modular designed UI, so you don't have to spend much time exploring where to find them.) Although being a free program for beginner-level users, Shotcut is more of a pro-level editing tool. It supports GPU acceleration for NVIDIA, AMD, and Intel Quick Sync (fast rendering), and shows a good performance on those machines though not powerful. However, it's also worth mentioning that Shotcut has quite limited transition effects for a variety of scenes.
Check out the full review of Shotcut >

#4. Lightworks
Lightworks is a powerful video editing program created for Windows, Linux and Mac operating systems. You can edit files, add transitions, add texts, do color grading, adjust and set sound effects, etc. in Lightworks. In addition, you are allowed to import videos into Lightworks without time limit and export them with no watermarks.
Check out the full review of Lightworks >

Final Thoughts
Till now, you've reached the bottom line of our Avidemux review. As one free and open-source program, Avidemux does deserve many credits for its various basic editing features. However, what couldn't be ignored is that it is not very stable (owing to the fact that it lacks technical supports), easily crashes when editing, and is not very intuitive to use (merely for a raw beginner). Putting those side effects aside, Avidemux is still the best free video editing software for beginner-level users and a good choice for whoever requires for quick editing. If you have better recommendations on best video editing software for beginners or want to read reviews of other free video editing software, feel free to leave us a word in the comment box below. We'd love to hear from you.


