Summary: How can you make low quality videos high quality? This 2026 guide walks you through 10 proven, professional methods to fix common issues such as blur, noise, and low resolution. You’ll learn how to enhance footage using AI upscaling, proper settings, video stabilization, and more. With clear, step-by-step tutorials, you can turn low-quality videos into sharp, high-definition visuals on any device.
Looking to elevate the quality of your videos? As a content creator, videographer, or someone looking to enhance personal footage, a video quality enhancer is essential for creating high-impact results. These powerful tools use advanced algorithms to sharpen details, improve color accuracy, reduce noise, and upscale resolution, giving your videos a polished, professional look.
With so many options available, it can be tricky to find the right one. In this guide, we have compiled a full tutorial showing how to fix video quality with the best 11 video quality enhancer software and apps on any device. Whether you're after step-by-step guidance for improving video quality or searching for free enhancement solutions, this guide has everything you need!

Quick Solutions for Better Video Quality:
- To fix blurry video: Use AI Super-Resolution to reconstruct missing details and sharpen edges.
- To fix grainy video: Apply Denoising to remove ISO noise while preserving textures.
- To make resolution higher: Upscale low-res 720p/1080p to 4K via AI for a native high-definition look.
- Optimal export settings: Use HEVC/AV1 codec at 30-60 Mbps to ensure zero quality loss after editing.
At a Glance - Top-Rated Video Quality Enhancers (2026 Tested)
We've analyzed 30+ tools based on AI upscaling efficiency, stabilization accuracy, processing speed and more. Here are the top performers for your specific needs:
| Video Quality Enhancer | Best for | Platform | AI Capability | Ratings |
|---|---|---|---|---|
Overall best for 4K/8K AI upscaling and batch enhancement |
Windows/Mac |
AI Super-Resolution (8K), Frame Interpolation, AI Stabilization | ||
AI restoration of old footage |
Windows/Mac |
Generative Detail Reconstruction, Motion Deblur, 16K Upscale |
||
The industry standard for video quality fixes for skilled users |
Windows/Mac |
AI Enhace Speech, Generative Extend, AI Color Match |
||
Surgical fixes for blurry and unstable videos via advanced tracking |
Windows/Mac |
AI Object Removal (Content-Aware Fill), Face Tracking |
||
Optimized high-speed enhancement for Mac users |
Mac |
Magic Mask, Smart Conform, Cinematic Mode adjustments |
||
The best free/open-source way to fix video quality with 3D modeling |
Windows/Mac/Linux |
AI Denoiser (Cycles), Motion Tracking |
||
Quick, one-click online AI visual boosts |
Online |
AI Auto-lighting, One-tap Sharpening |
||
Simple web tool for basic design-centric fixes | Online | Magic Edit, Basic AI Video Upscaling |
||
AI-driven restoration for social media creators |
Web/iOS/Windows |
UHD Image Quality (Upscaling), Anti-flicker, AI Retouch |
||
Granular manual control over video parameters | iOS/Android | Manual "Adjust Display" Engine (Non-AI) |
How to Make a Video Higher Quality on Windows/Mac
The most effective way to improve video quality is to utilize desktop video quality enhancer software. Video files are typically large in size and improving their quality often results in even larger file sizes. Video enhancing software generally offers more stable performance and larger storage space, minimizing the risk of crashes and data loss while fixing video quality. Additionally, a computer with a larger screen and sharper graphics can better display the resulting video. Here we have curated the 6 best video enhancement software that could increase video resolution to 1080p/4K, with detailed how-tos included.
1. VideoProc Converter AI
Overall best AI video quality enhancer to upscale low-quality video to sharp 1080p/4K
- OS: Windows 7+, macOS 10.13+. Uses CoreML/DirectML (DirectX 12+) for optimized AI Super Resolution.
- Pricing: Free trial; Price packages start at $34.95
- Important Update: The latest V8.7 version has overhauled its Super Resolution engine (V3 models), delivering a massive 40%-80% speed boost. It now processes high-frame-rate 4K content swiftly, significantly outperforming CPU-based competitors and getting smarter texture-and-motion enhancement for sharper results.
In our 2026 testing, VideoProc Converter AI remains the most robost tool if you want to make a video higher quality. It successfully bridges the gap between professional-grade AI enhancement and one-click simplicity, making it the go-to solution for both batch fixing and 4K video upscaling.
Why VideoProc Is the Best for Improving Video Quality:
- AI Super Resolution: Unlike traditional stretching that causes pixelation, VideoProc's AI reconstructs missing pixels while enhancing videos and images by 200%, 300%, or 400%. It can seamlessly increase the quality of 360p videos to the pristine standards of HD/4K with natural textures and effectively remove blur, flickering, artifacts, and ISO noise from CCTV, downloads, DVD rips, and old camera footage.
- AI Frame Interpolation & Stability: In addition to its ability to upscale and enhance low-quality videos, the best AI video enhancer fixes the "feel" of your video. The AI Frame Interpolation creates smooth 60/120fps motion, while AI Stabilization surgically removes jitters from GoPro, drone, or handheld phone shots.
- High-Fidelity Detail Generation: This tool enriches skin texture, hair sharpness, and natural fabric calrity, ensuring an immersive 4K viewing experience.
- Level-3 GPU Acceleration: VideoProc Converter AI is impressively lightweight and places minimal demands on your hardware resources. By offloading 90% of the task to NVIDIA/AMD/Intel GPU, it ensures a seamless and efficient AI upscaling performance, and prevents computer crashes—a common issue when processing large AI video files.
How to Enhance and Make a Video Higher Quality with VideoProc Converter AI
Step 1. Free download the best video enhancing software, run it, and click the 'Super Resolution' tab on the home page.

Step 2. Import the videos that you wish to enhance by dragging or clicking the +/Add Media icon. You can add multiple videos at one time.
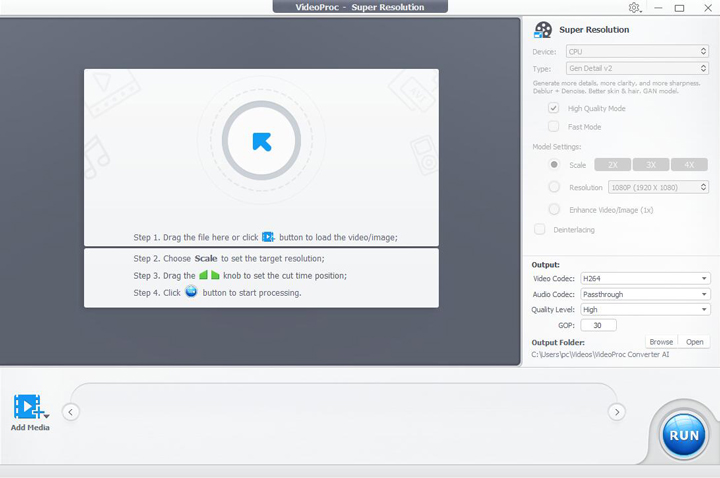
Step 3. Select the AI model for your specific footage:
- Gen Detail (recommended): generate more details, clarity, and sharpness for your videos, and deliver better quality.
- Real Smooth (recommended): tailored for video restoration, smoothing, flaw elimination, and enhanced fidelity.
- Anime: enhance and restore anime videos on older computers.
- Zyxt: enhance the resolution of low-quality video on older computers.
Step 4. Choose a scale option to enhance your video resolution by 2X, 3X, or 4X, or use the output resolution presets (1080p/2K/4K) directly to specify the output video size you want. Select between 'Fast Mode' or 'High Quality Mode' based on your preference for either improved processing speed or quality.
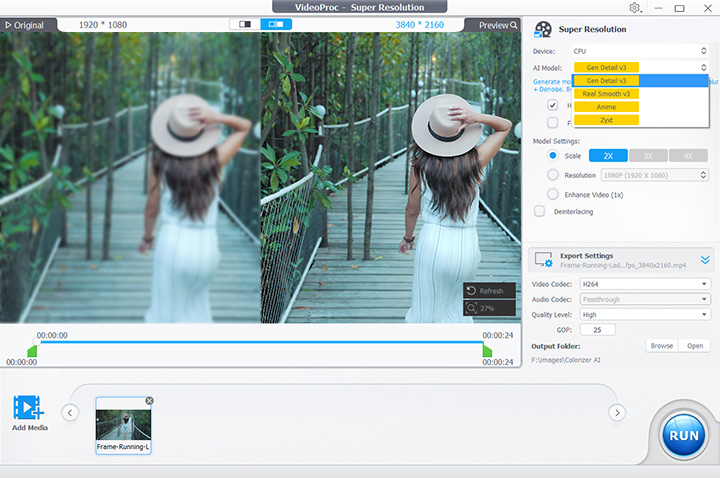
Step 5. (Optional) you can cut the video to enhance only a specific segment. Moreover, you can use the AI Frame interpolation and AI Stabilization features to further enhance your video quality.
Step 6. Choose a video codec like H.264 for best compatibility, HEVC for long-term storatge, AV1 for high-efficiency web delivery, Prores for further editing. Hit the Run button to fix and make the video quality better using VideoProc Converter AI.
Expert tips to fix specific video quality issues with VideoProc Converter AI:
- For low-res pixelated video: Use AI Super Resolution and choose Gen Detail or Real Smooth model. This generates new pixels based on deep learning rather than just stretching the image.
- For blurry or high-ISO grainy video: Also go to AI Super Resolution and choose Enhance (1x) only. This will not enlarge the video but just remove video artifacts instead.
- For shaky/blurry video: Go to AI Video Stabilization first, and then use AI Super Resolution to sharpen the video if your content is low in resolution.
- For choppy or stuttering video: Leverage AI Frame Interpolation to boost the frame rate to 60fps or higher for a fluid motion look.
How VideoProc Converter AI Performs in Practice?
In my real-world testing of VideoProc Converter AI, I put its portrait video upscaling to the test on a system powered by an AMD Ryzen 5 5600X, 64GB RAM, and an AMD Radeon RX 6700 XT (8GB) running Windows 11. The results were honestly remarkable: the AI didn't just enlarge the frame—it meticulously reconstructed fine textures like individual hair strands, the intricate details of floral patterns, and the subtle glint in the eyes, all of which remained razor-sharp even at high zoom levels. By effectively scrubbing away digital noise and motion blur, it made soft, low-res footage a clean, high-fidelity clip with impressive processing efficiency on my hardware.


2. Topaz Video Enhance AI
Best AI video quality enhancer for restoring old footage
- OS: Windows 10/11 (64-bit), macOS 11 or later. 8GB+ VRAM suggested for stable performance.
- Pricing: 30-day free trial; Starting at $25/mo, $299 billed annually.
- Key Tech: A library of models (Iris, Nyx, Theia, Appolo, Chronos, etc) for specific tasks like face recovery, motion deblurring, low-light denosiing, etc.
Topaz Video AI stands as a dedicated video quality enhancer and restoration software desktop users could leverage to fix and enhance video quality. Powered by cutting-edge artificial intelligence technology, it goes beyond the traditional methods to rectify and amplify video quality, rendering visuals sharper and more intricately detailed.
The software uses machine learning algorithms such as Iris, Proteus, and Nyx to analyze and identify the patterns in the video footage and then fills in the missing details by adding new pixels to the image. It also reduces noise and artifacts that may be present in the original footage, resulting in a cleaner and more polished final product. However, it demands high-end hardware and more processing time compared with other software.
Pros:
- Elevate video quality up to 8K resolution.
- Adjust color and contrast, deinterlace footage, stabilize shaky footage, and remove motion blur.
- Exceptional for human face recovery and fine texture restoration using specialized AI models.
Cons:
- Not very friendly for beginners.
- Significant investment at $299.
- Depands high-end hardware (GPU) for reasonable processing speeds.

How to Make Old Videos Better Quality with Topaz Video Enhance AI
Step 1. Download the video quality enhancer to your PC/Mac, run it and import your videos.
Step 2. Choose the AI processing models
Once the videos are imported, you need to select the ideal AI models for enhancement. The video enhancing software provides a diverse range of AI Processing models, each tailored to cater to specific video enhancement requirements.
Pro Tip: For old home videos with blurry or compressed faces, the Iris model often delivers better facial detail recovery. For general noise reduction and sharpening with flexible manual controls, Proteus is a versatile choice.
Step 3. Adjust the output settings.
Apart from the presets for fixing and improving video quality, the video quality increaser also offers the option to craft custom settings for more personalized results. You can determine the output settings based on your requirements and preferences once you've decided on the AI models.
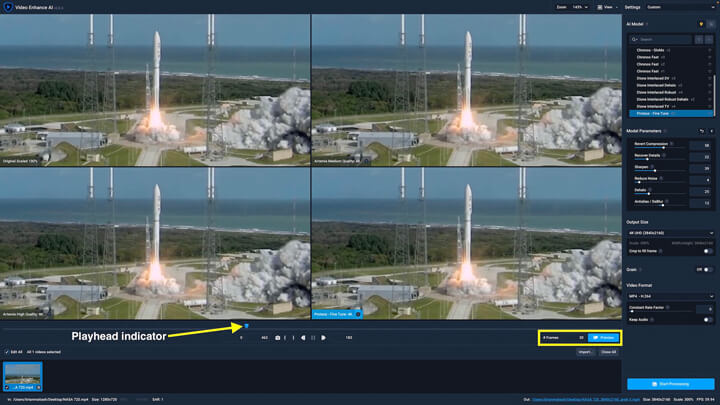
Step 4. Preview the output.
Before proceeding with the output, you have the option to generate a 30-frame rendered preview of your video, which can be a valuable checkpoint, allowing you to evaluate the enhancements and modifications applied to your video content before initiating the complete processing of the entire video enhancement.
Optional: you can opt to trim only the specific segment of the video you need to enhance, and to do that, just drag the slider along the timeline to designate the start and end timestamps.
Step 5. Click on Export to enhance video quality and save the final output.
3. Adobe Premiere Pro
Best for the industry professionals to make a video higher quality and color grading
- OS: Windows 10/11; macOS 12.0 or later.
- Pricing: $22.99/mo (Creative Cloud Pro: $41.99/mo)
- Key Tech: Integrated with Adobe Sensei AI for automated enhancement and Lumetri Color engine.
How to make video quality better? As the industry-leading best video editing software anda powerful video quality enhancers for 1080P, Adobe Premiere Pro absolutely does the trick. The video enhancing software offers a variety of tools to fix and improve video quality, including the Unsharp Mask Effect. This effect allows you to sharpen and enhance blurry footage by fine-tuning parameters such as Amount, Radius, and Threshold. On top of that, the robust 4K video enhancer software can also help you boost contrast and clarity, fine-tune vibrance and saturation, adjust shadow tint, and even give your video a cinematic look reminiscent of a Hollywood film. With Adobe Premiere Pro, you can turn a low-quality video into a polished masterpiece.
Pros:
- Professional-grade toolset to fix low-quality videos and make bad quality videos better.
- Includes both mannual control and AI features like Auto Reframe and AI Speed Enhancement to enahnce video quality.
- Seamless integration with other Adobe Creative Cloud apps.
Cons:
- The plugin (like Super-Resolution) or complex nesting is required to increase video resolution.
- Steep learning curve for beginners.
- High hardware overhead when using Enhance Speech and Auto Reframe simultaneously on 4K timelines.
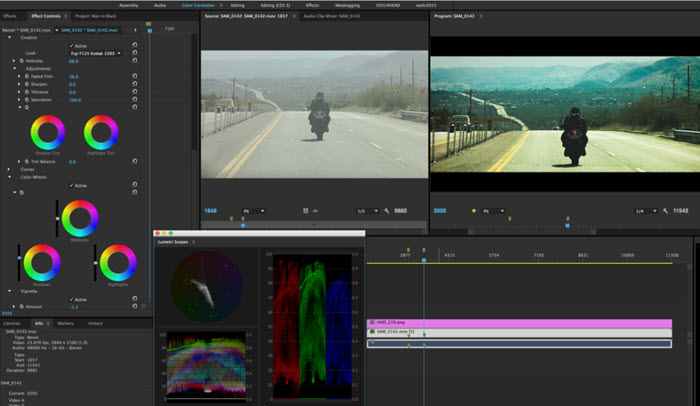
How to Improve Video Quality with Adobe Premiere Pro
Step 1. Open Adobe Premiere Pro and go to "File" in the top left corner. Choose "Import" to add your video to the project, and drag your video from the Project panel to the Timeline.
Step 2. Right-click in the Project panel, choose New Item > Adjustment Layer. Drag it to the Timeline and place it above your video clip. This allows you to apply effects to the entire sequence non-destructively.
Step 3. To enhance video quality, first use the Razor tool (shortcut: C) to cut unnecessary parts of the Adjustment Layer if needed. Then click the Adjustment Layer with the FX icon, go to the "Effect" tab, and drag "Unsharp Mask" onto the Adjustment Layer in the Timeline. Adjust the sliders (Amount, Radius) in the "Unsharp Mask" settings on the left to fix video quality and make video quality even better. You can also add masks to your video using the shape tools.
Pro Tip: Use the Lumetri Color panel alongside sharpening to fix exposure and color fading for a complete quality boost. For users with limited B-roll, leverage Premiere's Generative Extend to add frames and maintain high-quality pacing.
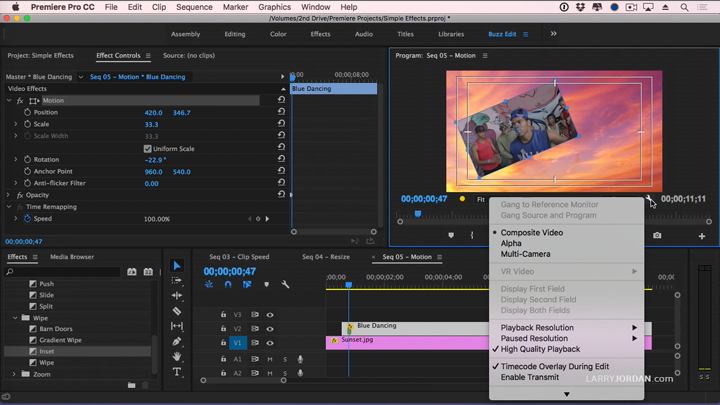
Step 4. Locate the Exports and customize the settings as per your preference. Customize your settings (H.264/HEVC, bitrate) to ensure the highest output quality. Then, click "Export" to enhance video quality.
4. After Effects
Best video quality enhancer to fix video colors and correct poor exposure.
- OS: Windows 10/11; macOS 12.0 or later.
- Pricing: $22.99/mo (Annual plan, paid monthly).
- Key tech: Advanced Motion Tracking, Warp Stabilizer VFX, and Content-Aware Fill.
In addition to Premiere Pro CC, Adobe offers another tool for improving and fixing video quality: After Effects. While this video quality enhancer is primarily geared toward animation compositing, motion graphics, and visual effects (VFX), it also helps you fix video colors, remove grain, correct poor exposure and white balance issues, and stabilize shaky footage using the Warp Stabilizer VFX effect to increase video clarity. Whether you need to touch up a few rough spots or completely fix and improve video quality, After Effects has you covered.
Pros:
- Enhance video quality, adjust brightness and contrast, and correct poor exposure and white balance issues.
- It can fix grainy footage.
- Now includes native AI-powered masking and restoration tools.
Cons:
- While it now has native AI tools, a dedicated Super Resolution plugin is still recommended for professional-grade high-res upscaling.
- A steep learning curve is required, which turns some users to the After Effects alternatives.
How to Make a Video Higher Quality with After Effects
Step 1. Import your footage you wish to enhance the quality of to the After Effects
Open After Effects and import your video by dragging and dropping it from your computer to the program. Place the video on the Timeline by dragging it from the Library.
Step 2. Stabilize Shaky Footage
Select your video layer in the timeline. In the menu, go to Effect > Distort > Warp Stabilizer VFX. Adjust stabilization settings in the Warp Stabilizer VFX effect to reduce shakiness.
Step 3. Color correct your video to improve video quality.
In the menu, go to Effect > Color Correction. Use the Lumetri Color effect to fine-tune aspects like exposure, contrast, highlights, shadows, and more under Basic Correction. You can also fix or enhance colors using White Balance.
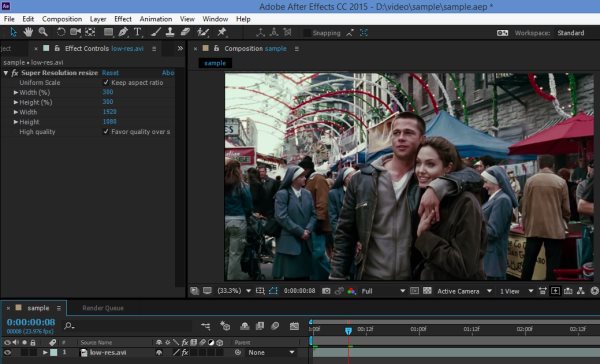
Step 4. Export to enhance your video quality
Tips: When exporting, choose H.264 or HEVC as the video codec to maximize final project quality. For the best results in 2026, use the Adobe Media Encoder queue for exporting.
5. Final Cut Pro
Best video quality enhancer to fix flawed and low quality video files on Mac.
- OS: macOS 13.5 or later. (Optimized for Apple Silicon M1-M4, utilizing the Neural Engine for 2x faster AI Light and Color enhancement.)
- Pricing: $299.99 (one-time price) or $4.99/mo for iPad version.
- Key tech: Metal engine acceleration, AI-powered Enhance Light and Color and Magnetic Mask.
Final Cut Pro, developed by Apple Inc., is a top-tier color grading software and 4K/1080p video quality enhancer software. With its comprehensive suite of filters and correction tools, you can easily adjust brightness, white balance, and contrast, as well as fine-tune the gamma levels, apply sharpening or blurring effects, and add distorting effects such as fisheye, pond ripple, and whirlpool to fix and enhance video quality. Additionally, the video enhancement software offers LUTs and tint filters that allow you to completely transform the look and feel of your footage. Whether you're working on a professional production or a personal project, Final Cut Pro is an excellent choice for taking your video quality to the next level.
Pros:
- It offers a non-linear timeline that let you fix and enhance flawed or low-quality video files easily.
- Highly optimized for Mac hardware, providing the fastest rendering speeds for 4K/8K files.
- It has much more features and control than iMovie.
Cons:
- There's no Final Cut Pro for Windows OS.
- It is very pricy.
- Requires high-speed SSD storage for optimal performance during AI processing.

How to Make Low-Quality Video High Quality with Final Cut Pro X
Step 1. Import your clips to the video quality enhancer and place it on the Timeline.
Step 2. Select your footage on the timeline, and press Option + Command + B. In the Inspector, change the Balance Color setting from Automatic to White Balance.
Fine-Tune Exposure: Press Command + 6 to open the Color Board. Adjust the Exposure mid-tones and add blue or red to the highlights as needed.
Step 3. Press Command + 5 and navigate to Effects. Under Basics, find the Noise Reduction filter, and configure Noise Reduction, adjusting the Amount to High and Sharpness to Medium. This can greatly fix and improve video quality.
Tip: As the Noise Reduction effect is resource-intensive, you can improve the performance by dragging the Noise Reduction effect to the top of the effects list.
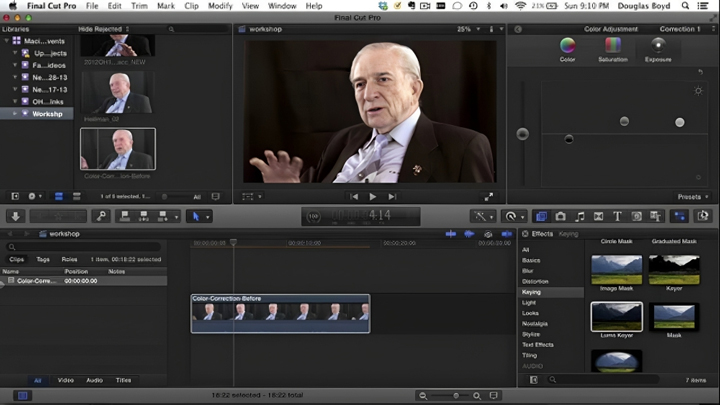
Step 4. Preview the result and use Command+E to export the project. Choose ProRes for master quality or H.264 or HEVC for a balance between file size and high quality.
6. Blender
Best free video quality enhancer with 3D modeling and VFX capabilities.
- OS: macOS 13.5 or later. (Optimized for Apple Silicon M1/M2/M3/M4).
- Pricing: free.
- Key tech: Cycles AI Denoiser, AgX Color Management, and FFmpeg encoding engine.
Blender is renowned for its 3D modeling and VFX capabilities, as well as its ability to enhance videos quality via its built-in Video Sequence Editor (VSE). With customizable render settings, you can improve your video quality by adjusting the encoding format from Xvid to H.264 or HEVC, increasing the bitrate settings and samples for maximum clarity. Moreover, the free video quality enhancer's Color Management feature enables you to fine-tune your video's display device, video transform (AgX/Filmic), contrast, gamma, and sequencing.
Pros:
- It is free and open-source with no watermarks.
- Includes advanced AI Denoiser to fix grain and noise in both rendered and imported footage.
- Versatile for both basic editing and advanced VHX video enhancement.
Cons:
- Steep learningcurve; The wrong settings might decrease the image quality.
- It can be slow with both CPU and GPU.

How to Fix the Quality of a Video with Blender
Step 1. Import the footage you wish to enhance the quality of.
Open Blender and choose the "Video Editing" workspace, and import your video by clicking "Add" > "Movie" and selecting your file.
Step 2. In the Video Sequencer, apply the Color Balance (Lift/Gamma/Gain) effect strip to adjust shadows, mid-tones, and highlights. For Blender 4.0 and later, ensure the View Transform is set to AgX in Render Properties → Color Management for improved color accuracy and dynamic range. AgX is superior to the old Filmic transform for preserving highlight details in high-intensity colors, making your video look much more 'expensive'.
Step 3. se the Sharpen effect strip to enhance edge clarity. If needed, apply the Denoise effect for mild noise reduction—though keep in mind that Blender’s VSE denoising is more limited compared to dedicated AI video denoisers.
Step 4. In the Output properties, set the File Format to FFmpeg Video. Under the Encoding tab, choose the H.264 or HEVC video codec and set the Output Quality to "Perceptual Lossless" to ensure you don't lose quality during the final render. Click Render > Render Animation (Ctrl+F12) to save your enhanced video.
How to Enhance Video Quality Online
The online video quality enhancers are becoming increasingly popular, and most video quality increasers online are free and easy to use, enabling users to improve video resolution, perform basic color correction, and remove shaky footage and background noise to fix and improve the quality of video. They are the go-to choice for quick social media fixes.
1. Canva
Best all-in-one AI video quality enhancer for social media and business.
- OS: Web-based, iOS, and Android.
- Pricing: Free for basic tools; $120/year (approx. $10/mo) for Canva Pro (includes AI Video Upscaler).
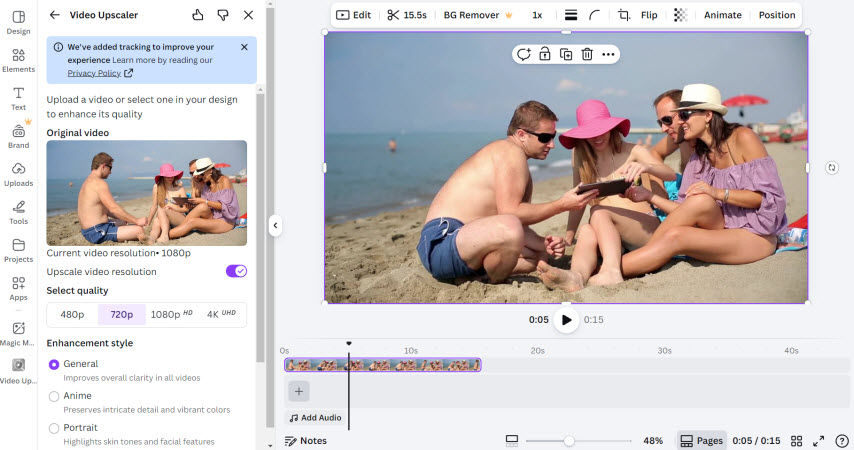
Canva has evolved from a graphic design tool into a powerful AI video quality enhancer. Its dedicated "Video Upscaler" app (inside the Apps marketplace) uses advanced machine learning to sharpen edges, reduce noise, and upscale video resolution to 4K. What makes Canva stand out is that it combines AI automation with manual control—after the AI upscaling, you can still use sliders to fine-tune white balance, brightness, saturation, and clarity to match your brand style.
Note: Upscaling a video in Canva requires at least 45 Video Upscaler credits, make sure you have enough credits before doing so.
Pros:
- One-click 4K AI Upscaling combined with manual adjustment sliders.
- No watermarks for Pro users and an incredibly vast library of templates.
- High-speed cloud rendering that doesn't rely on your computer's GPU.
Cons:
- The Video Upscaler app is primarily a Pro feature.
- Best for short clips (under 10 minutes); very long videos may take time to process.
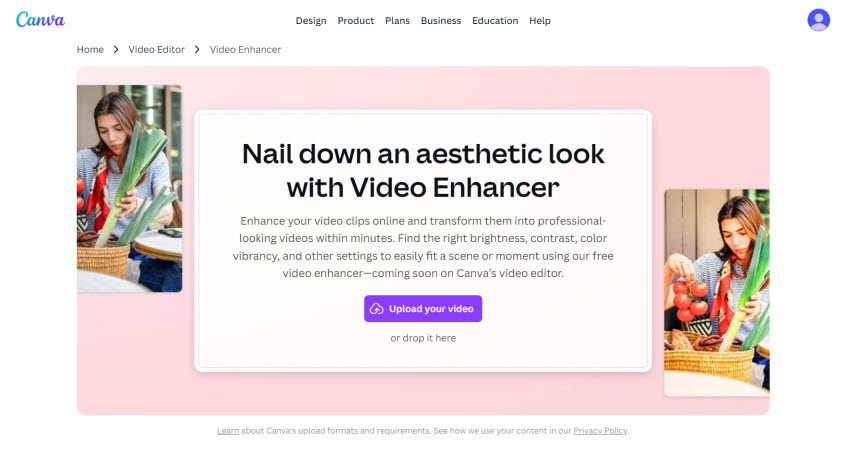
How to Fix Video Quality Online with Canva
Step 1. Open Canva and create a video project. Go to the "Apps" tab on the left and search for "Video Upscaler".
Step 2. Upload your video. Choose your desired resolution (e.g., HD or 4K) and enhancement style, then click "Upscale video". Choose a specific style based on your source video, such as General, Anime, or Portrait.
Step 3. Once added to your design, click "Edit Video" at the top. Use the Adjust tab to fine-tune brightness, contrast, and sharpness to further improve video quality.
Step 4. Click "Share" and select "Download" as a high-quality MP4.
2. Fotor Video Enhancer
Best online video quality enhancer to improve video resolution with one click
- Pricing: Free limited version; Pro: $3.99/mo; Pro+: $8.33/mo (billed monthly).
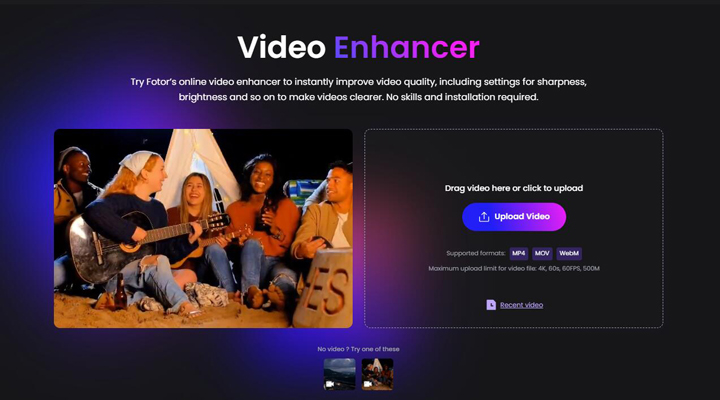
Fotor Video Enhancer is a cutting-edge online tool that uses AI to improve video quality effortlessly. It supports common formats like MP4, MOV, and WebM and offers both automatic enhancements for aspects like sharpness, color, and brightness. This tool bridges the gap between advanced video enhancement and ease of use, offering a powerful solution for content creators who want high-quality results without complex software. However, make sure your source video is less than 1GB in size and 5 min in length.
Pros:
- Easy to use and AI-powered enhancements.
- Automatic enhancements like sharpening details, color correction, and brightening dark videos.
- User-friendly interface and cross-device compatibility.
Cons:
- Potential for lower image quality and lossy compression compared to desktop software.
- Lacks granual manual control, for example, there are no sliders for sharpness or brightness.
- Limited free version (Watermarks on full exports).
How to Make a Low Quality Video Look Better Online with Fotor
Step 1. Go to Fotor's video enhancer page and upload your video. You can either drag and drop your video file or click to browse and select it.
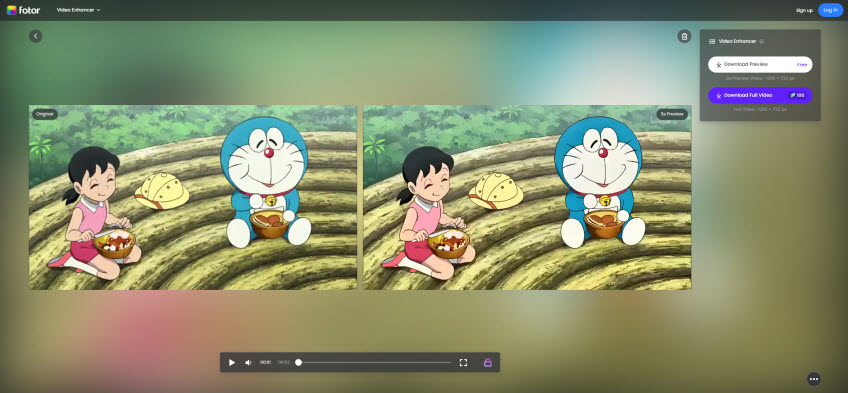
Step 2. Once uploaded, Fotor's AI-powered video enhancer will automatically analyze and improve your video quality.
Step 3. While Fotor applies automatic improvements, like sharpening details, color correction, and brightening dark areas.
Step 4. Preview the enhanced video, and download the enhanced video once you are satisfied with the results.
How to Enhance Video Quality on iPhone/Android
For mobile users, improving video quality on iOS or Android directly is a huge time-saver. In 2026, mobile video enhancer apps have evolved to offer both automated one-tap improvements and detailed manual adjustments. Here are the most effective tools for a quick quality boost on the go.
1. CapCut
Best all-in-one app to improve video quality with integrated sharpening and stabilization tools.
- OS: iOS 13.0 or later, Android 5.0 or later.
- Pricing: Free; Pro version available for $9.99/mo.
- Key tech: Image Quality Upscaler, Anti-flicker settings, and smart stabilization.
CapCut is a powerful tool designed to improve video quality through a suite of practical editing features. It addresses common recording issues such as flickering lights, digital noise, and shaky footage. With options to export in HD or UHD, it ensures that raw mobile clips are transformed into professional-grade content suitable for any social platform.
Core Features for Low-Quality Video Enhancement:
- Flicker Removal: Adjust levels to eliminate distracting light flickers often caused by artificial lighting during recording.
- Noise Reduction: A one-tap panel to smooth out grainy footage, particularly useful for travel or night-time videos.
- HD/UHD Adjustments: Support for upscaling blurry videos to higher resolutions, including 4K at 60fps.
- Smart Stabilization: Offers multiple levels of stabilization (Minimal, Recommended, or Most Stable) to fix handheld camera shakes.
- Auto Adjust: Instantly balances tones, exposure, and colors for users who need a quick, natural look without manual color grading.
- Retouching: Dedicated tools for human-centered videos to refine facial details and body visuals while maintaining high resolution.
Pros:
- Comprehensive toolkit covering stabilization, noise, and color in one app.
- Large collection of high-quality templates for quick, professional layouts.
- No watermark on free exports (if the end-frame is removed).
Cons:
- High-end "Image Quality" upscaling models require a Pro subscription.
- Advanced processing can cause older devices to heat up.
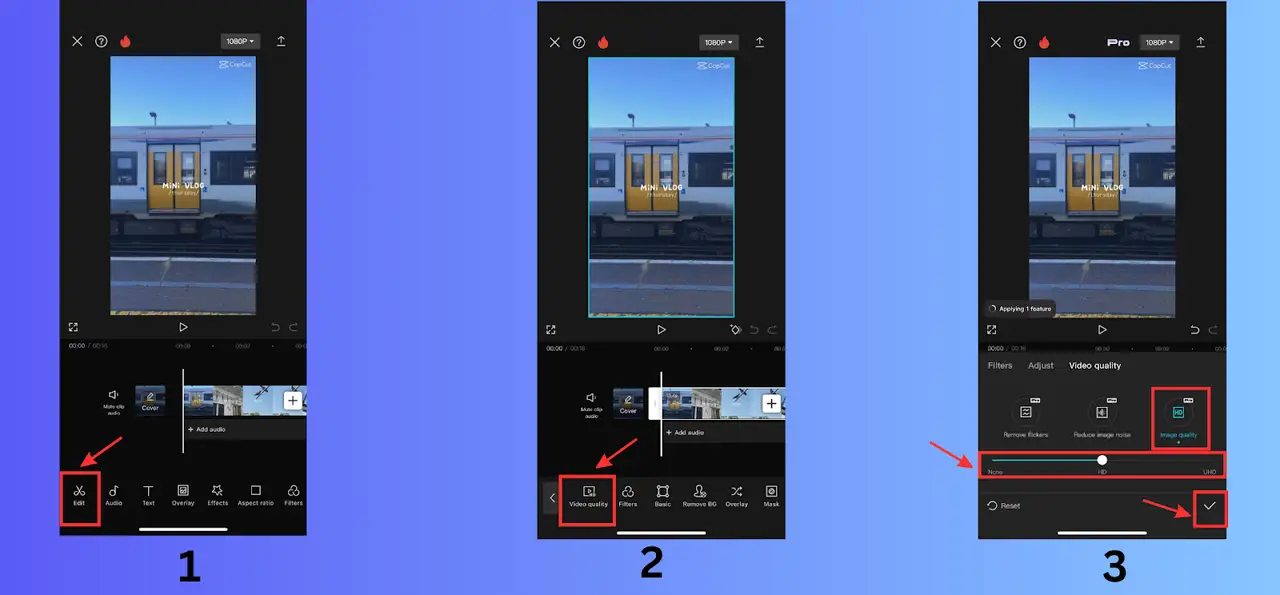
How to Make a Video Higher Quality on Mobile with CapCut
Step 1. Download and Import: Install the CapCut App from your official store. Open it, select "New Project," and choose the footage you want to improve from your gallery.
Step 2. Enhance Video Quality:
- Upscale: Tap the clip on the timeline, select "Image Quality" from the menu, and pick HD or UHD to sharpen the visuals.
- Stabilize: Choose "Stabilize" and drag the slider to your preferred level (Recommended or Most Stable) to fix shakes.
- Fix Colors: Tap "Auto adjust" to automatically perfect the brightness, contrast, and tones for a clearer look.
- Remove Noise: Use the "Reduce image noise" option to clean up grainy or dark footage.
Step 3. Export and Share: Once satisfied, tap the resolution settings at the top (ensure it's set to 1080p or 4K), then hit the export button to save your clip for social media sharing.
Money-saving tip: Batch-process your most critical clips first to maximize your Pro credits.
2. Videoshop
Best manual video quality enhancer app with various editing features.
- OS: iOS 13.0 or later, Android 7.0 or later.
- Pricing: Free (offers in-app purchases and subscription-based Pro features).
- Key tech: Granular display adjustment engine and high-bitrate rendering.
Videoshop offers a comprehensive set of manual tools for users who prefer to fine-tune their footage themselves. It enhances video quality primarily through precise control over parameters like brightness, contrast, saturation, hue, and color balance rather than automated AI processing. It is a reliable tool for basic correction, trimming, and rescaling, providing a stable experience for daily mobile editing tasks.
Price: Free (Pro features require subscription)
Pros:
- Detailed manual sliders for brightness, contrast, hue, and saturation.
- Allows users to set custom resolutions and frame rates for export.
- Clean, intuitive interface that is easy for beginners to navigate.
Cons:
- Lacks automated AI-based restoration or pixel reconstruction.
- Can occasionally become unstable when processing very large file sizes.
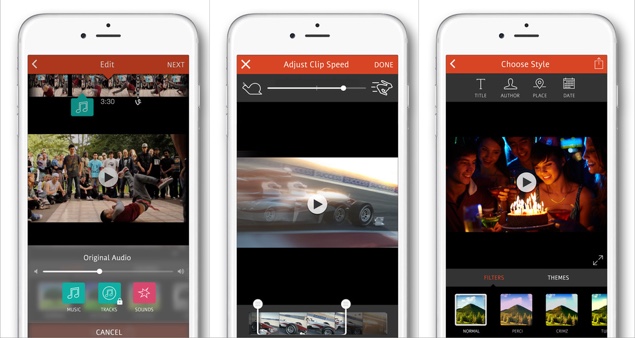
How to Enhance and Fix Video Quality on Mobile with Videoshop
Step 1. Install and open Videoshop on your device. Tap the "+" button to import your video.
Step 2. Apply adjustments to improve the overall look:
- Tap "Adjust" to manually fix brightness, contrast, and color saturation.
- Use the "Sharpen" filter to define edges if the footage appears soft.
- Use the "Trim" or "Crop/scale" features to optimize the video's composition.
Step 3. Preview your edits to ensure the quality is improved. When satisfied, tap "Download" and choose the highest resolution for export.
Note: Mobile apps and online solutions for video enhancement, while convenient, generally offer limited capabilities compared to AI-powered software. For significant video quality improvements, it's highly recommended to use the advanced AI video upscaling software mentioned earlier in this post on a computer.
Pre-Production Tips: How to Make High-Quality Video from Start
Apart from using video quality enhancers to fix issues later, the most effective way to make a video higher quality is to capture the best possible footage during filming. Here are the methods professional creators use:
- Use a High-Quality Camera: Start with the best camera you can afford. Higher resolution (like 4K) provides better quality and allows for cropping without losing detail.
- Adjust Lighting: Good lighting is crucial. Use natural light or invest in softbox lights to eliminate shadows and enhance clarity. This is the best way to prevent digital noise.
- Stabilize Your Footage: Use a tripod or gimbal to avoid shaky footage. Many editing software also offer stabilization features.
- Check Your Framing: Pay attention to the composition of each shot. Use the rule of thirds to create visually appealing scenes and avoid cluttered backgrounds.
- Adjust Camera Settings: Use manual settings for better control. Set the appropriate frame rate (e.g., 24fps for a cinematic look) and adjust ISO, aperture, and shutter speed to match the lighting conditions.
- Shoot in a Controlled Environment: Minimize background noise and distractions. Choose quiet locations and time your shoots when there are fewer interruptions.
- Record Extra Footage: Capture more footage than you think you’ll need. B-roll can be invaluable during editing and helps create a more dynamic video.
Post-Production Fixes: How to Make a Video Higher Quality via AI
Fixing video quality involves a combination of techniques, depending on the specific issues you're facing. Here's a breakdown of common problems and their solutions.
Frustrated with these multi-step adjustment? Discover a one-click solution to effortlessly fix and enhance your video quality.

1. AI Upscaling (Fixing Pixelated and Low-Resolution Video)
One of the most effective ways to combat poor video quality, especially when dealing with low resolution footage, is through AI upscaling. This process involves using specialized software or online tools, often powered by artificial intelligence, to increase the pixel count of your video. Unlike traditional stretching which causes blurriness, modern AI algorithms analyze the existing frames and intelligently generate new pixels, effectively enhancing clarity and sharpness. This is particularly useful for older 480p or 720p footages shot with lower-resolution cameras, allowing you to view them on larger screens without significant pixelation.
2. Sharpening and Denoising (Fixing Grainy and Blurry Video)
For noticeably better video quality, sharpening and noise reduction are essential. Sharpening refines edges for clarity, while noise reduction smooths out grain, especially in low-light situations. The careful application of both techniques results in a cleaner, more professional-looking video.
3. Color Correction (Fixing Faded and Dull Colors)
Color correction significantly improves video visuals. Adjusting brightness, contrast, and saturation fixes imbalances and adds vibrancy. While re-shooting with better lighting is ideal, post-production adjustments can salvage footage. Advanced color grading allows for creative control, transforming dull videos into captivating ones.
4. Video Stabilization (Fixing Shaky Video)
Shaky footage can be distracting and detract from the overall viewing experience. Video stabilization tools address this issue by smoothing out unwanted camera movements. These tools analyze the video for motion patterns and apply algorithms to counteract the shakiness, resulting in a more stable and professional-looking video.
5. AI Frame Interpolation (Fixing Choppy & Low-FPS Video)
A "higher quality" feel is often defined by motion smoothness. If your video looks choppy, AI Frame Interpolation can generate new intermediate frames to boost 24fps or 30fps to 60fps or even 120fps. This results in buttery-smooth playback that mimics high-end professional camera outputs.
6. Advanced Encoding (Avoiding Compression Artifacts)
Compression artifacts, which appear as blockiness or blurriness, are a common problem when dealing with compressed video files. Re-encoding your video with a higher bitrate can help mitigate these artifacts by preserving more visual detail. When exporting your videos, it's crucial to choose appropriate codecs like HEVC or AV1 and export settings to minimize quality loss.
Using a file type that employs less compression, or selecting a higher quality compression setting, can significantly improve the final output. This attention to detail during the encoding process ensures that your videos maintain their clarity and sharpness, even after being compressed for storage or online distribution.
FAQ
1. What are the common video quality related issues and how do they affect final clarity?
Video quality issues can throw a wrench into your viewing experience. Understanding why they happen is the first step toward fixing them. Here are some common culprits:
- Low Resolution (Blurriness): Blurriness occurs when videos lack the sharpness and clarity, resulting in a pixelated or blurry display. It is often caused by recording with outdated sensor, or using digital zooming, which stretches existing pixels beyond their limits. This is why AI upscaling is required to reconstruct the missing data.
- Compression Artifacts (Blockiness): These occur when video files are compressed, leading to visible distortions like blocky or fuzzy elements. They are usually caused by excessive file compression or a low bitrate, where visual data is discarded to save storage space.
- Frame Rate Issues (Choppiness): Videos with inconsistent or low frame rates can cause stuttering or choppy playback. This is often the result of a mismatch between recording and export settings, or shooting at a rate too low to capture fluid motion.
- Color Distortion: Problems with color accuracy, saturation, or contrast can affect the overall visual appeal. These issues often stem from low color depth (8-bit) or poor lighting conditions that fail to capture a full range of tones.
- Interlacing: An outdated issue where the lines between two consecutive frames are visible, causing a comb-like pattern. It happens when footage shot in interlaced mode is played on modern progressive displays without proper de-interlacing.
- Noise and Grain: Unwanted visual disturbances, like static or graininess, can degrade video quality.They are commonly caused by high ISO settings used in low-light environments, where the sensor struggles to capture clean light data.
- Aspect Ratio Problems: When the proportions of the video are not maintained, leading to a distorted display.This is caused by a mismatch between the source footage dimensions and the final export or display settings.
2. How does AI video enhancement differ from traditional enhancement methods?
Unlike traditional methods that apply fixed filters uniformly across frames, AI-powered enhancement employs neural networks (like Convolutional Neural Networks) to analyze contextual patterns in your footage. This adaptive intelligence allows three key distinctions:
- Cognitive Restoration: AI reconstructs missing details by referencing millions of learned video patterns, while traditional upscaling simply stretches pixels.
- Dynamic Temporal Processing: Modern AI models adjust enhancement parameters frame-by-frame based on scene content, ensuring visual consistency and removing artifacts that legacy software often misses.
- Automated Efficiency: Modern AI tools achieve Hollywood-grade results in minutes through automated workflows, eliminating intensive manual color grading.
3. What is the best way to make a bad quality video better?
If you are seeking a desktop solution, check out VideoProc Converter AI, the best AI video quality enhancer for Windows/Mac to fix and improve video quality; if you are looking for an online video quality enhancer, try Fotor Video Enhancer. Meanwhile, mobile users can rely on Videoshop as a dependable option to fix and enhance video quality.


