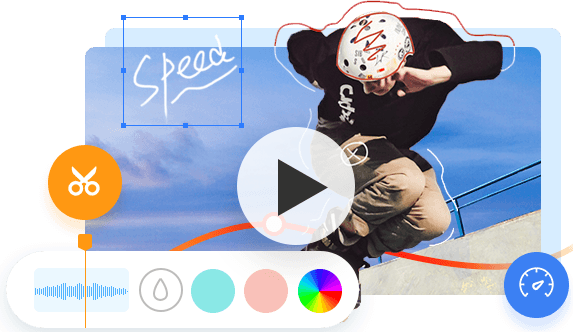
Summary: Blender builds its fame by 3D animation making and 3D modeling, but its Video Sequence Editor should not be ignored either. Video editing and 3D modeling are two different functions in this program. People who utilize these two features well create brilliant videos with magnificent 3D effects. Now we're going to make an all-round review of Blender.
What Is Blender Software?
When talking about Blender software, 3D animation making may come to most people's minds first. Of course, it is a piece of powerful 3D animation making, 3D modeling, and sculpting software. But its built-in video editor never lags behind other video editors. It is the versatility that makes it excel most free video editors.
But it was not born as what it is now. It was originally an internal 2D animation tool of a Dutch animation studio NeoGeo which quickly grew as the leading animation house in Europe in the late 1990s. Later its founder Ton Roosendaal decided to found a new company to develop a spin-off of NeoGeo. And Blender was developed in this new company called Not a Number (NaN). Though it was once shut down because of the company's capabilities and the market realities at that time, it survived with the help of public fundraising. And in 2002, its founder decided to build a team of dedicated volunteers all over the world and make Blender software free and open-source.
Disclaimer
Today we are going to make a comprehensive review of this software objectively, and trying to make every aspect clear to users who are seeking a tool that suits their work best. We promise to abide by the reviewing rules and present valuable facts to our readers. So you can read this article without worrying about ads or bias.
Note: Blender software is compatible with Windows, macOS, and Linux. You can download its latest version 2.93 now and it is entirely free. But if you pay for the subscription version which costs $11.50/month, you'll get more benefits, like film assets, hundreds of hours of video training, and large CC-0 texture and HDRI library, etc.
Main Features of Blender Video Editing Software
What can I do with Blender? This might be the first question when people come across this software. The latest Blender 2.82 mainly has 4 editing modes including Video Editing, VFX, Sculpting, and 2D Animation. You can complete both basic video edits and advanced 3D visual effects in this all-in-one software. Now we will walk you through every detail of its main function.
Basic Video Editing

Blender comes with a built-in Video Sequence Editor (aka Sequencer) that lets you perform basic video edits like cutting and splicing, as well as some complex tasks like color grading and video masking which is to apply effects to a specific area or section of your video cuts. This decent non-linear video editor enables users to:
1. Organize video and audio clips by cutting, duplicating, and moving strips.
Although it is a 3D software, the built-in video editor in Blender has all the functions that any other editors have. By easily clicking on the strips, you can delete, paste strips, and snap and slip strips. It is also shipped with color grading, filtering and texting like other video editors.
In the latest version of Blender, it has made a big step in video editing. Set Blend mode to Alpha Over by default. Whatever texts or images you add will be overlaid on top of the video. Previously, it was either replaced or crossed, and took a lot of time to adjust the overlay. And it finally adds new text fonts in the font list. You have more font options rather than changing the color and size.
The audio and video tracks are separated by default. You can right-click the audio strip to change speed or mute. You are also allowed to add other audio files and mix them with the video, which makes up for the absence of voice over recording in this program. To make audio editing more intuitive, it presents the audio wave to help you locate a part to cut and edit easily.
2. Add effects to video clips with up to 32 slots.
Slots, also regarded as channels in Blender video editor, are numbered horizontally in the Sequencer region, and it consists of 32 strips at most, each of them can contain a picture, animation, or several effects. And this obviously provides more possibilities for you to add effects and more materials to your videos.
Available effects in Blender are not limited in filters, transitions, and fade in/out which can be found in a right-click on the stripe. You can also speed up and slow down a video, or separate the audio from the video, and change the audio speed solely using Blender video editor. If you have more stunning ideas and want to add some special effects to it, you can then create the 3D image in the 3D mode of Blender, and reload the completed 3D work to the editing video. This is how Jurassic Park made with Blender. You can make another legend using it.
3. 3 types of editing visualization: live preview, sequencer, and preview/sequencer.
While editing, you are allowed to live preview the video, and also preview in the sequencer in which you can see the strips and timelines of the video material. Except for video preview, luma waveform, chroma vectorscope, and histogram display are also visualized in Blender. Each of them shows different aspects of the composite result. The Luma waveform shows the brightness and contrast of the frames, chroma vectorscope is to analyze the color hue and saturation, and the histogram shows RGB distribution. So you can edit and modify your videos in real-time and instantly correct unsatisfied color grading.
4. Proxy Render and Frame Offset.
Thanks to the proxy render and frame offset, Blender becomes one of the powerful free video editors that seldom freeze and lag. Blender allows generating proxy while editing large high-res videos at 25%, 50%, 75%, and 100% rendering respectively, but this is only enabled when there is a proxy cache on the disk at the resolution requested. Another way to enable proxy is to set the proxy render size in the Properties pane of the video strip, and this is the one that exactly creates smooth low-resolution preview while editing. To guarantee the synced output, Blender designed Frame Offset to compensate for the delay between your computer display and external video and audio outputs.
VFX: Motion Tracking and Compositing
As an integral part of the VFX creating pipeline of video studios, Blender, performing at the same level as HitFilm Express, is used for modeling, animation, rendering for many movies, e.g. Hardcore Henry (2015), Jurassic World: Fallen Kingdom (2018), as well as Canadian animation movie, Next Gen (2018). You can find millions of pieces of its work on the internet and totally convinced by its powerful functionality. And thanks to its robust imagery creating and compositing, we can experience fantastic worlds that never exist on our planet.
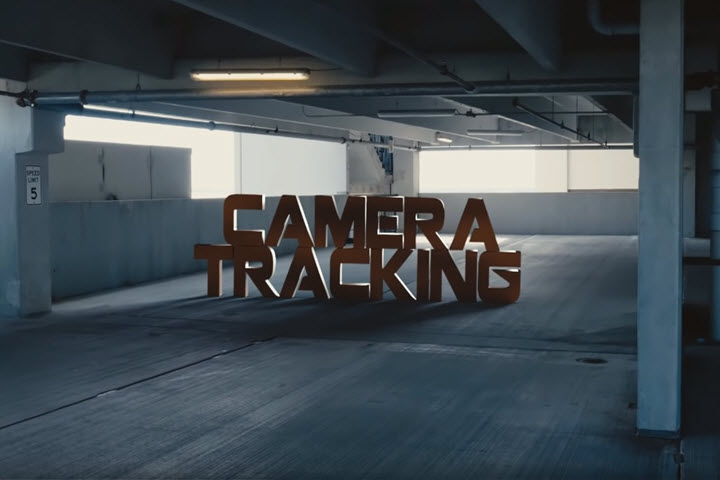
Due to the complicated actions of objects in the real world, simply combining it with 3D animation or 3D objects makes the footages look fake. And Blender motion tracking comes into play. It detects and records the motion of objects or a camera, and then apply the tracked data to 3D objects either created in Blender or imported from other 3D software.
Blender's motion tracker supports a couple of very powerful tools for the camera and object tracking, and 3D motion reconstruction. And it offers preview tracked footage and 3d scenes in real-time. Tracks can also be used to move and deform masks for rotoscoping in the Mask Editor, which is available as a special mode in the Movie Clip Editor.
Camera and Object Tracking
In post-production (or video effects creating), camera tracking is the process of recreating the frame path shot by the actual camera, including tripod shots. While object tracking is to track and recreate a specific object in the live footage. For example, just track your hands in a static shot to make it look like your hands are on fire. In addition to these two tracking modes, Blender software supports planar tracking to track flat surfaces using texture patterns. It can be used to replace things like billboards and screens on the footage with another image or video.
Blender software supports manual and automatic tracking. You need to watch a lot of video tutorials to learn loads of parameters and operations in manual tracking. But since the Blender 2.79, automatic tracking add-ons have been developed. The new auto tracker can automate marker creation and feature detection. It can also cut down on the amount of bad tracks derived from a shot. The add-on can be used reliably for simple shots. For complex ones, you can use the auto tracker tool in conjunction with supervised tracking. With its versatile video editing and post-production features, you don't need to switch to other software to go back and forth anymore.
Lens Calibration and Scene Stabilization
It is impossible to shoot absolute smooth footages with camera optical lenses. Because the lenses are curved, and they make straight lines appear to curve around the edge of the images. The wider the lens, the more distorted the image. With Blender, you can draw a straight line on the footage with the polyline brush in the Annotation tool, and then you can adjust the distortion values to make annotations match lines on the frames.
Sometimes, videos are shot while walking, running, and biking with a hand-held camera. Even though some cameras auto stabilize the footage while recording, they can't totally fix frames for all spurious jumps and tilting movements. Based on some tracked image elements, Blender firstly assumes a simplified model about this movement, then fits the movement of tracked features with this simplified model to derive compensation.
Compositing
Blender has a built-in compositing system that allows you to make adjustments to your rendered frames in the post-production (process only one frame or image at a time). The compositor comes with a powerful node library for camera effects, color grading, green screen keying, special effects and more. The node compositing helps you to enhance the colors of an entire movie clip in a dynamic way that changes over time (as the clip progresses). In this way, you use composition nodes to both merge video clips together and enhance them. Raw footage from a foreground actor in front of a blue screen, or a rendered object doing something, can be layered on top of a background. Composite both together, and you have composited footage. To process your image, you use nodes to import the image into Blender, change it, optionally merge it with other images, and finally, save it.
3D Modeling & Sculpting
At the beginning, we should point out that 3D modeling and sculpting are two different things. We use 3D modeling to create hard-surface projects by moving around edges, vertices, and faces of polygons. And anything softer or rounder (in general, grown rather than made) is difficult to model. While sculpting is used to make detailed and organic-looking meshes, and you aren't concerned to the structure of polygons as modeling.
Blender specializes in both 3D modeling and sculpting. In Blender 2.82, the General editing mode refers to 3D modeling, while 3D sculpting is in the Sculpting option. Blender modeling tools support:
- Editing the so-called devil in 3D modeling, N-gon (a face without more than 4 edges) without issues.
- Merging, sliding, and collapsing faces and vertices.
- Filling grids and bridging edges at a time.
- Creating 3D models by Python scripts.
- Adding multi effects without destroying the original object with the smart modifier.
- Unwrapping UV to paint and texture the surface in detail.
Instead of selecting a group of vertices, edges, and faces in modeling, sculpting manipulates geometry in the brush region of influence. Blender has more than 20 built-in brushes with various effects, such as Clay, Crease, Grab, Mask, Smooth, Pinch, etc. And you are enabled to customize brushes as well. To apply the sculpting strokes on the mesh, and modify it in time, Blender uses dynamic topology to sculpt complex shapes out of a mesh. And you can find it in the Dyntopo panel. Like other professional 3D sculpting software, Blender has remesh, symmetry and mask options to satisfy most 3D content creators.
With the polygon modeling and sculpting toolset, Blender definitely simplifies the transition between concept research and the final model product. And many CGI (computer-generated imagery) videos are made by Blender in this way. Moreover, the 3D characters and objects can be loaded to its built-in video editor, and this is how videos with special effects made. More and more artists, students and small enterprises are using it as the main tool, after all, there is no such professional and powerful 3D software costing nothing except hard learning.
2D Animation
Basically, Blender has the Grease Pencil tool allowing you to draw in the 3D scene. With more and more people sketching in the 3D mode, Blender developers finally created this separate utility to completing 2D animation making. With the release of Blender 2.8, 2D creating is fully functioned in the animation system. It has almost everything you need, onion skinning, framing, layering, and other effects that you can add on top in a non-destructive manner.
Grease Pencil
The feature in Blender that makes all 2D creation possible is exactly the Grease Pencil that allows you to sketch in the 3D space, which also indicates that you can mix 2D and 3D right in the viewport. Traditionally, people use it to create 2D animation, cut-out animation, and motion graphics. In the 3D environment, Grease Pencil can animate 2D objects in mainly 4 ways:
- Draw the movement of an object frame by frame, generally with a digital graphic tablet.
- Move the object as a whole to adjust its position, orientation or size in time.
- Deform the objects which means animating their points.
- Inherited animation. It makes the object move according to the movement of another object. This is how cut-out animation made.
Keyframe Interpolation
By means of interpolation, the intermediate animation frames can be generated based on the existing previous and following frames. This compensates for the motion blur and makes the animation smoother. When you animate some characters of simple shapes, you can use this tool to add new breakdown frames automatically. And once enabled, interpolated keyframes will be applied to all layers, and only workable with selected strokes.
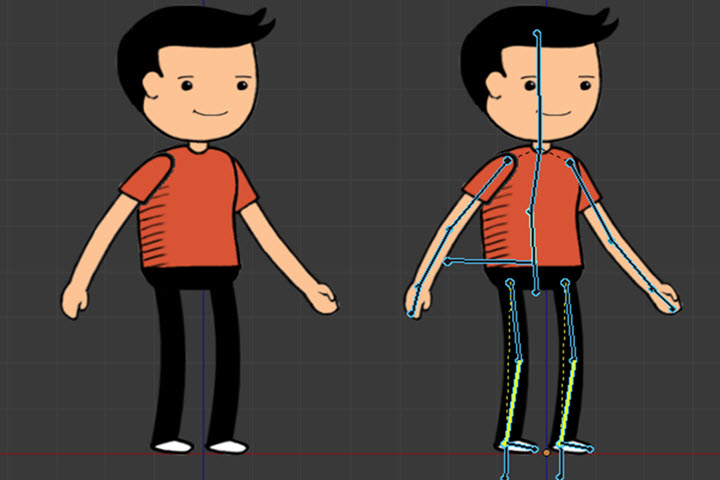
Character Rigging
Put it simply, rigging is a way to control the objects in Blender. It constructs movable parts of the character e.g. head and limbs in separate layers, and then combines them to make flexible joints for mesh objects. And this is the so-called armature, often used for skeletal animation. In addition to that, there are other features involved in rigging, e.g. Constraints, Object Modifiers, Shape Keys and Drivers.
Blender has also made a bonus in 2D animation, a new node that works in cycles called Shader to RGB. It converts any material into a cartoonist representation, just like an anime-making button.
Rendering: 3 Render Engines with Different Strengths
Rendering in Blender is actually the process of creating 2D images from a 3D model. And the rendered image is generated based on sets of data of color, texture, and material of a certain object. Blender has 3 built-in render engines including Cycles, Eevee, and Workbench.
According to Blender's official explanation, Eevee is a physically-based real-time renderer, Cycles is a physically-based path tracer, while Workbench is designed for layout and previews. They can work together, as well as render independently, but differ in render quality. Workbench is the basic renderer for fast modeling and animation rendering. Its primary mission is to display a scene into the 3D viewport.
Eevee is the brand new engine since Blender 2.8. It is a real-time render like game rendering in Unreal or Unity. Eevee uses a lot of tricks to render intuitively at the fastest speed. But it doesn’t use ray tracing (a rendering technique for generating an image by tracing the path of light as pixels in an image plane and simulating the effects of its encounters with virtual objects) to determine things like refraction, reflection, etc. It’s actually using shadow maps and screen spaces effects to render the model.
Cycles, the workhorse of all Blender rendering, uses ray tracing more accurately. Cycles differs from Eevee that it presents more details like reflections, global illumination, and ambient occlusion, but at the cost of rendering time.
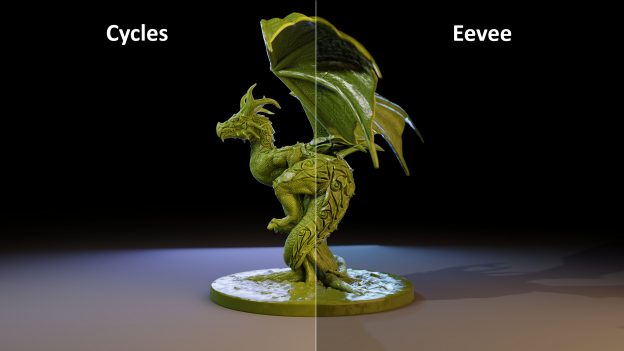
In a nutshell, Eevee is fast, but not accurate. Workbench is the basic renderer for visualization work throughout the whole process. Cycles is the one that smashed all the good features together but at the cost of rendering time. Besides these 3 built-in rendering engines, there are more renders available as add-ons.
Abundant Add-ons
Besides, Blender has developed plenty of add-ons for each editing mode. For instance, VSE Quick Functions in Toolboxes, this script is designed to make Blender video editing easier to use by implementing features often found in other video editors. Includes: strip parenting, ripple editing, right-click context menus, automatic proxy generation, and much more. And the same to 3D animation and modeling. Numerous add-ons constantly strengthen and enrich Blender functions, and raise it as powerful as other paid software.
However, these plug-ins rely much on the main software. Blender should be stable enough so that they can keep up all the time. Once Blender made big changes in updating, most of them should be re-develop to fit it again.
Is Blender Good for Video Editing?
Open-source 3D creation suit as it is, Blender software recently has ranked on the list of best video editors. And it does develop and modify the built-in video editor constantly. After all, it is the one with the most professional functions while cost noting. Blender has got good word of mouth for its 3D modeling, animation, and sculpting. As for video editing, it surely meets basic needs. But if you skim through the reviewing sites, users are complaining about the problems below:
1. Steep Learning Curve
Blender deters away many newbies by its complex editing interface and operations. So you need to get advanced technical knowledge primarily. Although there are loads of tutorials on the Internet, the entire systematic courses are very expensive. Since it is a long way to learn, many people turn to other easy video editors.
2. Audio Processing Issues
Blender is still a 3D-centered program and boasts of expertise in graphics processing. According to our recent survey, audio issues are the most discussed problems in different rating sites, for example, exporting videos without sound, a/v out of sync when joining videos of different frame rate, audio wave suddenly disappearing when adjusting offsets, etc. If you value video quality pretty much, Blender might not be your first choice.
3. Extremely Slow Rendering
"I am trying to render a raw screen capture video using Blender and the rendering process is extremely slow. It is taking about 4hrs+ to render 35mins of footage. I see that blender is only utilizing 6% (at most) of my CPU when rendering." Exactly, Blender does not utilize all the computer processors by default, and this is why it seldom crashes, but sacrifices render speed.
Blender Alternatives
Many users choose Blender software for its zero cost but have to suffer the painful learning curve and complex operations. Is there any similar video editing tool that is easier than Blender?
Of course, there are plenty of open-source video editors like Shotcut, Kdenlive, VSDC, OpenShot, etc. If you just want quick and easy edits, built-in video editors also worth a shot, like Windows Photos, and iMovie for macOS. At last, don't forget online video editors as long as your video file is within their size limitation. Let's check a Blender alternative below:
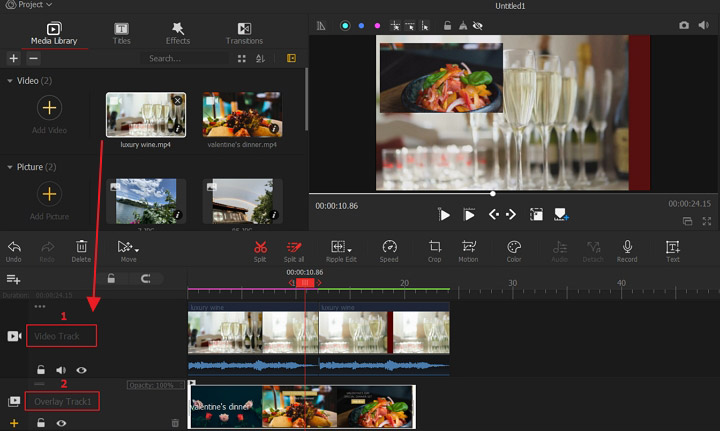
VideoProc Vlogger
If you are searching for an alternative to Blender, VideoProc Vlogger is an option to go. Developed as an impressive video editor for Windows and Mac computer, VideoProc offers a number of basic as well as advanced features to help you edit videos like trimming, splitting, merging, recording voice, adding music, adding subtitles, adding filters, adding transitions, changing speed, and more. You can grab this tool and create a stunning video within simple steps!

Final Words
Needless to say, Blender is prominent free 3D graphics software that performs at the same level as Maya and ZBrush. Formerly, video editing was an inconspicuous feature of Blender. But it took user feedback seriously and improved it to a prominent tool in video editing. Although great works are not created just by one software, Blender comes with the most comprehensive functions and abundant add-ons. To a certain degree, it is able to free users from annoying tool switching.


