Sound and background music instantly wake up your ear when watching a video. If the audio is bad, the audience can tell immediately. You might want to remove audio recorded by camera and replace it with enchanting melodies. In other cases, you might want to mute a video and make sure the audio is non-recoverable. The need usually occurs when the audio from the video contains information you don't want others to hear or know, or there are loud noises.
Depending on your main purpose to remove audio from video, the steps and tools to use could be different. For instance, you might want to:
- Mute the entire video;
- Remove unwanted part of the audio from a video;
- Disable or delete certain audio tracks from multiple tracks, i.e. multi-language tracks in movies;
- Reduce background noise from the video.
How do I remove sound from a video? All covered in this tutorial.
Remove Any Audio from Any Video on Windows and Mac
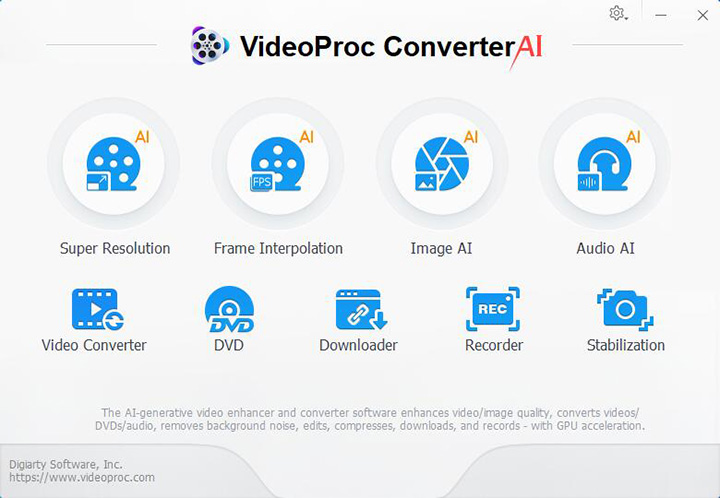
VideoProc Converter AI is a one-stop video tool for Windows and Mac users. It is lightweight and beginner-friendly. Among all the handy features, the audio removal function is easy to use, as well. You can easily uncheck the audio track to mute and export the video.
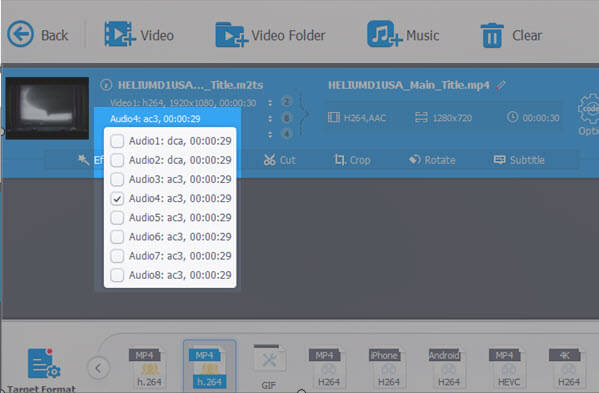
Compared with other audio removers, VideoProc Converter AI is way more versatile. With support for 420 codecs and formats, it can remove any audio track from almost any video file—regardless of the number of audio tracks or the codec format used. This process also resolves format incompatibilities, such as not being able to play videos shot on an iPhone on a Windows computer. Even better, VideoProc Converter AI supports batch processing and hardware acceleration. You can remove audio from multiple videos at a faster speed.


VideoProc Converter AI - Remove Any Audio from Any Video
- Lightweight, beginner-friendly, for Windows and macOS
- Remove almost any audio track of any codec or format, one or more
- Handle nearly any video file with support for over 420 formats
- Stable, Fast, Batch remove sound from videos with hardware acceleration
- All-in-one: AI noise remover, vocal remover, video compressor, downloader, etc.
Here is a detailed guide with pictures:
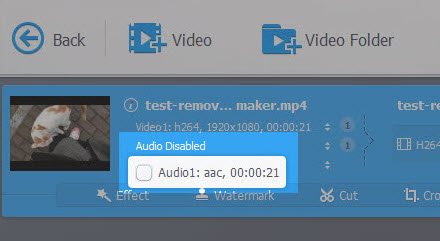
Step 1. Launch VideoProc Converter AI and Go to Video from main screen. Drag and drop your video clip into the program.
Step 2. Hover your mouse to audio information section and click on Audio. Uncheck the box, and you shall see Audio Disabled.
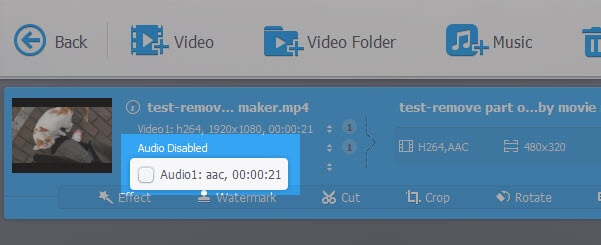
Bonus tips: if your source video has multiple audio tracks, you can choose one or more tracks to disable. If you uncheck all the boxes, the video will be muted.
Step 3. Select a target format and click Run to export and save your video.
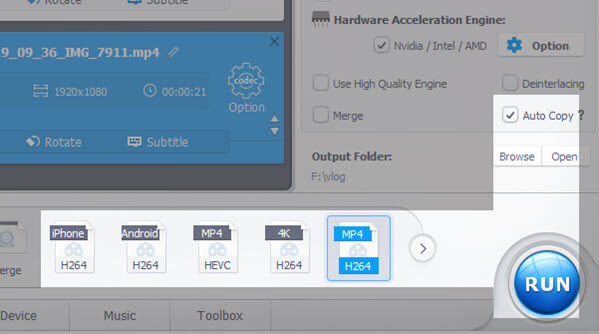
- If you have no desire to convert a video besides removing audio, you can simply choose a format that is the same as your source video.
- Tick Auto Copy so that the audio are removed while video stays the same without re-compressing.
- The detailed format and codec information of your video is displayed in this tool. If you see the information says h.264 mp4, you can ahead and select mp4 h.264 as the export settings. The same goes to MKV, MOV, and other format.
Free Download VideoProc Converter AI:
On Windows Using Movie Maker
Windows Movie Maker is a lightweight tool to edit video. It allows you to remove sound from a video or mute a video by changing the volume to zero. Mainstream formats are supported, including MP4, MOV, MKV and so on.
Though Microsoft discontinued the support for Movie Maker, you still can download and install Windows Movie Maker. In newer versions of Windows, Microsoft Clipchamp can also remove audio from videos in similar steps.
Steps to Remove Audio from Video in Windows Movie Maker
Step 1. Launch Windows Movie Maker, and drag and drop your video into the editing area. If you don't have it, you can go here to download it.
Step 2. Click on Edit tab, and then click on your video. You shall see the video being surrounded by a blue box, indicating that the entire clip is selected. Then you can click on the Video volume icon, and drag the knob to the left-most corner.
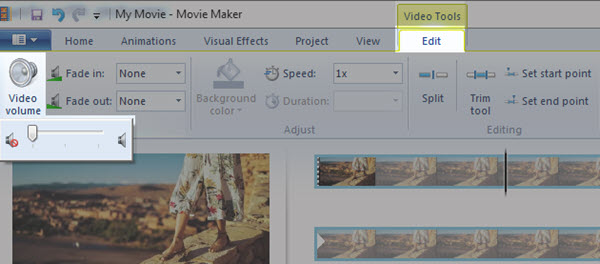
You can hit the play icon to watch how it goes. Generally, the audio shall be removed at this point, and you won't hear a sound in the video.
Step 3. Click the Home tab and hit Save movie. In the dropdown menu, you can select the export settings. The easiest way is to click Recommended for this project, which will give you an MP4 video without sound.

Tips 1: Mute Part of the Audio
If you don't want to mute the entire part, you can also remove unwanted part of the audio from your footage in Windows 10. We just need to go through some extra steps.
Step 1. Add video to Windows Movie Maker.
Step 2. Go to Edit tab.
Step 3. Select the part you want to mute/remove the sound.
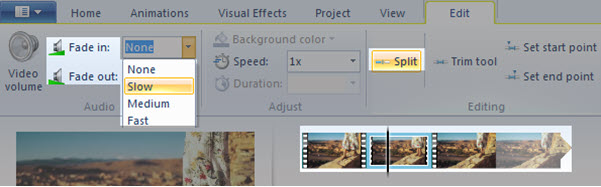
To do so, you need to split the video into several parts firstly: drag that black line to the start point of unwanted part, and click Split. Repeat the step to split the end point.
Step 4. Click on the unwanted part, and click Video volume to set it to zero (left-most corner).
However, as the sound is muted abruptly, it appears less natural when playing back. You can add fade in and fade out effects to make it better.
Tips 2: Remove Audio and Replace it with a New One
If your main purpose is to swap the music in the original video, you can easily delete audio and add new background music or voice recordings to the video.
Step 1. Follow the steps above to remove sound in Windows Movie Maker.
Step 2. Click Home Tab and hit Add music.
Step 3. Save the video.
On Mac Using iMovie
If you are looking for free programs to remove sound from your footage, iMovie is a nice choice. Since iMovie is pre-installed in Mac, it is fairly quick to use it without the hassle of installation.
Step 1. Go to Menu and click import to add the video.
Step 2. Drag the video into the project library.
Step 3. Click on the video, you shall see yellow surrounding lines indicating the clip is selected.
Step 4. Right click and hit Detach Audio.
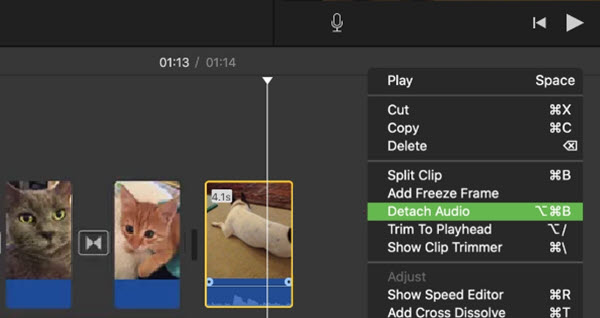
Step 5. An audio track is separated from the video.
Step 6. You can delete the entire audio track to remove audio, or split it and delete certain sections from the audio.
If you want to replace the audio, after deleting unwanted sound clips, you can add new music to video in iMovie.
Online Using AudioRemover
For short videos, you can make use of online audio remover, for example, AudioRemover. Most of online tools work similarly: you just upload the video to the cloud, let it do the job, and download the video. There are less customizable options comparing to desktop programs, but enough for simple task as removing sound.
As the name suggests, AudioRemover is a dedicated online tool to delete sound from a video clip. You can upload a file up to 500Mb in size. You can add MP4, AVI, MOV and other popular format, wait for the processing, and save your video.
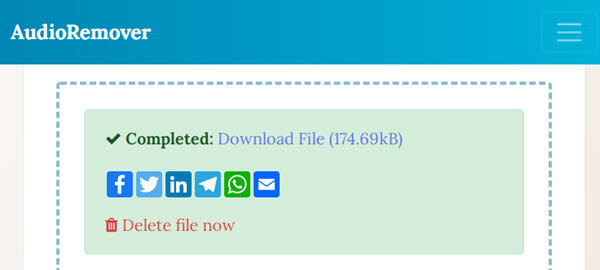
Step 1. Visit audioremover.com website.
Step 2. Click Browse and find your video to upload. Do not drag and drop, because browsers that supports media playback might play the video for you.
Step 3. Click the Upload video button and wait.
Step 4. When you see the download button, click it to save your muted video.
On iPhone Using the Photos App
The Photos app is Apple's built-in photo and video management tool for iOS devices. It is deeply integrated into the Apple ecosystem, providing a seamless experience for users who primarily use Apple products.
For videos, you can trim, crop, apply filters, and adjust visual qualities like exposure, contrast, and saturation. Newer iOS versions also include advanced features like "Audio Mix" for more control over a video's sound.
Here's how to remove audio from video on iPhone using the Photos App.
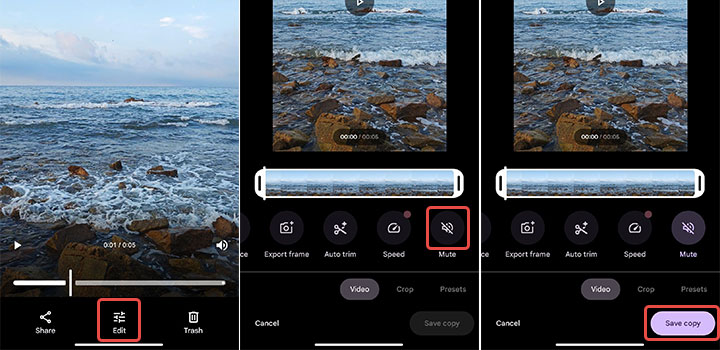
- Open the Photos app and select the video.
- Tap Edit at the top.
- Tap the speaker icon in the top-left corner.
- Tap Done to save your new video with audio removed.
On Android Using Google Photos
Google Photos is a cross-platform photo and video service. It offers basic editing tools, such as trimming, filtering, and muting the video. In addition to standard editing tools, Google Photos offers AI-powered features like Magic Editor for more sophisticated edits, though a subscription may be needed to save more than 10 of these edits. On Pixel devices, the "Audio Eraser" feature can remove distracting background noise from videos.
Follow the steps below to remove audio from video on Android with Google Photos.
- Open the video in the Google Photos app.
- Tap the Edit icon (three slider controls).
- Swipe right and click Video > Mute (the speaker icon).
- Tap Save copy to save the muted version.
Using VLC Media Player
VLC has a hidden function to convert and save video. During the process, you can remove audio tracks in Windows 10/11, so that the saved video won't have sound. Using VLC is less intuitive comparing to dedicated video editor and audio remover.
However, as VLC is a powerful and popular media player, you might already have it on your computer. If so, you can use this free program to remove sound from a video clip in no time.
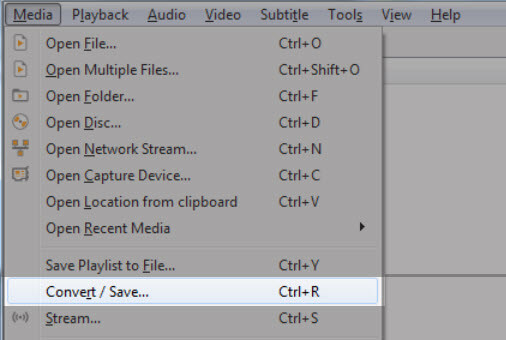
Step 1. Click Media from the menu, and select Convert/Save option(shortcut Ctrl+R).
Step 2. In the newly opened window, click + Add to import your video clip.
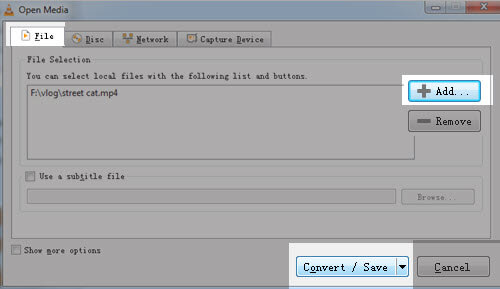
Step 3. Once added, click Convert/Save button.
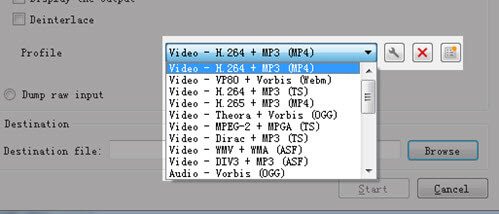
Step 4. In the Convert window, hover to the wrench icon, and click open a new window to edit profile.
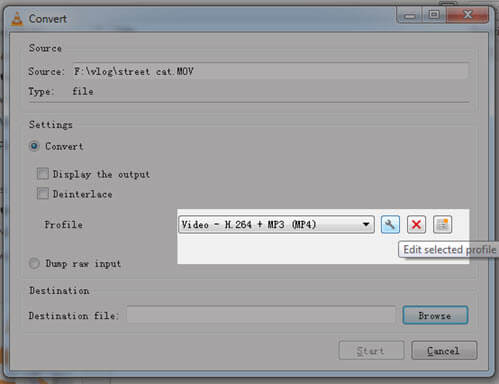
Step 5. Tick the Audio codec tab, and uncheck Audio. Click Save.

Step 6. Choose a target format and click Browse to select the output folder, click Start to strip the sound from the media.
Using Premiere Pro
For power users, it's easy to remove audio from video in Windows 10/11 via Premiere Pro. Besides, there are highly customizable settings to edit audio, add fade in and fade out effects, create acappella track by removing music, or remove vocals from a song.
If you also plan to invest time in learning non-linear video editing software and hone your skills, Premiere is worth diving in. If removing audio is a one-time task, you can resort to tools in previous section.
Follow these steps after opening up Premiere and creating a project:
Step 1. Import your media into the dashboard (or resource bin).
Step 2. Drag your video into the timeline.
Step 3. Select the clips > right click to select Unlink.
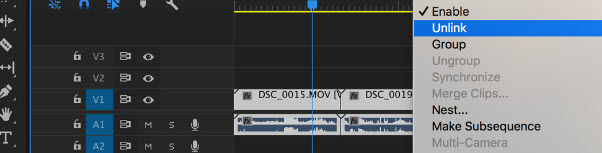
Step 4. Click on the audio track to delete, mute, adjust volume, all at your choice:
- Remove: click on the audio track and hit Delete on keyboard.
- Mute: drag the horizontal line down to the bottom.
- Adjust volume: drag the horizontal line up to amplify and down to reduce volume.
- Fade in and fade out: Expand the audio tracks > Click Track Keyframes > Volume, press Ctrl and click to add keyframe, drag it up or down to create diagonal lines.

Conclusion
That's all about how to remove audio from video. Removing sound can be essential for various reasons. Depending on your needs, there are multiple tools and methods available—from beginner-friendly apps to powerful professional software.
Among all these options, VideoProc Converter AI stands out as a versatile, lightweight, and user-friendly tool that supports over 420 codecs and formats. It allows you to easily remove any audio track, even from complex videos with multiple audio streams, and supports batch processing with hardware acceleration for speed.
Whether you are a novice or an experienced content creator, VideoProc Converter AI offers an efficient and reliable way to mute your videos without losing quality or format compatibility.
FAQ
1. How do I remove audio from a video?
To remove audio from a video, VideoProc Converter AI offers an easy solution: import your video, go to the audio section, uncheck the audio track to disable sound, and export the video. It supports over 420 formats and allows disabling multiple audio tracks if present, making it suitable for all skill levels.
2. Can I remove audio from video on iPhone?
Yes, you can remove audio from video on iPhone using the Photos app. Simply open the video, tap Edit, tap the speaker icon to mute, and save. For more advanced options or batch processing, a desktop tool like VideoProc Converter AI on Mac also works well.
3. How do I extract audio off a video?
To extract audio from video, VideoProc Converter AI can convert your video into audio formats like MP3 or WAV. Import the video, choose an audio output format, and export. This extracts the audio track without affecting video quality, with GPU acceleration for fast results.


