Time seems like an illusion in which we felt like experiencing nothing at that moment. But in retrospect, we realize that many things have been changed - a seed grew into a plant, ocean tides came and went, or the clouds wandered off in the sky.
Then time lapse (a photography technique) was invented. It is a magic method to compress these changes into a short video. Technically, it involves two procedures – taking photos at regular intervals and process them into a video to trick our minds into perceiving successive movements.
In this post, we'll show you how to make a time lapse from zero to one. Believe you can find everything you want to know in the 3 phases of time lapse creation:
- Time Lapse Photography and Videography
- Time Lapse Video Editing
- Bring It to the Next Level with Some Pro Tips
How to Do a Time Lapse Video on Camera and Smartphone
In most cases, we use cameras to shoot time lapse photos. But now cameras on smartphones catch up with the trend and even exceed many traditional DSLRs for the preset time-lapse mode. Cameras and smartphones both have their pros and cons, the choice depends on your specific needs – quick and simple operations or professional-looking results.
Whichever you prefer, you'll find detailed time lapse photography/videography tutorials in this part.
1. How to Shoot a Time Lapse with a Camera
Step 1. Prepare Gears
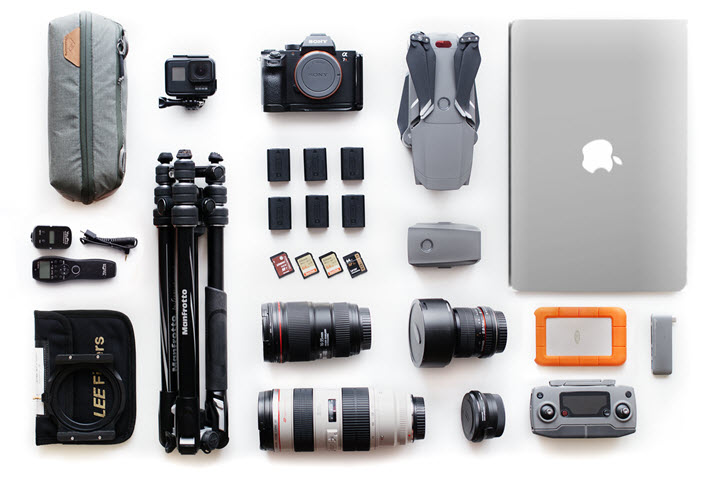
- A tripod: Your camera can stand still for a long time with a strong tripod so that you can easily capture the movements of the subject in your footage without blur.
- An ND filter: A neutral-density filter functions like a pair of sun glasses for the camera that reduces the amount of light coming through the lens while keeping the same color temperature. In time lapse photography, it enables you to adjust shutter speeds flexibly without exposure issues.
- A large memory card: A great time lapse comes from a huge number of photos or a video lasting for hours. Plus, we often shoot in RAW for maximum post-editing flexibility. Generally, a 128-GB memory card is capable of handling this.
- An intervalometer: Many modern cameras have built-in timers, if not, pack this tool in your bag. It is an external device to count intervals in between shots and tell the camera to close the shutter accordingly.
- A fully charged battery: Make sure that your camera can work constantly for a long time. After all, some missed moments would never come back again.
Step 2. Set up Your Camera
Manual settings deliver better outcomes because you can get consistent photos that are exactly in your style. While on auto mode, settings are changed along with the condition (e.g. focus and light), which will result in inconsistency of the entire image sequence. So when you combine them into a video, you'll see annoying flickers.
Let's go over the essential manual settings for time-lapse photography:
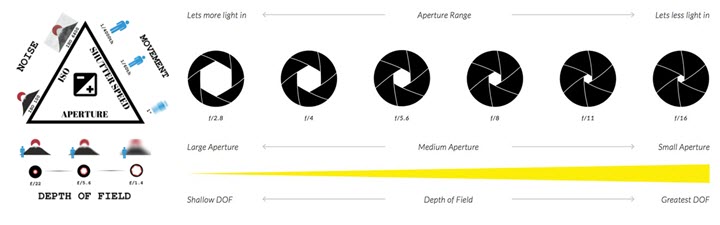
Aperture
It refers to the opening within the lens. A wide aperture (f/2.8 - f/5.6) lets in more lights and focuses sharply on things in a short distance. As of a wide shot of landscape time lapse, you should get more of your scene in focus, then set a narrow aperture (typically f/8 to f/11).
The best aperture depends on the specific situation. You can test it multiple times to find the one that keeps your subject in focus and let enough light come to the sensor.
Shutter Speed
Once the shutter closes and opens, an image is created on the sensor. The shutter speed determines how long it takes to finish this process and how much light hitting on the sensor.
The shutter speed for time lapses depends on the result you want to achieve. If you want sharp and clear shots, a faster shutter speed (1/125sec or faster) works. While for shooting an area with fast-moving cars, crowds, and alike with a fast aperture, the video will turn out to be jumpy as it freezes moving objects at different positions obviously.
ISO
ISO refers to the light sensitivity of the camera sensor. A high ISO means the photo has more gain and looks brighter, but more noise. For taking time lapse, a low ISO is recommended (ISO100 – ISO800).
Note: Aperture, shutter speed, and ISO work together to determine exposure. When you change any of them, you need to make the opposite adjustment to one of the others in order to maintain consistent exposure.
Resolution
Nobody could refuse imposing 4K/8K time lapses. And as video creators, you also have more details to deal with in post video editing software, such as resizing and introducing zoom & pan effects to them. But with limited memory, HD 1080p is okay.
If you utilize a time lapse to enrich your video content, the best resolution should be associated with the dimension of your entire work.
Interval
The time lapse interval largely depends on the moving subject. For slow-moving subjects, like stars, you can take a photo every 10 - 25 seconds and keep photographing for hours and even overnight. Whereas, for fast-moving clouds, you can photograph for 30 minutes to 2 hours, and take a photo every 3- 10 seconds.
Formula to calculate a reasonable interval
Time lapse interval = duration of shooting time/number of frames required
Where
Required frames = required video duration/frame rate of the final video
Photo or Video Time lapse
Photos often win over videos for making time lapse effects because of smaller size, battery saving, long exposure features, and more control over details (bit-depth and HDR) in post-editing. While videos are constantly recording and processing and soon run out of storage and battery.
But with a few exceptions, videos are better. You don't have time to process hundreds and thousands of photos. Or, you have a camera that has a built-in time-lapse movie mode to take photos at regular intervals and stitch them into a video file automatically.
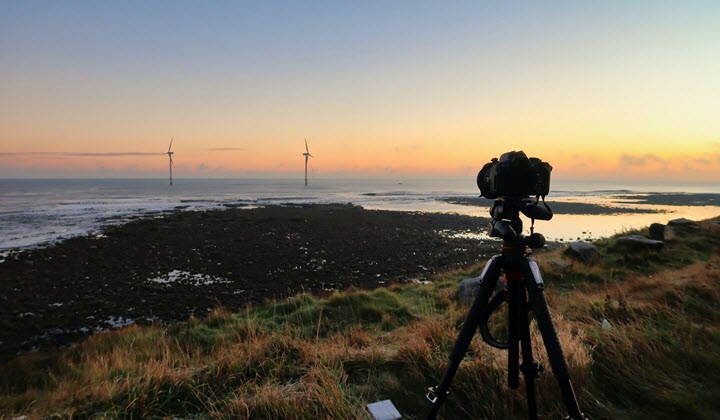
Step 3. Start to Shoot a Time Lapse
Ensure that you are clear about the time of the sunset, sunrise, etc., and the weather of your destination. Find a good location to spot it. Set up your equipment, and you can begin to take time lapses. Do not forget to spot the camera from time to time to check the battery, memory, and recording process.
2. How to Shoot a Time Lapse Video on iPhone
iPhone camera has a built-in time-lapse mode that does everything for you behind the scenes. It auto-captures 1-2 frames per second and makes them into a video at 30 fps by default. Let's see how to use this feature.
Step 1. Open the Camera app on your iPhone.
Step 2. Swipe right to find the Time-lapse feature.
Step 3. Press on the screen to lock AE/AF. Then drag the slider to adjust the focal point and the exposure.
Step 4. Tap the red button to start recording. And tap it again when you want to stop recording.
Step 5. Open the album and wait for it to process the images. Then you'll get a video with a time-lapse look.

Note: The maximum length of a time-lapse video on an iPhone is 40 seconds. So the longer you shoot, the more frames it drops in the final video.
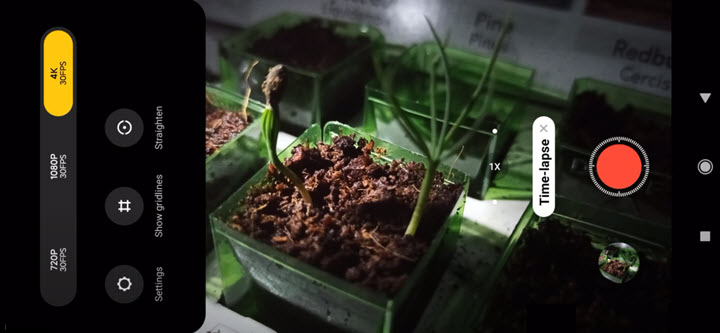
3. How to Shoot a Time Lapse Video on Android
Now, most Android phones also develop this smart feature such as Samsung, Huawei, and Xiaomi. The operation is slightly different from iOS, so we'll also show you detailed steps on Android.
Step 1. Open the camera on your Android phone.
Step 2. Swipe left to More and select Time-lapse.
Step 3. Tap the menu button in the upper right corner to choose a resolution.
Step 4. Tap the Settings option to change the interval, the stabilization option, and the encoder.
Step 5. Get back to the camera interface and start recording. When you end it, the video will be saved in the photo gallery.
How to Make a Time Lapse Video with VideoProc Vlogger
Either you get a photo sequence or a pre-processed video from the camera, you need the time lapse software to edit it somewhat, e.g. converting still photos into a video, speeding up or slowing down the time lapse preprocessed by the camera, and merging it with other videos.
VideoProc Vlogger is regarded as the best assistant to do time lapse for everyone. In addition to editing features of other time lapse software, it also has a super simple workflow and self-explaining UI. What's more, it supports videos and photo sequences directly loaded from your DSLR, DJI, GoPro, and iPhone, and automatically sorts them by file types (picture sequence or video).
Unique Features for Time Lapse Video Editing
- Batch process for large photo sequences.
- Various modes to change the speed of a time lapse video.
- Support all photo and video formats: PNG, JPG, HEIC, MP4, MOV, HEVC, 10-bit, RAW…
- High Quality Render Engine for 4K/1080p 60/120fps time lapse videos.
- Frame by frame editing and previewing for a precise result.
- Faster processing speed with full GPU acceleration.
Now download and install VideoProc Vlogger and make a time lapse video of your own from photos or normal videos.

1. How to Make a Time Lapse Video from Photos
Step 1. Open VideoProc Vlogger and create a new project.
Double-click the VideoProc Vlogger icon on your desktop to launch it. Complete settings for the file name, location, resolution, and frame rate to create a new project. Or you can open an existing project.
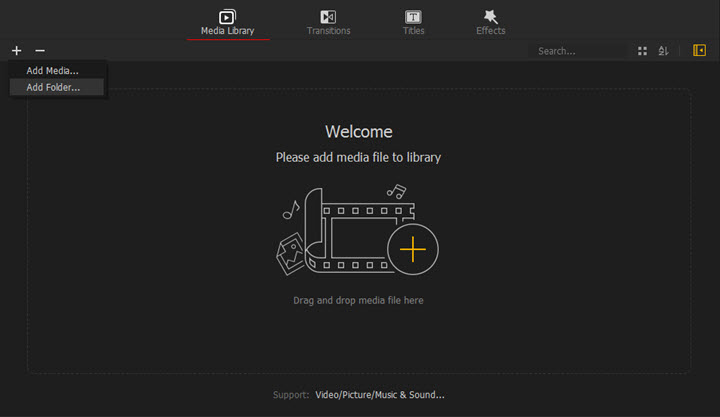
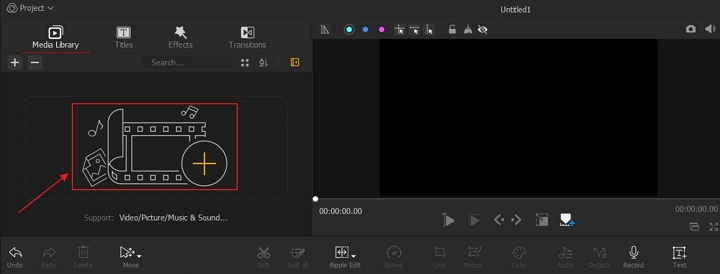
Step 2. Import one or multiple photo sequences to it.
Add a media folder to the media bin of this software. These photos will be sorted as one file under the Picture option and marked with its number.
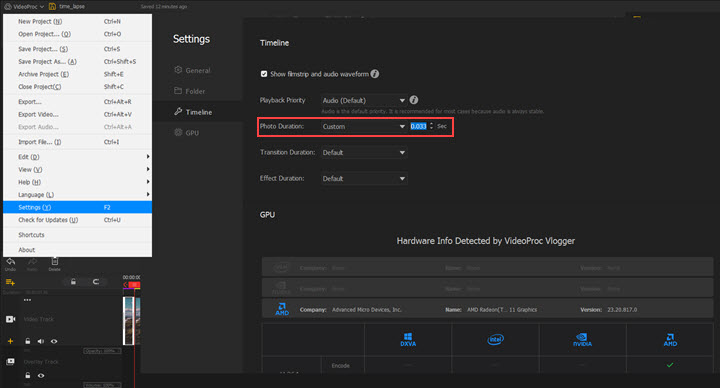
Step 3. Set the duration of photos.
Expand the project menu on the uppermost position. Navigate to Settings > Timeline > Photo Duration. Customize the duration, and it will be applied to every individual photo.
If you set the frame rate to 30fps in the project panel at the beginning, now you can reduce the photo duration up to 0.034s, which can create a fast and smooth look for your time lapse. While if you think it is too fast, you can increase the duration properly.
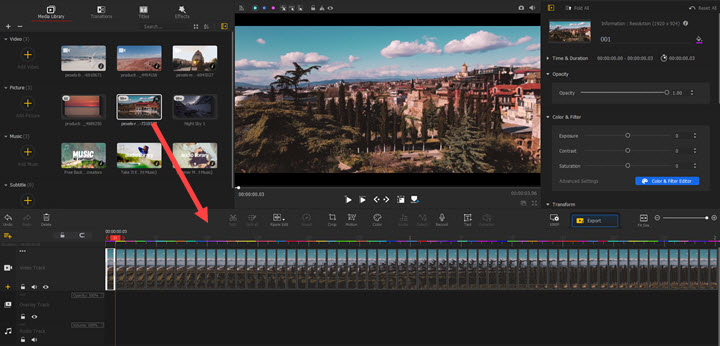
Step 4. Add photos to the timeline.
Drag and drop the sequence from Media Library to Video Track in the timeline. Play it from the very beginning, and you can see the magic happen.
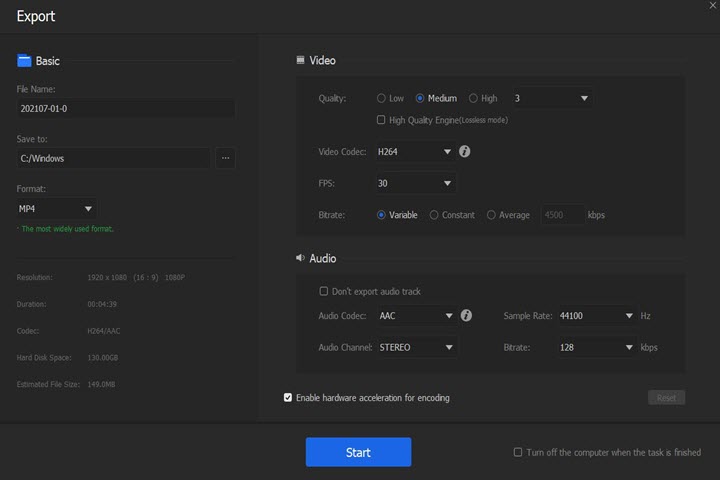
Step 5. Save and export the timelapse in a video format.
You can go on to add background music, filters, or other footage to it. At last, hit Export to save it to your computer.
2. How to Make a Time Lapse Video from Normal Video
If you just want to fake a time-lapse look to enrich your content, you are also enabled to turn a regular video into a time lapse by speeding up the footage in VideoProc Vlogger.
Step 1. Launch VideoProc Vlogger and create a project.
Open this software. Create a new project or open an existing project in it.
Step 2. Load media files to it.
Drag all the media files you need in editing to its Media Library. Then drag the standard video to the timeline.
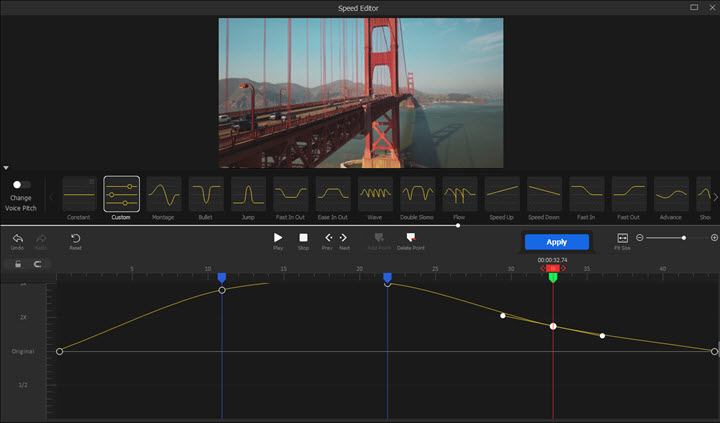
Step 3. Speed up the normal video to fake a time-lapse look.
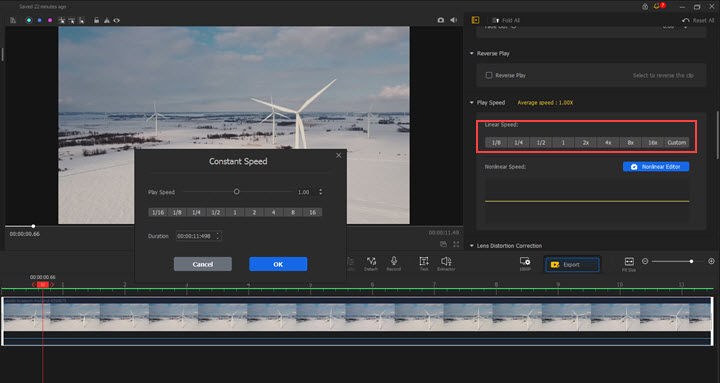
Click Speed in the toolbar to open its nonlinear speed editor. You can speed up the video by 8 times in Constant mode or up to 32x in Custom mode.
Preview the video and adjust it until it meets your expectation. Click OK to save the change.
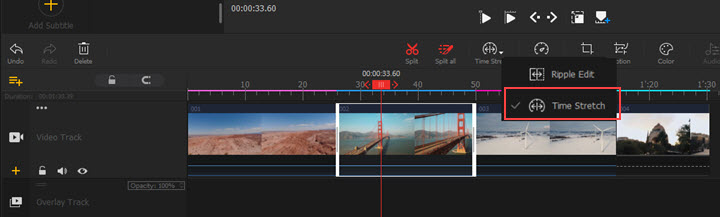
Tips: If you think the 32x speed is not fast enough, switch the Ripple Edit to Time Stretch in the toolbar, then drag the edges of the clip to go on speeding it up.
Step 4. Save and export the video.
You can continue editing or save it to your computer by hitting the Export button above the timeline.
Tips: To make the standard video look like made with pictures taken at different times, convert the video to an image sequence, then drop off some pictures in the sequence file. Finally, stitch the rest pictures into a video.
3. How to Change Speed of Time Lapse Video from GoPro/DJI/iPhone
iPhone, GoPro Hero Black, and DJI Mavic series come with handy time lapse and even hyperlaspe options. They shoot the photos in sequence and merging them into a time lapse video that may not need much post-processing. But this feature does not always yield time lapses of the ideal speed. You have to change the speed afterward.
Load time lapses from your camera to VideoProc Vlogger, and you can change the speed at will with the following methods.
Option 1. Change the speed at a constant rate.
Drag the video to the video track in the timeline. Click Speed to open its speed editor. Choose Constant mode in the preset panel and select a constant rate to speed up or slow down the video. You can also drag the yellow time to speed the change from 0.03x to 32x.
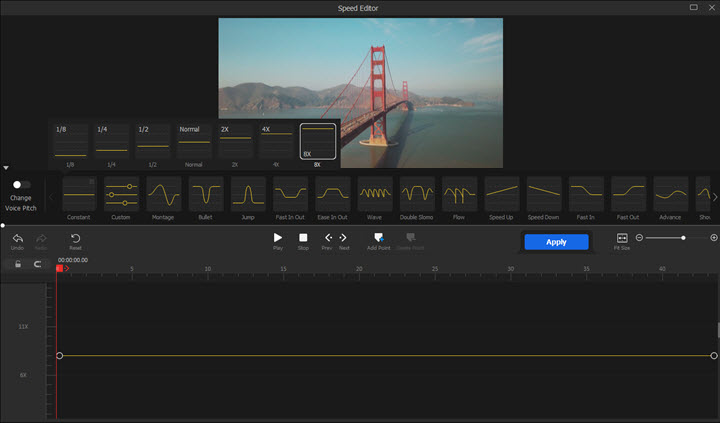
Option 2. Change the speed at a variable rate.
Select the video on the timeline, and click Speed. Insert one keyframe to the position where the speed change starts, and keep inserting keyframes until the change ends. Drag the line between each keyframes to adjust the speed.
Option 3. Change the speed to fit a required duration.
If you want to make time-lapse into a required length by changing its speed, you can use Time Stretch in this video editor. Switch Ripple Edit option to Time Stretch, then drag the edges of the video clip in the timeline in terms of the target duration.
Pro Tips for Making a Time Lapse Video
It's absolutely okay to stop at the steps above which can help you produce basic time lapses for daily sharing. If you want to step up your work, go on learning the key tips below for better time lapse videos.
1. From Time lapse to Hyperlapse
Basic time lapses are shot with a fixed angle and fixed settings. It does convey a sense of time compression, but nothing special in physical space. Whereas hyperlapses add movements like dolly, pan, tilt, and so on, therefore, enliven the footage to a large degree.
The hyperlapse can be achieved with built-in modes in many state-of-the-art action cameras and drones, like the GoPro Hero Black series, and DJI Mavic Air which automatically shoots hyperlapses in free, circle, lock, and waypoint modes.
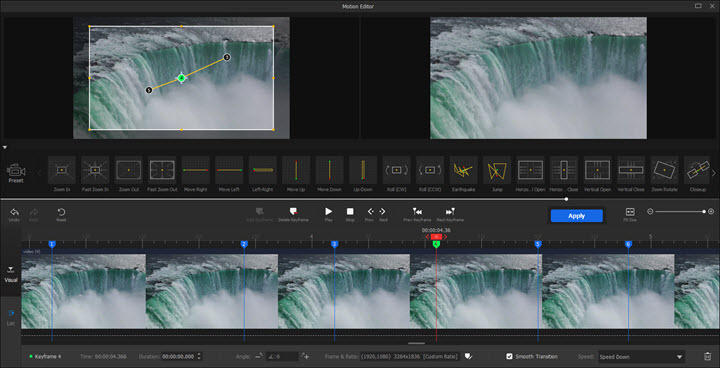
In post-editing, you still have chances to turn a basic time lapse into a hyperlapse. With the motion editor in VideoProc Vlogger, you can quickly make cinematic hyperlapse videos using its preset movements (pan, zoom in and out, roll, jump, close up, etc.) and customizable settings for keyframing, angle, and speed.
2. Color Correction and Color Grading
It is impossible to perfect everything while taking the time lapse for a long list of reasons, the weather, the light, the camera settings, etc.
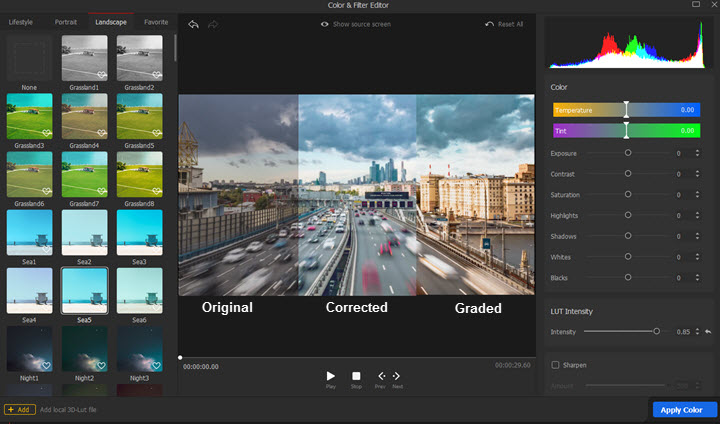
When recording a dawn-to-dusk scene, the variable natural light results in photos of different exposures that finally get a flickering time lapse video. Fortunately, it is fixable. You can adjust exposure, highlights, shadows, whites, and black with the color correction tool in VideoProc Vlogger.
Then, you'll enter the next stage, color grading, to add an artistic touch to your time lapse. This can be accomplished by customizing the temperature, tint, HSL, and vinegetting if you are a pro. Also, you can use its preset filters or employing some free Luts or filters that emulate a film look.
3. Background Music/Sound
Time lapse videos are recorded without audio regardless of any device you use. But the role of sound in a video should not be ignored. Background music/sound design and video editing come hand in hand in post-production.
For example, for an epic landscape time lapse video, a powerful composition with strings, bells and brass is often employed as the background music, which is always in crescendo. You can get tons of background music from free music sites covering public domain music, royalty-free music, audios released under the creative commons, etc.
Like some nature documentaries, you can add voiceover to your time lapse video to enhance the story, for instance, explain what's going on or just talk about your feelings towards the scene. After finishing the script, start recording with the voice recorder in VideoProc Vlogger and match it to the footage.
4. Advanced Time Lapse Stabilization
If you just share the original time lapse or hyperlapse recorded by the auto mode in your camera, the shaky footage will reveal that you are pretty amateurish. First, you did not check the weather in advance and flew your drone on a windy day to take time lapses. Second, you did not fix the shaky footage in post-production.
As of the fact that you've got shaky time lapse videos, you may need some skills to stabilize it with Premiere Pro or After Effects. They can recognize certain objects in the frame and keep tracking these points to make them at the exact position all the time.
5. Time-lapse Video Ideas
When we are speaking of time lapse videos, some epic landscape frames would come to our mind spontaneously, such as seaside and tides, sunset or sunrise, mountains, cloudy skies, and alike. But to make your story more interesting, you should show something that people don't often see which could be either the shooting techniques or the subjects in your time lapse.
If you are going to shoot some common subjects, like the traffic, a busy walking street, moving clouds, or a waterfall, consider using special videography techniques, such as aerial hyperlapse, motion control, or focus pull.
If you are looking for inspiration for time lapse subjects, here's a list of fresh ideas for your reference:
#1 Astro time lapse: If you want to make extremely splendid time lapses, record the movements of stars or meteors. But note that this also asks for many high-end gears and videography skills.
#2 Plants time lapse: The transformation from a seed to an adult plant, or from a bud to bloom is absolutely breathtaking. Also, you can record how a fresh fruit turns rotten.
#3 DIY and art project: The process of how a handmade work or a painting is performed. The audience cannot only appreciate the final work, but also see the detailed steps for further understanding of crafty.
#4 Construction: Anything that requires stepwise procedures to achieve a greater goal can be well-interpreted by time-lapse – a skyscraper, a bridge, a swimming pool, or a cabin built in reality, a model assembled in Legos, etc.
#5 Room cleanup: This is a good strategy to try time lapse at the least cost because you don't need to go out carrying many gears. The process of housekeeping and contrary between the messy and organized room is greatly satisfying and motivating the viewers.
#6 Study with me: If you are learning something recently, why not recording the entire process and make it a time-lapse? Concentrated study time lapses are a good niche to start on YouTube. The shooting durations range from an hour to a week, but they are all compressed into a time lapse of around ten minutes.
#7 Selfie time lapse: This is a long journey but meaningful. Take a selfie per day/week/month for years, and you'll be amazed by the changes in your appearance. Also, you can document your family, or a tree outside your window throughout the year.


