
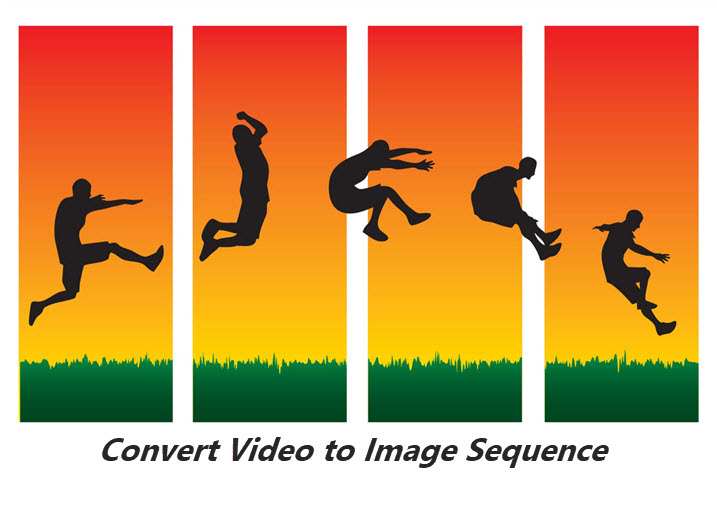
An image sequence stores individual video clips as still pictures with incrementing numbers in file names. By converting video to image sequence, you can pick out the moment when a moving subject is in the perfect pose or position from them or create stop motion effects and time-lapse look in post editing.
Burst and time-lapse modes can help you capture images in sequence. But what if you've recorded it into a video? Converting the video to an image sequence is also a good way out. And that's exactly what we are going to discuss today. Keep reading and find the best video to image converter for you.
How we created this guide?
We began by analyzing real user needs for converting videos to image sequences, including output quality, supported formats, processing speed, and cross-platform compatibility. We reviewed discussions on Reddit and forums to identify common frustrations, such as frame loss, slow batch processing, and format limitations.
Next, we tested multiple desktop and online tools, focusing on performance, usability, and reliability. Our tech writers documented each step, adding authentic screenshots and practical tips. Following this guide, you can confidently extract frames from any video while preserving quality, managing output settings, and avoiding common pitfalls.
1. Convert Video to Image Sequence in VideoProc Converter AI
VideoProc Converter AI, the best video to image converter for everyone, has a quick and simple workflow to finish the conversion at your fingertips. With 370+ formats and codecs in its arsenal, it can convert a broad range of videos to JPG and PNG, to name a few, MP4, AVI, MKV, FLV, MOV and WebM with transparency channel, HEVC, VP9/8, AV1, VR, 3D, , 360-degree videos, etc. In addition to formats, it gives you the full right to customize images amounts and dimensions.
Besides, its AI Super Resolution tool can upsale images and videos by 200%, 300%, and 400% with realistic texture, benefiting post-editing, sharing, and archiving in one stop.
Now download it to your Mac or Windows and convert video to image sequence in a snap! Hot!

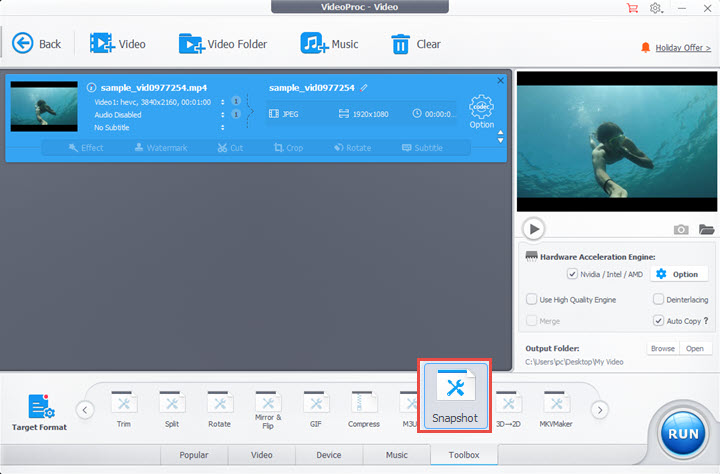
Step 1. Launch VideoProc Converter AI on your PC. Click "Video Converter" on the main interface, then import a video to it.
Step 2. Click "Toolbox" and choose the "Snapshot" option in it.
Step 3. Double-click on Snapshot to open a sub-window. Drag the green knobs to set the duration of the clip that you want to turn to pictures. And choose an output format (PNG or JPG), keep original image size, and check "Export All Frames". This is going to extract frames from the video without missing any movement in the footage.
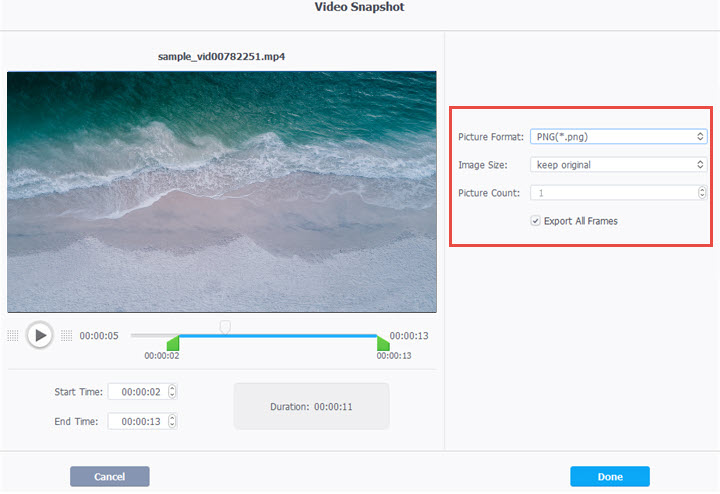
Note: If you want specific number of the exported frames, cancel "Export All Frames" and just input the number in the picture count option. It determines the frequency of snapshots capturing in VideoProc Converter AI. For example, if you ask it to convert a 10-second video to 20 images in sequence, it'll capture one image per 0.5 (10/20) seconds.
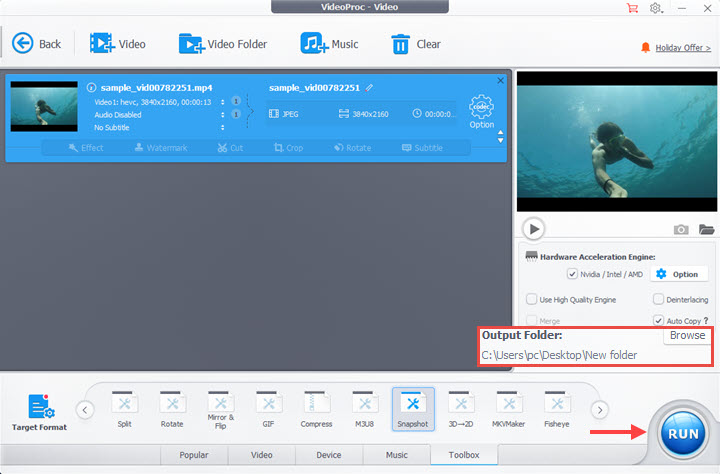
Step 4. Pay attention to "Output Folder" that indicates the storage path of pictures from your video. Also, you can browse to select another folder to save them. Finally, hit the "RUN" button to start converting the video to an image sequence.
 Pro Tips: The output images might not look clear if your video is in low resolution. Luckily, VideoProc Converter AI also lets you enhance image quality and increase image resolution to 4K/8K/10K in its AI feature - Super Resolution.
2. How to Convert Video to Image Sequence in Photoshop
Photoshop can work as a lightweight Premiere Pro. It lets you edit videos and convert MP4 files into a sequence of JPG or PNG images. Note that only Photoshop CS6 Extended or any Photoshop CC version supports video; earlier or standard versions cannot handle video files.
With the right version, frame extraction is straightforward, and you can control output format, resolution, and frame range. Still, exporting long videos or batches can be slow, and managing hundreds of frames requires careful naming and organization to avoid confusion. Photoshop is best for short clips or projects where precise image quality matters.
Step 1. Open Photoshop and drag a video to it.
Step 2. Go to File > Export > Render Video. Choose a folder to save the file in the sub-panel.
Step 3. Click the Adobe Media Encoder option and change it into Photoshop Image Sequence.
Step 4. Complete other settings like image format, image size, and video frame range.
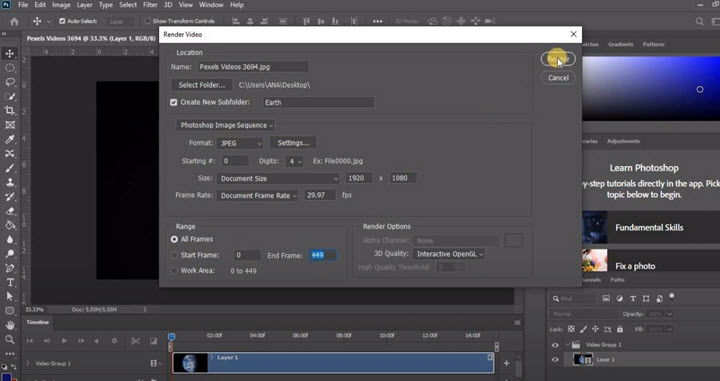
Step 5. Click Render, and wait for it to export the image sequence. Finally, you'll find these pictures in the location you've set.
3. How to Convert Video to Image Sequence in Blender
For experienced Blender users, converting a video into an image sequence is straightforward. The software provides extensive control over image format, color mode, bit depth, and color management, making it ideal for VFX, 2D animation, and 3D projects where frame accuracy and quality are critical. Advanced settings also allow precise adjustments for batch rendering and high-resolution output.
However, beginners often find the interface and settings overwhelming. Navigating the render settings, output formats, and frame ranges can be confusing, and exporting a video sequence incorrectly may lead to skipped frames or mismatched colors. Unless you are comfortable with Blender’s workflow, simpler dedicated tools are usually a better choice for frame extraction tasks.
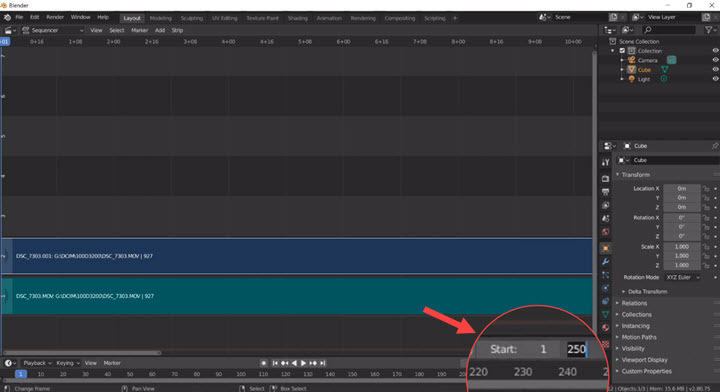
Step 1. Open Blender and change the editor type to Video Sequencer.
Step 2. Click Add to select and load video from your computer to Blender. Then you can see the total number of video frames. Move to the right corner to set the start and end frame in your image sequence.
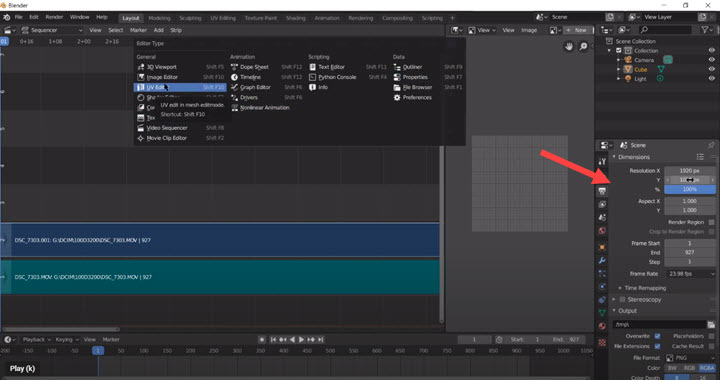
Step 3. Open Image Editor in Blender. Customize image sequence settings in the right area. Match the image dimension to the source video and input the frame rate of the video.
Step 4. Move to the Output settings to choose the location folder, image format, and color depth. If you don't want any quality loss, decrease the compression ratio to zero.
Step 5. Click Render > Render Animation in the top toolbar and you can see images coming into the output folder.
Note: Blender converts video to JPG/PNG images frame by frame, so you might get many images that seem duplicate, esp. in still footage.
4. How to Convert Video to Image Sequence in VLC
Many users choose VLC not only as a versatile media player but also for its built-in conversion tools. While it can easily convert between video formats with a few clicks, extracting a video into an image sequence is less straightforward and requires navigating multiple menus and settings. Beginners often find it confusing to locate the snapshot or convert options, and there is no real-time preview of the output frames.
VLC works best for small projects or quick single-frame extractions, but it can become cumbersome for long or high-resolution videos. There is no built-in support for batch processing, advanced naming, or format customization beyond basic options. Users who need reliable frame extraction, consistent quality, or large-scale image sequences may prefer dedicated tools that offer more control and faster performance.
Step 1. Open VLC media player. But do not rush to import your video to this media player because some settings have to be customized in advance.
Step 2. Navigate to Tools > Preferences and lets it show all settings in the last option at the bottom of the screen.
Step 3. Open Video > Filter > Scene filter.
Step 4. Tweak settings of Image format, Image width, Image height, Directory path, and Recording ratio. Hit Save to apply changes.

Step 5. Get back to the Filter options under Video in the Advanced Preferences panel. Tick the box before the Scene video filter and save it.

Step 6. Open a video with VLC media player, and it will be recorded in image sequence during the playback. Pause the video and close VLC, and you can find pictures from the video on your computer.
Note: VLC won't reset the settings by default. The next time you watch a video with this media player, it'll convert video to image sequence and save numerous files on your computer automatically. So cancel the scene filter right after capturing pictures from the video.
5. How to Convert Video to Image Sequence Free Online
Online video-to-image converters can be convenient for very short clips, especially when you need a quick frame extraction without installing software. Most free tools, like Online-Convert, impose size limits (usually under 100MB), so longer or high-resolution videos cannot be processed. Users often complain about slow uploads and downloads, inconsistent frame quality, and limited format options when working with larger files.
For casual tasks or single short videos, these converters save setup time and are easy to access from any browser. However, they are rarely suitable for batch processing or high-resolution projects, as exporting hundreds of frames can be slow, and output quality may suffer. If reliability, speed, and control over formats and resolutions matter, desktop software remains the preferred choice.
Step 1. Go to online-convert.com and open its Image Converter.
Step 2. Choose an image format, JPG, PNG, TIFF, or others. Then upload your video from your computer, Dropbox, or Google Drive.

Step 3. You can keep its default settings and start conversion immediately. If you want pictures of better quality, change the Quality settings to Best before the conversion.
Step 4. Wait for it to convert the video into images. Then you'll see a long list of images. Select all and download them as ZIP.
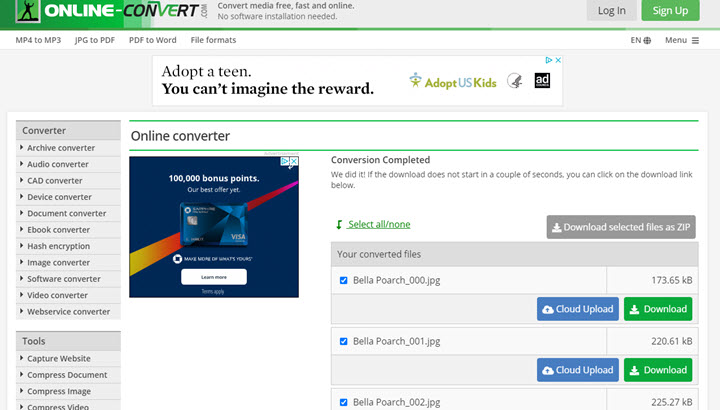
Step 5. Unzip the file, and you'll get a series of frames from the video.
Note: It takes snapshots from the MP4 clip every 2-3 seconds. And you are not allowed to change the settings.
FAQs
How do I convert MP4 to JPEG sequence?
In VideoProc Converter AI, just select JPEG in the Snapshot panel, and input the number of images. The software will export a sequential JPEG image series in a folder, maintaining the original frame order and quality.
How do I save a video as a PNG sequence?
After loading a video into VideoProc Converter AI, open the Snapshot tool in Toolbox and select PNG as the output format. You can define the frame range and destination folder to generate high-quality lossless frames.
How to export an image sequence in iMovie?
Click the Share icon in iMovie and select Export Image Sequence. Then choose the desired format and folder. iMovie exports the frames sequentially, but it’s limited to standard formats and may not support alpha or high-bit-depth images.
Can I batch export multiple videos to image sequences?
Yes. In VideoProc Converter AI, import multiple videos via Video Folders, set your snapshot format and frame range, then apply to all files. The tool automatically generates sequences for each video while keeping naming and order consistent.
How to preserve quality and avoid frame loss when exporting?
Always choose a lossless format like PNG or TIFF. Ensure frame rate matches the original video. VideoProc Converter AI maintains the exact timing and resolution, preventing skipped or duplicated frames, which is critical for VFX or analysis workflows.


