In-page Navigation
- 1.11.1 Recreate Camera Movement
- 1.21.2 Motion Crop for Social Media
- 1.31.3 Ken Burns for Slideshows
- 1.41.4 Creative Motion Transitions
Home > Video Editing Software > Guide > Motion Editor
Motion effects are powerful additions to videos, vlogs and slideshows. Using the Motion Editor in VideoProc Vlogger, you can easily and flexibly add motion effects.
With motion presets and customizable options to add keyframes, you can:
Free Download VideoProc Vlogger and play with the keyframes to get more creative. You can also try endless possibilities when combined with other editing tricks.
Watch video tutorial on how to use Motion Editor in VideoProc Vlogger, or read text instructions below.
In VideoProc Vlogger, you can use the Motion Editor to visually adjust the viewing box to set the video in motion, what you see in the viewing box is what you get in the edited video, and how the box changes from keyframe to keyframe is how the motion will display for various dynamic effects and movement of all directions.
You can use motion editor in the following scenarios and beyond to streamline the editing process:
If you are unaware of the importance of applying camera movement techniques during the shooting, or you are a one-person's team without dollies and rails — the case for most vloggers and content creators, you can add camera movement in the post editing, using Motion Editor. You can add keyframes or use 28 presets to imitate camera movement. Read detailed tutorials to Create Camera Movement for Vlogs.
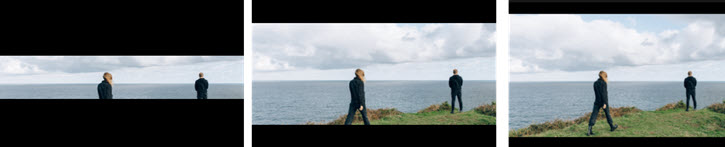
Motion Crop allows you to generate multiple versions of the video in different aspect ratios, while keeping the subject in the center of the frame, which is especially handy for content creators posting 1:1 for Instagram, 16:9 for YouTube, 9:16 for TikTok etc.
Within Motion editor, you can use cropping frame in different sizes, and use keyframes so that the "camera lens" always follow the subject within the original clip.
Watch video tutorial on how to use Motion Editor in VideoProc Vlogger, or read text instructions below.
You can combine pan and zoom motion effects to add motion to photo slideshows, use the Zoom in and position animation to showcase the photo wall, or manually add and adjust keyframes for all kinds of motions.
Besides stock transition effects such as dissolve, wipe, slide, etc., you can creatively add motion effects at the tail and head of adjacent clips as transitions. You can use motion presets such as cinematic opening and closing, or add keyframes for customization.
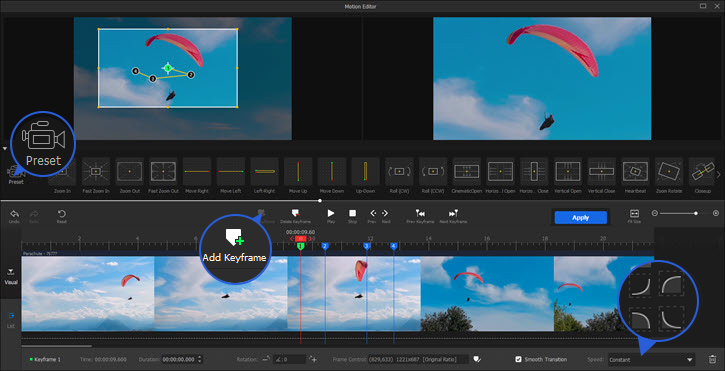
Source Editor: the screen on the left side. It shows the source clip, and allows you to visualize and edit the area being keyframed, by dragging the viewing box to change its position, size and rotation angle.
Preview Monitor: the screen on the right side. It shows real time preview of the applied motion effects. You can playback or scrub the timeline for previewing.
Viewing Box: the adjustable frame in the Source Editor. When you move, resize and rotate the viewing box from keyframe to keyframe, it will result in animation such as position changing, zoom in and out, and rolling.
Presets: batch add keyframes with pre-configured parameters to achieve certain motion effects.
Adding, Adjusting and Navigating Keyframes:

Visual or List: switch between these two tabs to view keyframes on the timeline or show in a list.
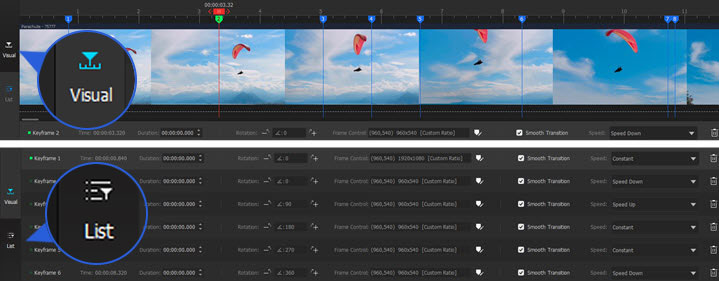
Keyframe parameters bar: click on a keyframe to display and adjust the parameters, including:
Assuming you have already created a new project, and import videos or photos to the timeline. Follow these steps to add motion effects (taking Zoom as an example):
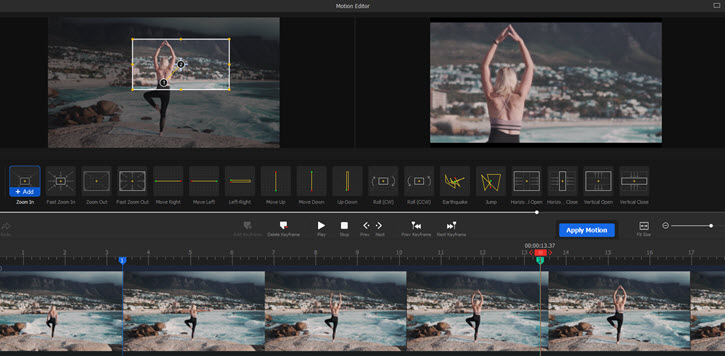
Step 1 Click on the clip, and hit the Motion icon on the toolbar.
Step 2 Drag the playhead to the point you want the Zoom In motion to start, hover on to Zoom In preset, and hit Add ![]() .
.
Step 3 Play the video for previewing and adjust the keyframes to your liking.
Step 4 Click Apply Motion.
 Tip:
Tip:Adjust the distance between keyframes: Since Keyframe 1 and 2 denotes two status, the closer the keyframes are placed next to each other, the faster the motion effect will be.
All the motion effects, such as pan and zoom, roll, move up and down, are made possible with keyframes.
keyframe 1 (00:00:05) tells the video to show the full image.
Keyframe 2 (00:00:10) is a cropped view of the image. Note the change of the W and H values.
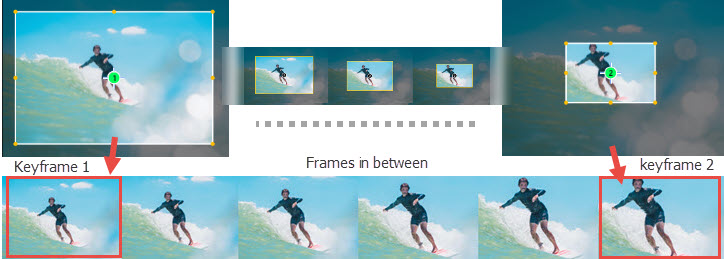
Then when you play the video from 00:00:05 to 00:00:10, what you see is a change from full image to a part of the focus, thus creating a zoom in effect.
If you click on any frame between the two keyframes, they are in states between A to B.
Keyframe 1 (Status 1): The box is on the left.
Keyframe 2 (Status 2): The box is on the right. Its vertical position (Y) is the same as status 1, and its horizontal value (X) is changing.
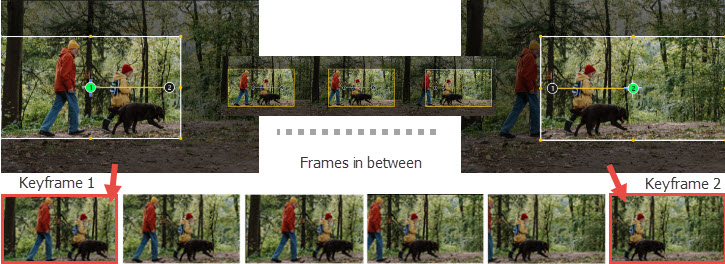
Therefore, from 1 to 2, the perspective is moving from left to the right.
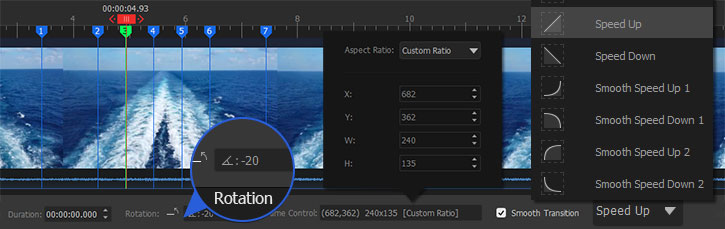
Keyframe 1: The box is not rotated. At the bottom, you can see the angle is 0.
Keyframe 2: Rotate the box 60 degrees clockwise. Now what's inside the box will be displayed in the preview window.
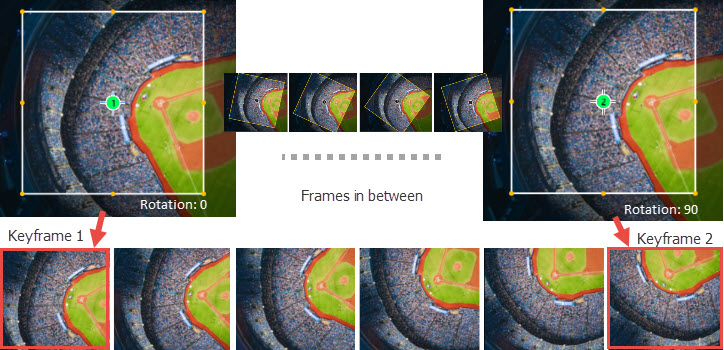
Therefore, from 1 to 2, the actual animation is the image being rotated counterclockwise.
With the viewing box on the source editor, you can easily change all parameters flexibly and visually by dragging the box and adjust its shape.
For instance, to create the popular ken burns (pan and zoom) effect for slideshows, you don't need to separately change positions (pan) and then change the scaling values (zoom).
To achieve an intended motion effect, knowing why you need to adjust certain parameters of the keyframe is essential.
When you add the first keyframe, here's what happens:
From the beginning of the clip to the first keyframe, the motion is displayed in a way that transits from the beginning status to the status of keyframe 1.
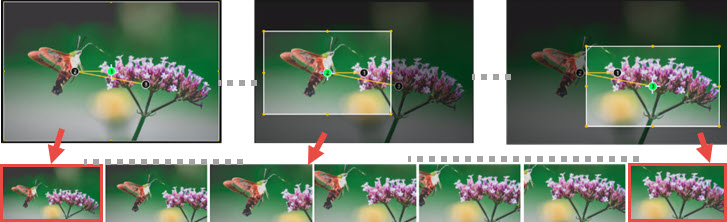
If you want a motion to start for a certain amount of time (00:00:05 to 00:00:15), and hold on for some time (00:00:15 to 00:00:30), then you need to add at least three keyframes:
To make sure two keyframes have identical parameters:
Notes:The X and Y value indicates the position of the box's anchor point, which is at the center of the box by default.
For instance, for a 1920x1080 project, when the box is placed at the center of the window, the X and Y will be 960 and 540 respectively.
To create the ken burns effect, you need to combine pan and zoom when adding and adjusting the keyframes.
Step 1 Select the picture/video you want to add ken burns effect and click Motion on the toolbar.
Pictures and static shots work better for ken burns effect.
Step 2 Add Pan effect.
Step 3 Add Zoom effect.
Once you get the hang of it, you can add more keyframes and adjust their parameters for different kinds of pan and zoom effects.
For vlogs, mini films and action cam footage, you can add cinematic opening effects at the start of the clip. After applying the effect, you can also add titles during the opening motion.
Follow these steps to create a cinematic opening effect:
Step 1 Inside Motion Editor, use the preset Cinematic Open.
Step 2 It will add two keyframes on the timeline. Drag keyframe 1 to the very beginning of the clip.
Step 3 Adjust the position of keyframe 2.
When shooting a video, despite the need for stabilization provided by a tripod or a gimbal, sometimes you need the handheld camera shake to provide a sense of immersion, the unrehearsed reality, and dynamics. For instance, handheld shake in a horror film can create tension and build up the nervous atmosphere.
If you haven't done so during the shooting, you can use Motion Editor to fake camera shake in the post.
Step 1 Drag playhead to the position you prefer the camera shake to take effect.
Step 2 Add Quake from the presets.
Step 3 Drag the playhead several second forward and repeat adding Quake preset.
Motion effects can be used creatively as a transition between two clips on the timeline. For instance, you can add zoom in motion at the end of the first clip, and add zoom out motion at the beginning of the second clip.
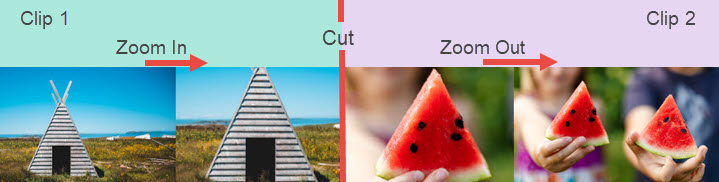
It works nicely if there are similar elements (in terms of shapes) in the adjacent clips. See example shown on the picture above.
Free Download VideoProc Vlogger to use Motion Editor, get creative and have fun.
For more guides of VideoProc Vlogger, please visit this page >
If you have any question, please email us or visit ![]()
![]()
![]()

Digiarty Software, established in 2006, pioneers multimedia innovation with AI-powered and GPU-accelerated solutions. With the mission to "Art Up Your Digital Life", Digiarty provides AI video/image enhancement, editing, conversion, and more solutions. VideoProc under Digiarty has attracted 5.2 million users from 180+ countries.
Stay current with our latest updates, guides, and subscriber-only offer.
Choose Language
Copyright © 2026 Digiarty Software, Inc. All rights reserved.
Any third-party product names and trademarks used on this website, including but not limited to Apple, are property of their respective owners.