In-page Navigation
Advanced Color Editing
Color editing is the re-creation of videos, which is a process that expresses the emotions and thoughts of characters in footage by grading the colors. As a one-stop video editing software, VideoProc Vlogger is helpful to complete color correction and grading, making your video more vivid and vital.
Let's download, install, and run VideoProc Vlogger. Follow the steps below to start advanced color editing.
Watch video tutorial on color editing in VideoProc Vlogger, or read text instructions below.
Basic Procedure of Color Editing
Color editing is primarily divided into two steps. The first one is color correction.
- To start with, you need to use Temperature and Hue to roughly adjust the white balance of the scene, so that it is roughly restored to the color seen by us when shooting.
- Then use Exposure, Shadows, Saturation, Highlights, Shadows, Whites, and Blacks to accurately correct the footage.
You don't need to use every parameter, just adjust depending on the color presentation and your preferences.
The second step is color grading, which is mainly to achieve stylized creation by changing the hue, saturation, and luminance of some single color so that the picture can convey your ideas more effectively.
- You can use the HSL section of the color palette to achieve your creation.
- H stands for Hue, S stands for Saturation, and L stands for Luminance.
Color correction and grading serve for expressions of video content. Before practice, it is essential to analyze the original footage, that is, to determine the overall tone of your footage and the emotions to be displayed in the segmented plots. The process can eliminate most of the repetitions in the actual operation and escape you from "breakdowns".
Although color grading varies from person to person, the film industry has a relatively consistent understanding of the emotions represented by colors. If you want others to understand the emotions of your shots, refer to the following.
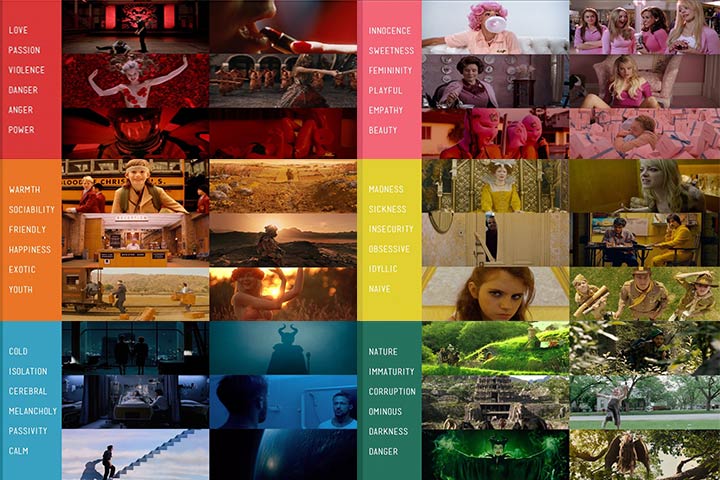
Image credited: vmovier
- Red represents love, passion, violence, danger, etc.
- Pink represents innocence, sweetness, femininity, empathy, playfulness, etc.
- Orange represents warmth, sociability, happiness, youth, friendliness, exoticism, etc.
- Yellow represents madness, sickness, insecurity, obsessiveness, naivety, etc.
- Blue represents isolation, sorrow, passivity, cold, melancholy, calm, etc.
- Green represents nature, immaturity, corruption, ominousness, darkness, danger, etc.
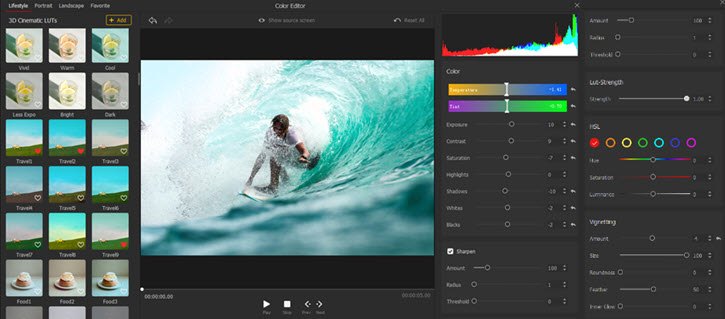
Parameters of Color Editing
In the editing panel, there are seven basic parameters you need to know.
1. Exposure
The Exposure slider is mainly used to adjust the shadows, highlights, and midtones of video footage. It determines the overall brightness of a video. When the adjustment range is small, it is main to adjust the midtones.
- Dragging the Exposure slider to a positive direction increases luminance so that the picture displays a bright, relaxed, and clear atmosphere.
- Dragging it in a negative direction makes the picture present a thick and dark atmosphere.
 Editing Tips
Since the Exposure slider affects the entire footage, it cannot be adjusted by a large margin. Otherwise, it will destroy the contrast of the scene.
2. Contrast
Contrast slider refers to the contrast between the light and the dark of footage.
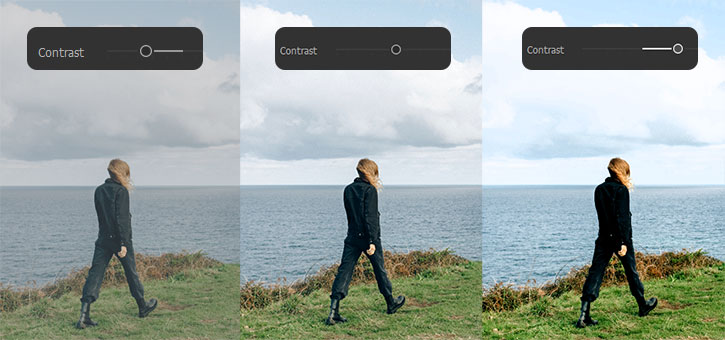
With an increase in contrast, the bright areas will be brighter, the dark will be darker, and the contrast between light and dark will be enhanced. It is typically used to power up expressiveness.
3. Saturation
Saturation controls the purity or intensity of colors.
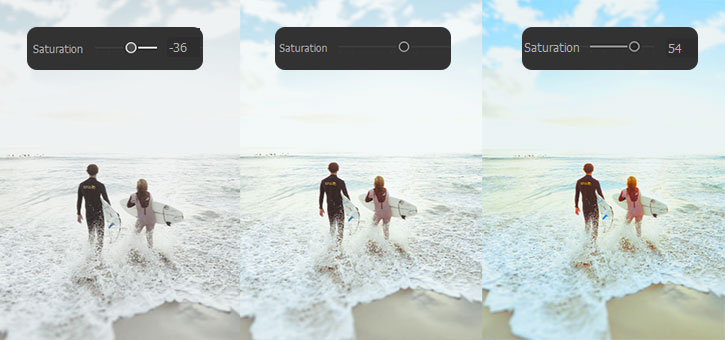
High saturation can increase the visual impact and make it easier to attract people's attention, but over saturation will make the scene too bright and easily result in visual fatigue.
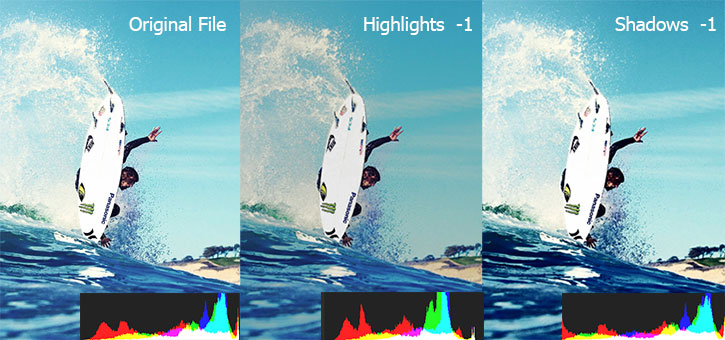
4. Highlights
Highlights slider controls highlights of bright regions in the footage, while the dark parts will not be affected.
Adjusting the parameter positively plays a role in unifying brightness where it works. Conversely, adjusting it negatively makes the bright part dark. And the whole picture becomes more layered and more detailed.
5. Shadows
Shadows slider determines the shadow of dark parts, while the bright parts are not affected in any way.
Adjusting parameters positively can increase the brightness of the picture and provide more image information while doing so negatively can unify the dark parts.
It helps to minimize unnecessary details and emphasize areas you want to show.
6. Whites
Whites slider is used to alter the general brightness, but it has a better impact on the bright parts. The difference with Highlight is that it acts overall, while Highlight only acts on bright parts of the picture.
7. Blacks
Blacks slider is used to change shadows of every area, it has a better impact on the dark parts. The difference with Shadow is that the Blacks influence the overall, while Shadow only acts on the dark part of the screen.
HSL Secondary Control
HSL section in the Color Editor allows you to control a specific color instead of the entire image. You can pick one of the seven hues for keying, and adjust its hue, saturation and luminance values.
For instance, if you want to retouch rose-ish color, you can tick Magenta to set it as the key. Then when you drag the Hue slide, to blue-ish section, for example, it means to change magenta colors into blue.
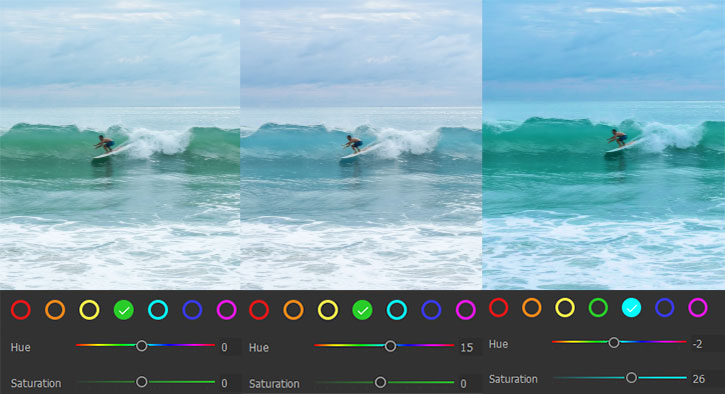
Set Key
Click the color circle to set a color as the target color. When you change the H, S, L value, it will only influence a portion of the image according to the target color.
Hue
Hue determines the color of an object. Red, orange, yellow, green, cyan, blue, and purple are common hues of the human eyes.
Dragging the Hue slider to change the hue of the target color picked above.
Saturation
Saturation determines the intensity of a color.
Dragging the Saturation slider to change the saturation of the target color picked above.
Luminance
Luminance determines how bright the white light is in color.
Dragging the Luminance slider to change the brightness of the target color picked above.
Editing TipsBeware that due to different standards of color values contained by the distinct display and diverse CME (Color Management Engine) owned by diverse editing software, what you see on your editing device may not be the same on others.
If you have higher requirements for color rendering, you'd better have a professional color display, use professional equipment to correct screen colors regularly, and convert color mapping before operation.
Color Correction
Color correction is generally for white balance. In most cases, we use an oscilloscope as assistance. In VideoProc Vlogger, you will find a histogram on the upper right side. It counts the numbers of pixels at different luminance levels.
Generally, you won't want the pixels to stack at the left-most or the right-most side, which means underexposure or overexposure respectively.

Edit Videos under Log Modes
Videos shoot in log preserve more information about exposure, and allows for more space in color grading. A Log video has a histogram like a picture below, in which blue, red, and yellow overlap, the luminance level of each channel mainly stays in the midtone area.
It is under well exposure, but not vivid. What you need to do is to increase Contrast and Saturation. And then perform stylized color grading based on the above methods.
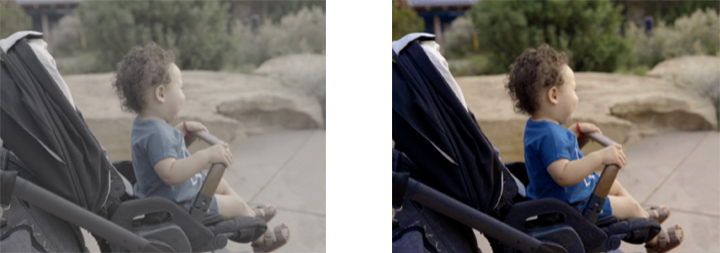
Fix Overexposure
Overexposed videos show a large number of white color blocks, where the details are lost in the brightest area. Therefore, repairing exposure is to present more details and increase the amount of information.
So is it an appropriate choice to fix the overexposed footage only by reducing the Exposure values? No. As mentioned before, Exposure slider adjusts the brightness of the entire image. If you just decrease the parameters of exposure, the footage will turn gray. The originally well-exposed areas will lose their correct colors.
Thus, when repairing the overexposed, it is recommended that you first use the Highlight, Whites, Blacks, Shadow, and Contrast sliders to adjust. If it still fails to achieve your ideal state, then slide Exposure appropriately.
Color Grading under Different Scene
1. Cinematic videos
Many people love watching movies. That is not only because the plots are charming, but also because we are attracted by colors that are different from in our daily life. It is to say that exaggerated and unusual colors are one of the movies' features. Thus, if you still pursue natural colors, you may fail to get cinematic scenes.
Then, how to make a cinematic video?
Make sure of a dominant tone and try to abandon the usual colors. For example, you want to make footage that shows a sense of cold memories. Blue is perhaps a great choice. So drag Temperature slide boldly to 100, and then use sliders related to lights to reduce luminance and provide details. At this time, natural colors of skin or other items may be given up. But the footage is truly more interesting and appealing.
Now throw common steps away and enjoy dragging sliders.
2. Summer-style videos
As we all know, thinking before acting is very important, which can be applied to color editing as well. Before starting operations, you are expected to know what kinds of elements will help you make summer-style videos.
- Over-exposure: usually, we try to get rid of over-exposure. However, in summer footage, overexposure helps create great sunshine, which is a symbol of summer.
- High saturation: it generally manifests energy and vitality, which matches what we see in summer. Yet it doesn’t mean that you make all colors into high saturation. It's an appropriate choice to insert summer style into one or two colors.
- High sharpness:with more sunlight in summer, things we see are much clearer compared to winter. Thus, high sharpness is also a must for your summer videos.
After browsing key elements, you probably know how to get a summer-style clip.
Feature-SharpSharp sliders adjust the contrast of the edge of the pixel of every frame, making the objects in the picture more prominent.
- Radius: it determines the sampling range of a single pixel in a picture.
- Amount: it determines the intensity of each pixel be sharpened.
- Threshold: it determines in which brightness range pixels will be sharpened.
Generally, Radius and Amount are used together. First, determine the former, then adjust the latter.
Now free download and install VideoProc Vlogger to edit colors with ease.
Related Guides
- > 3D LUTs
- > Compositing with Blend Mode
- > Add Video Effects
- > Add Transition
- > Edit Image with Filters
- > Advanced Image Editing
For more guides of VideoProc Vlogger, please visit this page >
If you have any question, please email us or visit ![]()
![]()
![]()
Is this page helpful?
