Summary: This DaVinci Resolve review purely aims at telling my insights and advice of an application to the readers who are attempting to select a video editing application for post-production at no cost. Moreover, the review will focus on the latest free version of DaVinci Resolve 17, but most of the features apply to both free and paid versions.
DaVinci Resolve Overview
Referencing to the DaVinci Resolve application, most of us would deem it to be the most robust color grading software for video editing. Well, it's definitely the tip of the sword in the film industry without any doubt in terms of color correction and stylizing for a specific look.
You might be thinking my speech is too objective. Thing that proves the DaVinci Resolve best in color replacement is probably the Academy Awards. Five out of the eight films nominated for Best Picture at the 91st Academy Awards Presentations, including the award-winning Green Book and the nominees of BlacKkKlansman, Bohemian Rhapsody, The Favorite and A Star Is Born, were produced using the color grading on DaVinci Resolve Studio.
So, is DaVinci Resolve only doing well in its color science? Nope. The real benefit that DaVinci Resolve has is that has brought color correction, video cutting and trimming, apply of visual effect and transition, sound mixing and more in the same software tool, which allows editors, colorists, VFX producers, and sound designers to work on the same project simultaneously.
The History of DaVinci Resolve
da Vinci Systems, found in 1984, was an American digital cinema company focusing on post-production solutions. It specified in building hardware-based color correction, such as da Vinci Classic, da Vinci Renaissance 888, da Vinci 2K; GPU-based color grading software like TCL and Resolve (the initial version of DaVinci Resolve).
Due to the poor management, da Vinci Systems were defunct in 2009 and purchased by an Australia company that produced broadcast and cinema hardware - Black Magic Design. Having been devoted to color correction for two decades, the DaVinci Resolve team began to bring its attention to developing and upgrading the video editing capability of the software.
In September 2010, the redesigned DaVinci Resolve version 7 was launched on macOS with the improvement both in features and price models. More so, Acquisitions from BMD continued in order to send DaVinci Resolve to the next level and compete with other mainstream post-production solutions like Adobe Premiere, Final Cut Pro, Avid.
And Fusion page (for VFX work) and Fairlight Page (for audio work) were brought to DaVinci Resolve in the wake of the recent adoptions of eyeon Fusion and Fairlight, which makes DaVinci Resolve an all-in-one video editing software.
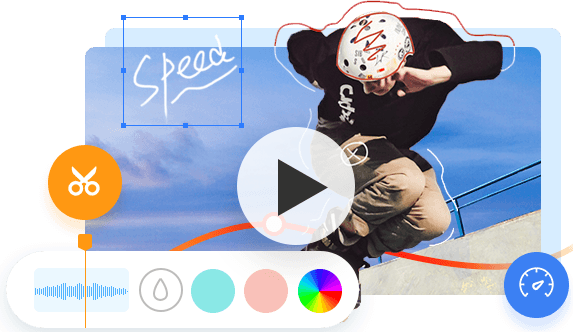
Best Free Video Editing Software for Landscape Video
The most exciting thing about DaVinci Resolve is the full support of Blackmagic Raw. Compared to traditional raw formats that produce rather huge files and would be quite intensive when coping with them on old computers, Blackmagic Raw, a free and cross-platform codec developed by BMD, features both on the fastest decoding speed by accessing to GPU accelerated and CPU optimized algorithms and incredible quality that delivers 12-bit, HDR, high resolution & frame rate image.
That's why DaVinci Resolve deserves to be the best software tool to alter color for films, commercials, landscape videos and more. And I have not much to dislike about the newest DaVinci Resolve 17 except for its steep learning curve. It's a bit hard to understand and use for beginners, such as color correction & color adjustments, the node editor, etc.
Deep Dive into DaVinci Resolve
You will walk through the pros and cons, price model, hardware configuration, interface, color adjustments, etc. of DaVinci Resolve 17. Without further ado, let's move on.
The Pros & Cons of DaVinci Resolve
Pros:
- Output videos will not be watermarked.
- Lifetime free upgrade. Even the free version of DeVinci Resolve 17.
- It packs with a wide range of capabilities, such as editing, super resolution, automatic mask, etc.
- If you purchase a BMD camera, you are free to get an activation key of DaVinci Resolve Studio 16.
Cons:
- H.265 codec is not available to the free version of DaVinci Resolve 17.
- It lacks of hardware encoding and some effect inspectors.
Pricing, System Requirement & Hardware Configuration
You can either choose to download the free video editing software of Resolve 17 or get a full version by paying a one-off fee of $299. This is the same with Final Cut Pro X in terms of pricing and drafts all the cloud subscription models like Adobe Premiere and Avid. And there is another way out to get Resolve at no cost. If you make a purchase of Blackmagic Pocket Cinema Camera 4K/6K, you are free to get a perpetual license for Resolve Studio.
This cross-platform application is compatible with Windows, Linux and mac OS. The interesting thing is that there is no general guideline about minimum spec to run DaVinci Resolve 17.
This question is hard to answer without knowing your exact workflow. If you are going to make some basic editing, your old machine might be good to go. If you plan to 4K, 6K at 50, 60 FPS, or plan a lot of VFX work on Resolve and get a reasonable response, you have to get a robust machine.
In the following is my experience and insight on minimum and requirement cost of entry to using Resolve:
- A 64-bit operating system (Windows 11/10, macOS 10.10 Yosemite, Linux CentOS);
- 16GB of RAM is recommended, 32GB for 4K, VFX work, etc.;
- An NVIDIA, AMD or Intel GPU with a minimum of 2GB of VRAM that supports versions greater than either is equivalent to Metal, OpenCL 1.2 or CUDA 10.
- A quad-core CPU or greater.
If you need smooth playbacks of your clips, you have to get at least one SSD installed. However, you would better get a workstation that is purpose-built for DaVinci Resolve through professional companies.
A Quick Look to DaVinci Resolve 17 Interface
The first part focuses on the role of Resolve various pages and panels. You can take it as a simple software tour that helps you have a smooth workflow when you start editing.
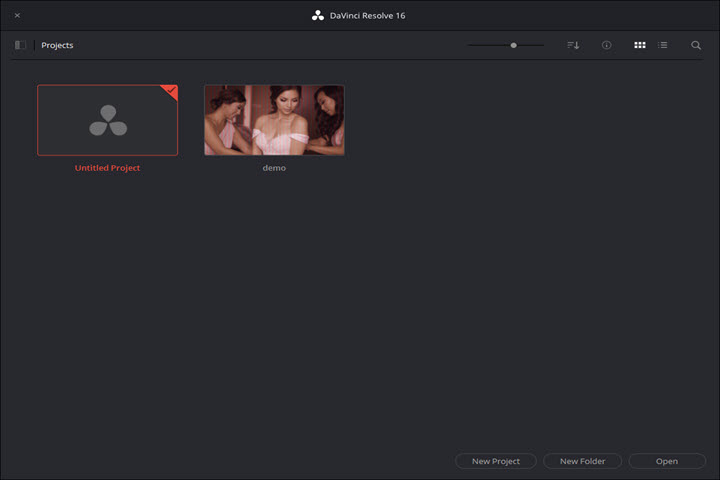
The first panel we will reach when we open Resolve is the Project Manager where you can create and manage your projects for each video. You can create a new project by clicking New Project or double-clicking the Untitled Project. When you get in Resolve, you should hold Ctrl + S to name and save the project. The first time you save is very important, otherwise, you will lose your project if the software crashes.
Activate Live Save and Project Backups
Note that when you open DaVinci for the first time, you should move to Preferences > User > Project Save and Load, and activate Live Save and Project Backups so that you won't lose any progress even if the software happens to abnormal termination. This is an edge of DaVinci Resolve 17 either.
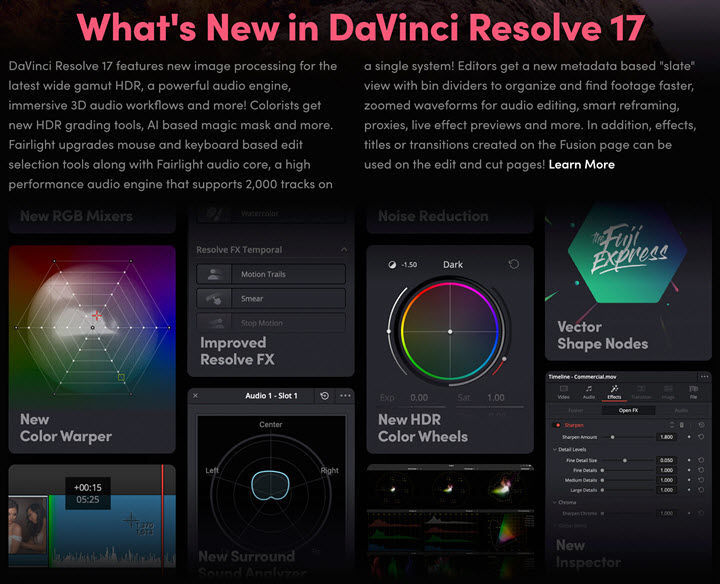
There are seven major pages designed for different stages of video editing at the bottom on the DaVinci main interface, including Media page, Cut page, Edit page, Fusion page, Color page, Fairlight page and Deliver page. You will walk through every page in the next part. Please keep reading!
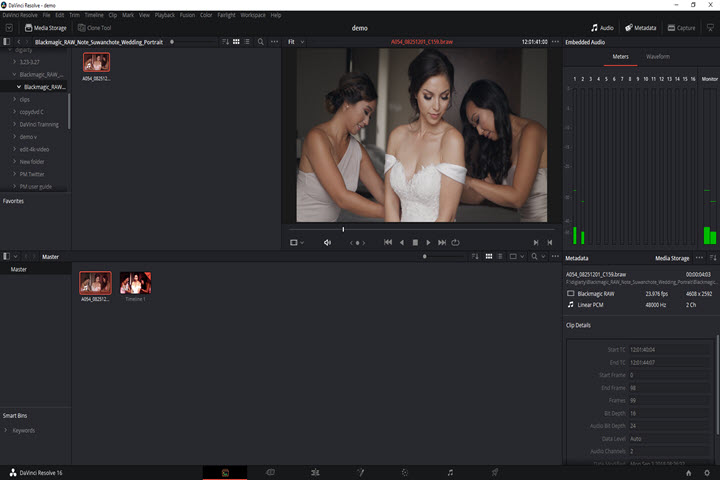
The first is the Media page that consists of five major parts, covering library browser, viewer, audio meters, media pool, and metadata editor. It is worth remembering that DaVinci Project Settings is independent. That said, once you have imported the materials to the media pool, you will not be able to change the project's frame rate anymore, which will easily cause dropping frames in the videos. So you have to select a proper frame rate for your entire project in the Project Settings before adding the clips at the beginning.
Once you have added and categorized your footage, you are good to go editing. DaVinci Resolve 17 has two editing pages, namely the Cut page and the Edit page. Both of them are alternative to each other.
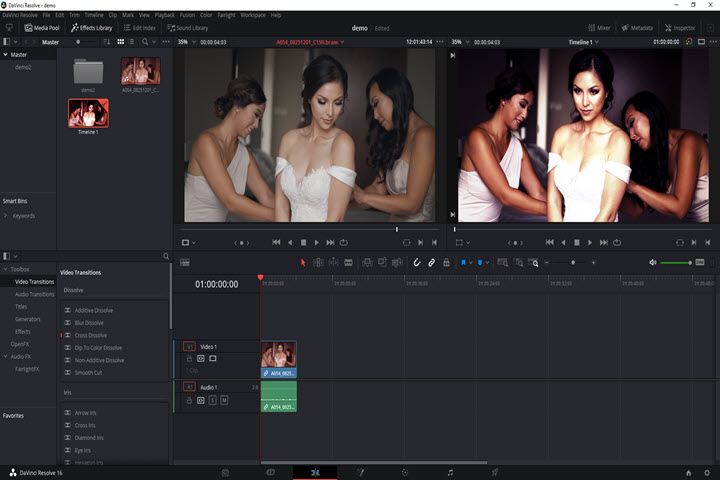
The Edit page is made up of five sections, including the media pool, the Source viewer and the Timeline viewer, the inspector, the Effects Library, and the timeline. To edit videos, press the I key and O key on the keyboard to make an in point and out point within the Source viewer. And drag and drop the clip to the timeline where you can composite various clips.
There are some differences between the Cut page and the edit page. Firstly, the Cut page has only one viewer, because the Source viewer and timeline viewer are merged together. Secondly, the media pool, Effect library, Titles, etc. have been hidden and placed in the upper left corner of the window.
This saves a lot of space to the timelines. The upper timeline shows the entire time of your edits. And the lower timeline shows the detail view of your edits. Furthermore, the way to edit in the Cut page is innovative. The unique option of Source Tape at the Cut page combines all the materials from the media pool into the viewer, which saves a lot of time when selecting materials. It is more suitable for creating rough cuts.
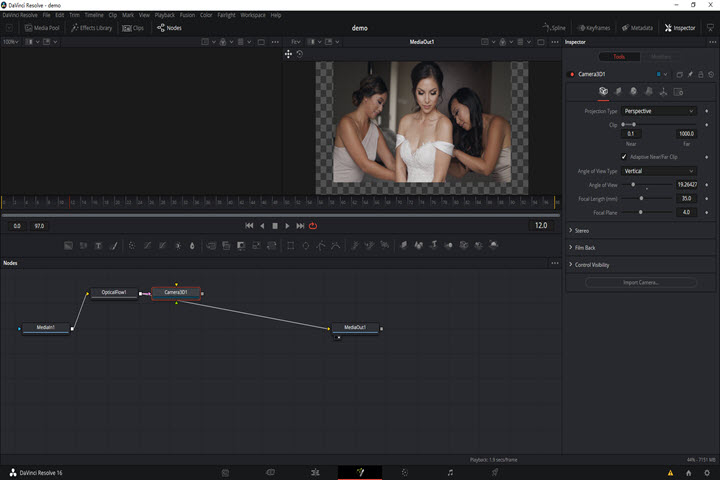
On the Fusion page, there are two viewers across the top displaying different images or blended effects. Below the viewers is a toolbar covering lots of the most commonly used tools, such as Background, Text, Blur, 3D effects and more. At the lower area of the Fusion page, there is the Node editor where you put your crazy thoughts into the videos. What you can see in the right is the Inspector where you are able to manipulate the tool or effect parameters.
But it is discouraged to use the DaVinci Resolve 17 free version to construct your effects, because the GPU encoding is not available to the free version, which slows down the entire workflow significantly.
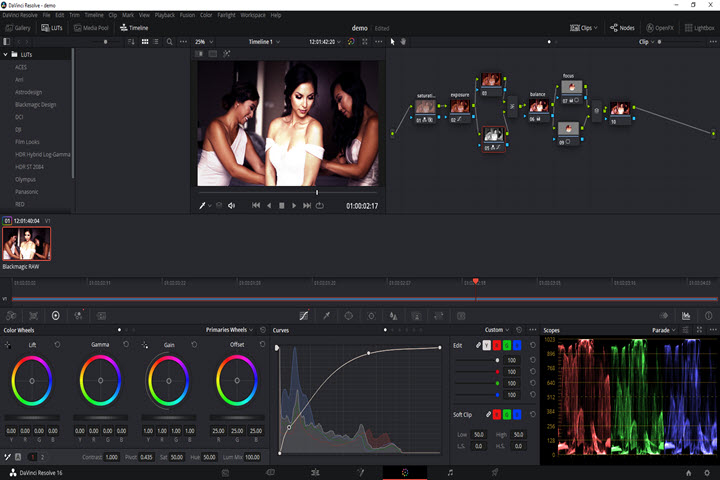
DaVinci Resolve has a strong color grading ability that you can have complete control over the image colors. The Color page covers the gallery, viewer, node editor, timeline and the lower color grading toolkits. You can save, copy or export the adjustments or Luts in the gallery.
The node editor records the way you make color corrections, image adjustments, effect, and more. And each node will have an impact to the images in order. The node editor can help you separate the various parts and perform individual color correction of the picture. The lower part in the Color page has all the necessary tools for color grading & correction, such as the color wheel, curve and so on.
Note that any adjustments will be recorded on the node you selected and influence the images. Any operation will be registered on the node you selected, and it will have a bad effect on the screen. Apart from the color adjustment, you can also stabilize, reduce noise or track the picture. Mastering this page helps you create stunning colors over the images.
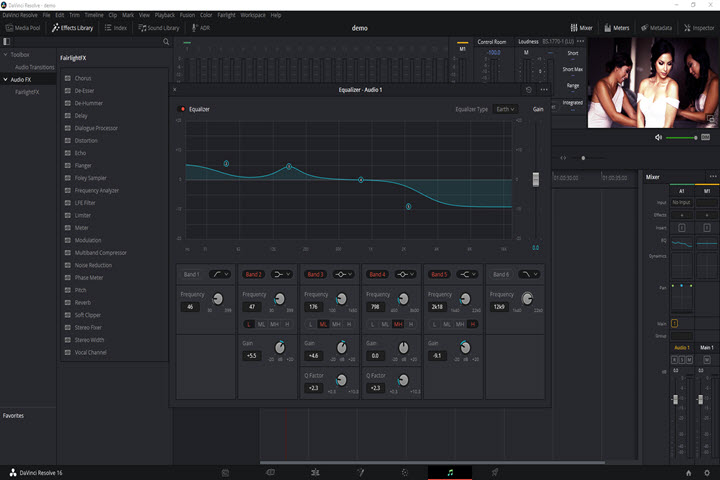
The Fairlight page is the place for editing and sweetening the audio, including monitoring panel, viewer, the timeline for audio track, and mixers. You can add audio effects to the soundtrack by going to the Effects Library, or process the sound on the entire track through the mixer. Audio is quite a significant part. And the clear sound can help you deliver your ideas and thoughts in a better way.
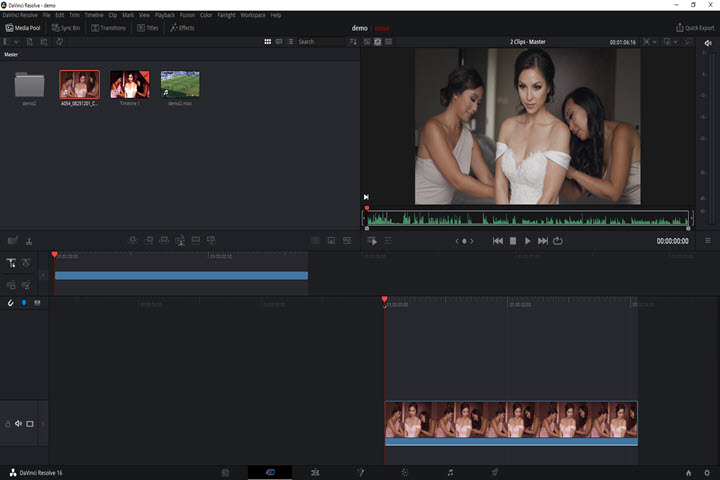
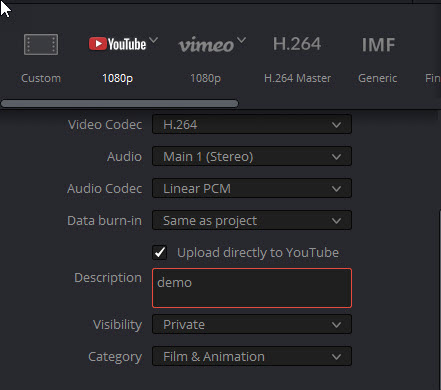
After you have completed your editing workflow, you have to move the Delivery page to export the videos at last. It is a bit similar to the Edit page, except that it adds the render settings to customize the output format and the Render Queue that shows all the projects waiting to render.
Besides, you can apply to a render preset that automatically configure the output format you need and post it to the social networks directly within the software tool. To do so, you should move to Preference and select the Internet account log in your social media account in the first place.
Color Correction & Grading
DaVinci Resolve has over three decades of color correction experience. It led the development of color correction hardware and software that works for enhancing visual images from digital sources. Therefore, you are allowed to alter the look of the clips as you wish over the timeline by enabling the accurate, deep and efficient toolkit in DaVinci Resolve.
Besides, DaVinci Resolve has made progress thanks to feedback from professional and worldwide colorists who work in the film and broadcast industry. As a result, the DaVinci Resolve Color page has evolved to work the way that advanced colorists do. Anyway, it's worth remembering that color correction is a highly creative skill. And there is always something new await to learn and explore!
The steps below will walk you through the way I relight images. You may get some enlightenment from the tutorial.
Step 1. Customize Camera Raw.
You should import your clips to Resolve at the get-go. To do so, move to the Media page and select the clip(s) on the library browser, then drag all the media you are going to edit to Media Pool.
Move to either the Cut page or Edit page and add the clip(s) to the timeline. Now you should switch to the Color page and set up the Camera Raw for your clip(s). In this panel, you can change decode quality, white balance, color space, gamma curve, etc. of your raw material.
This is a significant step to make sure the material is as adjustable as possible. As my clip is captured in Braw, so I leave it as Braw by default.

Step 2. Increase saturation.
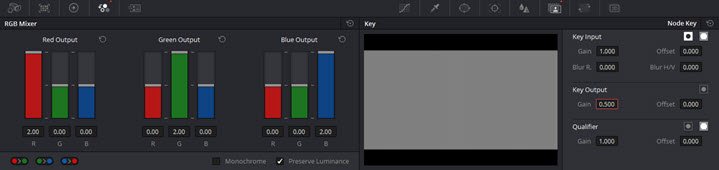
In the first node, I will introduce a little of color by going to RGB mixer and push them to the limit in every color output. Then I will move to Node key and reduce the Gain in the Key Output tab by half. In this way, you can get a neat video by increasing saturation.
Step 3. Adjust exposure.
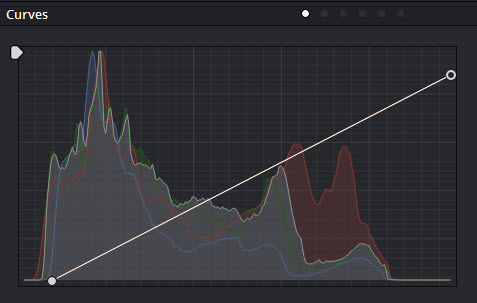
In my third node, I will move to the Curve tab and bring both shadows and highlight down. This step will make the image color to be more cinematic.
Step 4. Highlight the details.
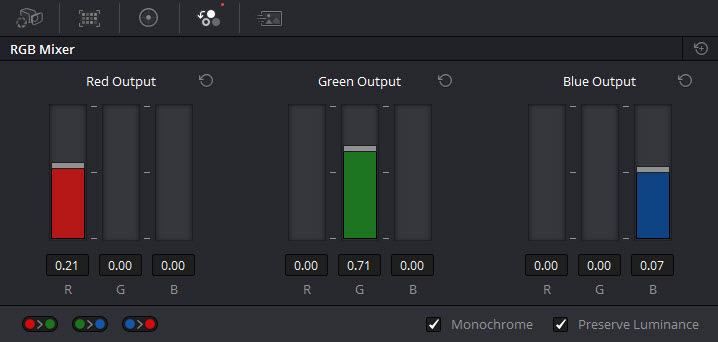
Next, I'll create a new node and switch it to the layer node. In this layer node, I'm going to turn everything monochrome and use the Composite mode overlay. The overlay is actually almost identical as a soft light but gives much stronger effect. And I would like to put some metallic feel to the image by tweaking the curve again.
Step 5. Basic balance.
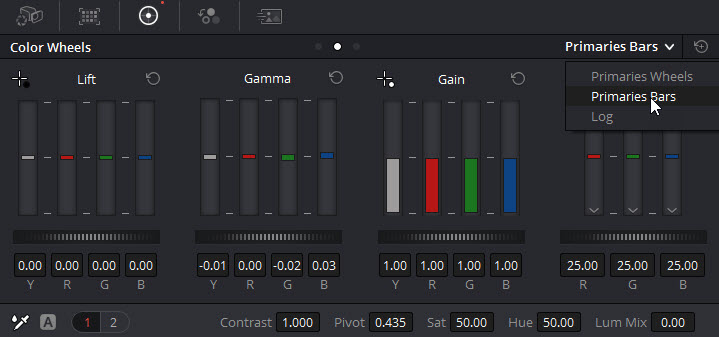
I will do some basic balances in this new node by going to Color Wheels > Primaries Bar on the right. First I will turn off the Lum Mix that I can individually work with channels. In the following, I'm going to take away the excessive colors and introduce a little to the less.
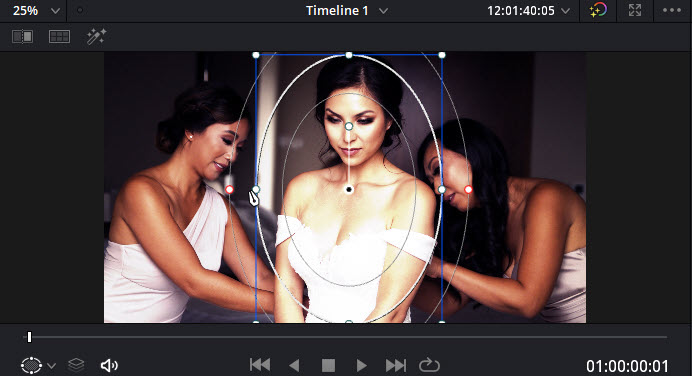
Step 6. Keep focus on the key role.
Less noted but equally significant, I will brighten the bride in the new node to avoid distracting attention. Here is the way I do: create a new note and convert it into parallel. Create a simple mask over the bride and add a little of color to the key role. In this way, we can have more of her in the frame.
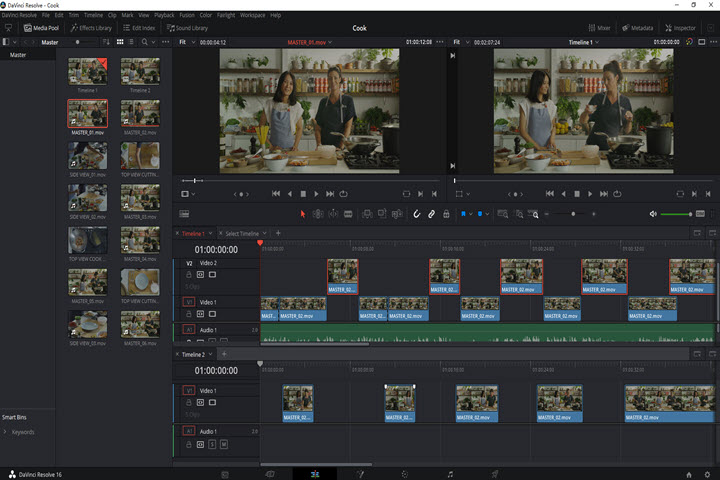
The Dual Timelines
A long clip usually has a lot of dead time when you might be speechless. You may make a cut to the sections you won't use directly in the timeline, but if you do in this way, you will be difficult to get them at a later time.
However, you get the Timeline View Options in the edit page. Once you have been enabled the Stacked Timelines, you can stack multiple timeline tabs or call out a new timeline in the lower area by selecting the plus icon on the right side of the timeline panel. Then when you are editing a long clip, find the content you think will use, then cut and then pull up to the video track two.
Then when you are editing the long material, you play it back on the timeline above, find the content you think is valuable, then cut it out, and then pull up a track. The step of this is that you can quickly distinguish valuable content from content that has not been used yet, without causing any damage to the original material.
In this way, you can quickly distinguish the selected contents from contents that have not been used yet without causing any damage to the original material.
Next, you can drag the selected contents of the video track two from the upper timeline to the lower timeline to construct your story. If you want to remove the gaps between the clips, you can select Edit in the top bar, then the Delete Gaps option. Then all the gaps will be taken away and the clips get merged.
Something about Retiming
You might be thinking that the cool transition is made by a plugin to do a zoom in or out and then add a blur. Not really. A good transition in the story connects every scene together seamlessly by changing speed.
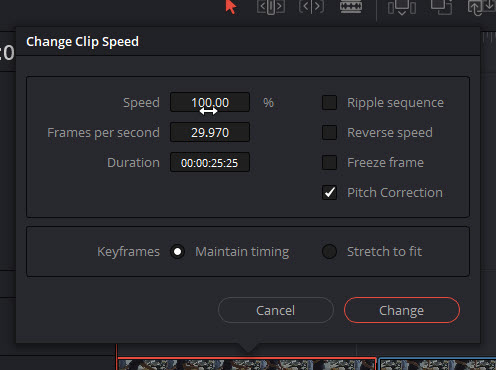
To modify the speed for a clip in Resolve, load the clip on the timeline, right-click the part that your will retime, select Change Clip Speed and a dialogue window pops up. You can modify the Speed by dragging the mouse left to right, or choosing the frame rate per second for the clip.
The speed and the frame rate are interrelated. One of them change, the other will change automatically. And you can check the Duration to know how long the final clip will be. After you have done with the adjustments, click OK, and you have successfully modified speed for a clip.
While there are other options in the dialogue, let's check it out. Ripple Sequence removes all the gaps between the clips automatically when the playback speed is changed. Reverse Speed is to play the clip in reverse order. Free Frame makes the clips to stop at one particular frame. Moreover, you can select the Pitch correction option to reduce the effect of retiming on the pitch slightly.
To interpret footage in DaVinci Resolve, you should select the materials you want to slow down in the media pool. Right click to the materials and select the Clip Attributes, then select a frame rate for the clip. In this way, you can modify the speed of all the materials at once.
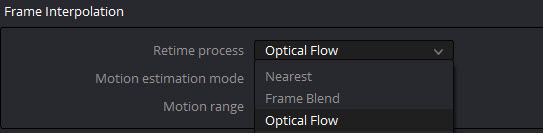
I'm going to talk about frame sampling at last, which is a significant concept in retiming. Changing the speed of a clip can cause dropping frames easily. But the frame sampling is to make our variable-speed picture smooth without stuttering. In DaVinci Resolve, you have three modes of frame sampling hidden in Project Settings > Master Settings: Nearest, Frame Blend and Optical Flow.
Nearest is to play the closest frame directly when there is a lack of frames, but this will easily cause frame dropping; Frame Blend is to use the frames before and after to combine a blurred intermediate frame, which is more suitable for fast playback; slow playback is not recommended. Optical Flow calculates a new frame by comparing the changes between the two frames using AI technology. It's easy to get a good effect only when the background is pure.
Tech Service of DaVinci Resolve 17
If you happen to any issue when using DaVinci Resolve and want to get some technical supports, you have three ways to go. First, you can navigate to the Blackmagic Design official forum and get some tips from the experts all around the world. Apart from that, BMD itself has been posted helpful information such as what is available in the new versions, troubleshooting for the particular issues.
Second, you are allowed to email the Blackmagic support team to get technical service. Blackmagic Design engineers will go back to you with the answer. And the last is that you can give Blackmagic Design support team a ring to get an answer immediately. Don't be scared of the language barrier, your call will contact the closest Blackmagic Design support office in your current countries or region.
Learning DaVinci Resolve
DaVinci Resolve 17 has embraced tons of capabilities ranging from cutting, color grading, creating visual effects, designing audio, etc. that may throne itself among a host of video editing software tools. But the question is that these features are too professional to the beginners, especially the node editors in the Fusion page and the Color page.
Therefore, its learning curve is a little steep for the initials. You have to take some lessons and improved yourself day after day.
Fortunately, there is nothing that you cannot cope with the help of a few YouTube tutorials and Google. Apart from the share from various individuals, there are some training lessons, including demonstration videos and training books in PDF, designed by Blackmagic Design that can help you master all the abilities in Resolve in no time.
Less noted but equally significant, you can take an online exam and receive a certificate of completion from Blackmagic Design after completing all the training lesson.
Frequently Asked Question about DaVinci Resolve 17
How to Get More GPU Use When Optimizing Media?
Purchase a full version of Resolve 17. The free version of Resolve 17 doesn't utilize the GPU as much as the paid version. If you are an expert who use Resolve frequently, it is suggested that you upgrade the Resolve. For those who use Resolve occasionally, the free version is good to go. If Resolve 17 still works at low GPU usage, you might be using an old version of the GPU driver that Resolve 17 fails to notice. Confirm what version of the GPU driver you are using at first. If the driver has been far to optimize, then get a fresh driver installed. After the installation is complete, reboot your machine and launch the Resolve to see if it notices your GPU.
H.265 codec Is Not Available in Free Version of DaVinci Resolve 16?
If you export the movie to social media, the free version has different output presets you need. And more importantly, videos won't be watermarked using Resolve. The limitations are that it only supports output resolution equal to either under 2160p, and it does not offer H.265 codec. By the way, you can turn to the free and open source video converters such as VLC and Handbrake.
DaVinci Resolve Alternatives
VideoProc Vlogger
If you are tired of the complicated features of professional video editing tools like DaVinci, VideoProc Vlogger is definitely an impressive alternative to DaVinci. Developed for both Windows and Mac platforms, VideoProc Vlogger offers advanced as well as basic features to help you edit a video in a simple and smooth way. You can add music, add watermark, add subtitle, add filter, add texts, add transitions, split, trim, merge, record voice, change speed, make picture in picture effect, and more.

Shotcut
To tell the truth, Resolve 17 is the best and all-around video editing software tool to cope with post-production. The most glaring thing is that you don't have to switch back and forth to different applications, and you can construct your story, make color correction & adjustments, create visual effects, mix audio and others all in the Resolve, which helps you create Hollywood content with ease.
However, the free version of Resolve 17 does not support GPU encoding, which may frown upon some users who rush to complete their projects. If you are hunting for a DaVinci Resolve 17 alternative, take consideration to the Shotcut that supports hardware acceleration powered by Intel Quick Sync, NVIDIA and AMD.
For more details about Shotcut, you can refer to the full-review guide on Shotcut >>


