"What does your video editing process look like? I'm new to editing and I'm trying to figure out the best way to streamline my video editing workflow and make the process easier"- Posted by u/srkdummy3 on Reddit
Creating a captivating video, whether it's for YouTube, Instagram, or a short film, requires skillful editing. But let's face it. Editing piles of raw footage into captivating one piece of video can be daunting work, as it involves more than simply piecing clips together. It's a meticulous process that demands careful planning and organization. That's why having a well-structured video editing workflow is crucial. From assembling the raw footage and making precise cuts to sound mixing and color grading, an optimized video editing workflow ensures that your final work maintains a consistent look and feel while saving you valuable time and effort. In this post, I'll guide you through the process of designing an efficient video editing workflow and provide you with everything you need to know about streamlining your editing process.
What Is a Video Editing Workflow
The video editing workflow refers to the overall process that editors use to transform raw footage and audio into a final, polished video. Thus, it happens after the footage is acquired and before the final export or distribution of the completed video.
Why Is a Video Editing Workflow Important
Do you really need to follow a video editing workflow? If you're one of those video editors who like to go with the flow and that works for you, then stick with it. But for those who want to speed up the video editing process, and waste less time figuring out what to do next, an efficient video editing workflow is a must-have. It can help you stay on track and leave no stone unturned in the editing process. By following it step-by-step, you ensure you don't miss anything that you need to go back in and add later on. For beginner video editors who aren't sure where to start, building a workflow (or using ours) is a good starting point. In a nutshell, the major benefits of following a video editing workflow:
- Guide a project from start to finish without skipping essential steps.
- Help to deliver a quality, focused edit efficiently and on time.
- Ensure consistent quality and continuity throughout the video.
- Facilitate collaboration and communication among the production team.
- Allow for easier revisions and iterations during the editing process.
Best Video Editing Workflow: 10 Steps
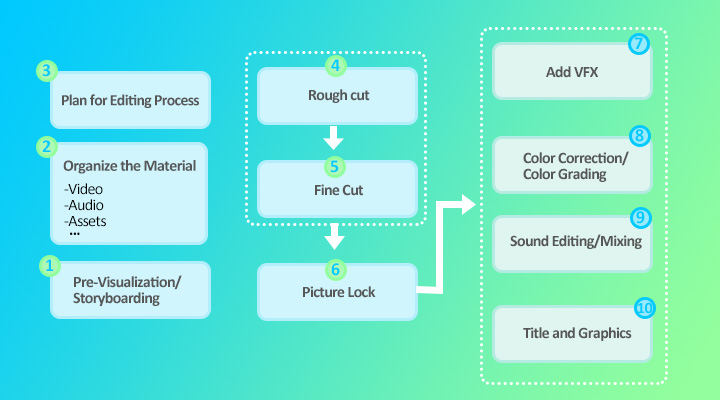
1. Pre-visualization or Storyboarding
Before starting to organize your material, spend some time on pre-visualization or storyboarding. This can help define the overall narrative of the video and determine what material you might need, ultimately deciding how that footage might be edited together.
2. Organize Your Material
Organizing your material allows for easy navigation through your footage. You may have accumulated hours of shots, taken from different scenes, by different cameras, at different angles, resolutions, or formats. Having all these sorted in a systemized way ensures that you can quickly find what you need when you need it. Below is a common method for organizing material:
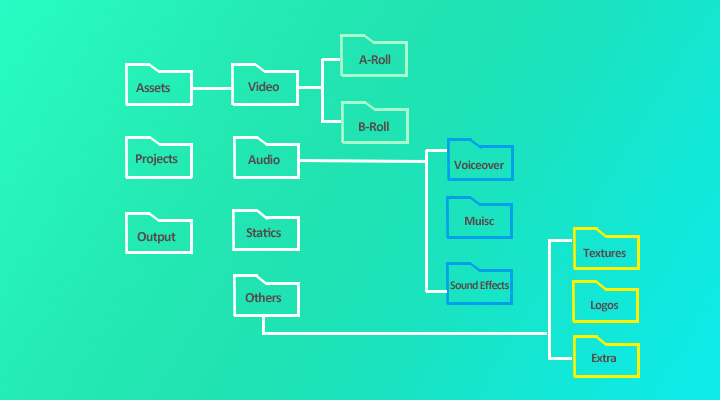
When you're working on big projects, creating extra folders can really help. For example, if you're dealing with voiceovers - these are the spoken parts of your project. You could make folders for each person who speaks, or for each scene where they talk. In the same way, if you have sound effects, you could keep all the background sounds in one folder and all the object sounds (like doors slamming or car horns honking) in another.
3. Plan for the Editing Process
Before diving into editing videos, it's crucial to have a clear plan. Establish goals and milestones to gain an overview of the project, much like piecing together a jigsaw puzzle - you need to envision the final picture to understand where each piece fits. Here are some key aspects you should consider:
- Core message: Define the video's primary idea or message.
- Narrative structure: Plan the storyline's sequence and presentation.
- Visual style: Choose color themes, transitions, and effects for the aesthetic.
- Pace: Decide on the video's rhythm and scene transition speed.
- Sound design: Select fitting music, voiceovers, and sound effects.
- Audience: Know your viewers to tailor your editing choices.
- Platform: Consider where the video will be published and platform-specific norms.
- Deadlines: Set completion dates for editing phases and the final product.
This way, you have a roadmap to guide your editing process, helping you stay on track and achieve your desired outcome.
Once you've organized your material, you can easily ingest them all into your video editing program. In my case, I use VideoProc Vlogger, which is my go-to choice for editing videos, photos, and audio into captivating stories.

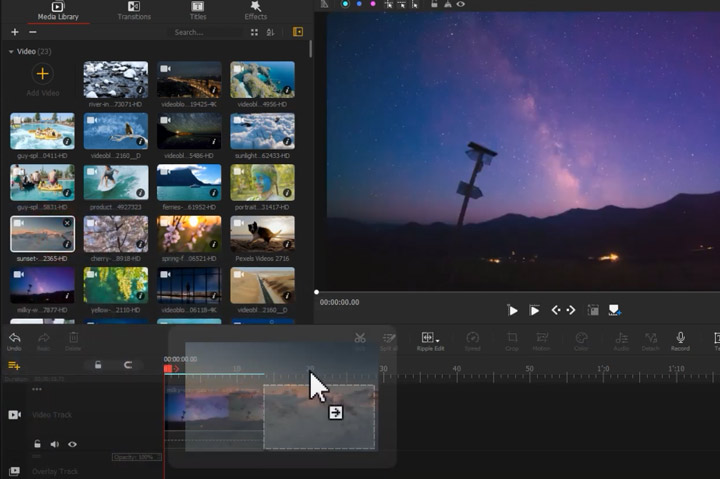
4. The Rough Cut
Now you come to the stage of creating a rough cut. During this stage, the focus is on assembling the overall structure and flow of the video, including arranging and trimming clips to create a basic sequence. The rough cut is essential in your video editing workflow because it provides an early glimpse of your video, opens up opportunities for early feedback, and provides an estimation of how much more work is needed for the final cut. Since your goal is to get the general pacing and narrative right, you don't need to worry much about fine details, pixel-level precision, or extra elements like transitions, color grading, sound design, or special effects. Let's check how VideoProc Vlogger make efficient rough-cut editing a breeze:
- Easily create complex projects with the support for 999+ tracks.
- Add, remove, and rearrange video/overlay/subtitle clips by drag-and-drop.
- keyboard shortcuts for common video and audio editing tasks.
- Smooth playback and rendering with the GPU acceleration tech.
5. The Fine Cut
Once the rough cut is complete and the overall structure is in place, you can move on to the fine-cut stage. This is where you refine the video further, paying closer attention to small details and making more precise adjustments. For example, you'll cherry-pick the best shots for your story, refine the pace, rhythm, and tone of the video based on the chosen scenes, and decide where and when to cut scenes. You'll also add B-roll footage and consider using techniques like match cuts, J-cuts, and L-cuts to enhance the flow and impact of the story. If your project contains main dialogues, this is the appropriate stage to add them to your project. However, not everything needs to be perfect at this point. You'll manage the sound/visual effects and color later on. Key features that VideoProc Vlogger can help make the fine cut:
- Frame-by-frame editing. Perfectly place and time each shot and cut.
- Manipulate time by adding constant or variable speed change effect.
- Apply match cuts, dissolve cuts, J-cuts, L-cuts, and more advanced cut techniques.
- Chop off unwanted pixels and improve composition and focus.
- Offer on-screen controls to scale/reposition/rotate clips in the preview window.
6. Picture Lock
Picture lock is like the final draft of a film—it's when you're happy with all the visual elements and don't plan on making any big alterations. You should involve your stakeholders or bosses (if you have) right at the picture lock stage, show them the film at this point, and ask for their feedback. This way, you can make sure everyone is on the same page before the final finishing touches.
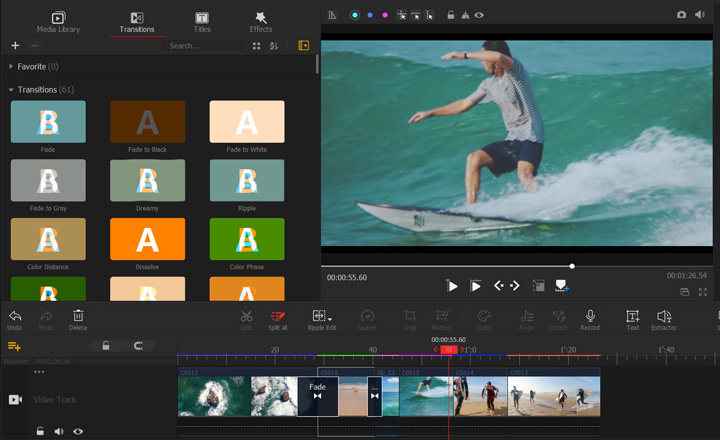
7. Visual Effects (VFX)
Once you've reached the picture lock stage, you start adding visual effects - known as VFX. This can be easy tasks like using a blue screen to change the background, much like how it's done on TV for weather reports. Or, it could get a bit more complicated, like adding fun animations, tracking the movement of certain things, or making a few people look like a big crowd. In essence, VFX is the final touch that amplifies the appeal of your video, making it more engaging and visually stimulating. Key features that VideoProc Vlogger can help add bisual rffects:
- A vast collection of transitions, titles, effects, speed, and motion presets.
- 23 blending modes for creating visually interesting and engaging videos.
- A motion editor for introducing camera movements, reframing, and other visual effects.
- Chroma key feature to remove blue, red, or any selected color from the footage.
- Refine your videos with fade in/out, adjustable opacity, and more.
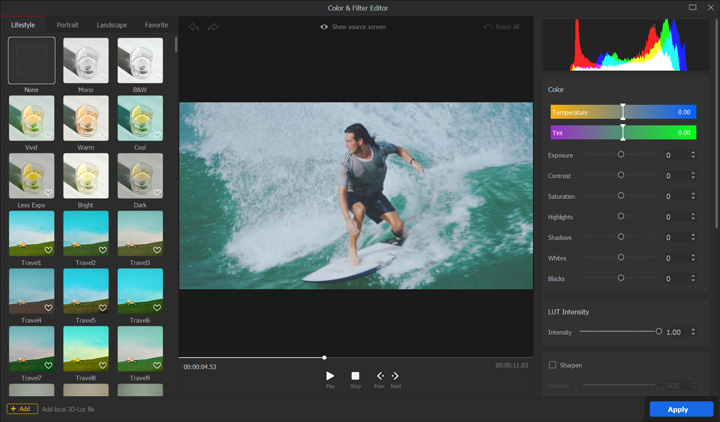
8. Color Correction and Color Grade
Next up is color correction in your project. Think of this as fixing any issues with the actual colors and brightness in your original footage, while making sure there's a match in color throughout the scene. For example, if one shot is too blue or too dark, you can tweak it until it fits in nicely with the other shots.
After color correction, you get to color grading. This is a fancy term for saying you're going to add special color effects that help set the mood and tone of your video. It's not about making colors accurate, but rather about using colors to tell your story. Say, if you want to convey a sunny, cheerful atmosphere, you might add warm, golden tones. Or, for a gloomy, mysterious scene, you could add cool blues or greys. VideoProc Vlogger makes color correction and color grading a hassle-free process:
- Adjust color balance with precise control over brightness, whites, contrast, etc.
- HSL Secondary Control to adjust the specific colors in your footage.
- Choose from 100+ built-in LUTs or import custom ones for cinematic looks.
- Preview the effects of color grading and color correction in real-time.
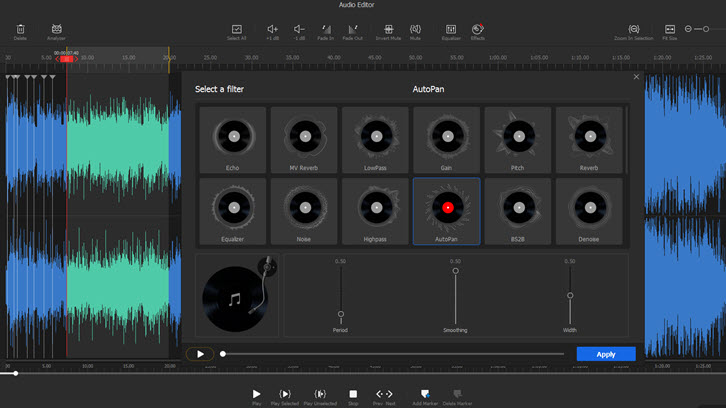
9. Sound Editing and Mixing
Sound editing and mixing is not just about making sounds louder or softer. It's more about making everything work together to tell your story better. This includes making sure that the speaking parts are easy to hear, adding sound effects that match what's happening on screen, tidying up any sounds recorded on set, choosing the right music to set the mood, etc. The aim is to balance everything so nothing overpowers the rest, making the video a fun watch full of great sounds that match the action. VideoProc Vlogger lets you edit and mix sound like a pro:
- Level up your videos with voiceover, sound effects, songs, etc.
- A suite of audio editing tools: trim, cut, change speed/pitch, etc.
- Shape the sound with 13 audio filters and 10-band EQ.
- Audio analyzer to detect and mark the beat in music automatically.
- Enjoy precise control over audio with the expansive waveform view.
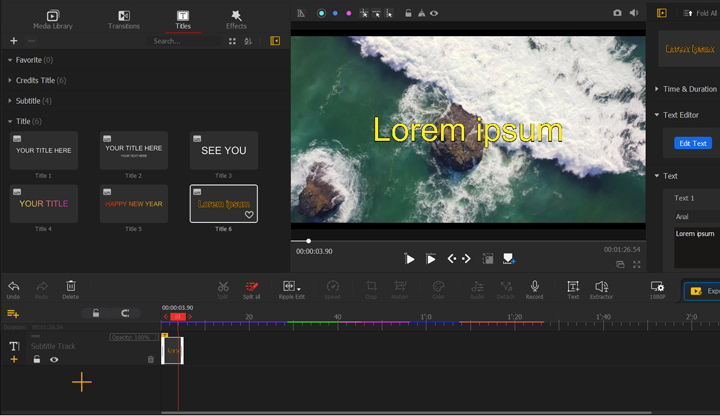
10. Title and Graphics
The process of adding titles and graphics usually comes toward the end of the video editing workflow. This ensures these elements perfectly sync with the sequence of shots and the video's overall pacing and rhythm. (Surely, you can also add them earlier, if you want to add them with some VFX effects.) Titles are essential for setting the context, introducing characters or locations, and providing additional information. Graphics, on the other hand, could include anything from animations and special effects to lower thirds and visual aids for enhancing the video's aesthetic appeal and improving viewer understanding. In VideoProc Vlogger, users of all levels can add titles and graphics effortlessly.
- Preset credits titles for creating stunning opening title sequences instantly.
- Custom animations, styles, borders, and more with the built-in text editor.
- Flexible on-screen controls to adjust the size, alignment, and placements of text.
- Automatically put subtitles to your footage by adding SRT, ASS, or LRC files.
- Decorate your video with eye-catching graphics obtained from any source.
Video Editing Workflow Best Practices and Tips
To maximize the effectiveness of your video editing process, consider these additional tips:
Retain your "off cuts": Instead of discarding unwanted footage, keep these trimmed clips. They can be invaluable for filling gaps or enhancing your final edit later on.
Save multiple versions and back up regularly: As you progress through your project, save different versions to track your progress and prevent data loss due to technical issues. Regularly back up your work to ensure its safety. The great part is VideoProc Vlogger and many NLE video editing programs will save your project at set time intervals, without you having to do it manually.
Edit in batches: When you're editing a video, it can feel overwhelming to work on the whole thing at once. Instead, try breaking your video down into smaller, more manageable sections or "scenes." For example, edit the first minute, then the second minute, rather than trying to do the entire 5-minute video straight through. Editing in these smaller batches lets you're able to focus on one section at a time, which makes it easier to ensure the pacing, style, and feel stays the same.
Seek feedback: Once you've edited your video, it's a good idea to share it with others and get their feedback. Even if you think your video is looking great, having fresh eyes take a look can help identify areas that could be improved. Other people may spot things you missed or have ideas to make your video even more engaging for the audience. Don't be afraid to show your work to friends, family, or even online communities - getting constructive criticism can be valuable in helping you take your video to the next level. The more perspectives you can get, the better you can make your final product.
Set time limits: When you're editing your video, it can be easy to get caught up in making tiny adjustments and tweaks forever. To avoid that, try setting aside specific time slots just for editing. For example, commit to working on your video for 30 minutes or an hour at a time. During that allotted time, focus solely on the editing task at hand and don't let yourself get distracted. Setting these time limits helps you stay disciplined and make steady progress, rather than getting stuck in an endless loop of minor changes. It keeps you efficient and prevents you from spending too much time perfecting every little detail.


