
Spot News: OpenShot just released the latest edition 2.5.1 with better optimized effects and performances.
Video is one of the killer content-marketing formats for business to retain the existing client base and lure in the new ones, and the best time capsule for individuals to recall the sweetest moments in life. That's why many people are looking into how to use OpenShot Video Editor.
Openshot is an open-source and free video editing software that goes compatible with all major operating systems, like macOS, Windows, and Linux. Despite being completely free of cost, OpenShot packs a wallop. It enables all basic and over the average editing toolkits, and receives update frequently. To learn more about the features, pros, and cons of OpenShot, you can read our in-depth review of Shotcut. In this article, we'll focus on how to use OpenShot to trim, rotate, add text, speed up videos, and apply other edits to make catchy videos.
How to Use Shotcut to Edit Your Video
Open up your browser, visit the official download site of OpenShot Video Editor, and then choose the platform you are running to download the matched installer file. Follow up the setup guide to install OpenShot Video Editor on your computer. To successfully install and run this free video editor, you need to have:
- A 64-bit operating system.
- 4GB of RAM (16GB of Memory is more recommended)
- 500MB of hard-disk space.
Step 1. Import Media in OpenShot
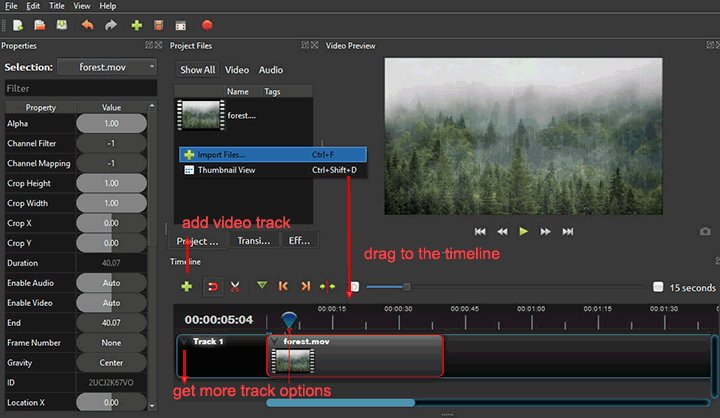
Let's get everything started by feeding the source media into OpenShot:
OpenShot allows you to add multiple video tracks, you can:
- Press the green plus icon on top of the timeline to add a new track.
- Press the arrow icon near the timeline to get options: Add Track Above, Add Track below, Rename Track, Lock Track, and Remove Track.
- Right-click on the media on the timeline and choose Separate audio to separate audio from the video track.
Step 2. Trim/Split Videos in OpenShot
You might need to reset the start and end time of your video by trimming and separate a video into multiple small pieces by splitting.
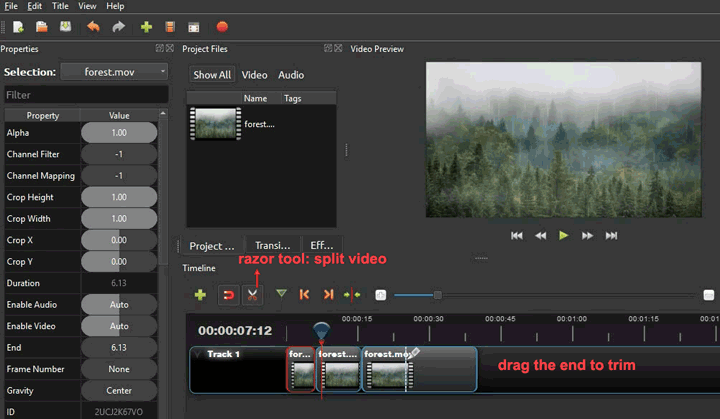
- To trim - Drag the ends of clips on the timeline to shorten them.
- To split - Press the scissor-shaped Razor tool, place the playhead at the position where you want to split, and click on here.
Step 3. Crop Videos in OpenShot
Suppose you have captured a certain frame but wish to present only cropped out portions in your final file. In such cases, you can avail the video cropping option of OpenShot by just following the steps mentioned below:
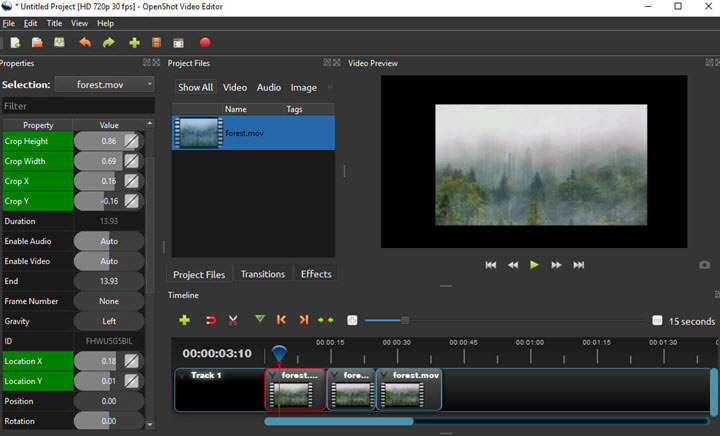
- Right-click on the video and choose the Properties option. This brings a new toolbar to appear at the left Properties panel.
- Scroll down through the Properties toolbar until you reach the Crop Height, Crop Width, Crop X and Crop Y options.
- You'll also notice the Location and X and Location Y option which is used to adjust the position of the kept frames.
- Change the values of the height and width to decide the frame range that you'd liked to keep.
Step 4. Rotate/Flip Videos in OpenShot
We often end up recording in the wrong orientation. This makes it imperative to rotate video for allowing a seamless audio visual experience to your clients. You can do that by simply following the steps lined out below.
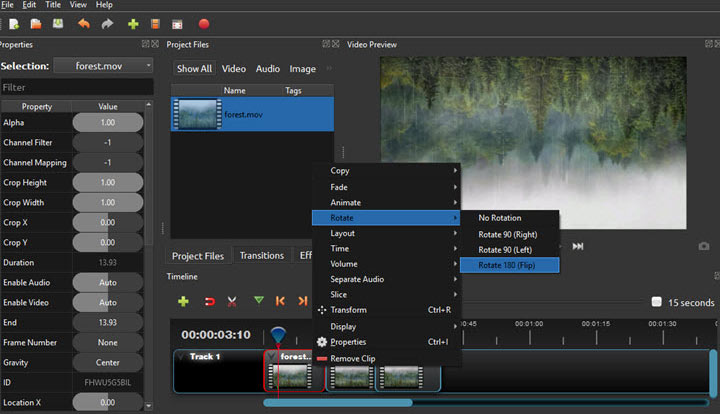
- Right-click on the clip and select Rotate from the drop-down list.
- You will now be provided with a sub-menu from where you can choose Rotate 90°(Left),Rotate 90°(Left), and Rotate 180° (Flip).
Step 5. Add Text in OpenShot
It becomes possible to emphasize certain discussions of the cast by adding text to the video clip. This can also prove to be extremely beneficial while creating tutorials. You can do the same by simply following the steps laid down below:
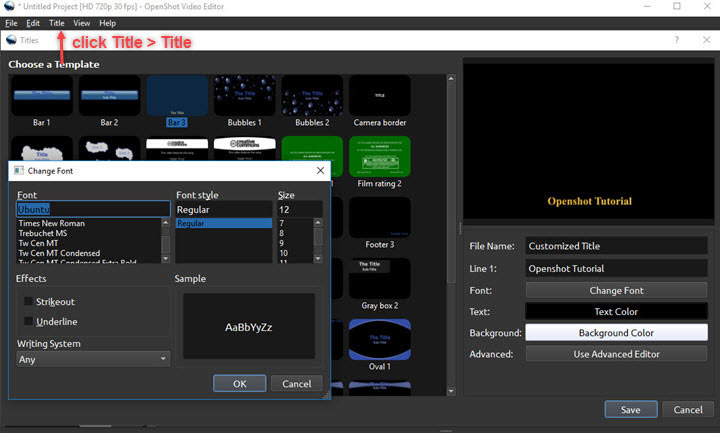
- Click on Title from the Menu bar. Doing this opens the Title Editor window.
- Take your pick among the various templates appearing under the template drop-down list.
For example, if you wish for the caption to appear at the bottom region of the clip, then you will have to proceed with the 'Bar 3' template. - Type your text in the "Line 1" box. OpenShot allows you to adjust the font color, type, and a lot more before saving the file. Once being saved, the file gets added automatically to the Project Files panel.
- Drag the text file into your timeline.
OpenShot Video Editor needs much CPU and memory resources when adding text overlay onto videos. Therefore, this process may slow down your computer or cause an immediate crash of OpenShot. Suppose you simply need to add some plain subtitles, we recommend you to use a CPU and memory friendly video editor, as like, VideoProc Vlogger to get the job done fast and flawlessly.
Step 6. Add Transition to Videos in OpenShot
OpenShot prepared tons of transition effects. And you can utilize them to acquire natural transfer from one scene to another or add creative flavor to your videos.
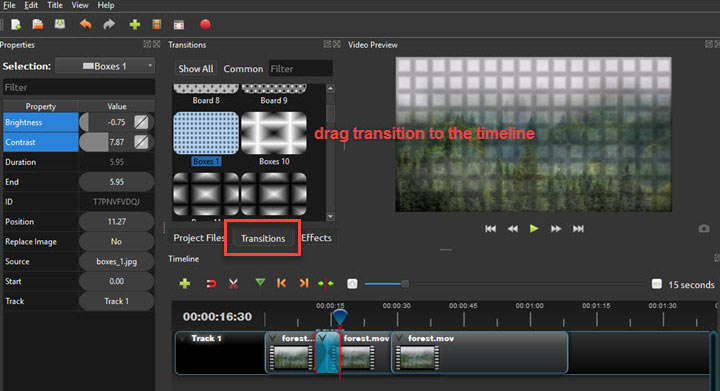
- Press Transitions to find plenty of stunning transitions prepared by OpenShot.
- Once you find the transition you like, drag it to the timeline and place it over the target video clip.
- Click on the chosen transition to open a new tab with several options to change the duration, start time, position, and other things.
Step 7. Speed Up/Down Videos in OpenShot
Revamping the speed of the recorded frames is helpful to hike up the engagement meter of your audience. In OpenShot, you can speed up/down videos in an extremely easy manner.

- Right-click the target video on the OpenShot timeline to find the Time option. Click this to obtain 3 sub-options: Normal, Fast, and Slow.
- Change the Time value on the Properties tab of OpenShot to define the customized speed. Alternatively, you can:
• Press Fast > Forward and select 2x, 4x, 8x, or 16x to speed up the playback speed.
• Press Slow > Forward and choose 1/2x, 1/4x, 1/8x, or 1/16x to slow down the playback speed.
Tips: You can reverse video in OpenShot by pressing Time > Normal, and press Backwards.
Step 8. Export Videos for YouTube, Twitter, Apple TV…
1. Go to File > Export Project > Export Video to enter the video properties setting panel.
2. Change the File Name.
3. Press Browse to define a new Folder Path.
4. OpenShot brings you dozens of output presets.
If you are a beginner, click on Simple, choose Profile, and then,
- Press Blue-Ray/AVCHD.
- Press DVD to get presets for DVD NTSC and DVD PAL.
- Press Device to get presets for Apple TV, Chromebook, Nokia nHD, and Xbox 360.
- Press Web to get presets for Instagram, Metacafe, Picasa, Twitter, Vimeo, Wikipedia…
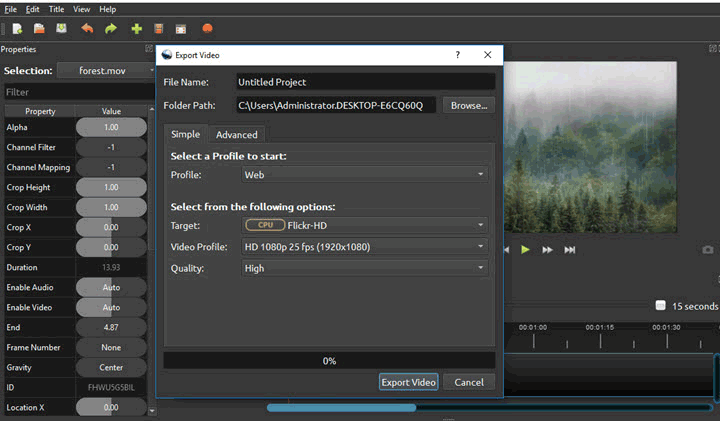
As for pro user, you can click on Advanced to customize video codec, bitrate, pixel ratio, audio channel layout, and a few other parameters.
5. Hit Export to start to render and export video from OpenShot.
Conclusion
Now that you have understood how to use OpenShot, you can easily take on all your video editing chores in a seamless manner. However, what we want to remind you is OpenShot Video Editor is a computer resource hog. It runs extremely slow and laggy on a low-end computer. What's worse, it goes crashes frequently no matter how great your hardware is.
Assume that you are not yet ready to make any investment to a better PC or Mac, we recommend you to use the GPU-accelerated video editor – VideoProc Vlogger. It comes with a complete video editing toolset that allows you to edit video by trimming, cutting, cropping, watermarking, deshaking, adding effects/transitions, editing texts, and more. Thanks to the support of the GPU acceleration tech and multi-threaded decoding, this speedy video editor can work even on a less-robust or old Mac or PC without blasting up your CPU or memory resource.


