Summary: Cyberlink PowerDirector is the professional-grade video editing software that is designed by CyberLink Corp. This free video editing software is best for creating and editing sports videos. In this post, we conduct an in-depth review on the latest version of PowerDirector and will walk you through its new features, pros & cons, alternatives and more.
CyberLink PowerDirector Overview
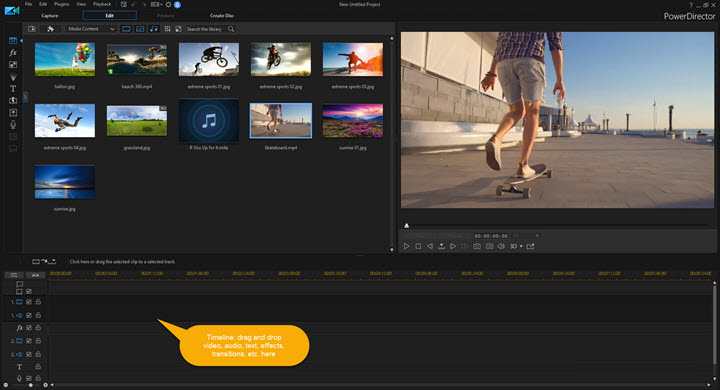
PowerDirector is one flagship product developed by CyberLink Corp. Despite selective free video editing software in the market, it is most preferred by professional users to make fine edits. In PowerDirector, PiP overlays, audio scrubbing, motion graphics, multi-screen support, and a variety of unique features are now added and can be applied to your video. You can get access to download this freemium program with no restriction.
After launching, there will be 4 modes for you to choose from: Full Mode, Storyboard Mode, Slideshow Creator, and Auto Mode. Warm Note: those 4 modes presented on the launching interface will navigate you to different editing panels: under the Full Mode, you can edit the video clips with a timeline; under the Storyboard Mode, all source files will be edited on a storyboard panel; you may create a slideshow in 4 simple steps with a Slideshow Creator; and with its Auto Mode, you are able to create a movie in 4 easy steps with ready-made templates and effects. Pick up your desired editing mode and enter its editing interface.
After downloading, you can enjoy a 30-day trial version with all its premium features (advanced editing features, no watermark, unlimited access to a collection of plug-ins and effects, 4K UHD video editing, etc..) free and available to use. After 30 days, you can still use PowerDirector, but the premium features will be removed, and you are excluded to some basic editing features with a watermark attached to your final export.
Cyberlink PowerDirector 19 Minimum System Requirements
- OS: Microsoft Windows 11, 10, 8/8.1, 7 (64 bit OS only)
- Processor: Intel Core™ i-series or AMD Phenom® II and above
- Memory: 4 GB RAM (recommended: 6GB RAM)
- Graphics: 128 MB VGA VRAM or higher (recommended: DirectX 11 compatible for 360 video and 2GB VGA VRAM or higher for AI plug-ins)
- Storage: 7 GB available space
- Sound Card: Windows compatible sound card is required
- Resolution: 1024x768, 16-bit or higher
- Addition: Internet connection is required
This professional-level video editing program provides a series of solutions to users aiming at different purposes. With its notable performances on processing videos shot by action cameras, PowerDirector is regarded as the best solution to sports video.
PowerDirector: Best Sports Video Solution
Apart from those ready-made templates with effects, animations, transitions, CyberLink PowerDirector provides you a series of effective tools to polish up your raw video. In its Power Tool Settings, you can use the motion tracker tool (to track the moving object), change the video speed for the whole video or the selected clip, play video in reverse, and so on. In the following, we will introduce those tools one by one and offer you the full review. Continue reading.
Motion Tracker
In PowerDirector, you are allowed to add many trackers to pinpoint the moving object and put a marker to highlight the tracking. With its motion tracker tool, you are allowed to insert texts, graphics or videos, effects to sharpen your sports video.
First, you'll need to drag and drop the video to the timeline then select it. After the video is selected, click on Tools tab (right above the timeline) > select Motion Tracker in the drop-down list. There will be a 3-step guide shown on the top-left interface which you can follow to finish the motion tracking:
Step 1. Drag the selection box to mark the object you want to track.
You can drag the white dots on the border of the selection box to adjust the selected area. Also, you may adjust the selection box with shortcut hotkeys: Ctrl + cursor keys (up, down, left, right) to specify the position.
Notice: there may be occasions that the box goes off the object you track. Under such circumstances, you can try to focus the selection box on one specific part of that moving object, or you can restrict the selection area to a specific color portion, which will help enhance the tracking.
Step 2. Click the Track button to start the motion tracking.
After you've selected the object, then you need to hit the Track button to set the start and end time of your clip.
You can click the Track one frame only button (it is above the timeline, adjacent to the Track button) to refine the tracking.
Step 3. Add a title, media clip, or effect to the tracked object.
You are allowed to add text, image or video, and effects to the tracked object:
To add the text title to the motion, click the Text button (the first graphic icon) on the left interface > type in the texts > make some adjustments on font, size, and color. Check the Backdrop and Border options if needed.
To add an image to the motion, select Media Clip (the second graphic icon) on the left panel > import image > adjust the image size by dragging the white dots on the box.
To add effects to the motion, tap on the Effect button (the last graphic icon) on the left side > choose from Mosaic, Spotlight, Blur and Gaussian Blur effects tab in the drop-down list > adjust some customization settings on color, brightness, gradient, etc.
Notice: if you have more than one moving object to track, you can add more trackers with Add a tracker button.
After you've finished step 1-3, you can tap on the Play button to preview the results. It is also worth noting that you can check Adjust effect distance with tracked object and Adjust effect size with tracked object options if needed.
If the object you are tracking appear in different scenes, you can do the followings:
Locate the first image sequence and click the Mark in button, then locate the last image sequence and click the Mark out button. Move to the Mark in point > specify the selection > hit the Track button. Better yet, the motion-tracking tool can also be applied to a 360-angle video, on which the selected object will stay highlighted.
Motion Tracker Tool Review
After my last marathon race, I got some on-spot video clips from my friend. I liked those clips a lot and decided to share it to my Facebook page. The problem is, however, there is a huge crowd of faces on the screen with similar sunglasses and sports wearings on, it'd be hard to spot where I am on the video. I assume that it'd be better if I can use some markers to pinpoint my location, then I turned to PowerDirector motion track tool for help.
First, I started with a sample video to see how it works. I threw the sample video on the timeline and initiated the motion track tool. Strictly, I followed those step guides pinned on the top-left interface, and thanks to them, I feel like the process is as easy as I'm doing a five-finger exercise! And I appreciate that a lot.
Then the problematic situation occurred: after I marked the selection box and hit the Track button for a while, then added an image to the selected object and hit the Play button to preview the results, I found that the image froze on the screen! However, it was supposed to track the moving object as I was told. The issue was not solved until I noticed that the Mark in and Mark out point is restricted to a specific timestamp rather than the whole video length. Hence, I adjusted the marker applied to the whole video, and it worked in flawless manner this time.
A Reminder: after the tracking object has been marked, you'll need to hit the Track button to initiate the motion tracking before click on the Play button to preview the effect, or the text/graphic/video/effects you insert may freeze on the screen and will not keep pace with your object.
Pros:
- Multiple trackers are allowed to be added
- Different effects can be applied to different tracker
- Specify the time by hour/minute/second/frame
- Track one frame only available
Con:
- The tracker may be out off the object easily
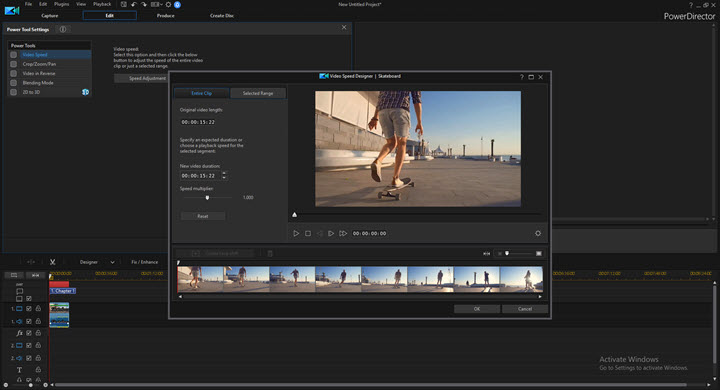
Video Speed
In PowerDirector, you are allowed to change the video speed of your sports video to adjust the speed of either the entire video or the selected clip.
First thing first, you need to import your source video to the library then drag and drop the video into the timeline > move to Tools tab > select Power Tools > choose Video Speed. As the two features are independent to be applied in changing video speed, we will analyze the two features independently in the following content. Keep reading.
Adjust the Speed of the Entire Video
On the left side of the Video Speed Designer panel, you can drag the white knots on the speed multiplier to speed up / slow down the whole video (starts from .1 speed). After you've set the speed parameter, you can hit the Play button to preview the result. Moreover, you can compare the new video duration with the original video length on the left side of the panel, both are presented there.
Warm Note: You can customize audio setting and interpolation setting inside the Settings tab. You are allowed to either remove or keep audio for your sports video, and you can apply its interpolated technology (it keeps the frame rate and refine slow- motion playback results).
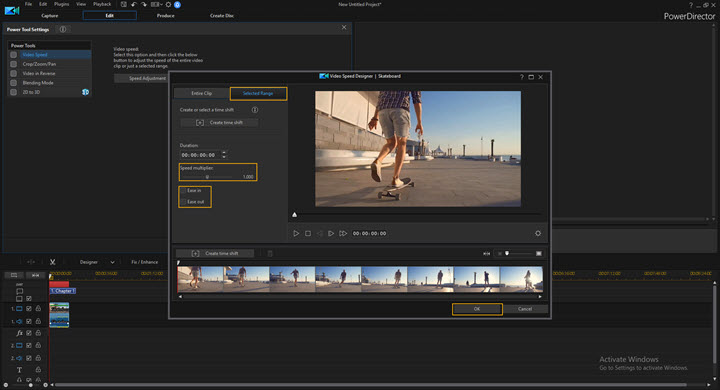
Adjust the Speed of the Selected Clip
First, you need to select a clip. You can drag the playhead to locate the start point of your clip.
Second, after you've selected the start point of your clip, you need to create a time shift for it. Click on the Create time shift button, then it will be presented on the footage you choose. Adjust the clip by dragging the two ends of the orange box to specify the range.
Third, set the play speed for the selected range. You can either manually drag the speed multiplier to set the speed (starts from .1), or you can type in the time duration you need for the clip and the speed multiplier will auto match with your choice. Note: ease in / ease out options are available.
Forth, repeat the process for the rest clips and adjust them until all clip range has reached the finest degree. Warm note: if you are not OK with the clip range, you can click on the recycle bin graphic icon to remove it, or you can right-click on the mouse and click on Remove to get rid of the range.
Last, hit the Play button to preview the results.
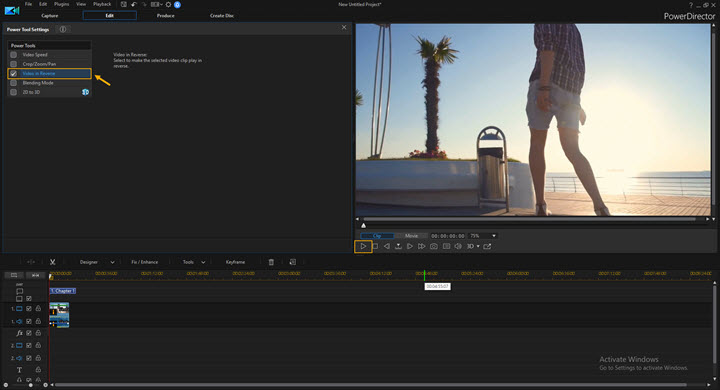
Video in Reverse
In PowerDirector, you can use the video in reverse tool to playback your video clip to add effects to your sports video.
First, add the video to the timeline, choose the video and set as follows: Tools > Power Tools > Video in Reverse.
Second, hit the Play button to preview the video in the preview window on the right interface.
Third, move to the Produce tab in the top menu toolbar, set the output format, the output folder and export the video.
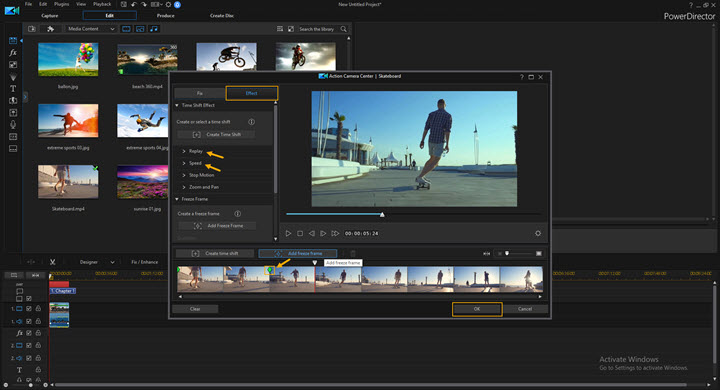
Action Camera Center
In PowerDirector Action Camera Center, you are allowed to adjust the fisheye distortion, customize vignette amount, vignette midpoint parameters in lens correction, apply video stabilizer to fix the shake and enhance the video, and do some color grading works in it as well.
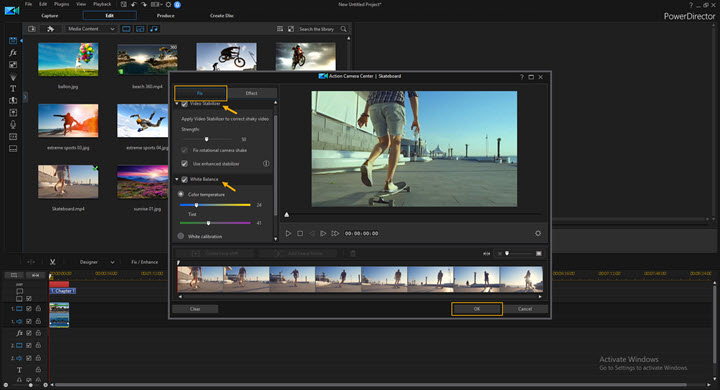
Better yet, in its Effect tab, you can set the replay and reverse effect for a selected video clip, apply the stop motion, create a freeze-frame, and more. It is worth mentioning that popular action cameras like DJI, GoPro and 4K video cameras like Olympus, Sony, Panasonic, Polaroid, etc. can be chosen in its lens correction tool.
Review: PowerDirector Sports Video Solution
PowerDirector offers users a collection of powerful and effective tools namely motion tracker, video speed adjustment, lens correction, video stabilizer and more, so it is the best solution for sports video. No matter your videos are shot by an action camera or not, you can edit them well with PowerDirector thus breathing life in them. Although being dubbed as the best solution for sports video, PowerDirector has both credits and curses as well.
Pros:
- Exact footage can be located by frame
- A bunch of effective tools is intuitive to use
- Parameters are customizable in Action Camera Center
- Popular action cameras and 4K video cameras are built-in to refine lens correction
- Speed multiplier can be auto-detected to match with the clip duration
Cons:
- Video in reverse is applied to the whole video and can't be used to a selected range
- Some users reported the freeze issue when using the video speed adjustment tool
- Occasional crash issues - it crashed when I set color presets in Action Camera Center
PowerDirector for iOS Devices [Bonus Tip]
For a long period of time, PowerDirector has been excluded to be used on desktop and Android mobile devices solely. Apple users haven't been invited to join them until December 23rd, 2019, on which day CyberLink released PowerDirector mobile application on the App Store for iOS users. This time, iPad and iPhone users can get access to PowerDirector without limitations. It's worth noting that 4K editing and watermark removal features are limited to a premium membership.
PowerDirector Alternatives [Stay-Tuned]
It is hard to define which is the best replacement for CyberLink PowerDirector. Here, we round up a series of optional choices out of your different purposes:
VideoProc Vlogger
VideoProc Vlogger is an impressive PowerDirector alternative for both Windows and Mac users. With basic and advanced features, it can help you process your videos in an easy and efficient way. You can add text, add music, add images, change speed, merge video, detach audio from video, add filters, add effects, change colors, add subtitles, record voice, add transitions, and more. Just get it to your computer and edit a video quickly!

DaVinci Resolve
If you want to find another freemium program that owns similar video editing capabilities of PowerDirector, we recommend you DaVinci Resoleve. DaVinci is much like to PowerDirector Suite, which allows you to edit video, correct color, and adjust audio in one system! Davinci Resolve has won a fame in color grading (in case you are curious, read the difference between color grading and color correction), so it is frequently used by producer in the film industry for post-production.
iMovie
If, however, you'd like to edit videos on Mac computers, which couldn't be accomplished by PowerDirector yet, you can have a go with iMovie. With iMovie, you are able to make quick edits on iOS and macOS devices with abundant templates and transition effects.
Final Thoughts
Now, you've hit the bottom line of our CyberLink PowerDirector review. In a word, this freemium video editing software does deserve you to have a try as it demonstrates excellent performances on processing and post-producing sports videos with remarkable editing features like slow-motion, motion tracking, reverse and freeze, fisheye correction, shaky video stabilization, color grading (good for outdoor videos), and many more credits adds up to make PowerDirector the best sports videos solution.
If you have any other best free software recommended on sports video, feel free to leave us a word in the comment box below. We'd love to hear from you.


