In-page Navigation
Create a Video Quickly with VideoProc Vlogger
VideoProc Vlogger is free and streamlined video editing software for hobbyist videographers and vloggers. It knows customer pain points well. Built with humanized design, e.g. ripple edit, frame-by-frame preview, auto-audio beats, speed ramping, VideoProc Vlogger lets you spare less time to create better videos, and makes your 4K/HDR footage, GoPro/DJI videos and alike, cinematic.
Let's download, install, and run VideoProc Vlogger. Follow the steps below to create your first video.
Watch video tutorial on how to edit a video quickly with VideoProc Vlogger, or read text instructions below.
Preparation Before Creating a Video
To produce a video more efficiently, you are suggested to do the following preparation:
- Transfer the required videos, images, and audios to computer.
- Be familiar with the main working panels of VideoProc Vlogger.
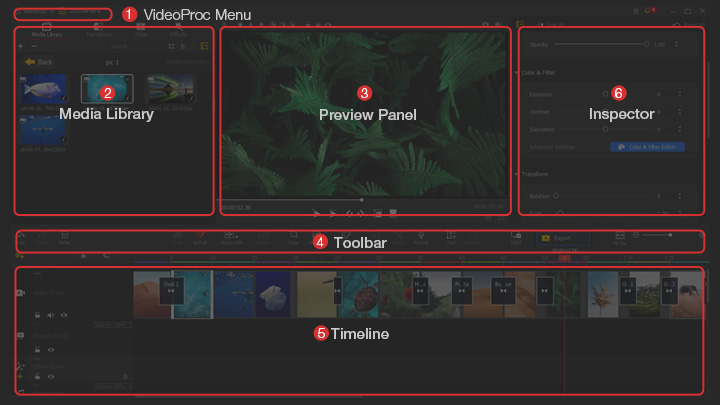
As launch the software, the Project Panel will pop up automatically. After creating a project, you will enter the main UI and see the six working panels below.
① VideoProc Menu: It's where to manage the project, set UI language, make settings, check updates.
② Media Library: It's where to place all media files for editing. Click the icon above to swift to other menus like transitions, titles and effects.
③ Preview Panel: It's where to check your editing results in real-time.
④ Toolbar: It's where to find the important editing tools.
⑤ Timeline: Here offers an overview of all tracks for video, audio, overlay, effect, and subtitle.
⑥ Inspector: It's where to change the properties of the videos.
Check detailed VideoProc Vlogger interface introduction >
How to Create a Video Quickly with VideoProc Vlogger
Step 1 Create a new project
As you launch the software, the project panel will pop up automatically.
Here you can customize project name, project location, choose or customize video resolution, e.g. commonly used 3840 X 1080 [16:9] [4K] for YouTube, 2160 X 3840 [9:16] [2K], 2532 X 1170 [19.5:9] for iPhone, 1080 X 1080 [1:1]. All the settings could be easily modified later on. Check detailed resolution suggestions >
Moreover, you can change Frame Rate (30/60/120 fps) for high video quality or creating a slow-motion video. Currently, VideoProc Vlogger supports up to 4k 120fps. But for general editing, please keep 1080p 30fps.
Then tap +New Project.

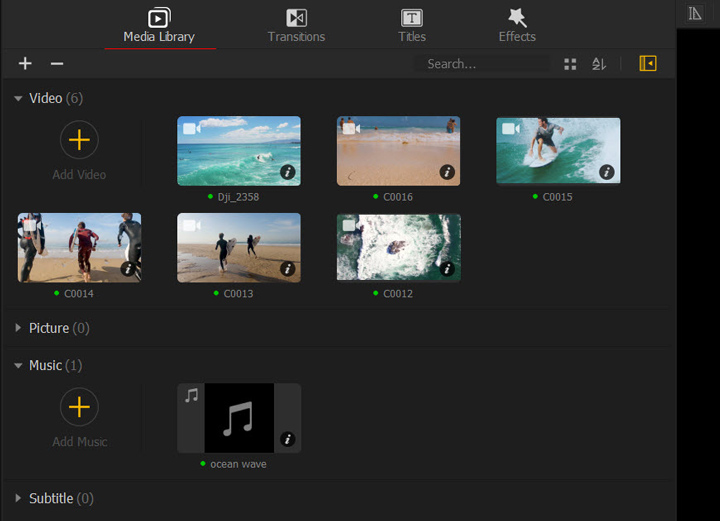
Step 2 Import media
To start, you should import all the media files you've prepared, such as video shots, background music, images and subtitles. You can simply drag and drop the media files/folders into Media Library; or hit "+" to import them. VideoProc Vlogger supports almost all video audio image formats, e.g. H.265/HEVC, H.264/AVC, HDR, Apple ProRes, QuickTime, MP4, GIF, HEIC/HEIF, PSD, SRT, etc.
 Tips
TipsDon't worry if you have too many media materials. VideoProc Vlogger helps group media by name, duration, date created, in ascending or descending order. You can search video, audio, photo in the media library.
This program can auto-save the project by default to effectively avoid accidental data loss. You can hit the dropdown menu of Project, select Settings and set the duration of the auto-save project.
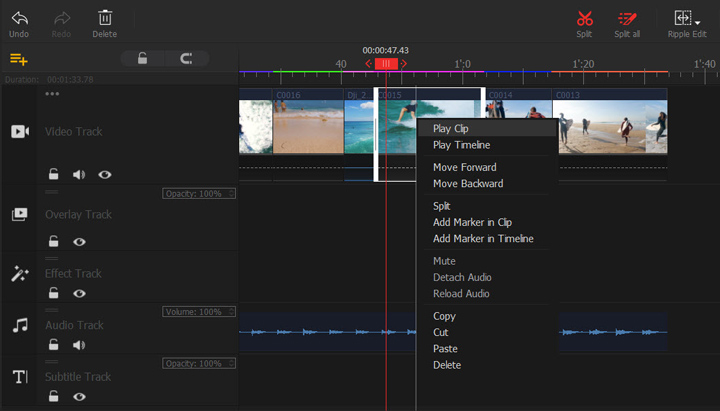
Step 3 Split and rough edit
Firstly, drag videos/audios to video/audio track. By default, the timeline has a main video track (top video track), overlay track, effect track, audio track, and subtitle track. That's extremely user-friendly for the newbies. You can add more tracks if needed.
Then split and re-sequence. You can cut and edit music first, in that way you can set the mood for the video. Or, you can just edit the video first, depending on your editing habits.
For video: You can drag and order video clips easily on the video track since this program supports ripple edit by default. You can preview the video while locating the in and out points that need to delete. Meanwhile, right-click the point and choose Add Marker in Clip, then hit Split in the toolbar and click Delete on the keyboard to remove these clips. For batch deleting unwanted clips, you can split video clips firstly. Then press Ctrl and select these clips. Finally, click Delete on the keyboard.
For music: If the audio does not match the video, you can split and remove any unwanted parts. Then, select the audio in the Audio Track and hit Audio in Toolbar to enter audio editor. Here you can set Fade in or Fade out for your music, or do more advanced audio editing, including Audio Analyzer, Equalizer, audio mixing, and more cool audio effects. Don't forget to mute the video if you do not want to keep the original audio.
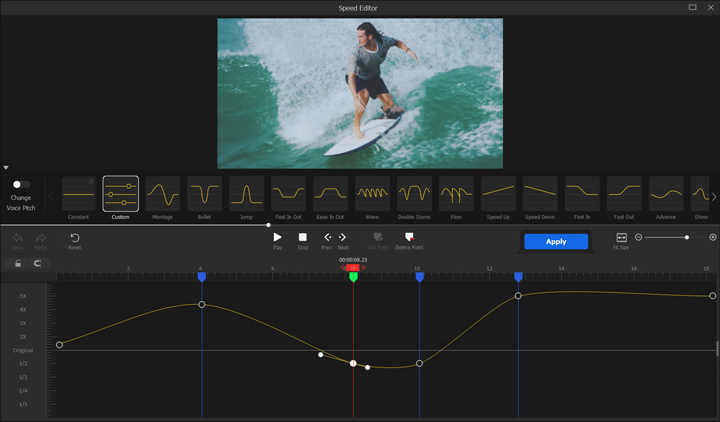
Step 4 Change video speed
To make a cool video, you can speed up a clip for a funny effect or make a slow-motion of some wonderful footage. VideoProc Vlogger offers both liner and nonlinear speed edits.
- Constant speed change: Select the clip in Timeline, hit Speed in Toolbar or Play Speed menu in Inspector. You can speed up (2x, 4x, 8x or customize) or slow down (1/8, 1/4, 1/2 or customize) video as your needs.
- Speed ramping: Select the clip in Timeline, hit Speed on the toolbar, and here will pop up the speed editor window. Choose the Bullet preset and drag the playheads to the starting point of the two frames. VideoProc Vlogger allows you to use more than 14 speed-ramping presets effects or customize video speed. You just need to locate the keyframe and drag the curve to adjust speed.
 Tips
TipsVideoProc Vlogger offers more advanced editing solutions, such as, motion crop, color grading / 3D LUTs filter, make PIP / split screens videos, green screen, add zoom in/out effect, scale, denoise, lens correction, etc. Go to the related articles, you can get more tutorials.
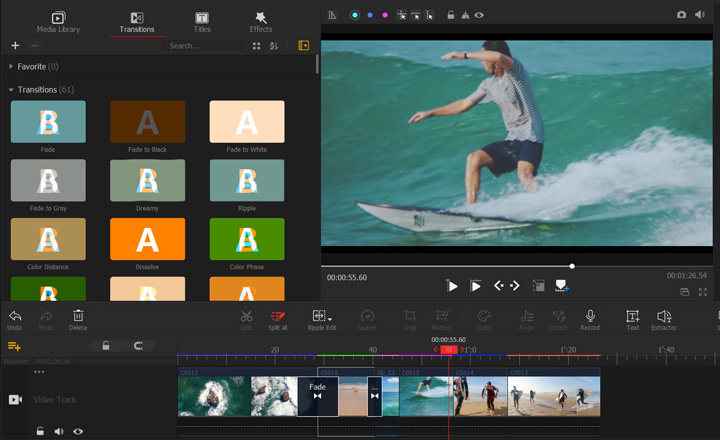
Step 5 Add transition
Hit the Transitions tab in the Media Library and select a suitable transition. Then drag and drop to the area between two video clips. You can slide the arrows to adjust the duration of the transition. Meanwhile, you can add your transition to the Favorite.
 Tips
TipsIt's recommended to add all your favorite templates of Tittle/Subtitle, Filters and Transition effects into Favorite by clicking the heart icon. That's time-saving when you make the final choice, instead of seeking the effect again.
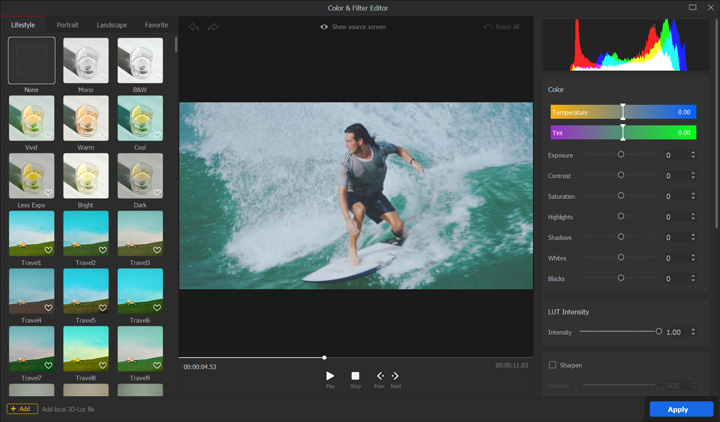
Step 6 Do color correction
Select the video clip and find Color & Filter in Inspector. Here you can adjust the parameters like exposure, contrast and saturation to get your desired results. Or if you want to save some work, turn to the 3D LUTs in the Color Editor. There are a bunch of options; just pick the one you want to work with. Follow the same steps to colorize the following clips, in that way your video will be more appealing.
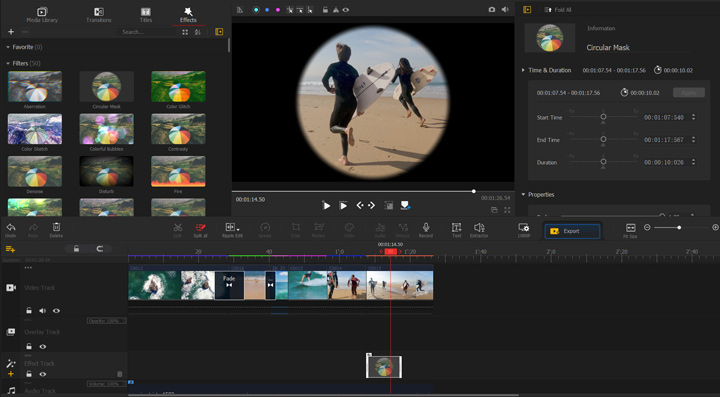
Step 7 Add filters
Hit Effects tab in Media Library and select suitable filters. Then drag and drop to affect track, and put it to the right place. You can adjust the duration of the filter.
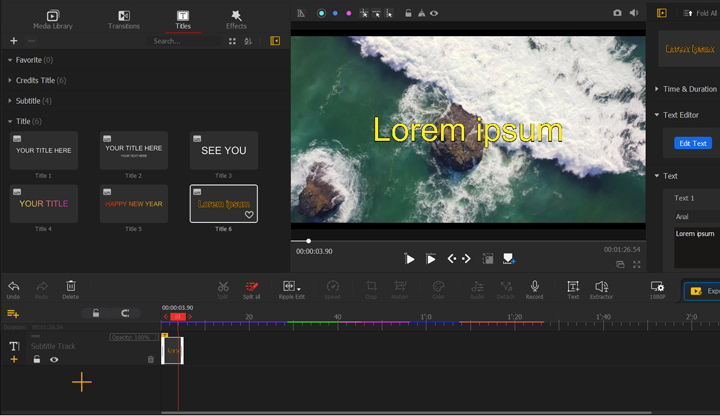
Step 8 Add titles or subtitles
Click the Tittles tab in the Media Library, and you'll see many templates of Credit Title, Subtitle and Title. Just choose your favorite one, drop to the subtitle track, and pace to the correct segments. Then copy & paste prepared text, customize vertical and horizontal position in Inspector.
Clicking on the Edit Text button right here, you can also find a basket of text styles and animations. And you can also adjust parameters like Text size, position, color and font. After you finish, click Apply.
 Editing Tips
Before adding titles or subtitles, you can add markers on the video track via the skimmer (the gray vertical line) to mark footage for putting the title/subtitle more precisely.
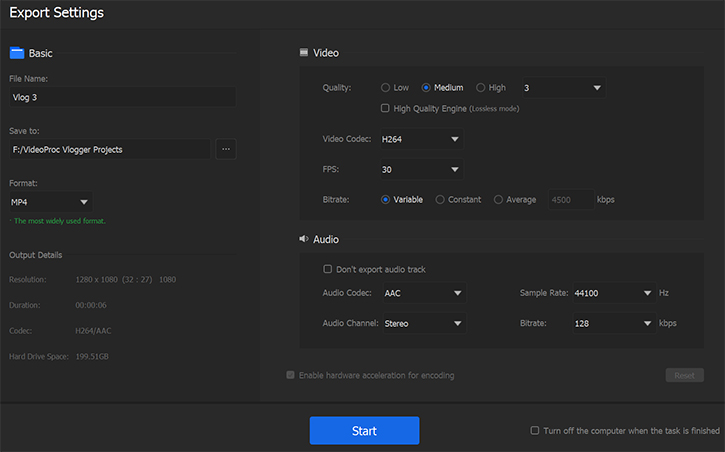
Step 9Preview and export video
Tap the Play button in the preview panel and make sure that all the edits are done. Then tap Export in the toolbar. You'll see the window below for output info. Don't forget to select "Enable hardware acceleration for encoding" which will speed up the process to a great extent. After confirming all the parameters are correct, you can hit Start to export the video.
Now free download and install VideoProc Vlogger to make an impressive video.
Related Guides:
- > Create an Epic Sports Video
- > Edit to the Beat in VideoProc Vlogger
- > Create a Slideshow Video in VideoProc Vlogger
- > Discover Creative Features in VideoProc Vlogger
- > Create Cinematic Camera Movements in VideoProc Vlogger
- > Create Split Screen Video in VideoProc Vlogger
For more guides of VideoProc Vlogger, please visit this page >
If you have any question, please email us or visit ![]()
![]()
![]()
Is this page helpful?
