
What is a video transcoder? A video transcoder is a desktop-based program developed to decode a compressed video into an intermedia uncompressed format and then re-encode it into another format.
The transcoding process might involve changes in the codec, GOP length, bitrate, resolution, sample rate, frame rate, and a few other properties. To put it simply, the goal of a video transcoder is to change a video from one encoding format to another for shrinking the file size or making the material easier to share, play, or edit.
- Upscale the resolution from 1080P to 4K
- Change the frame rate from 120FPS to 30FPS or 60FPS
- Turn the video codec from HEVC to MP4, H.264, VP9...
- Add watermark, text overlay, subtitle, and transition
However, which video transcoder should you pick among a raft of free and open-source video transcoders in the market? Keep reading. We've compiled a list of the best free & open source video transcoders for Windows.
Best Free Video Transcoder for Windows
# VideoProc Converter AI
VideoProc Converter AI is the best free video transcoders around. Its interface is self-explained and uncluttered, allowing beginners to transcode video effortlessly in one click.
The 47x faster speed and the support of around 400 video/audio formats ensure its capable of transcoding videos between all popular and rare formats in a matter of seconds - H.264/MPEG-4 AVC, H.265/HEVC, VP9, VP9, AV1, M2TS, AVCHD, ProRes, 3GP, VOB, MP4, MOV, AVI and more.
It's also a great pick for users who want to transcode videos without compromising quality. The adoption of the last high-entropy encoding algorithm and Max-Quality Compression Engine lets you transcode video while keeping 98% + of the original quality.

Why Should You Transcode Video File(s) via VideoProc Converter AI
- Transcode 8K, 4K/1080P, and HDR video from 370+ formats to 420+ others
- Ready made profiles for iPhone, YouTube, Facebook, Vimeo, video editor, etc.
- Easily adjust bitrate, GOP, frame rate, resolution, video/audio codec, and more
- Aslo the best video converter, audio converter, video downloader, and screen recorder
- 47x faster speed but 2% CPU usage, powered by the full GPU acceleration tech

How to Transcode Video Using VideoProc Converter AI
Step 1. Download, install, and launch this capable video transcoder.
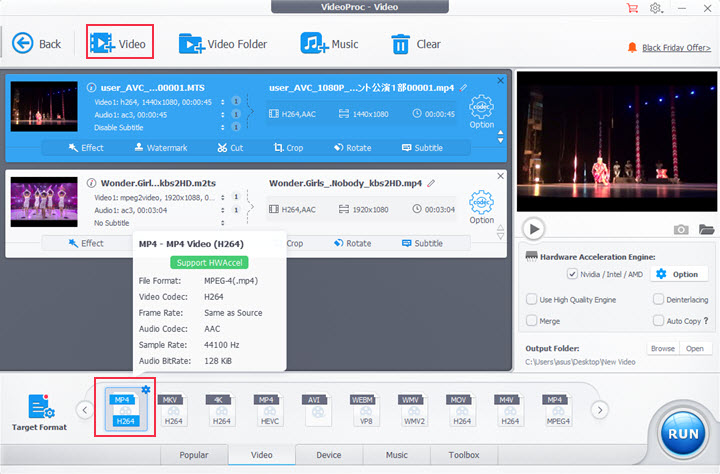
Step 2. Hit Video. Drag the source video file(s) from the local disk onto the program. You can also add the folder that stores the target videos onto this free video transcoder.
Step 3. Go to the Target Format section and choose the wanted output format.
Tips:
Select the codec Option button to access the setting options for adjusting the quality, resolution, frame rate, GOP length, audio sample rate, and many other parameters.
You can find Trim, Watermark, and a variety of other editing tools by clicking the Toolbox icon.
Step 4. Uncheck the option box of Auto Copy to start to transcode video (s) with VideoProc Converter AI.
VideoProc Converter AI - One Step Solution for All Your Video Conversion Needs!
Best Free Open Source Transcoders for Windows
The major difference between the open source and other video transcoders is that the source codes of the open source software is available publicly and allow users to edit and distribute. Most of them take no charges, support prevalent formats, and let users customize the settings of the resolution, bitrate, audio channels, and a plethora of other parameters.
- Steep learning curve: most open source transcoders are tricky to set up and use.
- Lack of extensive support: users might get no support when experiencing technical issues.
- No guarantee in security: they are vulnerable to malicious attacks.
# HandBrake
HandBrake is one of the top-rated open source video transcoders for Windows, Mac, and Linux. With it, you can rip DVDs into digital media format as well as quickly transcode videos for sharing on Discord, YouTube, and other major platforms.
One of the biggest cons of HandBrake is it only lets you output video files in MP4, MKV, and WebM. As for the output video or audio codec, this free video transcoder doesn't leave you many choices.
It supports only H.265, H.264, MPEG-4, MPEG-2, Theora, VP8, and VP9. Thus, if you want to transcode video to CineForm, Apple ProRes, or other lossless formats for editing on Premiere Pro or Final Cut Pro, HandBrake isn't for you. You can use Handbrake alternatives for those purpose.
How to Transcode Video Using HandBrake
Step 1. Go to the official site of HandBrake to download and install it on your Windows or Mac computer.
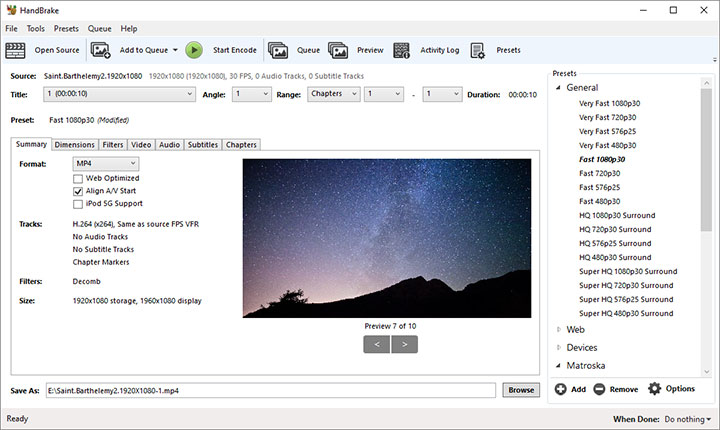
Step 2. Drag and drop the source video file onto this open source video transcoder.
Step 3. Go to the Format menu under the Summary tab and choose the specific container format.
Step 3. Hit Dimensions and change the value of Width and Length to customize the resolution.
Step 4. Hit Video or Audio to find the controls settings for the output video or audio codec.
Step 5. Click on Save and choose the output folder.
Step 6. Hit Start Encode to start to transcode video with this free and open source video transcoder.
# VLC
VLC is a top-rated open source and cross-platform media player. It's also a reliable free video transcoder that lets you change the encoding formats of your video files from the popular ones like H.264, MPEG4, VP8, MP4, MKV, or into another. It lets users configure the video encoding settings.
However, we don't recommend you to make customize adjustments because VLC provides no preset options. For example, we can't choose 120FPS, 60FPS, or 30FPS as the target frame rate and 1920 x 1080P or 1920 x 1200 as the target resolution directly.
How to Transcode Video Using VLC
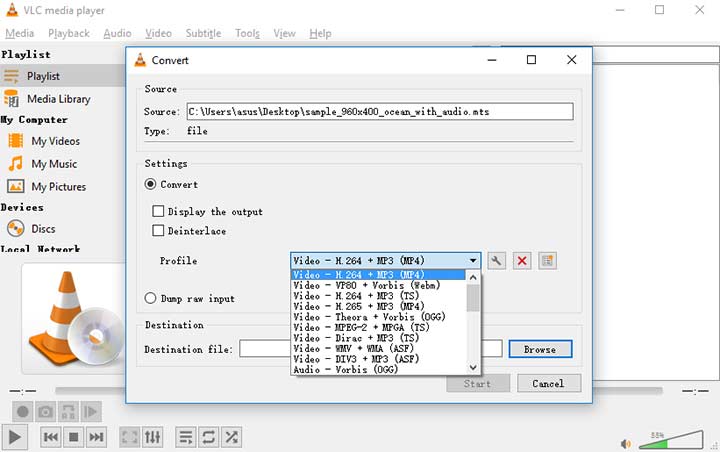
Step 1. Launch up VLC, hit Media, and choose Convert/Save.
Step 2. Click on +Add and choose the source video file that you want to transcode.
Step 3. Hit Convert / Save, go to the Profile section, expand the drop-down options, and choose the needed one.
Step 4. If necessary, click on the gear icon to get the options for adjusting the container format, video codec, audio codec, frame rate, sample rate, and more properties.
Step 5. Click on Browse and choose the output location.
Step 6. Hit Start to start to transcode video via VLC.
# FFmpeg
FFMPEG is a free and open-source command tool that collects a set of libraries and toolkits for transcoding, recording and streaming multimedia content. It can handle virtually all video and audio formats, including Theora, Cinepak, and QuickTime Animation.
Moreover, FFmpeg users have maximum freedom to decide the codec, size, and quality of the result file. Whether you want to transcode a variable frame rate video to a different format with a constant frame rate or you need to turn a lossy video into a lossless format, FFMPEG can get things done.
Sadly, the absence of the regular GUI makes FFmpeg too complex for beginners to start with.
How to Transcode Video Using FFmpeg
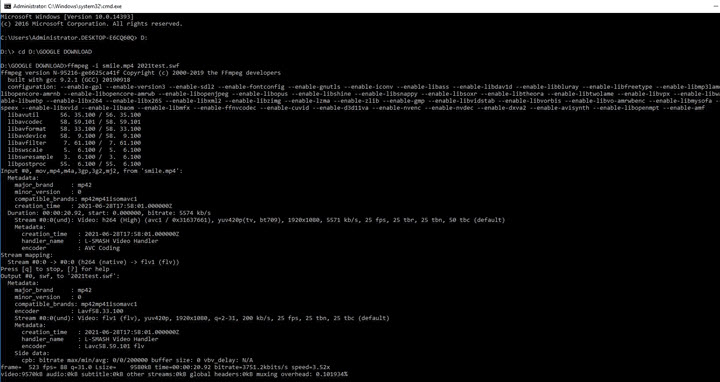
Step 1. Download FFmpeg Windows's package, extract the ffmpeg.exe file and copy the unzipping files.
Step 2. Create a new folder named FFmpeg under your system directory. Paste the unzipping files onto this new folder.
Step 3. Press Windows and S on the keyboard, input system variable on the search bar, and click Edit the system environment variables in the search results.
Step 4. Hit Environment variables on the bottom right. On the pop-up new panel, click on Path under the Users variables for the PC section.
Step 5. Hit Edit > New and then add the FFmpeg binary directory (the root path where the FFmpeg executable files are stored) to the path. Click on OK to confirm.
Step 6. Press Windows and R on the keyboard to open FFmpeg. Enter the proper command line to start to transcode your video file via FFmpeg.
Bonus Tips: You can check detailed tutorials with pictorial guide on How to Install FFmpeg on your computer, including all OS: Windows, Mac, Linux Ubuntu and Debian
# VidCoder
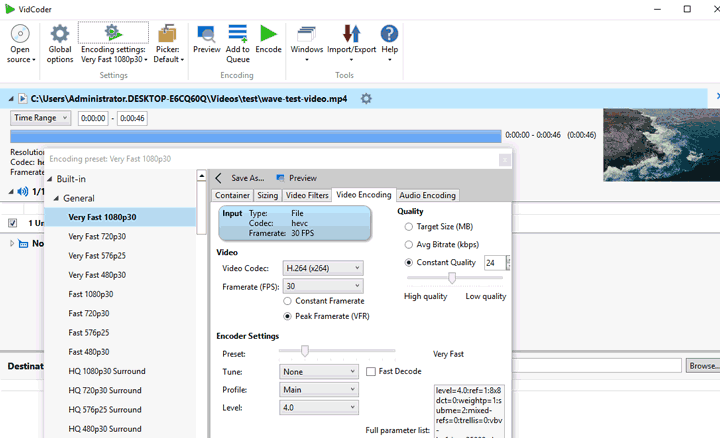
Vidcoder is widely known as the easier alternative to HandBrake for Windows. The list of the supported video and audio formats of this free and open source video transcoder is almost the same as that of HandBrake.
The built-in presets help you quickly transcode videos for YouTube, Discord, Vimeo, and other mainstream platforms and devices. It lets you create your own preset as well as customize the parameter settings for the output video file. Sadly, with VidCoder, you can't transcode video to MOV, AVI, FLV, Cinepak, DNxHD, VOB, and many other widely used formats.
How to Transcode Video Using Vidcoder
Step 1. Get the most recent version of VidCoder downloaded and installed on Windows.
Step 2. Hit the Open Source icon on the upper left and select the source video file for import.
Step 3. Click on the Encoding settings icon and choose the loved preset.
Step 4. To change the presets settings, click on the Encoding settings icon. After that, use the given options to make adjustments as you need.
Step 5. Click on Encoder to start to transcode video via VidCoder.
# Xmedia Recode
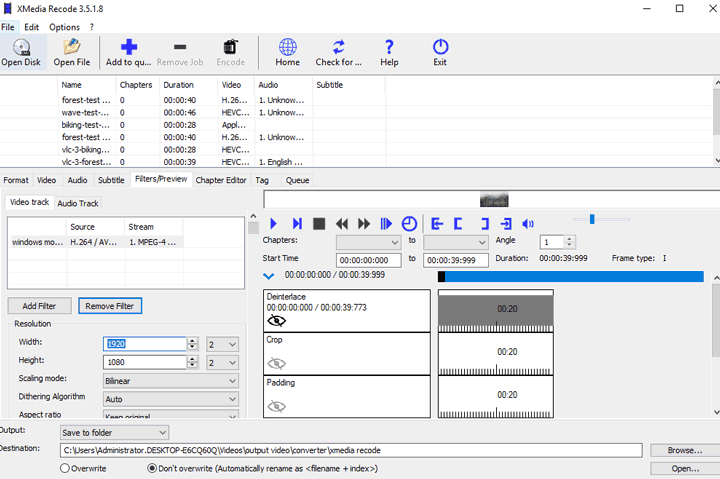
Xmedia Recode allows you to transcode multiple video files to formats compatible with video editing software, TVs, smartphones, DVDs, and gaming systems in one go. Many users call it the "HandBrake Plus". Its UI is very similar to HandBrake and VidCoder but it boats more features and supports more video formats.
You're allowed to transcode video from almost all known formats to any of the 100+ formats supported by Xmedia Recode, including H.264, H.265, M4V, MKV, MMF, (S)VCD, SWF, and WMA. Thus, this free and open source video transcoder is a perfect pick for those who are familiar with HandBrake but prefer more output video formats other than MP4/MKV/WebM.
How to Transcode Video Using Xmedia Recode
Step 1. Download and install the latest version of Xmedia Recode on Windows.
Step 2. Launch up the video transcoder, hit Open File, and then select the source video that you want to transcode to import to the program.
Step 3. Go to the Format section, find the desired output format among the drop-down list of the Format menu, and select it.
Step 4. Click on Video to navigate yourself to a new section. Herein, you can customize the video profile like the video codec, rate control mode, encoding profile, and frame rate.
Step 5. Click on Audio to find the options to further customize the audio profile, such as audio codec, object type, channel, and sample rate.
Step 6. Go to the upper part, choose Add to Queue, and then hit Encode. Xmedia Recode starts to transcode video on Windows.
# WinFF
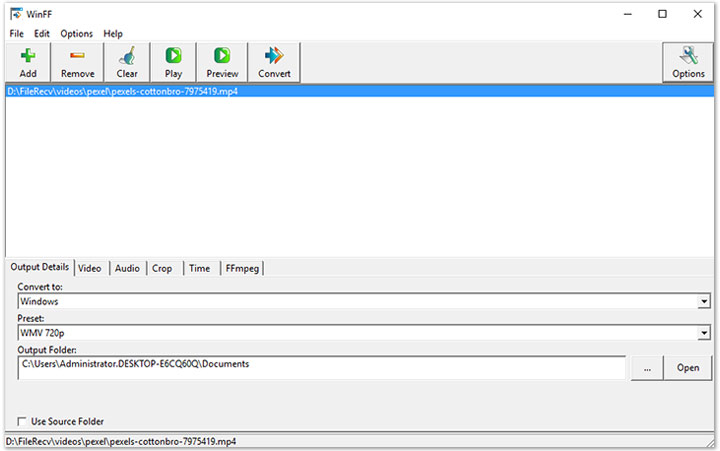
If you need a simple video transcoder that is very basic to use, then this might be a good option. WinFF is a GUI frontend for the FFmpeg project available for Windows XP/7/8/10 and Linux. It offers some presets that can help beginners quickly transcode video to WMV, MPEG4, and several other video formats.
Tech-savvy or experienced users? You can create customized presets for transcoding your video files to H.264, H.265, VP9, and other more advanced formats.
How to Transcode Video Using WinFF
Step 1. Hit Add and select the original video file that you want to transcode onto this free and open source video transcoder.
Step 2. Go to the Convert To menu, hit the drop-down icon, and then select the desired output formats or the video playback devices/platforms.
Step 3. Hit Convert to enable this free video transcoder to start processing your video.
# MediaCoder
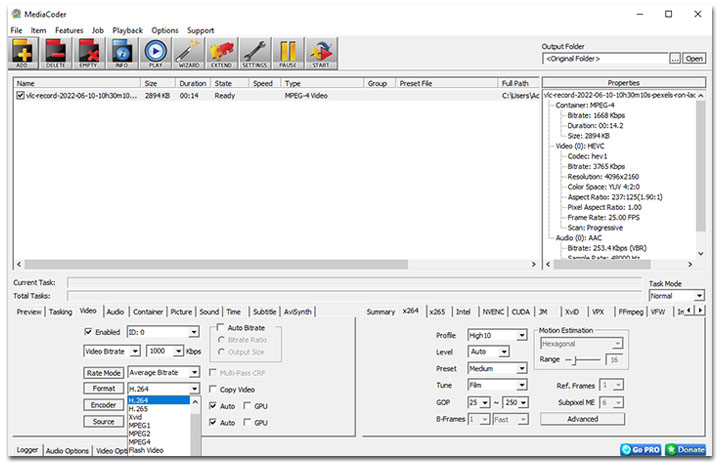
MediaCoder is less-known than other free and open source video transcoders listed in this post, but it's absolutely one of the most powerful ones in the market.
It lets you transcode between plenty of old and fresh video and audio formats, such as VP8, VP9, H.264, H.265, PCM, Huffyuv, Vorbis, and mp3Pro. It doesn't offer many ready-made profiles for popular devices like the majority of other video transcoders do. However, this is not a big deal for advanced users as it lets you take full control of the transcoding. You can change the bitrate, rate mode, bitrate rate mode, encoding level, and a plethora of other things.
Moreover, it comes with the denoise, deshake, de-logo, crop, rotate, and many other useful video filters for helping you quickly improve the video file. The downsides? It may take a while to learn and get used to since its UI is cluttered with a raft of unexplained jargon. The free version of MediaCoder doesn't let you output video above 1080P.
How to Transcode Video Using MediaCoder
Step 1. Go to the official site of MediaCoder. Download and install the latest version of it on Windows.
Step 2. Fire up this free video transcoder, hit Add, and then select the source video file for adding to the program.
Step 3. Click on Container, go to the dropdown menu of Container, and select the wanted video format.
Step 4. Hit Video to navigate to a new tab, here you can configure the video codec and other encoding settings.
Step 5. If necessary, you can go to the audio, subtitle, and other tabs to make further adjustments.
Step 6. Click on Start to start to transcode video via MediaCoder.


